Broccoli, Fig, and Goat Cheese Pasta

Happy Food Matters Monday! The fourth week of the Food Matters Project brings a very interesting recipe.

I adapted this recipe from the Food Matters Cookbook. The original recipe was Baked Rigatoni with Brussel Sprouts, Figs, and Blue Cheese chosen by Marcia of Twenty by Sixty. I have to admit that I was very worried about this dish. I mean the combo of brussel sprouts, figs, AND blue cheese was just a bit on the odd side.

Number one, I’m not a fan of brussel sprouts OR blue cheese. But, I do looooove figs, both dried and fresh. A note on figs. The most popular dried fig is the black mission fig, but any variety would taste great. I used dried Conadria Figs from Trader Joes. Dried figs are also a great snack and a fabulous source of fiber.

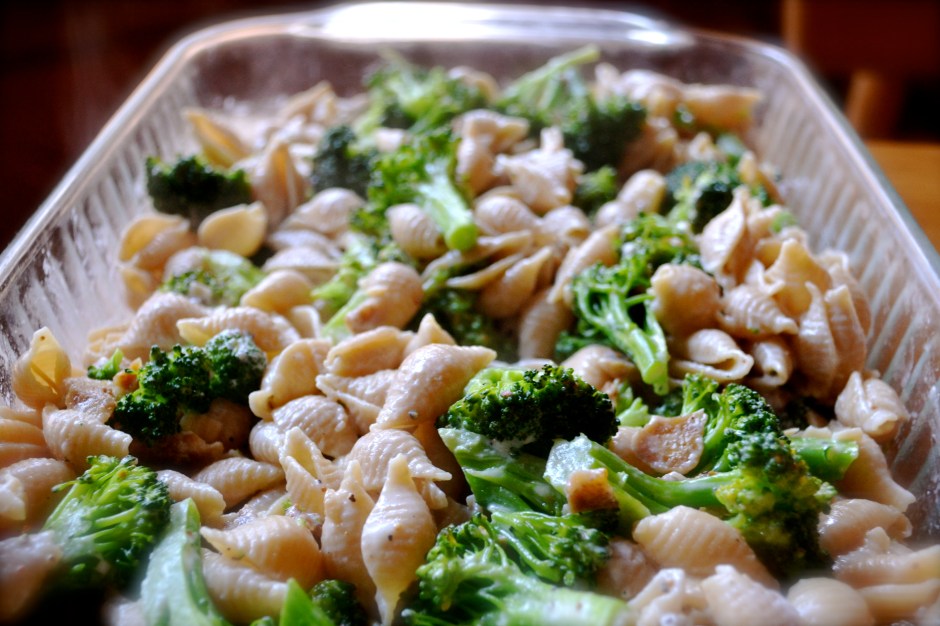
My variation on the recipe was to use broccoli and goat cheese instead of brussel sprouts and blue cheese. Love!

This really was DELICIOUS. An inspired dinner that was perfect and spot on. The original recipe calls for baking the pasta, but I found that this dried out the pasta dish because the goat cheese ends up just soaking into the pasta instead of coating it like you would want. I personally liked it without baking it.

The other major bonus to this recipe is that you can throw it together in under 20 minutes. I cooked the broccoli in a steamer placed over the pot of boiling pasta. Double duty!

This dish just proves to me that Mark Bittman truly knows how to make food matter. If you are curious at other variations, check out the original recipe by Marcia at Twenty by Sixty and other adaptations by the rest of the FMP food blogging gang.

Broccoli, Fig, and Goat Cheese Pasta

Note: The cheese is easily swappable for what you have on hand, as long as it is easily meltable. Also instead of figs, apples or pears would also work well.

Serves 4 to 6

Ingredients

  • 8 oz whole wheat pasta
  • 1 head of broccoli
  • 1/2 cup of dried figs, chopped
  • 1/2 cup goat cheese, crumbled
  • 1/4 cup parmesan cheese, grated
  • 1 tablespoon olive oil
  • salt and cracked pepper
  • red pepper flakes (optional)
  • sliced roasted almonds or pine nuts (optional)

Instructions

  1. Bring pot of salted water to boil. Place pasta in boiling water. Cook for about 6 minutes. While pasta is cooking, place broccoli in a steamer basket and place over pot of boiling water. Steam for about 3 to 5 minutes or until broccoli becomes bright green. Do not overcook. Remove from steaming and run cold water over the broccoli to stop the cooking process.
  2. Drain pasta, reserving about 1/4 to 1/2 cup of pasta cooking liquid.
  3. Combine pasta, broccoli, figs, goat cheese, parmesan cheese, and olive oil back in the same pot that you cooked the pasta. Stir and cook on low heat until cheese melts, adding back pasta water as needed a tablespoon at a time. Pour into serving bowl and top with slivered toasted almonds or pine nuts.

Cheesy Cauliflower and Shells Casserole

I have a weakness with melted cheese. I’d eat melted cheese on paper. That might not be the best thing to tell you when I try to sell this latest cheesy casserole adventure to you, because it tastes awesome…and I swear there is no paper in it, just cauliflower.

In college, I used to eat way too much of the boxed variety of mac and cheese. Bleh…and the homemade variety is usually so laden with a literal ton of cheese, that my heart hurts for days. So, I had pretty much sworn away from the dish, until this weekend.  

Although I am a big fan of sneaking veggies into dishes at all times, I have never been a big cauliflower lover (Ear muffs, Mr Cauliflower). I don’t know, maybe I’m not drawn to it at the market because it is all white and always outshined by the bright orange sweet potatoes, the deep green kale, kaleidoscope orange and red and yellow chard, or the brilliant purple and white striped eggplants. 

But now I feel bad that I have left the poor cauliflower out of my vegetable obsessions…merely because it lacks color.

So I decided to include the often forgotten cauliflower in a cheesy mac and cheese dish inspired by recipes from Vegetarian Times and Runner’s World. Like all things american…if you don’t like it, simply smother it in either butter or cheese. Voila!  But honestly folks, that isn’t the intention with this healthy dish.

Cauliflower doesn’t get mushy like broccolie and adds a good firm contrast to the gooey cheese and soft noodles. You could leave the noodles out and make just a cauliflower gratin, if you wanted.  The cheese sauce is basically a bechemel sauce (butter, flour, and milk) with raw milk sharp cheddar and parmesan added. The key ingredient for me in this whole dish is smoked paprika (not plain or sweet hungarian paprika…smoked).  You can find it in most grocer stores or speacialty shops. The smokiness adds a great layer of flavor without adding bacon (gasp, i know).

Cheesy Cauliflower and Shells Casserole

Quantity: 4 to 6 servings 

Ingredients

  • 1 cup of dried whole wheat shell pasta
  • 1 head of cauliflower (4 cups)
  • 1 tablespoon butter
  • 1 1/2 tablespoons white whole wheat flour (or all purpose)
  • 1 cup of milk
  • 1/2 cup reserved water from cooking the cauliflower or the pasta
  • 1/2 to 3/4 cup shredded sharp cheddar
  • 1/4 cup shredded parmesan
  • 1 teaspoon dijon mustard
  • 1 1/2 teaspoon smoked paprika
  • salt and fresh cracked pepper, to taste
  • 1 egg yolk, lightly beaten

Instructions

  1. Preheat oven to 350 F. Spray an 8X8 pyrex with nonstick spray. Set aside.
  2. Cook pasta in medium pot according to package directions. Reserving 1/2 cup of liquid.
  3. Steam cauliflower for 5 to 7 minutes. Cauliflower should be cooked, but firm and not mushy.
  4. In a medium saucepan, melt butter over medium heat. Once butter is melted, whisk in flour, stirring constantly. Cook on medium heat for 1 to 2 minutes, stirring constantly. Whisk in milk and reserved cooking liquid. Cook over medium heat for 7 to 10 minutes until thickened, stirring frequently to keep from burning.
  5. Remove sauce pan from heat. Stir in cheese, dijon mustard, paprika, salt, and pepper.  Once cheese is melted, stir in beaten egg yolk.
  6. Toss steamed cauliflower and cooked pasta with cheese sauce.
  7. Pour cheesy cauliflower and pasta into sprayed 8X8 pan. Carefully place in oven.
  8. Bake for 20 to 30 minutes, or until top is lightly browned. Remove from oven and allow to cool for 5 minutes. Sprinkle lightly with smoked paprika.

Winter Thai Curry Stew

I have a confession. Some people buy shoes. Some people eat chocolate. Me? I’m weird….I buy food. I love going to a great market and searching out new items or new vegetables. Recently, I stumbled upon a huge and beautiful rutabaga at the market. I’ve never had one, so I decided that she was coming home with me along with some parsnips, carrots, and kale.

Winter root vegetables are great to have on hand because they can store at room temperature or down in your basement for 6 months!  So even if I don’t exactly know what I am going to do with them when I buy them (like the rutabaga), I know that they will wait for me for until the inspiration occurs. Plus, these winter veggies are full of nutrients such as vitamins A and C, calcium, folate, and potassium (just to name a few). Because of all these nutrients, these vegetables are great for warding off cold-weather infections.

So one night the inspiration came, I threw together several root vegetables that I had on hand along with some coconut milk to make this AMAZING stew. Coconut milk is a great staple to keep on hand in your cabinet. It can take any meal and make it an 11. And let me tell you my friends…this stew is a 12! Jam on it. Make it. Love it. Hoard it.

Winter Thai Curry Stew (serves 4 to 6)

Note: The vegetables in this stew (like most soups/stews) are interchangeable and are not set in stone. I simply used what I had on hand and what is currently in season….roots. This would be great with regular potatoes, sweet potatoes, and even broccoli. In the summer, use summer squash, green beans, and spinach. The cooking times will be reduced for these spring and summer vegetables because they are not as hearty as winter vegetables.

Ingredients

  • 1 Tablespoon of coconut oil or olive oil
  • 1 medium onion, diced
  • 2 garlic cloves, minced
  • 1/2-inch piece of fresh ginger, peeled and minced
  • 1 Tablespoon of Thai curry paste (I used green curry paste)
  • 3 to 4 cups of diced vegetables (I used 1/2 rutabaga [peeled and cubed], 1/2 butternut squash [peeled and cubed], 2 parsnips [sliced thin], and 2 carrots [sliced thin])
  • 6 to 7 cups of low sodium vegetable or chicken broth or water (or combination)
  • 1 teaspoon of low sodium soy sauce
  • 1 to 2 cups of diced kale (1-inch strips), hard stems removed
  • 1 cup of reduced fat unsweetened coconut milk
  • 1 teaspoon honey  (optional)
  • salt and pepper to taste

Instructions

  1. Heat oil  in dutch oven over medium-high heat. Add onions and cook for about 5 minutes, or until translucent. Add garlic, ginger, and Thai paste, stirring constantly for an about 1 minute.
  2. Add vegetables, broth, water, and soy sauce. Bring to a boil. Reduce heat until the stew is simmering. Cover and cook until vegetables are tender. For root vegetables, this took about 20 minutes. If you are using spring or summer vegetables, this will take only 10  minutes.
  3. After vegetables are tender, add kale, coconut milk, and honey. Cook for about 3 to 5 minutes, or until kale is tender. Add salt and pepper to taste.

Kale and Mushroom Grilled Cheese Sandwich

I love cheese. I especially love MELTED cheese. So a grilled cheese sandwich is one of my all time favorite sandwiches…plus it is super quick. But think outside the box of your normal buttered bread and american cheese. I love melted goat cheese…creamy and tangy. I also threw on some raw milk cheddar.

I’m always looking for a way to sneak veggies into things. It’s a sick obsession that I have. My other obsession being ketchup, but that’s another story. Kale is fresh green that is available in the winter when spinach is scarce. If you boil kale, it will become soft. However, if you roast or grill kale, it takes on a new consistency…crispy and crunchy. To a sandwich, crisp kale adds a great change. But if you don’t have kale, feel free to mix up the veggies with what you have on hand or with what is in season.

Kale and Mushroom Grilled Cheese Sandwich (serves 1)

Ingredients

  • whole grain bread
  • handful of kale
  • baby bella mushrooms, sliced
  • dijon mustard
  • crumbled goat cheese
  • raw milk white cheddar
  • salt and pepper

Instructions

  • Spray a griddle pan with nonstick spray.  Spread butter on both sides of bread or spray both sides with nonstick spray.
  • Place veggies on griddle. Mushrooms and kale will take about 5 minutes. Place the bread on the griddle pan. Toast the bread about 1 to 2 minutes. Flip bread. Spread the toasted side with dijon mustard and then sprinkle the cheese on top. Put the hot sautéed veggies on top of the cheese. Salt and pepper. Top with the other slice of bread. Toast the sandwich on both sides for another minute or so.

Curried Butternut Squash Soup

This is a creamy soup that feels totally indulgent.  It’s the type of soup that you would think had a boat load of cream and butter, but has none. You can load up on seconds and your body will thank you for the extra nutrients.  Plus, it takes less than 30 minutes to throw together and it’s so smooth. I use an immersion blender to puree the soup after the butternut squash is cooked, but you could also transfer the soup to a blender in batches. Just be careful of hot splattering soup….I speak from experience. Nothing like getting hot soup in the eye and face.

The prime difficulty in this soup is carving that dang butternut squash. Cut the squash in half, remove and discard the seeds. Cut the squash into disks. Then, trim off the skin. Dice the flesh in 1- to 1/2-inch cubes. If you can’t find butternut squash or are in a time crush, luckily, many grocery stores sell frozen pre-cut butternut squash that will work like a charm.

I still had a honken huge butternut squash left from my garden that I harvested early in the fall. Winter squash and sweet potatoes are my favorite thing to grow because they keep for so long. I can hoard my fall-harvested crop in our basement throughout the cold winter. They are like little treasures when it is so barren and cold outside. Throwing this squash into a bowl of warm and comforting soup, reminds me that in a few months, spring will come back and I will soon be able to start planning my garden, growing plants, working the soil, and eagerly anticipating my yield. I don’t think about the part where the stupid squirrels eat my yield and the sun scorches up the ground.

Anyways, you should make this soup. Any good curry powder will do. You could also go a thai route and throw in some red or green thai curry paste and some coconut milk. Dang…why didn’t I do that. Next time. next time.

Curried Butternut Squash Soup (serves 6 to 8)

Ingredients

  • 1 Tablespoon olive oil or coconut oil
  • 1 medium to large onion, diced
  • 1 carrot, diced
  • 1 celery stick, diced
  • 2 cloves of garden, minced
  • 1 1/2 Tablespoons curry powder (depending on how spicy you prefer)
  • 1 butternut squash (4 cups), diced
  • 1 quart vegetable or chicken stock (low sodium)
  • salt and pepper
  • greek yogurt (optional)
Instructions
  1. Heat oil in dutch oven or large pan over medium-high heat. Add onion, carrot, and celery. Sauté for 5 minutes, or until onions are translucent.
  2. Add garlic and curry powder. Saute for 1 minute or until spices are fragrant. Add butternut squash and broth. Bring to a boil. Cook for approximately 20 minutes or until squash is cooked through.
  3. Use an immersion blender to puree the soup or transfer the soup to a blender in small batches. Once the soup is completely pureed, add salt and pepper to taste.
  4. Ladle into bowls. Top with a tablespoon of greek yogurt.

Chicken Mushroom Noodle Soup

This is a soul warming soup. The kind of soup that you will want to keep around and curl up with a great book.  I’ve been fighting a cold for a week and this soup was the perfect prescription.

It’s easy and comes together in less than 30 minutes.  This is the kind of soup that is great for these cold winter days. The kind of soup that you don’t have to think too much about, because you can use leftover chicken, frozen veggies, and pre-made stock. It takes longer to throw a pair of wool socks on than it does to make this soup…well not really, but you get the point. So lay back and relax.

Chicken Mushroom Noodle Soup (serves 6)

Ingredients

  • 1 Tablespoon of olive oil
  • 8 oz baby bella mushrooms, sliced 1/4-inch thick
  • 1 large onion, diced
  • 1 teaspoon italian seasoning
  • 1 teaspoon dried thyme
  • 1 cup shredded chicken
  • 7 cups low-sodium chicken broth or vegetable broth
  • 2 cups dried egg noodles
  • 1 1/2 cups green beans (frozen or fresh), cut into 1-inch pieces
  • 1 teaspoon lemon juice
  • 1/4 parsley, diced
  • salt and fresh cracked pepper

Instructions

  1. Heat oil in large pot or dutch oven over medium-high heat. Add onions and mushrooms, and sauté for 5 minutes. Stir in italian seasoning and thyme. Add chicken and broth. Bring to a boil.
  2. Add noodles and simmer for 3 minutes, stirring occasionally. Add green beans, and simmer an additional 3 minutes. Remove from heat.  Stir in lemon juice and parsley. Season with salt and pepper to taste.

Hoppin John

Happy New Year!   Every year growing up, my mother would always fix black eyed peas for good luck. There have only been a few years where I haven’t had them….one such occasion was in college when I was broke down in Texas while on my way to the Orange Bowl. I settled for a bean burrito….I figured beans of any type would work. I think my car got stolen that year. So moral of the story….eat your black eyed peas people!

So, in keeping with that tradition, I make Hoppin John, which is a fabulous spicy black eyed pea and ham dish served over rice. My other tradition is to stay home and in my pajamas. So far, it has been a successful start to the new year.

Hoppin John (serves 6)

Ingredients

  • 1 tablespoon olive oil
  • 1 medium onion, small diced
  • 1 red or green bell pepper, small diced
  • 3 ribs of celery, small diced
  • 3 cloves garlic, chopped
  • 1 pound black-eyed peas, dried (soak overnight in 6 to 8 cups of water)
  • 1  smoked ham hock (plus extra leftover ham if you were lucky to wrangle some from your family from Christmas ham or other dinner)
  • 1 quart of low sodium chicken or vegetable stock (or water)
  • 1 bay leaf
  • 1/4 teaspoon thyme
  • 1/8 to 1/4 teaspoon ground cayenne
  • 1 teaspoon cajun seasoning
  • salt and pepper to taste
  • 1 cup long grain brown rice
  • 2 1/2 cups water
  • 1/4 teaspoon of salt

Instructions

  1. In a large Dutch oven or kettle, heat oil and add the ham hock and sear on all sides. Ad the onion, celery, bell pepper, and garlic and cook for 4 minutes. Add the soaked black-eyed peas, stock, bay leaf, and thyme.
  2. Bring to a boil, reduce the heat to medium-low, and simmer gently for 40 minutes to an hour. If you don’t soak the beans overnight, you can add unsoaked beans to the pot but will need to cook for 2 to 3 hours.  Peas will be creamy and tender. If liquid evaporates, add more water or stock.
  3. Remove the ham hock bone and cut off the meat. I usually add leftover ham from the holidays that I freeze.
  4. Remove and discard the bay leaf.
  5. Using the back of a wooden spoon, mash some of the peas against the side of the pot until the stewed peas have some body (slightly thick). Add the cayenne, salt, and pepper to taste. I like to top this with tabasco and green onions. Serve over brown rice.
  6. For Rice: Add 2 1/2 cups of water and salt to a medium pot and bring to a boil. Add 1 cup of long grain brown rice, cover, and lower heat to low and cook until the rice is tender, about 20 minutes.

Peruvian Roasted Chicken

This is seriously the most flavorful chicken I have ever cooked. Sweet paprika and lemon really make this peruvian chicken amazing. Use a good sweet hungarian style paprika. Roasting a whole chicken is easy, so don’t let it scare you. And it looks pretty! Buying whole chicken is cheaper than chicken breasts. If you don’t have a whole chicken, use either a whole chicken cut into pieces or several bone in breasts or thighs.  For whole chickens, rinse and pat them dry prior to applying the marinade. 

Marinading chicken for several hours prior to cooking helps keep the pieces moist and adds more flavor. However, if you are running short on time, I’m sure you can skip this part and just rub the bird down with the marinade. Did I mention that I looooove this marinade? Seriously, you can throw this on just about ANYTHING and it will make it better.

This is a great one dish meal. The paprika and lemon make this recipe pop. For the roasted vegetables, use whatever you have on hand. I happened to have several sweet potatoes from the farmers market. I will be making this dish over and over and over. The leftovers were even better.

Peruvian Roasted Chicken (serves 6)

Ingredients

  • 1 1/2 teaspoons expeller-pressed canola oil, plus more for oiling the pan
  • 1 1/2 tablespoons sweet paprika
  • 1 tablespoon ground cumin
  • 1 1/2 teaspoons fine sea salt
  • 1 1/4 teaspoons ground black pepper
  • 5 cloves garlic, finely chopped
  • 2 1/2 tablespoons white wine vinegar
  • 2 large sweet onions, peeled and thickly sliced
  • 1 chicken (about 4 lbs), whole or cut into 10 serving pieces
  • 2 red bell peppers, cored, seeded and cut into chunks
  • 1 lb of sweet potatoes or new potatoes, diced in 1/2 inch pieces
  • 2 lemons, (quarter one of the lemons and slice the other lemon in thin rounds)

Instructions 

  1. In a small bowl, combine paprika, cumin, salt, pepper, garlic, vinegar and oil to make a paste. Reserve 2 tablespoons of the paste for roasted vegetables. Place onions, peppers, and sweet potatoes in a large bowl and toss with 2 tablespoons of the paste. Reserve remaining paste for the chicken.
  2. If using a whole chicken, pull off the excess fat around the cavity of the chicken and discard. Rinse and pat the chicken dry inside and out. Place the chicken over the sink or on a plate, rub the chicken all over with 2 of the lemon quarters, and discard the used lemon. Slip a finger under the skin at the edge of the cavity and run it along each breast to gently loosen the skin from the meat of the breasts and thighs. Rub chicken with remaining paste. Gently work a little of the paste between the skin and meat, trying not to tear the skin. If running short on time or using a cut up chicken, skip this part.
  3. Place the whole chicken or chicken pieces in a 2-gallon resealable bag and pour any remaining paste/marinade on top. Seal the bag. Turn the chicken several times to coat. Refrigerate for 3 to 8 hours or overnight.
  4. Preheat oven to 425ºF (220°C). Spray a roasting pan with nonstick spray. Adjust the oven rack to the middle position.
  5. Transfer the chicken to a baking dish or roasting pan. If using a whole chicken, squeeze the 2 remaining lemon pieces into the cavity of the bird, place the pieces into the cavity and tie the legs together with kitchen string. Season the chicken all over with 1 teaspoon of salt. If using chicken pieces, just place in prepared roasting pan and season with salt.
  6. Place onions, peppers, sweet potatoes, and sliced lemon around the chicken (or in a separate roasting pan). Roast the chicken in the oven, basting occasionally with pan juices, until chicken is cooked through and vegetables are very tender, about 1 hour.  The bird will be done when the juices of the chicken run clear when the thigh is pierced with a fork and an instant-read thermometer inserted into the thickest part of the thigh reads 165ºF (74°C). Allow the chicken to rest for a few minutes after you remove it from the oven.

Spicy Black Bean Soup

This is hands down the best black bean soup I have ever had….and I have tried multiple black bean soup recipes. This one is soooo flavorful and addictive. It makes quite a bit, but you will be thankful for the leftovers because it tastes better the second day (if that is even imaginable). This recipe also freezes well. Reheat the frozen portions for a quick lunch or dinner. Or bathe in it…because it is THAT good.

Don’t let the long list of ingredients spook you. It is such a flavorful soup and so easy to throw together. If you don’t have smoked paprika, you can leave it out. But I think it adds a nice flavor along with the bacon. Mmmm. For a vegetarian version, you leave out the bacon and use vegetable broth instead of chicken broth.

(Note: Ketchup can be used in place of the tomato paste and maple syrup.)

Spicy Black Bean Soup (serves 6 to 8)

Ingredients

  • 6 slices of smoked all natural bacon, diced in 1/4″ slices
  • 2 medium onions, diced
  • 6 cloves of garlic, minced
  • 1 jalapeño, diced (keep seeds for a kick or deseed if want a milder soup)
  • 1 medium sweet bell pepper, diced
  • 1 15 oz can of chicken stock (or vegetable stock)
  • 1 15 oz can of diced tomatoes, undrained
  • 1 Tablespoon of chili powder
  • 1 teaspoon smoked paprika
  • 1 teaspoon cumin
  • 2 teaspoons of worcestershire sauce
  • 2 Tablespoons tomato paste
  • 2 teaspoons of maple syrup
  • 4 15 oz cans of black beans, drained but not rinsed
  • 1 bunch of cilantro, chopped (about 1 cup)
  • kosher salt and cracked pepper to taste
  • juice of 1/2 lime or 1 Tablespoon of lime juice
Instructions
  1. Cook bacon over medium heat in a dutch oven until bacon is cooked but not crispy, about 5 minutes. Drain a portion of the grease out, leaving just enough to sauté the onions.
  2. Add onions and cook until translucent, about 4 minutes. Add sweet bell pepper, jalapeño, and garlic. Cook for about 2 minutes.
  3. Add broth, tomatoes, spices, tomato paste, and maple syrup. Heat to boiling. Reduce heat to medium low and cook covered for 5 minutes.
  4. Add black beans. Increase heat to medium until boiling. Reduce heat to medium low and cook an additional 10 minutes, covered.
  5. Stir in 1/2 cup of the chopped cilantro, salt and pepper to taste, and lime juice. Heat until soup thickens, about 5 minutes.
  6. Allow to cool for 5 minutes. Ladle into bowls and top with remaining chopped cilantro, sour cream or greek yogurt.

Healthy and Easy Eggplant Parmesan

The market is overflowing with the end of season harvest.  And when faced with a good deal, I can hardly ever walk away….like 10 eggplant for $3! well thank you….but now…I have 10 eggplants. Hrmmm.

Eggplant parmesan is typically breaded and fried. Which, yes…delicious. But, I opted for a lighter version with loads of flavor.  This recipe is so delicious and allows you to taste the eggplant instead of BREADING.  There is a debate on whether to pre-salt your eggplant to remove the bitterness and draw out excess water….do it if you have time, but it isn’t entirely necessary. To presalt the eggplant, lay eggplant slices in a single layer in a colander and apply salt liberally. Let sit for 15 to 30 minutes. Rinse and pat dry.

Now lets talk cheeeeese. I’m in deep smit with goat cheese…so I add it to EVERYTHING….egg sandwiches, pizza, burgers, quinoa, my face…. It is creamy and provides a lot of flavor for less calories than other cheeses. But, if you aren’t a fan or don’t have it on hand….leave it out and you can either sub mozzarella or even feta for a punch of flavor.

Healthy Eggplant Parmesan (serves 4)

Ingredients

  • 1 – 2 Tbsp olive oil
  • 1 large globe eggplant, sliced in 1/2 inch rounds
  • salt and fresh cracked pepper
  • 1/4 cup goat cheese crumbled
  • 1/2  cup shredded parmesan cheese
  • 1/4 cup fresh basil or 1 tsp dried basil
  • 1 25 oz jar marinara sauce
Instructions
  1. Preheat oven to 375F. Lightly brush olive oil on both sides of eggplant slices. Lightly season both sides of eggplant with salt and pepper. Spray a baking sheet with nonstick spray. Place eggplant in a single layer on baking sheet.  Bake for 10 minutes, until browned. Flip and cook an additional 5 to 10 minutes. Remove from oven.
  2. Spray an 8×8 inch baking dish with nonstick spray. Spread 1 cup of marinara sauce on bottom of baking dish. Arrange half the eggplant on top of the marinara sauce. Cover with 1/2 cup of sauce and goat cheese and 1/4 cup of parmesan. Repeat with remaining eggplant and marinara sauce and parmesan cheese.
  3. Bake for 25 minutes or until sauce is bubbling and cheese is melted. Let stand for 5 minutes before serving.