Make Ahead Mexican Breakfast Casserole (Gluten Free, Grain Free, and Dairy Free)

A typical weekday morning involves me making a mad dash to get ready and out the door in time. I typically try to squeeze in a morning run, pushing my timeframe and running out the door with barely my hair fixed and DEFINITELY nothing ironed and praying that I thought ahead the night before to pack something for breakfast to eat on the road or in the office.

Most people suffer from the dash and go morning routine. Whether it is because you try to cram a morning workout in or get your kids ready or are just hitting that snoozypooze buttom one too many times, a healthy breakfast is likely the last on your list. I find that if I don’t eat a good solid, protein rich breakfast, the rest of my day has me STARVING AND EATING MY ARMS. Try going the rest of your day with only bloody nubs….not good. Gross, I know. I used to toast whole grain bread and slather almond butter on it for a quick breakfast, but lately I’ve been trying to eliminate gluten and grains from my diet.  Finding quick make-ahead gluten and grain free breakfast alternatives has been the hardest challenge. Until now….

As a fabulous solution to the gluten and grain free breakfast conundrum (and to preserving my poor arms from being eaten), I present to you the great make ahead breakfast casserole! (Imagine glitter flying around right now and echoing god-like voices because this thing is awesome…like you just-won-a-trip-to-Bali awesome or you are-smaller-than-your-favorite-skinny-jeans awesome or you have-a-years-supply-of-ketchup awesome….or is that just me? fine…just me…well it would be friggin awesome.)

I call it “make ahead” for two reasons:

(1) All of the ingredients can be combined the evening or day before, refridgerated, and then baked the morning you plan to serve, and/or

(2) the casserole can be baked ahead of time and the leftovers taste just as delish as if it were fresh baked.

Whip one of these casseroles up on a Sunday evening…go ahead, eat B for D (breakfast for dinner)… and then eat the leftovers for breakfast throughout the week. Brilliant! This gluten-free casserole serves a crowd (10 at least) or it can feed 2 peeps for a full week. It is also a great way to use up excess ground beef!

This recipe is really just a building block. Any meat or veggies could be interchanged. I shredded a sweet potato as the starch.  But if you have picky eaters in your house and they are not down with the sweet potato, then go tell them to make their own breakfast…OR you could be nice and use a shredded potato instead. This casserole is not too spicy but could be amped up by adding an additional jalapeño and chili powder, or using chorizo sausage instead of the ground beef.

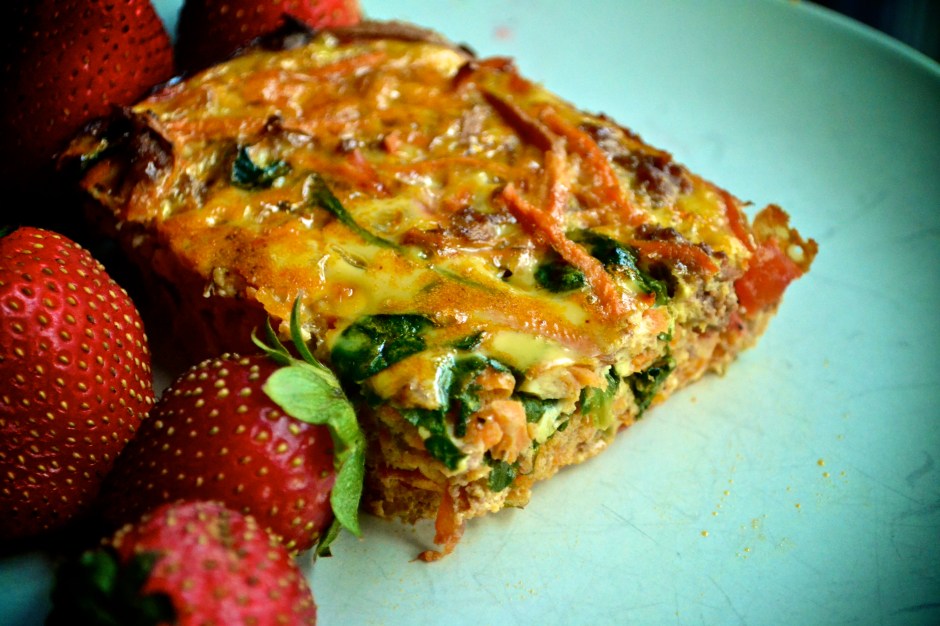
Make Ahead Mexican Breakfast Casserole (Gluten Free, Grain Free, Dairy Free, Paleo-Friendly)

Serves 8 to 10 

Ingredients

  • 12 eggs, whisked
  • 1/2 medium onion, diced
  • 1 lb ground beef
  • 1 sweet potato*, shredded with skin on
  • 1 jalapeno, deseeded and chopped
  • 2 cloves of garlic, minced
  • 1 teaspoon chili powder
  • 1 teaspoon smoked paprika
  • 1 teaspoon salt
  • 2 cups diced fresh tomatoes (or 1 can of diced tomatoes, drained)
  • 2 cups fresh spinach (or chard or any leafy green you choose)

*Note – if you have picky eaters in your house, you can substitute regular potatoes for the sweet potato. And if you are _really_ in a pinch, you can substitute frozen hashbrowns.

Instructions

  1. Preheat oven to 375 F. Spray a 9″X13″ baking dish with nonstick spray and set aside.
  2. Whisk eggs in a medium bowl and set aside.
  3. Shred sweet potato using a food processor with shredding attachment or by hand. Set aside.
  4. Cook ground beef in a large skillet over medium-high heat until no pink remains. Break into crumbly pieces using a spatula. Drain off extra grease. Add onion, shredded sweet potato, garlic, jalapeño, chili powder, salt, and paprika into skillet. Cook until onions are translucent (about 5 to 7 minutes).  Add tomatoes and spinach into skillet and cook for about 2 minutes or until spinach begins to wilt.
  5. Pour beef and sweet potato mixture into the prepared 9″X13″ pan and spread evenly along the bottom. Pour whisked eggs over the top, making sure to mix the eggs into the sweet potato mixture with a spoon or spatula. (The casserole can be made ahead 1 day in advance up to this point and covered and refrigerated. Remove from fridge 15 minutes before cooking.)
  6. Place in preheated oven and bake for 30 to 40 minutes or until middle of casserole is set (not jiggly) and edges are lightly browned. Remove from oven and allow to cool for 5 minutes. Feeds a crowd of 8 to 10 or it feeds 2 people over the course of a week!!!!

Ground Beef, Okra, and Tomatillo Curry

A few weeks ago, I was able to break away and travel south to Oklahoma to visit my family. It was much needed and filled with lounging by the pool, giggling with my two younger sisters, drinking early morning coffee with my mother, making the best roasted tomato and avocado salsa with my brother, making smores with peanut butter and chocolate (omg) over a backyard bonfire, learning the art of cupcakery from my talented youngest sister, and harvesting a metric poop ton of produce from the GREAT GARDEN.

My stepdad has more hobbies than you can shake a stick at. He is also one of the most talented individuals I have known. His latest hobbies include organic gardener/farmer and bee keeper extraordinaire!  He has planted a bajillion plants, including okra, heirloom tomatoes, cherry tomatoes, yellow tomatoes, tomato tomatoes (did I mention tomatoes yet?), green beans, squash, zucchini, tomatillos, bush beans, bell peppers, raspberries, fruit trees, blackberries, asparagus, onions, chard, herbs, and so on and so on and I know I’m missing some. They have the space (10+ acres) and use it! I’m super impressed. But being able to grow a huuuuge garden is the big thing that I miss about having a yard that is bigger than a postage stamp.

While out there, I gathered several pounds of okra and tomatillos since I am not growing them at my place. Most of my northern friends, grew up never eating okra.  Mmmmm.  At restaurants in Oklahoma, fried okra is more popular than french fries. So good. But there are more ways to eat okra than just deep fried *gasp*. I know…why change a good thing.

My regular okra dish that I whip up is stewed okra and tomatoes! I was inspired by a Food&Wine recipe that added tomatillos instead of tomatoes.  I went a little further, making this a one pot meal and added ground beef and more curry. The tomatillos give it a nice tang and the curry provide a lot of flavor and heat. You can usually find tomatillos in the hispanic section of most grocery stores. Tomatoes can be subbed for the tomatillos.

You can also leave out the ground beef for a vegetarian meal or side dish. Just reduce the spices, tomato paste, and water by half. Serve over rice or over a baked sweet potato.

Ground Beef, Okra, and Tomatillo Curry (Gluten free, Grain free, Dairy free) inspired by Food&Wine

Serves 4 to 6

Ingredients

  • 1 tablespoon coconut oil or olive oil
  • 1 onion, diced
  • 1 jalapeño, deseeded and diced
  • 1 teaspoon turmeric
  • 1 teaspoon ground ginger
  • 1 Tablespoon garam masala (available at specialty stores or Target)
  • 1/2 to 1 Tablespoon curry powder
  • 1 lb ground beef
  • 1 lb tomatillos, husks removed and diced*
  • 2 cups okra, chopped in 1/2-inch rounds
  • 1 cup diced fresh tomatoes
  • 3 Tablespoons tomato paste
  • 1 1/2 cups water or broth
  • 1 teaspoon salt (or to taste)
  • 2 Tablespoons lemon juice
  • 1/4 cup fresh cilantro, diced

*Note – if you do not have access to tomatillos, replace with diced fresh tomatoes or a can of diced or crushed tomatoes.

Instructions

  1. Heat the oil over medium heat in a large skillet or pot. Add the diced onion, jalapeno, turmeric, ginger, garam masala, and curry powder and cook over moderate heat for 3 to 5 minutes.
  2. Add the ground beef and cook until no pink remains, breaking into pieces.
  3. Add the okra and tomatillos and cook over moderately high heat, stirring, until browned and beginning to soften, about 5 minutes.
  4. Stir in the tomatoes, tomato paste, salt, and water and simmer over low heat until the okra is tender. Remove from heat.
  5. Stir in the lemon juice and 2 tablespoons of cilantro. Sprinkle the remaining 2 tablespoons of cilantro on top. Serve.  

Grilled Eggplant with Goat Cheese

Sometimes the best things are the simplest.

A handwritten note.

A hug.

A smile from a stranger.

The smell of fresh rain.

An afternoon nap.

A porch swing.

Fresh produce from the garden grilled to perfection….grilled eggplant with goat cheese. It’s simple. Eggplant + goat cheese = good.

Grilled Eggplant with Goat Cheese (Gluten free, grain free, vegetarian)

Serves 2 as a side

Ingredients

  • 1 globe eggplant, split lengthwise
  • olive oil
  • salt and pepper
  • goat cheese
  • fresh herbs (basil, thyme, or parsley)

Instructions

  1. Preheat grill for direct heat. If using oven, preheat oven to 400F.
  2. Slice eggplant in half lengthwise, making sure to cut straight through the stalk if possible. Why? Cause it looks fancy without being fancy.
  3. With a small knife, make three or four parallel cuts in the flesh of the eggplant, making sure to not cut through to the skin. Repeat at a 45-degree angle in order to get a diamond hatch pattern on the flesh. Brush with olive oil (about 1/2 to 1 tablespoon per half). Sprinkle with salt and fresh cracked pepper.
  4. Place the eggplant halves skin down on the grill over medium flame. Grill for 5 to 7 minutes, or until flesh is well cooked and browned. Flip and quickly sear the flesh. Watch closely. This should only take a minute. Remove from grill.
  5. Sprinkle with crumbled goat cheese and fresh herbs. Finish with a light drizzle of olive oil.

Chilled Avocado and Roasted Corn Chowder

Two chilled soups within a week! Sounds crazy I know. But hang with me on this. It’s creamy and cold. And no, I am not on an all liquid Vita-mix juice diet.

Corn is finally hitting the market. Nothing is more sweet and rewarding than fresh grilled corn. I love eating it directly from the grill right off of the cob. I can barely wait for it to cool down and I always burn the roof of my mouth. A small price to pay for juicy corn! I love corn that is so sweet that it needs no butter, just tons of flaky kosher salt. Mmmmm.

The corn crop is pretty light this year due to the drought that the midwest is currently experiencing. Prices are going up and the yield is going down. So grab these babies now while they are hot! Get extra to freeze and pack away like a good little food hoarder. Here is a great resource for preserving extra corn on the cob safely.

This recipe is inspired by Mark Bittman’s Avocado-Corn salad from the Food Matters Cookbook. The original recipe was chosen by Jenn of Vanilla Lemon. Although the salad itself sounds incredibly delicious, I was also inspired by this Avocado Chipotle Bisque recipe. Seems like the best of both worlds!

My chilled avocado and roasted corn chowder gets a great smoky flavor from chipotle powder and from roasted corn.  I roasted the corn easily using my gas stovetop oven. Place the shucked corn cob on the burner. Turn the burner on medium-high heat, turning the cob with tongs until it is lightly charred on the kernels to your desired doneness. The kernels can be removed easily by using a serrated knife. Rub the flat backside of the knife up the cob to release all of those great corn juices, allowing the corn juice to drip into either a bowl or the bowl of the food processor.

This chowder can easily be made with frozen corn that you wisely stored from the summer harvest. Also, after cutting the kernels from the cob, save the cobs and boil in water to make a corn broth to use in this soup! Handy dandy.

Chilled Avocado and Roasted Corn Chowder (Dairy Free), Adapted from the Food Matters Cookbook and Vegetarian Times.

Serves 4

Ingredients

  • 2 medium avocados, diced (2 cups)
  • 2 ears of corn, roasted and kernels removed from cob
  • 1/2 red bell pepper, diced
  • 3 1/2 cups of water, vegetable broth, or corn cob broth
  • 1 tablespoon olive oil
  • juice of 1 lime (about 1/4 cup)
  • 2 tablespoons white miso paste
  • 2 tablespoons fresh cilantro
  • 1/2 teaspoon chipotle powder

Instructions

  1. First, take shucked corn and roast over an open flame or grill. I turn the gas on my stovetop range to medium-high heat and hold the corn over the flame with tongs. Allow the kernels to blacken. This will take about 2 to 3 minutes to roast one cob.
  2. Using a serrated knife, cut the kernels from the ears of corn. Using the dull side of the knife, scrape the juices from the cobs into the bowl. The cobs can be reserved and used to make corn cob broth which is detailed here!
  3.  Place all ingredients in a blender or food processor fitted with the steel blade. Blend until smooth. Serve immediately or chill for up to 1 day. Serve topped with diced cherry tomatoes, roasted corn, and cilantro.

Garden Gazpacho

I am trying a few new things lately. Girlie things. Now, for those of you who do not know me very well, I am not a “girlie” girl. I’m an engineer that loves chemistry jokes.  I love love love t-shirts, cold beer, a great pair of jeans, duct tape, and power tools. I hate putting make up on or doing my hair (very apparent but I try). I have more running shorts than dresses or nice clothes in general. True story.

But a dear friend of mine is trying to convince me to give “girlie” a go. She loaned me a nice purse (my old purse looks like a nap sack bag according to my husband)and I even got a pedicure and a manicure. I felt like Eliza Doolittle!  I hate purses and I get irritated at the time it takes to get my nails done. That being said, I do have to admit that I feel a little more put together (even if this is the biggest and heaviest and most awkward purse and I want to throw it at someone everytime I can’t get it on my shoulder using just one hand). But I am trying…sort of. Right?

Another new thing that I have tried recently is cold soup. Cold soup? Really? Yes, really.

Give it a go.  It is quite refreshing on a hot muggy day. (Unlike this new purse!) And it’s easy. And no oven or stove! Bonus! Top with avocado slices or shredded chicken for a full meal or serve as a starter.

Throw all that produce that you have streaming out of that beautiful garden or farmers’ market into a blender or food processor, blend, chill, and then eat!  Or if you are like me and can’t wait for the darned soup to chill, eat it straight out of the food processor bowl. Mmmm. I recommend removing the blade first!

Garden Gazpacho

Serves 6 as a side

Ingredients

  • 6 large tomatoes, cored and roughly chopped
  • 1/2 large cucumber, seeds removed
  • 1 green bell pepper, cored
  • 1 clove of garlic
  • 1/2 medium onion, chopped
  • 2 to 3 tablespoons of red wine vinegar
  • 2 to 3 tablespoons of olive oil
  • 1 to 2 tablespoons of lemon juice
  • 1 teaspoon of fresh basil
  • salt and pepper to taste

Instructions

  1. Because this makes quite a bit, you will have to do this in batches. Combine half of the ingredients into a food processor or good blender. Blend until smooth. Pour into a container.
  2. Process the half of the ingredients and blend until smooth. Combine the soup with the first batch. Place in the refrigerator for at least an hour to chill properly.

Open-faced Tomato and Cucumber Sandwich with Tahini-Miso Spread

I’m going to make this short and sweet….just like this recipe.  It’s hot. So hot. My oven is staying off…so off.

But you know what is not hot…this open-faced sandwich. She’s cold. Nice and cold to break that heat.  This is an awesome quick lunch or light dinner.

The tahini-miso spread is quite addictive. You can add a bit of water to it, thinning it out to use as a dressing for kale salads or veggies as in Cookie and Kate’s Raw Kale Salad with Creamy Tahini Miso Dressing. Brilliant.

Alright..got it? Good. Oh and this cute open-faced sandwich is loosely based on Mark Bittman’s Updated Tea Sandwiches. This recipe was chosen by Aura of Dinner with Aura. Check out the other recipes here at the Food Matters Project page.

Open-faced Tomato and Cucumber Sandwich with Tahini-Miso Spread

Serves: 2

Ingredients

  • 2 slices of whole grain bread
  • 2 tablespoons of tahini-miso spread (recipe below)*
  • 1/2 cucumber, sliced
  • 1 tomato, sliced
  • crumbled feta
Instructions
  1. Spread 1 tablespoon of tahini-miso spread on each slice of bread.
  2. Layer tomato slices and cucumbers. Sprinkle with feta. Enjoy!

*Tahini-Miso Spread Ingredients

  • 1/4 cup tahini
  • 1 tablespoon white or red miso paste
  • 1 teaspoon of lemon juice
  • 1 teaspoon of rice wine vinegar

Instructions

  1. Mix all ingredients together in a small bowl.
  2. To use as a dressing for salads, add 1/4 cup of water.
  3. Spread/dressing can be stored in the refrigerator for a week.

Baked Curry-Spiced Falafel Sliders

Hellooooo summer. I went on a lazy bike ride one evening this weekend and watched families grill on their patios, kids running through water sprinklers, in promptu baseball games in neighborhood streets, old couples walking hand in hand down the trail by our house, and dogs playing fetch with their owners. Lightning bugs danced around me and the first chirps of cicadas filled the air. It was magical and classic.

The change between seasons and its effect on people is so curious to me. During the short cold days of winter, we stay tucked away in our homes, hybernating and watching reality TV. But as spring and summer hit, bringing with them longer and warmer days, people bloom like the vegetables and flowers in gardens.  They open up their homes and patios to their freinds and family, communing with one another and experiencing the outdoors. Neighborhoods turn into blockparties every night. It sometimes feels like a scene out of a Norman Rockwell painting. 

Another awesome thing about summer versus winter is that food turns from heafty casseroles to finger foods! And oh how I looooove finger foods. Huge burgers leave me lethargic, but sliders….I can have two DIFFERENT kinds. This is perfect for a gal like me that can not make up her mind when it comes to food or anything really.

If you are looking for a handy dandy finger food to take or serve at a party, these falafel sliders are perf.  This recipe is adapted from “Braised Chickpea Fritters and Vegetables” from Mark Bittman’s Food Matters Cookbook and was chosen as part of the Food Matters Project by Lena of Mrs Garlic Head.

I adapted them to be spiced with curry and carrots, plus turned them into a picnic totin finger food. The curry kick makes them a winner for even meat lovers.  For this falafel, use uncooked chickpeas that have soaked overnight. You will need a good food processor to create the chickpea “flour” and mix in the additional ingredients. Baking the falafel makes them a bit crumbly, but still delicious. If you prefer, you can pan fry them in a bit of olive oil or coconut oil. The leftovers can either be frozen or refridgerated. I ate the leftovers cumbled over a delicious kale salad.

Baked Curry-Spiced Falafel Sliders

Ingredient

  • 1 cup dried chickpeas, rinsed, picked over and soaked for at least one hour and up to overnight (do not cook and do not substitute canned beans)
  • 1 small red onion, quartered
  • 1 cup fresh cilantro
  • 3 garlic cloves
  • 1 tablespoon ground cumin
  • 1 teaspoon curry powder
  • 1 teaspoon kosher salt
  • 1/2 teaspoon freshly ground black pepper
  • 1/2 teaspoon baking soda
  • 2 medium carrots
  • coconut oil or olive oil
  • Slider fixings (12 whole grain rolls or pita, cucumbers, crumbled feta, cilantro, cucumber-mint raita*)

Instructions

  1. Preheat oven to 375F.  Oil a roasting pan with 1 to 2 tablespoons of olive oil or coconut oil.
  2. In a food processor, combine soaked and drained chickpeas, onion, cilantro, garlic cloves, cumin, curry powder, carrots, baking powder, salt, and pepper. Process until smooth, about 1 to 2 minutes.
  3. Scoop out 1 tablespoon at a time and shape the falafel into small 1-inch patties at 1/4 inch thick. Place each falafel pattie in the well oiled roasting pan.
  4. Bake for 10 minutes. Remove the roasting pan and flip the patties carefully. Place the roasting pan back into the oven (middle rack) for another 10 minutes. The patties will be light brown.
  5. Assemble your sliders with small whole grain rolls or pita flats, sliced cucumbers, red peppers, and cucumber-mint raita (recipe below).

*Cucumber-Mint Raita

  • 1 cup greek yogurt
  • 1 cup of peeled and diced cucumber, pressed with a paper towel to remove excess moisture
  • 1 tablespoon fresh lime or lemon juice
  • 1 tablespoon fresh mint leaves, chopped
  • pinch of garlic powder
  • Salt to taste

Instructions – Mix above ingredients together in a medium bowl. Season with salt to taste.

Grilled Salmon and Vegetable Bundles

Tired. That’s me.

Just tired and drained. I have visions of grandeur as I drive home from work of repainting my back room or organizing my library or, hell, doing laundry. But I can barely get the gumption to fix dinner sometimes.

On days when I am tired or pressed for time, I usually cook fish. I always keep some good fish like wild caught salmon or tilapia in the freezer. Frozen fish thaws out quickly and can be grilled or broiled in a flash.

My typical grill method is to throw the filets and some fresh veggies drizzled with olive oil, salt, pepper, and lemon juice into aluminum foil packets.  Sprinkle with fresh herbs, such as dill or basil or tarragon, or top with dijon mustard and lemon juice. Seal your packets and then grill for about 10 minutes or until the fish flakes when you put a fork in it.

Grilling everything in handy dandy foil packets is like unwrapping a gift that your grill has made for you. Thank you!  Some people call these “hobo” packets.  I don’t know too many hobos and therefore, I do not know whether this is their preferred cooking method.

When picking salmon, I recommend buying skin-on wild-caught Alaskan sock-eye salmon. It’s bright coraly pink in color, not light pink like farm-raised. Salmon is rich in selenium and omega-3s! So eat up!

Grilled Salmon and Vegetable Bundles

Serves 2 to 3

Ingredients

  • 2 (6 oz) skin-on wild alaskan sock-eye salmon filets, thawed
  • olive oil
  • 2 cups of fresh seasonal vegetables (snap peas, beets, tomatoes, onions, carrots, squash, asparagus, garlic, eggplant, etc)
  • fresh herbs (dill, tarragon, parsley, or basil)
  • 1 tablespoon of dijon mustard
  • salt, pepper, and lemon juice

Instructions

  1. Preheat your grill.
  2. In a bowl, combine your vegetables. Drizzle with 1 tablespoon of olive oil. Season with salt, pepper, and fresh herbs.
  3. Spread 1/2 tablespoon of dijon mustard on each filet. Sprinkle with fresh herbs and salt and pepper.
  4. Lay out 2 aluminum foil sheets at 1 foot each. Place one salmon filet on each foil sheet. Divide veggies among each foil packet. Place another foil sheet on top of each packet and seal around the edges.
  5. Place foil bundles on preheated grill. Grill for about 10 minutes. Filet will flake when fork is inserted into fish and pulled back. Vegetables should be tender. Remove from heat and chow down!

Black Bean and Chard Breakfast Tacos

Greens are overflowing the farmer’s markets and my garden. Now is the time to load up on fresh leafy greens like chard, kale, mustard greens, and lettuce.

It was a shock to the system to arrive home from vacationing in cold South Dakota (highs in the 40s) and arrive in KC with heat indices topping at 100 degrees!!!! Today has been full of harvesting my spring plants and planting summer crops of basil, cilantro, beets, green beans, tomatoes, strawberries, and more chard. I can’t get enough! Plus, adding greens makes me feel not so guilty when I partake in one (or three) brews for Memorial Day celebrations and maybe an extra hunk of dark chocolate. Shhhh!

So back to those lovely greeeeeens. This is why today’s Food Matter’s recipe, Beens N’ Greens Burritos (chosen by Good Things Grow) is perfect for this time of year. I slightly adapted the recipe as a breakfast dish, adding a poached egg and serving it on corn tortillas instead of flour. I prefer corn tortillas to flour (even whole wheat flour tortillas), because they are less processed and typically have less than 5 ingredients. Corn tortillas also topically have more protein, fiber, and less carbs than their flour brethren.

This is basically the same as my Huevos Racheros recipe, but with the addition of swiss chard. Yum. Great start to the day!

Black Bean and Chard Breakfast Tacos

Serves 4

Ingredients

  • 2 teaspoons of olive oil
  • 1/2 onion, diced
  • 1 bunch (about one pound) of swiss chard (or kale or spinach), washed and cut into 1-inch strips (removing stems)
  • 1/2 teaspoon smoked paprika
  • salt and pepper
  • 4 corn tortillas
  • 4 eggs
  • 1 cup cooked black beans
  • 1/4 cup crumbled feta
  • cilantro
  • salsa or pico de gallo
Instructions
  1. Heat olive oil over medium-high heat in a skillet. Add onion and sauté for 5 minutes or until translucent.
  2. Add chard and sauté for an additional 5 to 10 minutes, or until chard wilts. Add black beans and heat through. Remove from heat and set aside.
  3. Cook eggs to your liking. I prefer poached…mmmm.
  4. Heat tortillas by either throwing them in the microwave for 15 to 30 seconds or over the stove in a pan with with a tad bit of olive oil.
  5. Place one tortilla on each plate. Divide chard/black bean mixture among each plate. Top with cooked egg, feta, and cilantro. Dive in!

Spicy Mango and Coconut Quinoa Salad

Fresh. Sweet. Spicy. Sassy.

No, not me…this quinoa salad. Well…yes, me too, but also this salad.

This dish is basically mango salsa mixed with quinoa…oh and flaked coconut, because we all need more flaked coconut in our lives.  Flaked coconut makes me feel fancy and on vacation. Adding it to this salad was just an extra bonus.

I’m a huge fan of quinoa salads. They are probably my second fav next to kale salads.  Quinoa is an amazing grain, or seed rather, packed full of protein and fiber.  This quinoa salad feeds 4 to 6 as a side dish. It’s great served along side grilled wild alaskan salmon.  To make a more substantial meal and serve it as a main course, the addition of 1/2 cup of roughly chopped roasted salted peanuts or almonds will add protein and make it a bit more hearty.  

This recipe started out as just mango salsa, which was adapted from this week’s Food Matters Project recipe, Mexican-Style Fruit Salad with Grilled or Broiled Fish which was chosen by Food and Frederick.  However, my salsa was taken to superhuman status after I was inspired by the Mango and Coconut Black Rice Salad in my new fav cookbook, Plenty from London’s Ottolenghi.  Holy cow, I have never seen such great veg-tastic food porn in my life. It’s gorgeous. It’s inspiring. It’s a must. I love this book, like I love mason jars….and that’s a lot of love people. Because, seriously, mason jars are about the most useful thing in the world. And duct tape. But duct tape is not beautiful.

Spicy Mango and Coconut Quinoa Salad

Serves 6 as a side dish

Ingredients

  • 2 cups of cooked quinoa* (see note on cooking instructions)
  • 1 jalapeño, seeds removed and diced
  • 2 green onions, diced
  • 1 red bell pepper, thinly sliced
  • grated zest and juice of 1 lime
  • 2 tablespoons of chopped fresh mint
  • 1/4 cup of chopped fresh cilantro
  • 1/4 cup of chopped fresh basil
  • 1 large mango (or 2 small mangos), chopped into 1/2-inch chunks
  • 1/4 cup flaked unsweetened coconut

Instructions

  1. Add all ingredients, except the diced mango and flaked coconut, into a bowl. Toss to combine.
  2. Add mango and coconut, and stir just to mix. Do not over stir or the mango pieces will disintegrate and become too mushy. Taste and adjust the seasonings.

*Cooking Quinoa- Rinse 1 cup of uncooked quinoa thoroughly, until water is no longer milky. Place rinsed quinoa in a saucepan with 2 cups of water or broth. Cook on medium-high heat until it comes to a rolling boil. Reduce heat, cover and simmer for 15 minutes or until tender and the water has been cooked out. Remove from heat and fluff with a fork. I like to double this, cooking extra to eat throughout the week.