Green Chile and Bacon Frittata

My posts have been a bit brief lately because I am getting closer and closer to taking my Professional Engineering (P.E.) exam.  ONE MONTH!!!  October 26th can’t come quick enough. I am stressing and wish I had more time to prepare, but I just want to get this thing over with.  I’ve locked myself in my “Ladies’ Parlor” for way too long.

What is the Ladies’ Parlor, you ask?

Well, men get their “Man Caves”… so I have taken over my spare bedroom  upstairs and turned it into the Ladies’ Parlor.  My “Ladies’ Parlor” is awesome and fun and has chairs and proper lady drinks and tea cakes and sandwiches and long gloves and long cigarrettes and NO BOYS ALLOWED

Actually, I lie. It is none of those things…YET. 

At this point, it is a study dungeon. Ugh.  It has a sad table and a sad lamp and a sad chair.  But after October 26th…it will DEFINITELY have a cocktail bar. Hell…why don’t I have one of those now? That would most definitely help me through those long nights. 

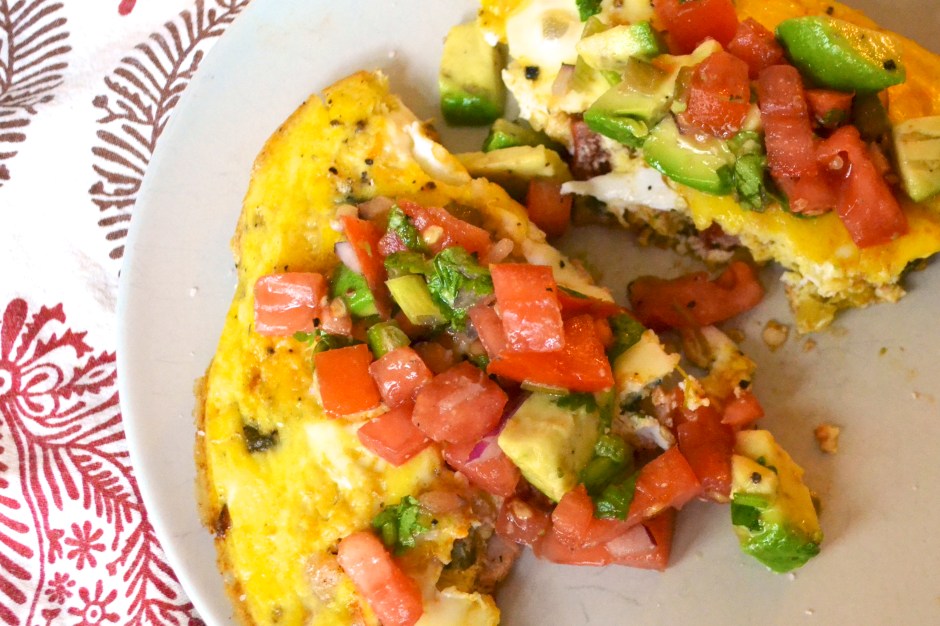
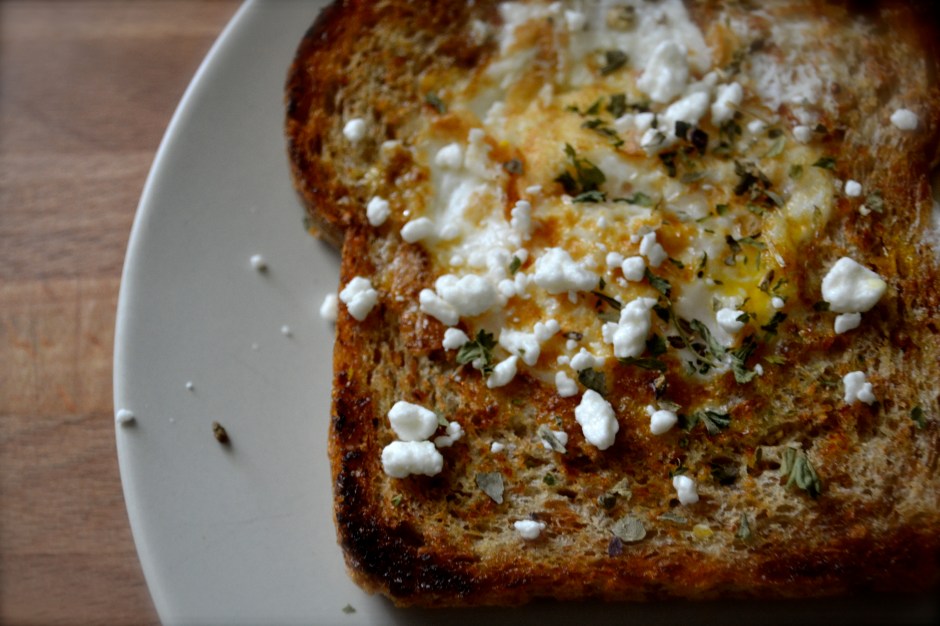
You know what else gets me through these long days….a solid breakfast. I have to have eggs in the morning. I looooove eggs. What’s better than eggs? Eggs + Bacon.  And the only thing better than that combo, is Eggs + Bacon + Fresh Roasted Green Chiles. I’m serious, folks. Do it.

If you are from the midwest, this time of year is when you look forward to fresh roasted hatch green chiles!  I always stock up and throw several bags in the freezer to enjoy through the winter. Get them while the gettin is goooood.

I threw in some fresh roasted hatch green chiles into a frittata and it was majical. Put them on anything…burgers, eggs, sandwiches, burritos, quesadillas, stew! Ladies’ Parlor Approved!

Green Chile and Bacon Frittata

Serves 4

Ingredients

  • 8 eggs
  • 2 roasted hatch mild green chiles (deseeded, skin removed, and chopped)
  • 1 tomato, diced
  • 1/4 cup canadian bacon or 4 slices of bacon (cooked and chopped into pieces)
  • Optional toppings: avocado, fresh salsa, cilantro

Instructions

  1. Preheat oven to 400 F. Butter or spray a nonstick skillet (or cast iron skillet). Set aside.
  2. In a medium bowl, whisk eggs and sprinkle with a pinch of salt and pepper.
  3. In the prepared skillet, scatter the green chiles, tomatoes, and cooked bacon evenly on the bottom.  Pour the egg mixture on top. Place in the oven for 15 to 20 minutes. (Note, I have an oooold oven, so keep an eye on this, my times may be off a bit because my oven is a beast). Remove when set.

Brats with Roasted Cauliflower and Apples

For our wedding anniversary, Kiley and I spent a few restful days in Hermann, MO. It’s a quaint German town in eastern Missouri. We relaxed, we drank, we ate. It was perfect.

While there, we stocked up on some amazing smoked knackwurst. So good.

Because this week’s Food Matters Project recipe was Whole Cauliflower with Sausage, I decided to use our fresh knackwurst and roast up some cauliflower and local apples.  Apples and brats are great together. This is a great one pot or rather a one roasting pan meal.

Enjoy the fall flavors! Oh, and check out the original recipe at Food Fascination.

Brats with Roasted Cauliflower and Apples

Serves 4

Ingredients

  • 4 brats, polish sausage, or chicken sausage, cut into 1/2-inch rounds
  • 1 head of cauliflower, cut into florets
  • 2 apples, cored and cut into 8 pieces each
  • 1/2 onion, sliced thinly
  • 1 tablespoon olive oil

Instructions

  1. Preheat oven to 425F. Add sausage slices to roasting pan. Toss cauliflower, apple slices, and onions with olive oil in medium bowl. Add to roasting pan.
  2. Roast sausages, cauliflower, apples, and onions for 30 to 35 minutes at 425F or until cauliflower is browned and sausages are cooked through.

Roasted Beets with Apples and Greens

I have a confession.

I have a Friday ritual.

I cry.

I cry every damn Friday morning…not because I want to cry. No, I cry because Story Corps comes on NPR’s Morning Edition every Friday morning while I am on my way to work. And I’m not a cryer, folks,…I’m tough…I’m strong…I do what I want….Rargh!!!!

But on Fridays, there I am….crying at the stop sign or crying by a playground or crying in the parking lot of my office.  I have mascara smeared across my face because this little old man is being interviewed by his granddaughters and he is talking about his wife of 70+ years that just passed away and he remembers dancing with her the first day that they met and how beautiful she was and how she sparkled and now life just doesn’t have that sparkle anymore because she was his sparkle and….damnit…here those stupid tears come again.

This morning those tears streamed down again as I heard an amazing story of a young woman that was homeless in highschool. She shared a room in a Chicago shelter with 6 other family members. She rode the bus 1.5 hrs one way every day to school. She currently is in college, working hard and continuing to take care of her family.  And here those tears come again…it kills me knowing how common this story is. So many Americans are well below the poverty line. So many children are homeless. They have so much to overcome and many are able to but many do not have the chance.

So here is where I give an interweb high five *BAM* to all you educators (my husband included) for fighting for these kids and working long hours and believing and loving and opening your homes and hearts. Keep trucking, because what you do matters.

Doh! There I go again. Telling ya’ll a story and forgetting to go into much detail on the featured recipe.  So lets talk beets and fall apples!  A dear friend of mine from grad school sent me a recipe for an apple and kale saute.  I drooled and immediately made it the next night but added two roasted beets that I had bought at the market. Winner!

Roasting beets is super duper easy. It is way better than boiling…ew!  Read below for a short tutorial on roasting and removing the outer skin of the beet. I always run my roasted beets under running water and the skins rub off easily. Oh and USE THOSE GREENS!!!!  I added the beet greens with the kale. The tart apples and earthy roasted beets are a perfect pair. A dijon vinegerette drizzled on top really seals the deal!  Serve as a side with grilled salmon, pork chops, or chicken. Or for a vegetarian or vegan dish, serve over quinoa and maybe add some toasted walnuts. Mmmmm fall.

Roasted Beets with Apples and Greens (adapted from Whole Foods Market)

Serves 4 as a side

Ingredients

  • 1 bunch of beets with beet greens (about 1 lb)
  • 2 small apples
  • 1/4 medium red onion, thinly sliced
  • 1 bunch of kale, stems removed
  • 1 Tablespoon olive oil, divided
  • 1 Tablespoon apple cider vinegar, divided
  • 1 teaspoon stone ground mustard or dijon mustard
  • salt and pepper to taste

Instructions

  1. Preheat oven to 400 F. Let’s roast some beets! Remove greens from beets. Set beet greens aside to use later. Scrub beets well and do not dry off. Wrap beets loosely in aluminum foil. If beets are similar size, then they can all be wrapped together. If the beets are very large, then wrap them separately. Transfer the wrapped beets to a baking sheet and roast for 1 hour for large beets and 45 minutes for smaller beets. Beets are done when a fork slides easily to the middle of the beet. Allow the beets to cool for 5 minutes, or cool enough to handle. Hold the beets under running water and rub the outer skin away easily. Note – if the skin doesn’t come off easily then it is likely that the beets need to cook a little longer.  Peel and slice all the beets. Set aside.
  2. While the beets are roasting in the oven and they have about 20 minutes until they are done, start cooking the rest of your ingredients. Wash and remove the stems from the beet greens and kale.
  3. Heat 1/2 Tablespoon of olive oil in a skillet. Saute red onion for 5 minutes or until translucent and browned. Add thinly sliced apples and cook for 5 minutes, stirring frequently. Add 1/2 tablespoon of apple cider, kale, and beet greens. Place lid on top of skillet and allow to steam for about 5 minutes, stirring frequently. Remove from heat when greens are wilted.
  4. In a small bowl, mix remaining 1/2 tablespoon olive oil, 1/2 tablespoon apple cider vinegar, and mustard. Set aside.
  5. Divide the kale and apple mixture among 4 plates. Place sliced beats on top of kale and apples. Season with salt and pepper. Drizzle with vinaigrette. Serve warm or at room temperature. Note – If you don’t use all of the roasted beets, they can be stored whole or sliced for up to a week in the refrigerator.

Pumpkin and Apple Almond Flour Muffins (Grain Free)

So I have a crush. And not a little one. A BIG one…a huge, gushy, get red, giggle, snort, blow chocolate milk out of my nose kind of crush. His name…. Pumpkin…that’s Mr. Pumpkin. Ya….you know him. You all love him.  He’s like the Matthew McConaughey of fall produce.  Whatever he is in, it’s golden, perfect, never disappoints and always shirtless.

Such is my crush….mmmmm pumpkin. I’ve been collecting and dreaming about amazing recipes: pumpkin bourbon ice cream, pumpkin bars, pumpkin bread, pumpkin coconut soup, pumpkin latte, pumpkin butter, pumpkin oatmeal, pumpkin pancakes, pumpkin smoothie, pumpkin cheesecake, pumpkin curry. The list goes on and on and on and on, people. It’s bad. I’ve got a pumpkin fever!

And then I stumbled upon this great pumpkin muffin recipe made with almond flour. As soon as the calendar hit September 1st, my oven went on and in went these delicious pumpkin muffins.  I had just picked up some local golden delicious apples at the market and decided to throw one into the mix. I’d been dreaming of these puppies and boy howdy they did not disappoint…much like Matthew McConaughey.  Pull the muffin liner off and they too will be shirtless. Whoah!

I honestly have to say these are hands down the best pumpkin muffins I have had…gluten free or not. It’s a double bonus that they are not only gluten free but grain free. So if you are on the fence about experimenting with almond flour, give these puppies a go. You will forever be in deep smit. You can even eat them shirtless. I won’t tell.

I should note that I made these with my newest purchase of Honeyville blanched almond flour.  I’m super impressed with the light texture.  Trader Joe’s offers almond meal and it is made from unblanched (skins still on) almonds. Bob’s Redmill also sells almond flour. Although Bob’s is blanched,  it has a more coarse texture but still tastes gooooooood. So if you are looking for a lighter texture to baked goods, I’d invest in a better almond flour such as Honeyville or go to Nuts.com.  Store your flour in the fridge or freezer. I also think Whole Foods offers bulk almond flour.   Another option is to regrind Bob’s almond flour in a coffee grinder. Just be careful to not let it process to long or you will end up with almond butter. DOH!

Pumpkin and Apple Almond Flour Muffins (Grain Free) (Slightly adapted from the Urban Poser)

Ingredients

  • 1/2 cup pumpkin puree
  • 2 large eggs, beaten
  • 1/3 cup maple syrup (or honey)
  • 2 Tablespoons coconut oil, melted
  • 3 Tablespoons apple sauce
  • 1 diced apple, leave skin on if organic
  • 2 1/2 cups blanched almond flour (I use Honeyville or go to Nuts.com)
  • 1/2 tsp baking soda
  • 1/4 tsp salt
  • 1 Tablespoon ground cinnamon
  • 1/2 teaspoon ground nutmeg
  • 1/4 teaspoon ground ginger
  • 1/8 teaspoon ground cloves
  • 1/4 cup of walnuts or pecans
Instructions
  1. Preheat oven to 350F. Spray 12 cup muffin tin or place muffin liners within tin. Set aside.
  2. In a large mixing bowl, combine wet ingredients (eggs, pumpkin, maple syrup, coconut oil, and applesauce). Combine until well mixed. Add diced apple. Set aside.
  3. In a separate bowl, combine dry ingredients (almond flour, baking soda, salt, and spices). If you do not have blanched finely ground almond flour, you may need to regrind your almond flour in a blender.
  4. Add the dry ingredients to the wet ingredients. Mix until combined where there are no visible lumps. Add nuts and mix until combined. The batter will be rather thick.
  5. Spoon the batter into the prepared muffin liners or muffin tin. Fill to about 2/3 full, smoothing the tops with the bottom of a spatula or spoon.
  6. Bake in 350F preheated oven for 25 to 30 minutes or until golden brown. Check doneness by inserting a toothpick into the center of a muffin. It will come out clean when done. Allow to cool on a rack, if you dare. Dive in. These freeze well.

Grilled Delicata Squash with Kale

Do you smell that? Ya…that’s fall people. IT is HERE! Well almost.  The weather man is taunting us. There are 90s in the forecast for the coming week but I have my fingers in my ears and I am not listening because my windows are open, it is in the 60s outside, and I am ready to pull out my BOXES O’ SWEATERS! Yes…that was plural….boxes.

Mmmmmmmmm….sweaters.

Also… winter squash is edging its way onto farmer’s tables at the market. Pumpkins, gourds, acorn squash, butternut squash, spaghetti squash, cinderella pumpkins.

Mmmmm…pumpkin. Oh, be ready people…pumpkin recipes are going to blow this place up! We are going to be swimming in pumpkin at this hacienda. But until then, let’s get back to winter squash, shall we?

One of my favorite winter squash varieties is the delicata squash. It is slightly larger than an acorn squash, but smaller than a butternut.  And did I mention that it is SOOO much easier to cut in half due to the thinner outside skin. The other beauty to this squash (besides those awesome trendy stripes) is that the skin is edible after it is cooked!  Now don’t get me wrong. I love butternut squash like the next bloke, but carving off all that stupid skin and hacking and chopping and nearly taking off my fingers and ear lobes in the process to just get a few measly cups makes me a bitter woman. More bitter than normal. And that’s bitter, people.

The inside flesh is smooth and similar to butternut in texture.  It caramelizes when roasted or grilled.  This dish can easily be adapted for roasting in an oven.  In an oven preheated to 425F, Roast for about 40 minutes. Around 30 or 35 minutes, keep an eye on them and test with a fork. They are done when the fork slides through with no resistance, like a potato.

You could serve the squash alone, but I topped them on top of a fresh lacinato kale salad. A perfect fall salad! Now, where’s my sweater?


Grilled Delicata Squash with Kale

Serves 4 as a side

Ingredients

  • 1 delicata squash, deseeded, halved and sliced in 1/2-inch slices (keep skin on)
  • olive oil
  • salt and pepper
  • 1 bunch of kale (or swiss chard), stems or ribs removed and leaves cut into 1-inch strips and gently massaged. (Read this article to see why and how to massage that beautiful kale.)
  • feta (leave off for vegan and paleo)

Instructions

  1. Prepare and heat grill for direct grill method.
  2. Toss squash slices in olive oil and season with salt and pepper. Grill over medium heat for 5 minutes. Then carefully flip to the other side. Continue grilling for another 5 minutes.
  3. Meanwhile, back on the ranch, add kale strips to a medium bowl. Sprinkle with salt and gently massage so that the kale slightly breaks down and becomes dark in color.
  4. Divide kale between 4 bowls. Place grilled squash rings on top of kale. Top with crumbled feta.

Make Ahead Mexican Breakfast Casserole (Gluten Free, Grain Free, and Dairy Free)

A typical weekday morning involves me making a mad dash to get ready and out the door in time. I typically try to squeeze in a morning run, pushing my timeframe and running out the door with barely my hair fixed and DEFINITELY nothing ironed and praying that I thought ahead the night before to pack something for breakfast to eat on the road or in the office.

Most people suffer from the dash and go morning routine. Whether it is because you try to cram a morning workout in or get your kids ready or are just hitting that snoozypooze buttom one too many times, a healthy breakfast is likely the last on your list. I find that if I don’t eat a good solid, protein rich breakfast, the rest of my day has me STARVING AND EATING MY ARMS. Try going the rest of your day with only bloody nubs….not good. Gross, I know. I used to toast whole grain bread and slather almond butter on it for a quick breakfast, but lately I’ve been trying to eliminate gluten and grains from my diet.  Finding quick make-ahead gluten and grain free breakfast alternatives has been the hardest challenge. Until now….

As a fabulous solution to the gluten and grain free breakfast conundrum (and to preserving my poor arms from being eaten), I present to you the great make ahead breakfast casserole! (Imagine glitter flying around right now and echoing god-like voices because this thing is awesome…like you just-won-a-trip-to-Bali awesome or you are-smaller-than-your-favorite-skinny-jeans awesome or you have-a-years-supply-of-ketchup awesome….or is that just me? fine…just me…well it would be friggin awesome.)

I call it “make ahead” for two reasons:

(1) All of the ingredients can be combined the evening or day before, refridgerated, and then baked the morning you plan to serve, and/or

(2) the casserole can be baked ahead of time and the leftovers taste just as delish as if it were fresh baked.

Whip one of these casseroles up on a Sunday evening…go ahead, eat B for D (breakfast for dinner)… and then eat the leftovers for breakfast throughout the week. Brilliant! This gluten-free casserole serves a crowd (10 at least) or it can feed 2 peeps for a full week. It is also a great way to use up excess ground beef!

This recipe is really just a building block. Any meat or veggies could be interchanged. I shredded a sweet potato as the starch.  But if you have picky eaters in your house and they are not down with the sweet potato, then go tell them to make their own breakfast…OR you could be nice and use a shredded potato instead. This casserole is not too spicy but could be amped up by adding an additional jalapeño and chili powder, or using chorizo sausage instead of the ground beef.

Make Ahead Mexican Breakfast Casserole (Gluten Free, Grain Free, Dairy Free, Paleo-Friendly)

Serves 8 to 10 

Ingredients

  • 12 eggs, whisked
  • 1/2 medium onion, diced
  • 1 lb ground beef
  • 1 sweet potato*, shredded with skin on
  • 1 jalapeno, deseeded and chopped
  • 2 cloves of garlic, minced
  • 1 teaspoon chili powder
  • 1 teaspoon smoked paprika
  • 1 teaspoon salt
  • 2 cups diced fresh tomatoes (or 1 can of diced tomatoes, drained)
  • 2 cups fresh spinach (or chard or any leafy green you choose)

*Note – if you have picky eaters in your house, you can substitute regular potatoes for the sweet potato. And if you are _really_ in a pinch, you can substitute frozen hashbrowns.

Instructions

  1. Preheat oven to 375 F. Spray a 9″X13″ baking dish with nonstick spray and set aside.
  2. Whisk eggs in a medium bowl and set aside.
  3. Shred sweet potato using a food processor with shredding attachment or by hand. Set aside.
  4. Cook ground beef in a large skillet over medium-high heat until no pink remains. Break into crumbly pieces using a spatula. Drain off extra grease. Add onion, shredded sweet potato, garlic, jalapeño, chili powder, salt, and paprika into skillet. Cook until onions are translucent (about 5 to 7 minutes).  Add tomatoes and spinach into skillet and cook for about 2 minutes or until spinach begins to wilt.
  5. Pour beef and sweet potato mixture into the prepared 9″X13″ pan and spread evenly along the bottom. Pour whisked eggs over the top, making sure to mix the eggs into the sweet potato mixture with a spoon or spatula. (The casserole can be made ahead 1 day in advance up to this point and covered and refrigerated. Remove from fridge 15 minutes before cooking.)
  6. Place in preheated oven and bake for 30 to 40 minutes or until middle of casserole is set (not jiggly) and edges are lightly browned. Remove from oven and allow to cool for 5 minutes. Feeds a crowd of 8 to 10 or it feeds 2 people over the course of a week!!!!

Creamy Herb Cashew Dip

I think my husband is part fish. When the temperatures begin to increase, he craaaaaves water. Not to drink, but to swim and frolic. Well, I should clarify…he doesn’t really frolic, but he does squeel…a manly squeel and dance…a manly dance.  It’s a good squeel…like a kid discovering a never-ending stash of gummy bears…or me discovering a never ending stash of kale. Don’t judge.

He scoured the web for swimming pools in KC as the temperatures climbed higher and higher, topping at 107 F over the weekend. Luckily a friend allowed us to crash her apartment pool this weekend, quenching his need to be submerged in liquid. It was wonderful. I had forgotten how luxruious it feels to lay by a quiet pool sipping a cocktail, wearing big Jackie-O sunglasses, and munching on snacks.  

This weekend has solidified that my next purchase will be a kiddie pool to place in my tiny tiny tiny yard…Oh and to get some tiny unbrellas for my cocktails. Every girl deserves these two things! Wait..we also deserve pedicures…and great friends….and brunch…and…ok, ladies deserve a lot.

For a pool-side snack, I whipped up an easy dairy-free dip that gets its creaminess from pureed raw cashews. I made the dip dairy-free for two reasons: (1) dairy and the hot afternoon sun do not play well together and (2) my cute manly-squeeling-non-frolicing husband does not consume dairy. 

The dip is basically a vegan ranch dip that can be served with veggie sticks (or crudites for all you unbrella-adorned-cocktail-drinking Jackie-O glass-wearing ladies) or crackers or spread on a sandwich or even watered down and added to KALE as a dressing. It also would be great with these easy homemade beet chips from Meg at My Whole Food Romance, which was this weeks recipe for the Food Matters Project. Mmmmm…

Creamy Herb Cashew Dip (dairy free, gluten free, grain free, paleo, vegan, vegetarian)

Makes 1 1/4 cups

Ingredients

  • 1 cup raw cashews
  • 1/4 cup water
  • 1/4 cup unsweetened coconut milk or almond milk
  • 2 to 3 tablespoons fresh lemon juice
  • 2 teaspoons each of fresh dill, parsley, and chives (save a little bit to sprinkle on top)
  • 1 to 2 cloves of garlic, sliced
  • 1/4 teaspoon cumin
  • 1/2 teaspoon onion powder
  • 1/4 teaspoon kosher salt

Instructions

  1. Add all ingredients to the bowl of a powerful food processor fitted with the steel blade. Process for 2 minutes or until smooth.
  2. Refrigerate until chilled (about an hour). Sprinkle with fresh dill and chives. Serve with plenty of veggies for dipping!

Paleo Fudge Brownies (Gluten Free and Vegan)

I’m going to let you in on a weird little fact about me…I prefer ketchup over chocolate. Chocolate has never been a major craving of mine.

*gasp*

I know…so weird.  This probably isn’t the best lead in sentence to convince you to make these brownies….I promise they do not taste like ketchup. Total let down, I know. womp womp.

Actually, chocolate…well, milk chocolate is too sweet for me. However, recently I have become a huge fan of gooooood dark chocolate.  That is, dark chocolate with at least 72% cacao…preferably with 85% cacao. And bonus….it’s good for you. And sometimes you just need some good melty chocolate. So I decided to find a way to turn this awesome dark chocolate into a flourless brownie so that my gluten free hubby could also partake. I’m a doll, I know. Also, if he helps eat them, then I don’t fall asleep with the whole pan in bed. Don’t judge!

Although I have dabbled in flourless and gluten free brownies before, these Paleo Fudge Brownies take the cake…pun intended. They taste amazing and are gluten free, grain free, dairy free, vegan, peanut free, soy free, and processed sugar free. Which also makes them a great dessert to take to cookouts if you have anyone that may have food allergies or sensitivities.

I like these better than conventional brownies that are loaded with flour and sugar and butter (blasphemy, I know), which typically leave me in a coma. And even my sweet-toothed, chocolate-loving hubby adores these.

Instead of flour, the base for this fudge-tastic brownie is almond butter!  You could use any nut butter that you have on hand.  Just make sure that it is unsweetened and all natural. They are sprinkled inside with melted chunks of good dark chocolate (SWOON) and topped with toasted walnuts. Are you drooling yet?

When baking these puppies, make sure you do NOT overcook them. If overcooked, they will taste like brownie croutons, which are still edible, but not as delightful as fuuuuuuudgy brownies. If you slightly undercook them, I guarantee you will take them to bed with you. No judging here.

Added bonus, my friends…they are good for you, and are packed with protein, dark chocolate, and omega-3s from the flax meal and walnuts.

You are welcome!

Paleo Fudge Brownies (slightly adapted from Elana’s Pantry)

Makes 16 brownies

Ingredients

  • 1 small banana
  • 3 pitted dates
  • 1 cup almond butter
  • 2 tablespoons ground flax seeds, mixed with 3 tablespoons of water to form a paste (or 1 egg to make it nonvegan)
  • 2 tablespoons of coconut oil or grapeseed oil
  • 2 tablespoons of unsweetened applesauce
  • 2 tablespoons of agave nectar (or honey for nonvegans)
  • 1 tablespoon of vanilla extract
  • 1/2 cup cacao powder
  • 1/4 teaspoon sea salt
  • 1/2 teaspoon baking soda
  • 1/4 cup chopped dark 85% cocoa chocolate bar
  • 1/4 to 1/2 cup of chopped walnuts

Instructions

  1. Preheat oven to 350°F. Spray an 8X8 inch baking dish with nonstick spray or grease well with butter or coconut oil.
  2. Pull out your food processor. If you don’t have one, use a stand mixer and substitute another banana (two total) for the dates. The dates will not break down in a stand mixer, only a good food processor. Combine the banana(s), dates (if using a food processor), almond butter, and ground flax seed mixture.
  3. Pulse in coconut oil, apple sauce, agave nectar, and vanilla until the mixture is smooth.
  4. Add cocoa powder, salt, and baking soda. Pulse to combine.
  5. Stir in chopped dark chocolate.
  6. Transfer batter into a well greased 8×8 inch pyrex baking dish. Top with chopped walnuts.
  7. Bake at 350°F for 30 minutes. Let cool for about 5 minutes, if you dare, before cutting and serving. (Note – Try not to drool on the brownies while cutting.)

Black Bean and Chard Breakfast Tacos

Greens are overflowing the farmer’s markets and my garden. Now is the time to load up on fresh leafy greens like chard, kale, mustard greens, and lettuce.

It was a shock to the system to arrive home from vacationing in cold South Dakota (highs in the 40s) and arrive in KC with heat indices topping at 100 degrees!!!! Today has been full of harvesting my spring plants and planting summer crops of basil, cilantro, beets, green beans, tomatoes, strawberries, and more chard. I can’t get enough! Plus, adding greens makes me feel not so guilty when I partake in one (or three) brews for Memorial Day celebrations and maybe an extra hunk of dark chocolate. Shhhh!

So back to those lovely greeeeeens. This is why today’s Food Matter’s recipe, Beens N’ Greens Burritos (chosen by Good Things Grow) is perfect for this time of year. I slightly adapted the recipe as a breakfast dish, adding a poached egg and serving it on corn tortillas instead of flour. I prefer corn tortillas to flour (even whole wheat flour tortillas), because they are less processed and typically have less than 5 ingredients. Corn tortillas also topically have more protein, fiber, and less carbs than their flour brethren.

This is basically the same as my Huevos Racheros recipe, but with the addition of swiss chard. Yum. Great start to the day!

Black Bean and Chard Breakfast Tacos

Serves 4

Ingredients

  • 2 teaspoons of olive oil
  • 1/2 onion, diced
  • 1 bunch (about one pound) of swiss chard (or kale or spinach), washed and cut into 1-inch strips (removing stems)
  • 1/2 teaspoon smoked paprika
  • salt and pepper
  • 4 corn tortillas
  • 4 eggs
  • 1 cup cooked black beans
  • 1/4 cup crumbled feta
  • cilantro
  • salsa or pico de gallo
Instructions
  1. Heat olive oil over medium-high heat in a skillet. Add onion and sauté for 5 minutes or until translucent.
  2. Add chard and sauté for an additional 5 to 10 minutes, or until chard wilts. Add black beans and heat through. Remove from heat and set aside.
  3. Cook eggs to your liking. I prefer poached…mmmm.
  4. Heat tortillas by either throwing them in the microwave for 15 to 30 seconds or over the stove in a pan with with a tad bit of olive oil.
  5. Place one tortilla on each plate. Divide chard/black bean mixture among each plate. Top with cooked egg, feta, and cilantro. Dive in!

Egg in a Basket

Unfortunately, I am traveling and living out of a hotel right now doing field work for my job. YAY…I actually feel like a wild lion that had been put in a zoo for years and is finally able to go home to the jungle. Except my “jungle” is a landfill construction site…oooooh! Hot, I know.

Anyways, because of my recent “being let back into the wilds of field work” and living out of a suitcase, I was not able to complete the Food Matters Project’s weekly challenge….Roasted Asparagus and White Bean Soup chosen by Adrienn Eats.  Sound delicious, so be sure to check out the recipes on the FMP site, here.

Instead…I present you with one of my all time favorite and easiest breakfasts…..egg in a basket.  Take a piece of GOOD bread, generally 1/2-inch to 1-inch thick. Cut out a circle. Heat some butter in a pan. Throw your bread in the pan. Break the egg into your “basket”. Cook. Flip. Eat. Well…put it on a plate, THEN eat it. Mmmmm.

Have I mentioned to you that I looooove breakfast. And I loooooove eggs. And since I love a good juicy runny egg….and toast, it seems only natural to cook the two together. At the same time. Using fun shapes.

Like Mrs Pac man…

This breakfast takes 5 minutes…..or less….literally.  So try it out, have some fun.

Sorry for the short post, but so is life from a hotel with a terrible internet connection.

Egg in a Basket

Serves 2

Ingredients

  • Nonstick spray or 1 tablespoon of butter
  • 2 slice of good whole grain bread (thicker slices serve as better “baskets”, but mine was 1/2-inch thick and worked fine)
  • 2 eggs
  • a pinch of fresh herbs (such as basil, parsley, tarragon, chives)
  • goat cheese or shredded parmesan cheese (optional)
  • salt and pepper

Instructions

  1. Cut out a small circle inside your toast using a biscuit cutter, fun cookie cutter shape, or simply the top of a jelly jar (should be about a 2-inch diameter circle).
  2. Spray a skillet with nonstick olive oil spray. Heat the skillet for a minute, but don’t let the spray start smoking. If you are using butter, heat 1 tbsp of butter over medium-high heat until the butter begins to foam and subside, but not smoking.
  3. Lower the heat to medium-low. Place the slices of bread in the skillet (may need to do this one at a time depending on the size of your skillet or griddle pan), quickly break the egg in the whole filling with egg white first then carefully add the yolk.
  4. Cook for about 2 minutes, until the bottoms of the egg-baskets are set and golden brown. Add the bread cut-outs to the pan and allow to toast on both sides.
  5. Flip carefully and cook for an additional 1 to 2 minutes for runny eggs or 3 minutes for firmer eggs. Make sure to flip your bread cut-outs too.
  6. Remove from skillet. Top with salt and pepper. If you are feeling fancy shmancy, add some fresh herbs and goat cheese crumbles.