German-Style Cinnamon Apple Walnut Pancake (Gluten Free)

It is official… I AM DONE!  I took my Professional Engineering (P.E.) exam yesterday and I feel GREAT.  I was so worried that after I finished that 8-hour monster exam, that I would feel drained and crappy and not want to be around anyone….but instead I walked out of that room like Mary Poppins and a bird singing on my shoulder. I was on a high…and still am. Who knows if I passed, but it feels good for it to be over.

I feel like I have new-found freedom. A new life. What should I do with ALL this time…. build a pantry? Finish painting the hallway that I started painting a year ago? Finish painting the back bedroom that I started a year ago?  Clean? no……

Instead, I shall make apple pancakes. And applesauce and apple pie and apple butter. And well, a lot of apple things, because I went apple picking last weekend.  Like nearly everyone that goes apple picking, we got quite zealous and brought home bushels and bushels and bushels of apples. I’ll be handing out loads of apple-themed goods for christmas. Act surprised! Heck…I might just hand you an apple. 🙂 Cheers.

Although I have a big crush on Mr Pumpkin, my true love is the humble Apple.  There are so many varieties.  A variety for all of my moods and emotions…tart or crisp or sweet or complicated. And who can resist that amazing aroma of baked cinnamon apples!? If you can resist it, your sick…weird…you need help.

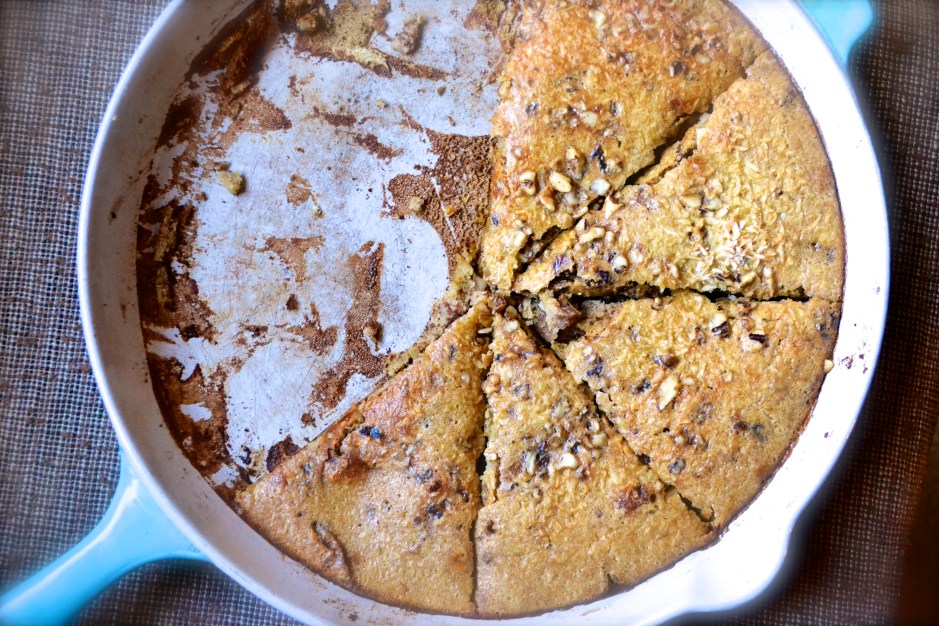
So, with my loads of free time, I present an aroma therapy, gluten and grain free version of a german-style pancake that is made with coconut flour and loaded with cinnamon apples and walnuts.  It is made in one large oven proof skillet and would be perfect for crowds and the upcoming holidays.  The bottom of the “pancake” is layers of thinly sliced cinnamon spiced apples that bake in the oven while you prepare the batter. After the batter is whipped up, remove the baked apples from the oven, pour the prepared batter on top, sprinkle with nuts, place back into the oven, and let the holiday spirit and aroma fill your house. No fuss. Sit back. Sip that coffee. Then you can pull out a piping hot pancake that everyone gets to enjoy…..at the same time.

Oh…and don’t forget the real maple syrup, people. No Log Cabin! I mean it.  The pancake itself is not that sweet. It has natural sweetness from the apples, but it provides ample opportunity to manually sweeten your pancake slice with the goodness of fresh maple syrup and a dollop of coconut butter. Mmmm.

Note: This pancake is made with coconut flour. Coconut flour can not be substituted one for one with other flours. Because it does not contain gluten, it is dense and requires a poop ton of eggs to lighten and fluff up the recipe. Coconut flour can be found in most health food stores, online, and the health food section of most grocers.  It’s very healthy and packed with nutrients and fiber. It does not impart an overwhelming flavor of coconut to the pancake. It is the perfect balance of nuttiness. Don’t be scared….try something new!

German-Style Cinnamon Apple Walnut Pancake (adapted from the Foodie and The Family)

Serves 8

Ingredients

  • 2 medium apples, sliced thin with skins on (I used fresh picked Fuji)
  • 1 + 1/8 teaspoon ground cinnamon
  • 1/2 + 1/8 teaspoon ground nutmeg
  • 3 tablespoons coconut oil, melted and divided (or unsalted butter)
  • 4 tablespoons coconut palm sugar (or honey, maple syrup), divided
  • 6 eggs, beaten
  • 3/4 cup milk (or almond milk, coconut milk)
  • 2 teaspoons gluten-free vanilla
  • 1/4 cup coconut flour
  • 1/2 teaspoon baking soda
  • pinch of salt
  • 1/4 cup walnut pieces
  • 1/4 cup unsweetened shredded coconut (optional)

Instructions

  1. Preheat the oven to 375 F. Place 10-inch cast iron skillet in oven to preheat the skillet.
  2. Core apples, but keep skins on. Slice the apples thinly with a mandolin slicer at about 1/8-inch thick. To the apples, add coconut palm sugar (or honey or maple syrup), 1 teaspoon of cinnamon and 1/2 teaspoon of nutmeg. Toss to coat with sugar and spices.
  3. Remove the preheated skillet from oven. Add 1 tablespoon of coconut oil  or butter to the skillet and allow to melt. Toss sliced apples into the skillet and stir to coat the apples with melted coconut oil. Spread the apples evenly along the bottom of the skillet. Place the skillet with the apples back into the preheated oven to bake while you prepare the batter (about 10 minutes).
  4. In a large bowl, whisk eggs, milk, melted coconut oil (or butter), vanilla, and coconut sugar. In a separate medium bowl, add coconut flour, 1/8 teaspoon nutmeg, 1/8 teaspoon cinnamon, salt, and baking soda. Add dry ingredients to wet ingredients. Mix well to combine or until there are no lumps.
  5. Remove skillet with baked apples from oven. Stir apples and redistribute evenly along the bottom of the skillet. Pour batter mixture evenly over the prepared baked apples. Sprinkle with walnuts and unsweetened coconut.
  6. Place the skillet back into the oven. Bake for 25 to 30 minutes at 375 F, or until top is golden brown.
  7. Remove skillet from oven. Serve with fresh maple syrup and homemade coconut butter!

Beat Texas-Style Chili with Butternut Squash

As we get older in life, we begin to run out of “firsts”.

Early in life, there are so many firsts….first kiss, first love, first car, first road trip, first house, first job, first successful homemade meal for others. The first meal I made my husband when we met was horrible. I made him Chicken Helper but used ground beef and I think there was some freezer-burned shrimp thrown in for good measure. *Shudder*  The chick-beef-shrimp-arole was barf-worthy. I think the poor boy choked it down…with a smile. What a man.

Lucky for both of us, I have come a long way from the mystery meat boxed meal days.

Last weekend I made a chili…a chili that was a “first” for me. Now, I have a pretty kickass chili recipe that I normally make. But I wing it every time. I’ve been making it for years and we love it.   However, I saw a delicious brisket style chili in Bon Appetit and I wanted to give it a go.

So this chili was the first time that I have ever followed an actual recipe for chili. The first time I have ever made a chili WITHOUT beans! gasp.  The first time that I have added winter squash to chili. The first time that I cooked a chili in the oven..say whaaat??? AND the first time that I have made chili without ground beef (with exceptions of vegetarian chili and white chicken chili)!

*Drumroll* And ladies and gents, I gotta tell ya….that although I totally heart my old standby “throw some beans + tomatoes + ground beef + hoooooopla of chili powder” method of making chili…this chili is OUTSTANDING. Yes…caps are necessary. I will have a hard time making another type of chili now. It’s changed my life.

The original Bon Appetit recipe called for 5 pounds of beef brisket…yes FIVE.  I cut that down to accommodate the 2.5 lb arm roast that I had from my CSA (community supported agriculture) stash. I cut the thawed roast into 1/2-inch to 1-inch portions. Simmered low and slow in my dutch oven in a 350F oven for 3 to 4 hours. The roasted beef chunks just fell apart. Butternut squash is added during the last hour of cooking.  It adds a great chunkiness and heartiness to the dish.  And don’t forget the chili powder….like 1/4 cup of chili powder.  Recipes that only call for 1 tablespoon make me laugh…THAT AIN’T CHILI!  That’s northerners attempt at spicing up marinara sauce, I think.  Well, in my personal (and correct) opinion. No offense, northerners. Ya’ll make a lot of things right…but chili (and biscuits and gravy) ain’t it.

Last weekend, I made this chili on a cold and rainy day when OU beat the crap out of Texas. SO it was only fitting that we ate Beevo for dinner. Mmmm. So I call this the Beat Texas-Style Chili…and beat them we did.

Texas-Style Chili with Butternut Squash (adapted from Bon Appetit)

Serves 8

Ingredients

  • 2 slices of bacon, diced
  • 1 medium onion, chopped
  • 1 medium yellow or red sweet bell pepper, chopped
  • 2 to 3-pound beef roast, trimmed and cut into 1/2 to 1-inch pieces
  • 3 large cloves of garlic, minced
  • 1/4 cup chili powder
  • 1 tablespoon ground cumin
  • 1 tablespoon smoked paprika
  • 1/4 to 1/2 teaspoon chipotle chili powder (lower quantity for less spicy)
  • 1 teaspoon dried oregano
  • 1 1/2 teaspoons kosher salt
  • 2 cups of water
  • 1 15 oz can of fire roasted tomatoes with green chilis
  • 1 4 oz can of green chilis
  • 1 8 oz can of tomato sauce
  • 2 to 3 cups diced butternut squash
  • 1/2 diced cilantro

Instructions

  1. Preheat oven to 350°F. 
  2. Sprinkle diced beef all over with coarse salt and pepper. Set aside.
  3. Sauté bacon in heavy large ovenproof pot (dutch oven is perfect for this) over medium-high heat until the bacon begins to brown. Reduce heat to medium and add the onions. Cook until tender, about 5 minutes. Add diced beef and garlic to pot and stir to coat with bacon and onions. Allow to brown on outside.
  4. To pot, add water, chili powder, cumin, oregano, and 1 1/2 teaspoons coarse salt. Add tomatoes with juices, green chiles, and tomato sauce. Stir to coat evenly.Bring chili to simmer. Cover and place in oven. Cook for at least 2 hours. Remove from oven. Spoon off grease from top if any. Add squash and stir to coat. Add additional water if the chili is really thick (about 1/2 cup to 1 cup), keeping the meat covered. Place the pot back into the oven, uncovered. Roast uncovered until beef and squash are tender, about 45 minutes longer.
  5. Remove from oven when beef is tender. If it isn’t, put it back into the oven for a little longer. When the beef is tender, spoon off any fat or grease from the top of the chili. Season chili to taste with salt and pepper.  Stir in diced cilantro or serve it as a topping.

Slow Cooker Beef and Sweet Potato Stew

One of my favorite kitchen gadgets (besides my amazing food processor) is my slow cooker…a.k.a Madame Crockpot.  My mom bought Madame Crockpot for me when I left for college *cough* many moons ago. Madame has been my constant companion through many tough seasons. Madame Crockpot has saved me numerous times and has always provided a nutritious and hot meal when I came home from a long day of studying, or working, or camping, or skiing, or fishing, or running, or lounging around watching Last of the Mohicans on a rainy day.

If only she fit in my pocket! I would take her everywhere!!!!

Lately I have been studying and studying and studying every chance I get. So, as always, Madame Crockpot came to the rescue this past weekend and made me an amaaaazing beef stew.

The beauty of stew is that it is really hard to screw it up.  It’s quite a simple recipe….(1) brothy substance, (2) veggies, (3) herbs, (4) toss in meat if you want, and (5) cook it low and slow. So feel free to swap some things out for what you have on hand. I think mushrooms would be a fabulous addition or even butternut squash.

Slow Cooker Beef and Sweet Potato Stew (Gluten and Grain Free)

Serves 8

Ingredients

  • 1 to 2 pounds beef stew meat, diced into 1-inch cubes (include beef bones if you have them)
  • 1 medium onion, diced
  • 1 cup carrots (about 3 to 4 medium-sized), cut into 1-inch pieces
  • 2 medium sweet potatoes (I used 1 sweet and 1 white), leave skin on and dice into 1/2-inch cubes
  • 1 can of diced tomatoes (or 2 cups fresh)
  • 4 cups of organic beef broth
  • 1 tablespoon tomato paste
  • 1 teaspoon fresh rosemary, chopped
  • 1 teaspoon fresh thyme, chopped
  • 1 teaspoon smoked paprika
  • 1/2 cup frozen green peas
  • salt and fresh cracked pepper to taste

Instructions

  1. Add diced beef to slow cooker. Place vegetables in order as they appear above (onions through sweet potatoes).  Pour canned tomatoes with juice on top.  Mix beef broth, tomato paste, balsamic vinegar, and herbs together in a bowl. Pour on top of vegetables in crock pot.
  2. Put lid on crock pot and cook on low for 10 to 12 hours or on high for 4 to 6 hours. Add peas during last 15 minutes of cook time. Season with salt and pepper.

Gluten Free Pumpkin Blondies

These gluten free blondies are closely related to my Paleo Fudge Brownies which have almond butter as the base ingredient.  For these Pumpkin Blondies, I wanted the pumpkin flavor to be front and center stage.  Pureed canned pumpkin plus pumpkin pie spices give them an amazing fall flavor that will blow your mind.

I’ve made these several times for dinner parties and group gatherings. I have to say that I prefer them with dark chocolate chunks, unsweetened shredded coconut, and just slightly undercooked (about 25 minutes), where they end up more like gooey pumpkin chocolate chip cookie bars.  However, if you prefer to not eat your blondies with messy gooey hands (freaks), then cook these puppies until they are fully set up (about 30 minutes).

Note – if you are using salted almond butter, reduce the quantity of salt or leave out entirely. Similarly, if your nut butter is sweetened, then reduce the quantity of honey equivalently. You could easily sub another type of nut butter for the almond butter. If you do not have pumpkin pie spice blend, then sub cinnamon. 

Pumpkin Blondies (Grain Free, Gluten Free, Paleo Friendly, Dairy Free, Refined Sugar Free) adapted from This Primal Life

Serves 16

Ingredients

  • 1 cup unsalted almond butter
  • 1 cup pureed pumpkin (canned or fresh)
  • 1 egg
  • 1/3 cup honey (or maple syrup)
  • 1 teaspoon baking soda
  • 1/4 teaspoon salt
  • 1 teaspoon pumpkin pie spice blend
  • 1/3 cup dark chocolate chips (optional)
  • 1/2 cup shredded unsweetened coconut (optional)

Instructions

  1. Preheat oven to 350F. Spray an 8″x8″ pan with nonstick spray. Set aside.
  2. In a medium bowl, combine almond butter and pumpkin. Mix until combined. Add egg and honey. Mix well. Stir in baking soda, salt, and pumpkin pie spices. Stir in chocolate chips and 1/4 cup coconut. Top the remaining 1/4 cup shredded coconut.
  3. Pour into prepared pan. Bake in preheated oven for 25 to 30 minutes or until toothpick comes out clean. Remove from oven and allow to cool for 5 to 10 minutes. Best when eaten warm!

Nutty Coconut Date Balls

I love snacks. I would much rather eat several small meals than huge ones. Maybe because I loooove food and the thought of eating different types of food all day is quite a treat to me.

Also, being a runner, I get hunger pains and need a quick fix!  Eating my arm ain’t pretty, folks. You don’t want to see me get HANGRY.

This is basically my version of the coconut Lara bar.  These little balls are all over the food blogosphere, but I had never had a chance to make them until now.  For Food Matters Project Monday, Cheese Please chose Cheese-Nut Balls from Mark Bittman’s Food Matters Cookbook.  My hubby is dairy free, so I swapped out the cheese for dates and made individual snack bites.  These Nutty Coconut Date Balls are perfect little energy snack bites. The dates taste like caramel goodness with smacks of coconut.  Feel free to roll them into balls or press them into a sheet pan and cut them like bars. They make great travel food!

Coconut Pecan Date Balls

Ingredients

  • 1 cup dates, pitted
  • 3/4 cup chopped nuts (such as raw unsalted walnuts, pecans, macadamia nuts, almonds and/or cashews)
  • 1/2 cup shredded unsweetened coconut
  • 1/8 tsp sea salt
  • 1/8 tsp ground cinnamon

Instructions

  1. Add the dates one at a time through the feed tube of the food processor while it is running. The dates will turn into a date paste.
  2. Add the nuts. Process until the consistency appears like cake crumbs, but it will easily stick together when you press the mixture between your fingers.
  3. Add salt and coconut. Pulse until mixed.
  4. You can either make these into bars or balls. If making into balls, simply remove the blade from the food processor and take one tablespoon at a time of the mixture and roll it between your palms until a ball forms.  To make bars (like larabars), put the mixture into a shallow baking pan and press the mixture into it. Seal and store in an airtight container in the fridge until you are ready to serve it.   These will last up to 2 weeks in the fridge or longer in the freezer.