Easy Whole Wheat Pizza Dough

Years ago, the Jimy Lahey (the owner of Sullivan Street Bakery) released his amazing no-knead method for making bread. It does require planning and allowing the flour-salt-yeast-water mixture to sit in a warm draft-free environment and ferment for 12 to 24 hours.  But it is simply and I have made several amazing batches of bread this way.  Mark Bittman adopted Jim Lahey’s method in the Food Matters Cookbook, slightly adapting it to a whole wheat version of pizza dough. In fact, the March issue of Bon Apetit did the cover story on Lahey’s no-knead pizza dough.

It really doesn’t take much time. In the morning, throw 3 cups of whole wheat flour (I used half white whole wheat and half whole wheat pastry flour), some salt, and 1/2 teaspoon of yeast in a bowl then add 1 1/2 cups of water. Stir with a wooden spoon. Put plastic wrap over it. Set aside. Done.

The pizza dough will be ready for you to work your magic once you get home from work. It will have bubbles on top from the fermentation process. Place the dough on a floured surface and work into small individual pizzas.

No need to spend extra “dough” on take out. Make this a fun experience with kids or friends or yourself. As you can see, I had two great helpers tonight in making individual pizzas. The kids chose their own toppings and they even experimented with an interesting guacamole pizza. Hrmmm.

If you don’t use all of the dough, or change your mind on dinner that night, the pizza dough will keep in the fridge for up to 3 days or in the freezer for up to a month.

See what everyone did with this recipe at the Food Matters Project. The original recipe was chosen by Niki of Salt and Pepper.

Easy Whole Wheat Pizza Dough

Notes: I recommend investing in a good pizza stone! It makes a difference.

Makes: 2  10″ pizzas or 4 individual mini pizzas

Dough Ingredients

  • 3 cups whole wheat flour (I used whole wheat white flour and whole wheat pastry flour)
  • 1 teaspoon fine sea salt
  • 1/2 teaspoon active yeast
  • Optional Toppings (olive oil, spicy tomato sauce, fresh mushrooms, goat cheese, fresh herbs, etc.)

Instructions

  1. Place flour, salt, and yeast in a medium bowl. Add 1 1/2 cups of luke warm water. Stir with a wooden spoon until mixture comes together. Should resemble biscut dough. Cover with plastic wrap. Set aside in a warm draft-free spot for at least 8 hours, but preferably 12 to 18 hours. The longer it sits, the better the taste. The dough will keep in the refridgerator for up to 3 days at this point.
  2. When you are ready to cook the dough, preheat oven to 500 to 550 F (or as high as it will go), placing a rack in the upper third portion of the oven and place a pizza stone on the rack. Preheat oven for at least 30 minute (45 minutes to 1 hour is preferable to recreate wood-fired pizza). If you are not using a pizza stone and are using a baking sheet, there is no need to preheat the baking sheet.
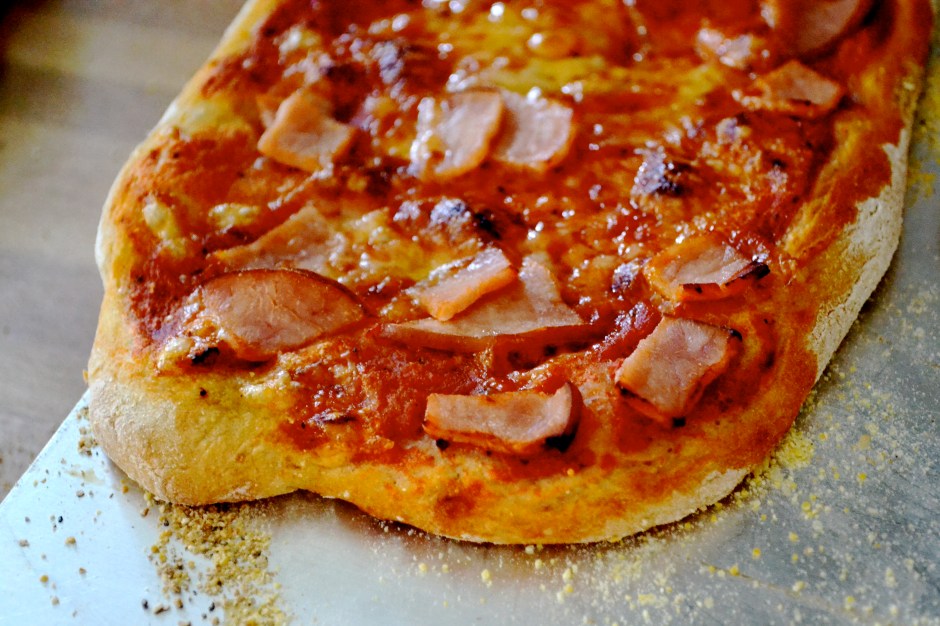
  3. Meanwhile, put the dough on a floured work surface. Shape into a rectangle and divide into several small pizzas, gently molding into appropriate sizes.  Dust with flour and set aside on rimless baking sheet or pizza peel that has about 1/4 cup of corn meal on the baking sheet (easy to slide the uncooked pizza dough off). Allow dough to rest while oven preheats
  4. Top pizza with desired toppings (sauce, cheese, veggies). Remember, the lighter the toppings, the better this will be. Loading a pizza with too many toppings can result in a soggy pizza.
  5. To transfer the pizza from the rimless baking sheet to the hot pizza stone in the oven, use small and quick back-forth motions. Slide the pizza from the rimless baking sheet (or pizza peel) onto the hot stone.  Bake pizza for 8 to 10 minutes, then broil on high for 2 minutes, or until bottom is crisp and top is melted and done.
  6. Using the rimless baking sheet, remove pizza from hot stone and  transfer to a work surface to slice. If you have another pizza to cook, allow the pizza stone to reheat under the broiler or at 550 F for 5 minutes. Repeat steps 5 and 6 with remaining pizzas.

Braised Chicken in Sweet and Sour Rhubarb Sauce

If you have only had rhubarb in pies and cobblers, you should branch out and try adding it to the main course.  Today’s recipe was chosen by Culinary Adentures with Camilla for week 10 of the Food Matters Project. The original recipe is Braised Fish in Rhubarb Sauce from Mark Bittman’s Food Matters Cookbook, where white fish is cooked in a carmely/lime/rhubarb sauce. Instead of fish, I decided to use this recipe to make a natural sweet and sour chicken dish using rhubarb as the sour and honey as the sweet. Unfortunately, rhubarb has not quite hit the markets yet, but luckily I had some frozen and tucked away from my rhubarb crop last year.

While most rhubarb you see in the grocery stores and markets are a beautiful red, I unknowingly bought a green and a red variety of rhubarb to plant in my garden.  Rhubarb, like asparagus, is a  perennial plant, coming back year after year to give you great tart goodness.  The stalk of the rhubarb plant is edible, while the leaf is poisonous.  Because rhubarb plants love sun, be sure to plant them in a good sunny well drained area that will not be disturbed.  You will not be dissappointed. You can freeze the rhubarb by cutting the stalk into 1/2 to 1-inch pieces and freezing them in a single layer on a cookie sheet. Once they are frozen, place them in a ziploc bag for future use.  In today’s recipe, I used frozen green rhubarb from last years crop.

Because of rhubarb’s pucker power, it needs to be balanced with some sweetness….honey.   I also added the juice of two oranges to balance out the sauce.  The result…awesome and healthy! I loved that it was not loaded down with artificial flavors and processed sugar.  It was fresh and healthy. However, as far as looks go….it would never win a beauty contest. My rhubarb is green….so the sauce looked a bit like green mash.  I only added 2 tablespoons of honey, which was enough for me…..but I think my husband would have preferred it to be more on the sweet side and less on the sour side. But that’s why he has me…I’m sweet enough for everything. (BAH!)

So even if your guests or kids sneer their nose at the site of the slime chicken you are serving (I know I’m selling this dish to you guys, no wonder I’m an engineer and not a salesman), once they taste it…seriously….they will be suprised.

You can use rhubarb in recipes that you would likely also use pineapple. This sauce would be great on pork too.

Check out what the recipes that the FMP food bloggers came up with here. Happy Monday!

Braised Chicken in Sweet and Sour Rhubarb Sauce (adapted from Mark Bittman’s Food Matters Cookbook)

Serves 4

Prep/Cook Time: 30 minutes

Ingredients

  • 1 cup of diced rhubarb (frozen or fresh)
  • juice of 2 oranges (1/2 to 3/4 cup)
  • 2 tablespoons of honey (or more depending on level of sweetness you prefer)
  • 1/2 to 1 teaspoon of fine ground black pepper
  • 1/4 teaspoon of ground ginger
  • 1 tablespoon of coconut oil (or grapeseed oil)
  • 1 medium onion, chopped in 1/2-inch pieces
  • 1 lb of chicken breasts, cut in 1-inch pieces
  • salt and pepper to taste
  • chopped cilantro

Instructions

  1. Place rhubarb, juice of oranges, and honey in a small saucepan and heat over medium-low heat. Stir often and cook for 5 to 10 minutes (do not scorch) or until rhubarb appears mushy and pureed. Stir in ginger and pepper. Remove from heat.
  2. Meanwhile in a medium skillet, heat coconut oil over medium heat. Add onions once coconut oil is completely melted. Saute onions for 5 minutes, or until slightly brown and transluscent. Add chicken and cook until browned on all sides.
  3. Add rhubarb sauce, lower heat to low, and simmer chicken and rhubarb sauce for a 5 minutes, stirring often. Add salt and pepper to taste. Serve topped with cilantro.

Coq au Vin with Vegetables

It’s Monday and another edition of the Food Matters Project.  I’m a little late in my post, but it has been hard to get behind the stove and cook when it is soooo gorgeous outside. We had nearly six days of straight drab and dreary rain and then the sun popped out this weekend in full spring fashion.  It was grill action time!

Unfortunately, that means I put off my Vegetables au Vin with Coq recipe from the FMP. It was chosen by Evi + Sam of the Fifth Floor Kitchen blog. It is the chicken and veggie version of Julia Child’s Beef Bourginogn, my ALL TIME FAVORITE INDULGENCE DISH. Although I love love love that dish, it takes a friggen lifetime to make.

Mark Bittman’s Vegetables au Vin with Coq takes a fraction of that time, clocking in at 40 minutes to an hour. In his recipe, he uses eggplants, mushrooms, onions, and green beans along with chicken and braised in a red wine sauce. I love recipes that allow me to drink while I cook.

My version uses a whole organic farm raised chicken ($2.50 to $3.50 per pound) which is cheaper than buying organic chicken breasts ($6 to $7 per pound). Use a good pair of kitchen shears to cut the bird up into 4 pieces (breasts and thighs). Save the wings, neck, back, and other parts to use in making homemade chicken stock by throwing those parts in a crockpot, filling with water, adding some carrots or celery for extra flave, and turning on low to cook overnight. Bam…homemade stock.

Instead of eggplant, I stuck with carrots, celery, mushroom, onions, green beans, and spring peas. Because green beans and spring peas do not take long to cook, I add them at the very end so that they aren’t mushy. Use a fruity wine, such as Pinot Noir.

Coq a Vin with Vegetables (adapted from Mark Bittman’s Food Matters Cookbook)

Ingredients

  • 2 tablespoon of olive oil
  • 1 whole chicken, cut into 4 pieces
  • 1 onion, chopped
  • 1 lb baby bella mushrooms, roughly chopped
  • 2 celery stalks, chopped
  • 2 medium carrots, chopped
  • 3 garlic cloves, minced
  • 2 cups chicken stock (preferable homemade)
  • 2 cups fruity red wine (such as pinot noir)
  • 2 bay leaves
  • 1 tablespoon fresh thyme, chopped
  • 2 tablespoon fresh parsley, chopped
  • 1 tablespoon sweet cream organic butter
  • 1 teaspoon fresh cracked pepper
  • 1 lb frozen green beans
  • 1 cup of frozen green peas

Instructions

  1. In a Dutch oven or large pot, add 1 tablespoon of olive oil and heat over medium-high heat. Add the chicken, turning and rotating as necessary. Once all sides are browned, remove the chicken from the pan.
  2. Add the rest of the olive oil, onions, carrots, celery, and mushrooms. Cook the vegetables for about 15 minutes, stirring occasionally, until they being to turn brown. Stir in the garlic and sauté for 1 to 2 minutes.
  3. Add the stock, wine, bay leaves, and herbs. At this time, return the chicken to the pot. Bring the liquid to a boil, then lower the temperature and allow it to cook for about 20 minutes. The chicken should be cooked through at this point, if not, cook for another 5-10 minutes.
  4. Remove the chicken from the pan and add butter to the liquid. Allow it to cook until it is reduced by half, and becomes saucy and thick. Add the green beans and peas. Cook for about 5 minutes. Sprinkle in pepper, or any additional salt. Remove the bay leaves.
  5. If you’re making this dish ahead, refrigerate it at this point. If you’ll be eating it soon (or when you’re reheating), then add the chicken back into the pot and allow to warm up for about 5 minutes. Garnish the dish with parsley when serving.

Curried Tomato and Sweet Potato Soup

It is SPRING! Hope you had a great weekend.

Happy Food Matters Monday. Today’s fabulous recipe is brought to you by the FMP project. The original recipe, Curried Tomato Soup with Hard Boiled Eggs, was chosen by Joanne of Eats Well With Others. This is a simple and delicious version of tomato soup.

Although tomatoes are definitely not in season right now, I luckily still had two mason jars of canned tomatoes in my cellar that I had canned this past summer.  You can easily substitute regular canned tomatoes.

The original recipe called for 3 cups of tomatoes, 2 potatoes, cauliflower, and hard boiled eggs.  Sorry, but the hard boiled eggs on top of a soup kind of freaked me out. If you want to give it a go, try it. I tried to poach an egg in the soup, and it turned out ok. But I probably wouldn’t do it again…but that’s just me.

My version has sweet potatoes that I had stored from the market and a mix of kale and swiss chard from my garden.  This just goes to show you how versatile this recipe, and most recipes, are. You can substitute whatever you have on hand or whatever is in season for most vegetables.

Curry powder and sweet potatoes are a match made in heaven!

Adding coconut milk gives his soup added creaminess.

I also pureed the soup using an immersion or hand blender which makes this soup ever more creamier. You can leave it chunky, if you prefer.

You could also reduce the amount of water in the recipe (use 1 cup instead of 3) and serve this over basmati rice!

Curried Tomato and Sweet Potato Soup (Adapted from Mark Bittman’s Food Matters Cookbook)

Time: 30 minutes

Serves: 4

Ingredients:

  • 2 tablespoons coconut oil (or vegetable oil)
  • 1 medium onion, diced
  • 1 garlic clove, minced
  • 1/2 teaspoon ground ginger (or 1 tablespoon of fresh grated ginger)
  • 2 tablespoons of curry powder
  • 1 teaspoon ground cumin
  • 1/2 teaspoon red pepper flakes
  • 1/2 teaspoon honey
  • 2 sweet potatoes, peeled and diced
  • 1 medium carrot, diced
  • 1 cup lite coconut milk
  • 3 cups vegetable broth or water
  • 3 cups of diced tomatoes (2 cans) with juice
  • 1 bunch of kale (1 to 2 cups), ribs removed and sliced in 1 inch ribbons
  • 4 tablespoons of chopped cilantro
  • salt and pepper to taste

Ingredients:

  1. Heat coconut oil in a heavy dutch oven over medium-high heat until melted. Add onions and cook for 3 to 5 minutes or until onions are translucent. Add garlic, ginger, curry powder, cumin, and red pepper flakes. Cook for an addition 1 minute or until spices become fragrant.
  2. Add diced sweet potatoes and carrot. Stir and cook for 2 minutes, coating potatoes.
  3. Add coconut milk, vegetable broth (or water), and diced tomatoes with juice. Bring to a boil. Lower heat and simmer with lid on pot for 15 to 20 minutes or until potatoes are tender.
  4. Use an immersion blender (hand blender) or a regular blender (or food processor) to puree most of the soup. If using an immersion blender, place the immersion blender into the pot and puree the soup until your get the desired consistency. If you are using a regular blender, remove a few cups at a time and puree in batches. Be careful to not splatter the hot soup. Add the pureed soup back to the pot.
  5. Add kale and cook over medium-low heat for an additional 5 to 10 minutes or until kale is tender. Add salt and pepper to taste.
  6. Ladle into 4 bowls. Top with chopped cilantro.

Warm Hummus Dip with Sweet Potato Chips

Today, I am going to share some recipes that are big money savers and healthy.  You will learn to cook dried beans, prepare a dip from those beans, and make sweet potato chips (from scratch) to transport that bean dip to your mouth.  This is, of course, Food Matters Monday and the main recipe (warm hummus) is brought to you by the Food Matters Project.

Number 1COOK BEANS FROM SCRATCH. Seriously. Easy and cheap. Yes, canned beans are cheap anyways, but cooking your own is cheaper, tastier, and healthier (no added salt and BPA from cans). One pound of dried beans (about 2.5 cups) will make over 6 cups of cooked beans. One pound of dried beans costs the same as one can (less than 2 cups) of beans.  Rinse and pick through 1 pound of dried beans (any variety), removing rocks and bad beans. Soak the beans overnight (at least 8 hours). Drain and rins, refilling the crockpot with the soaked beans and water (no salt) until the water is about 1 inch over the beans.  Cook in your crockpot on low all day while you are at work (8 to 10 hours).  Now, you will have a crap ton of beans. Separate the beans in freezer safe ziplock bags, placing 2 cup portions in each bag. Freeze. Pull them out when you need them in a dish, soup, or dip.

Number 2MAKE YOUR OWN HUMMUS. Stop buying store bought dips. Now. After you have made your own huge pot of garbanzo beans following the directions above, throw three cups of those beans, some of the cooking liquid, two heaping tablespoons of tahini (sesame paste), two tablespoons of olive oil, salt to taste, and several tablespoons of lemon juice into a food processor and whirl until smooth. Done. Hummus can be served both warm or cold. Really. Try it warm. You’ll dig it.

Hummus can be spiced a meriad of ways: roasted garlic, basil, roasted red peppers, curry powder…. I chose to separate my hummus into two dishes, adding smoked paprika to one batch and siracha garlic chili paste to the other. Following Mark Bittman’s recommendations in “Hummus Served Hot”, I warmed the paprika hummus over the stove for a new spin. I loved the creaminess that it added.

Number 3MAKE YOUR OWN CHIPS. I chose to do some sweet potato chips, seasoned with cumin, smoked paprika, and sea salt. So so so so addictive and delicious. They were great alone or dipped in the hummus. It is best to have a mandoline slicer to slice your vegetable about 1/8 inch thick. Also, another tip, keep the chips in a single layer on the baking sheet to keep them from getting soggy. They will crisp up much better when they are not crowded (speaking from experience).

So, branch out and try to make these things from scratch. Best treat in the world. You deserve it.

Check out Naturally Ella for the featured FMP recipe of Hummus Served Hot. Also, don’t forget to stop by the FMP website to see the other delicious spins on this recipe. Have a great Monday!

Warm Hummus Dip with Sweet Potato Chips (adapted from Mark Bittman’s The Food Matters Cookbook)

Hummus Ingredients

  • 3 cups of garbanzo beans (chickpeas)
  • 1/4 cup of reserved cooking liquid from beans (or water)
  • 2 heaping tablespoons of tahini (sesame paste)
  • 2 tablespoons of olive oil
  • 3 tablespoons of lemon juice
  • 1/2 to 3/4 teaspoon of sea salt

Hummus Instructions:

  1. Combine all ingredients in food processor. Process until smooth. Add salt to taste.
  2. Optional mix ins: Saute garlic in olive oil and add garlic-flavored olive oil. Add 1/2 tablespoon smoked paprika.

Sweet Potato Chips Ingredients:

  • 2 sweet potatoes, peeled and sliced on a mandolin slicer 1/8 inch thick
  • 1 tablespoon olive oil
  • 1/4 teaspoon smoked paprika
  • 1/8 teaspoon cumin
  • 1/8 teaspoon cayenne (optional)
  • 1 teaspoon of salt

Sweet Potato Chips Instructions:

  1. Preheat oven to 400 F.
  2. Combine sliced sweet potatoes and remaining ingredients in a medium bowl. Toss until all are covered with seasonings and olive oil.
  3. Place sweet potato chips in a single layer on two nonstick baking sheets, lined with parchment paper or sprayed with nonstick spray.
  4. Place on middle and top racks. Cook for 25 minutes, rotating sheets half way through cooking process.
  5. Remove from oven and allow to cool for 5 minutes. Sprinkle with salt, if necessary.

Seared Bean Sprout Salad with Sesame-Orange Dressing

What is a bean sprout? It’s the sprout from a germinated mung bean. Bean sprouts are usually used in asian cooking and provide a bright crunchy texture to a stir fry dish. I originally intended on sprouting my own mung beans (which is really easy), but I didn’t have time. It takes 5 to 7 days of soaking the mung beans in water (changing every 12 hours). But you can easily find bean sprouts at your local grocer or asian market.

Today’s recipe is brought to you by the Food Matters Project, which is a group of foodie bloggers dedicated to cooking our way through Mark Bittman’s Food Matters Cookbook. The original recipe was chosen by Dominica of Food Wine Love and was supposed to be Seared Bean Sprouts with Beef and Sesame-Orange Sauce. 

Although this looked both easy and delicious, I was on my way to a dinner party last night and needed to bring a side dish. I decided to turn the recipe into a bright and colorful salad, adding some shredded carrots, diced cucumber, and chopped cilantro. It was really easy to throw together and was definitely unique.

Check the FMP website to see what the other foodies chose to do with this recipe!

Seared Bean Sprout Salad with Sesame-Orange Dressing

Makes: 8 servings (as a side dish)

Salad Ingredients

  • 1 Tablespoon sesame seeds
  • 1 Tablespoon canola oil or coconut oil
  • 1 lb bean sprouts, rinsed
  • 1/4 teaspoon salt
  • 1 bunch of scallions, green and white parts chopped
  • 2 carrots, shredded
  • 1 cucumber, diced
  • 1/4 cup cilantro, chopped

Dressing Ingredients

  • 2 oranges, juiced
  • zest of 1/2 orange
  • 1/2 Tablespoon fresh ginger, minced or grated
  • 2 Tablespoon soy sauce
  • 1 teaspoon sesame oil
  • 1 teaspoon tahini paste
  • 1 Tablespoon rice wine vinegar
  • 1 Tablespoon honey

Instructions:

  1. Add 1 tablespoon of sesame seeds to a DRY skillet. Cook on medium heat for 3 to 5 minutes, lightly toasting sesame seeds. Remove and set aside.
  2. Place 1 tablespoon of oil in skillet and heat over medium heat. When oil is hot (not smoking), toss in bean sprouts and salt. Stir fry for 3 to 5 minutes, or until lightly browned. Remove and place in colander. Run cold water over sprouts to stop them from cooking. You want them to still be crips.
  3. Add the sprouts, cucumber, shredded carrot, cilantro, and scallions to a medium serving bowl.
  4. Combine all dressing ingredients into a mason jar or lidded jar. Shake well. Pour over salad and stir.  Chill until you are ready to serve it. Toss before serving and sprinkle with toasted sesame seeds.

Broccoli, Fig, and Goat Cheese Pasta

Happy Food Matters Monday! The fourth week of the Food Matters Project brings a very interesting recipe.

I adapted this recipe from the Food Matters Cookbook. The original recipe was Baked Rigatoni with Brussel Sprouts, Figs, and Blue Cheese chosen by Marcia of Twenty by Sixty. I have to admit that I was very worried about this dish. I mean the combo of brussel sprouts, figs, AND blue cheese was just a bit on the odd side.

Number one, I’m not a fan of brussel sprouts OR blue cheese. But, I do looooove figs, both dried and fresh. A note on figs. The most popular dried fig is the black mission fig, but any variety would taste great. I used dried Conadria Figs from Trader Joes. Dried figs are also a great snack and a fabulous source of fiber.

My variation on the recipe was to use broccoli and goat cheese instead of brussel sprouts and blue cheese. Love!

This really was DELICIOUS. An inspired dinner that was perfect and spot on. The original recipe calls for baking the pasta, but I found that this dried out the pasta dish because the goat cheese ends up just soaking into the pasta instead of coating it like you would want. I personally liked it without baking it.

The other major bonus to this recipe is that you can throw it together in under 20 minutes. I cooked the broccoli in a steamer placed over the pot of boiling pasta. Double duty!

This dish just proves to me that Mark Bittman truly knows how to make food matter. If you are curious at other variations, check out the original recipe by Marcia at Twenty by Sixty and other adaptations by the rest of the FMP food blogging gang.

Broccoli, Fig, and Goat Cheese Pasta

Note: The cheese is easily swappable for what you have on hand, as long as it is easily meltable. Also instead of figs, apples or pears would also work well.

Serves 4 to 6

Ingredients

  • 8 oz whole wheat pasta
  • 1 head of broccoli
  • 1/2 cup of dried figs, chopped
  • 1/2 cup goat cheese, crumbled
  • 1/4 cup parmesan cheese, grated
  • 1 tablespoon olive oil
  • salt and cracked pepper
  • red pepper flakes (optional)
  • sliced roasted almonds or pine nuts (optional)

Instructions

  1. Bring pot of salted water to boil. Place pasta in boiling water. Cook for about 6 minutes. While pasta is cooking, place broccoli in a steamer basket and place over pot of boiling water. Steam for about 3 to 5 minutes or until broccoli becomes bright green. Do not overcook. Remove from steaming and run cold water over the broccoli to stop the cooking process.
  2. Drain pasta, reserving about 1/4 to 1/2 cup of pasta cooking liquid.
  3. Combine pasta, broccoli, figs, goat cheese, parmesan cheese, and olive oil back in the same pot that you cooked the pasta. Stir and cook on low heat until cheese melts, adding back pasta water as needed a tablespoon at a time. Pour into serving bowl and top with slivered toasted almonds or pine nuts.