Spicy Roasted Red Pepper and White Bean Spread

I love versatile things, like a great cardigan, real vanilla ice cream, pita bread, and mason jars.  These things can take on multiple functions and are a great base. That’s where today’s recipe fits in…a great base or launching point for many other recipes.

Today’s featured recipe is the third recipe from the Food Matters Project, a group of food bloggers focused on cooking through the Food Matters Cookbook by Mark Bittman. The original recipe, featured by Heather of girlichef, is Roasted Red Pepper and Walnut “Pesto”. The original recipe purees 8 roasted red peppers, walnuts, olive oil, and basil to form a pesto-like spread. I decided to do a variation and replace half of the roasted red peppers with cannelini beans and use almonds instead of walnuts (because that is what I had on hand). I wanted to move this recipe more towards hummus and add a kick with red pepper flakes.  The red pepper flakes help balance out the sweetness that occurs from the red peppers. I think the quantity of red peppers is a little much and could be reduced to two peppers.

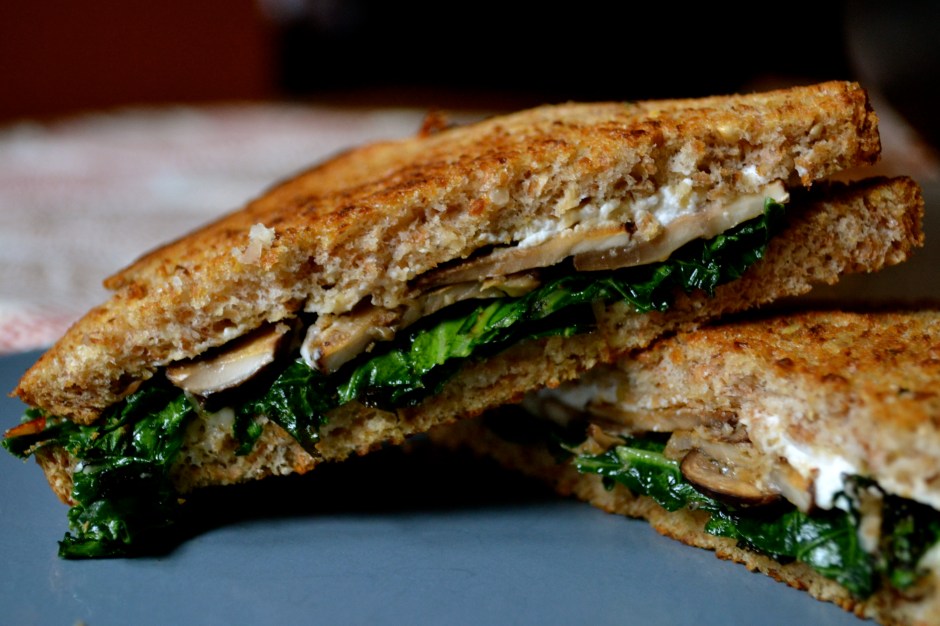
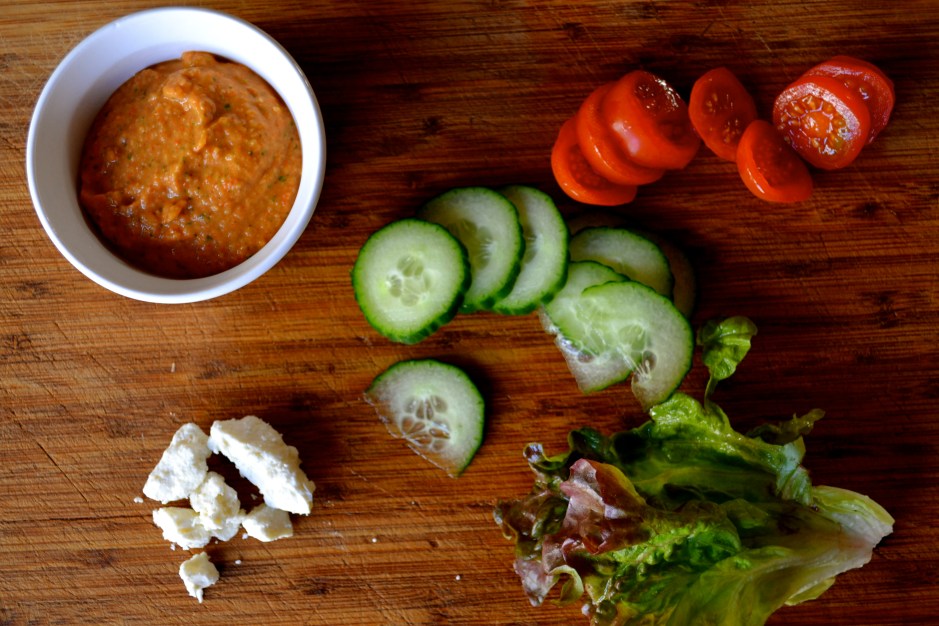
This spread ends up being like the little black dress of condiments. I used it as a sandwich spread to amp up my veggie sandwich. And because this recipe makes quite a large batch, I had enough left to use as a pesto-like base to a pasta dish with roasted tomatoes, goat cheese, and extra basil (sorry no pictures of that awesomeness).

The primary component of this recipe is roasted red peppers. You can use jarred roasted red peppers, but it is also really easy to roast your own. Simply place them red peppers (whole) on a foil lined roasting pan. Turn your broiler on high or heat your oven to 450F. If using the broiler, the processes will only take about 15 minutes, but make sure your turn the peppers every 4 to 5 minutes, browning on all sides (see picture below). If you decide just to roast them in an oven preheated to 450F, this process will take about 45 minutes. After the skin is slightly charred, wrap in the aluminum foil from the pan and allow to sweat and cool. Unwrap after at least 10 minutes or until cooled off. Run the peppers under cold water and peel the skin off of the peppers. Remove the tops and deseed. And voila, you have roasted red peppers! These are good on pizza, sandwiches, hummus, pasta dishes, and so much more!

If you are intested in other variations on the FMP recipe, check the main website here.

Spicy Roasted Red Pepper and White Bean Spread (adapted from The Food Matters Cookbook by Mark Bittman)

Note: I liked this spread on sandwiches and as a dip for pita chips. It also works well tossed onto fettucini with some goat cheese and roasted tomatoes. The possibilities are pretty limitless.

Ingredients

  • 2 roasted garlic cloves (roast at the same time that you roast the red peppers)
  • 3/4 cup roasted almonds (or walnuts)
  • 1 15 oz cannelini beans (2 cups)
  • 3 roasted red bell peppers, skinned and deseeded
  • 1/2 cup fresh basil or parsley
  • 1 to 2 Tablespoons olive oil
  • 1 Tablespoon lemon juice
  • 1/4 teaspoon salt
  • red pepper flakes to taste

Instructions

  1. Roast red peppers as described above or use jarred roasted red peppers.
  2. Place garlic in food processor and pulse. Add almonds and pulse until a fine meal is formed.
  3. Add beans, basil, red peppers and puree. Drizzle olive oil and lemon juice into the puree. Pulse the food processor until all is combined. Add salt and red pepper flakes to taste.

Healthy Chocolate and Banana Pudding Parfaits

This weekend I had a major pudding craving but did not want to resort to making the boxed variety (bleh) or standing over a stovetop trying to make it from scratch with lots of eggs, cream, and chocolate.  So began my search for both a healthy and easy pudding.

I found this interesting recipe for pudding in Mark Bittman’s Food Matters Cookbook. He uses tofu (stop rolling your eyes) instead of milk.  The recipe basically takes a block of firm tofu and divides it in two portions. Half of the tofu is blended with melted chocolate, sugar syrup, and vanilla. The other portion of tofu is blended separately with bananas, sugar syrup, and vanilla.  The food scientist in me was seriously curious. Would it be creamy? Would it be chocolaty? Would it be soy-y? The verdict…YES. YES. and not really.

The chocolate pudding had a slight soy aftertaste, but not near as bad as the aftertaste associated with soy milk. The flavors and thickness of both puddings improved as they chilled in the fridge. My husband liked the banana pudding the best. I liked them both, but actually liked the chocolate one a bit better (even though I’m not a big chocolate fan) only because it was slightly more firm and more “pudding-ish”.

Allow the two puddings to chill for ate least 30 minutes before making the parfaits. 

Adaptations: Next time I think I may replace the sugar syrup with almond milk and maple syrup or honey. I am also dreaming about a butterscotch variation….I will keep you posted on the results of the experiment. If you want to make _all_ chocolate or _all_ banana, then double the ingredients of the flavor that you want and do not include the ingredients of the one that you do not want.

 Healthy Chocolate and Banana Pudding Parfaits (serves 6), slightly adapted from Mark Bittman’s Food Matters Cookbook

Ingredients

  • 1 lb organic silken tofu (divided), drained
  • 1/2 cup sugar (I used turbinado sugar which gave a bit of a carmel flavor)
  • 1/2 cup water
  • 1/2 cup semi-sweet or bittersweet chocolate chips, melted
  • 1/2 teaspoon vanilla extract, divided
  • 2 ripe bananas
  • salt

Instructions

  1. Place sugar and water in a small saucepan. Heat to boiling over medium heat. Stir constantly until the sugar is completely dissolved. Remove from heat and allow to cool for at least 10 minutes.
  2. Drain the tofu and divide in half. Place half of the tofu with the melted chocolate, half of the vanilla, and half of the sugar syrup in a food processor or blender. Process until smooth. Add a dash or two of salt. Blend in and taste.  Place chocolate pudding in a bowl with a lid. Refrigerate for at least 30 minutes.
  3. Clean out the bowl of the food processor.
  4. Place the other half of the tofu in the food processor along with the bananas, the remaining vanilla extract, and the remaining sugar syrup. Puree until well blended. Add a dash or two of salt. Blend in and taste. Place banana pudding in a separate bowl with a lid. Refrigerate for at least 30 minutes.
  5. Layer pudding in small individual glasses with chocolate on the bottom and banana on the top.

Homemade Microwaved Seasoned Popcorn – BBQ Style

I love love love to snack. I’m a big fan of all things dippable and munchable. I also love bbq, which is especially great here in KC. So popcorn seasoned with my favorite BBQ rub is great snack item for me during the day when I need a good salty and spicey fix. I was pretty excited to find out that the second recipe in the Food Matters Project was Seasoned Popcorn, chosen by CookieandKate.

Years ago to save money, I quite buying bagged popcorn and started buying whole unpopped kernel corn. I began popping my own popcorn in a glass container or small brown paper bag (lunch-size), saving oodles of money and eliminating preservatives. Also, I had a tendency to mow down an entire massive bag of butter-laden popcorn, only to find myself incredibly thirsty with orange-stained fingers and unaware that I had ingested 6-servings in one sitting.

So if you are buying packages popcorn…stop! Popping your own is so simple, easy, and you can change up the seasoning to suit your snacking desires. Use 2 tablespoons of unpopped corn per person. Place the corn kernels and salt in a brown paperbag and fold over a few times. Microwave on high for about 3 minutes, or until there are 4 seconds between pops. Open the bag carefully because steam will build up.

Along with BBQ seasoning, I also like to top popcorn with shredded parmesan cheese, cracked pepper, and salt. I spray the popcorn with nonstick spray to help the topping stick. You can also melt some butter and pour over…so much better than butter flavor!

Check out the featured recipe for Seasoned Popcorn by Kate of CookieandKate. Go to the FMP website to see other great ideas for popcorn seasonings!

Homemade Microwaved Seasoned Popcorn (serves 2), from The Food Matters Cookbook by Mark Bittman

Note: The seasonings for popcorn can be limitless. For a sweet fix, top with cinnamon sugar. For a spicy kick, try curry powder. Cheesy? go for parmesan cheese or nutritional yeast (found in most health food stores, giving a good cheesy flavor).

Ingredients

  • 1/4 cup kernel corn
  • 1/4 teaspoon sea salt
  • topping of choice (shredded parmesan, cracked pepper, cinnamon sugar, bbq seasoning..etc).

Instruction

  • Place popcorn and salt in paperbag or glass lidded container. If in a paperbag, fold the top over several times.
  • Microwave on high for 3 to 4 minutes (or until there are 4 seconds between pops).
  • Be careful when opening the container because steam will have built up. Toss the popcorn with the seasonings.

Winter Thai Curry Stew

I have a confession. Some people buy shoes. Some people eat chocolate. Me? I’m weird….I buy food. I love going to a great market and searching out new items or new vegetables. Recently, I stumbled upon a huge and beautiful rutabaga at the market. I’ve never had one, so I decided that she was coming home with me along with some parsnips, carrots, and kale.

Winter root vegetables are great to have on hand because they can store at room temperature or down in your basement for 6 months!  So even if I don’t exactly know what I am going to do with them when I buy them (like the rutabaga), I know that they will wait for me for until the inspiration occurs. Plus, these winter veggies are full of nutrients such as vitamins A and C, calcium, folate, and potassium (just to name a few). Because of all these nutrients, these vegetables are great for warding off cold-weather infections.

So one night the inspiration came, I threw together several root vegetables that I had on hand along with some coconut milk to make this AMAZING stew. Coconut milk is a great staple to keep on hand in your cabinet. It can take any meal and make it an 11. And let me tell you my friends…this stew is a 12! Jam on it. Make it. Love it. Hoard it.

Winter Thai Curry Stew (serves 4 to 6)

Note: The vegetables in this stew (like most soups/stews) are interchangeable and are not set in stone. I simply used what I had on hand and what is currently in season….roots. This would be great with regular potatoes, sweet potatoes, and even broccoli. In the summer, use summer squash, green beans, and spinach. The cooking times will be reduced for these spring and summer vegetables because they are not as hearty as winter vegetables.

Ingredients

  • 1 Tablespoon of coconut oil or olive oil
  • 1 medium onion, diced
  • 2 garlic cloves, minced
  • 1/2-inch piece of fresh ginger, peeled and minced
  • 1 Tablespoon of Thai curry paste (I used green curry paste)
  • 3 to 4 cups of diced vegetables (I used 1/2 rutabaga [peeled and cubed], 1/2 butternut squash [peeled and cubed], 2 parsnips [sliced thin], and 2 carrots [sliced thin])
  • 6 to 7 cups of low sodium vegetable or chicken broth or water (or combination)
  • 1 teaspoon of low sodium soy sauce
  • 1 to 2 cups of diced kale (1-inch strips), hard stems removed
  • 1 cup of reduced fat unsweetened coconut milk
  • 1 teaspoon honey  (optional)
  • salt and pepper to taste

Instructions

  1. Heat oil  in dutch oven over medium-high heat. Add onions and cook for about 5 minutes, or until translucent. Add garlic, ginger, and Thai paste, stirring constantly for an about 1 minute.
  2. Add vegetables, broth, water, and soy sauce. Bring to a boil. Reduce heat until the stew is simmering. Cover and cook until vegetables are tender. For root vegetables, this took about 20 minutes. If you are using spring or summer vegetables, this will take only 10  minutes.
  3. After vegetables are tender, add kale, coconut milk, and honey. Cook for about 3 to 5 minutes, or until kale is tender. Add salt and pepper to taste.

Honey Chipotle-Glazed Roasted Root Vegetables

I have been reading through Mark Bittman’s Food Matters Cookbook. It is a large (almost overwhelming) compilation of over 500 recipes that are focused on incorporating more plant-based meals into your diet, reducing meat intake, and eliminating processed foods. If you have never heard of Mark Bittman, I recommend checking him out. He is a seasoned chef that has several cookbooks (including “How to Cook Everything”, “How to Cook Everything Vegetarian”), has a new York Times food column, and is a featured chef in several magazines, including Runner’s World (which is where I first discovered him and his yummy sweet potato muffins).

His recent cookbook is easy to read and leaves a lot of room for personal interpretation. So when I found out about The Food Matters Project, I was pumped to join in on the fun. The FMP is a compilation of several food bloggers that will be tackling a recipe from the cookbook each week. The FMP has a listing of the participating food bloggers and the scheduled recipes that we will be preparing. There will be a featured blogger each week and the rest of us will be doing our interpretations of the recipe, posting on our individual websites. Check in weekly to see the updates.

Today is the official launch of the project. The first recipe from the cookbook is “Chipotle-Glazed Squash Skewers” prepared by Sarah of 20somethingcupcakes. I decided to do a variation by skipping the squash skewers (say that 50 times fast) and applying the glaze to a variety of root veggies, such as parsnips, carrots, and butternut squash.

The result….AWESOME. Roasting the vegetables brings out a carmelized flavor. These are a great alternative to fries. They also would be great served over rice or quinoa, or even with some cheese in a quesadilla! Also, the honey-chipotle glaze was so delicious. It would be wonderful on a variety of veggies, salmon, or chicken.

For the original recipe (Chipotle-Glazed Squash Skewers), check out Sarah’s blog. To see the other participating food bloggers interpretations, check here!

Honey Chipotle-Glazed Roasted Root Vegetables

Ingredients

  • 1 1.5 to 2 lb butternut squash, skinned and cut into 1/2-inch thick by 2-inch long pieces (like french fries)
  • 2 medium parsnips, skinned and cut uniformly like the butternut squash
  • 2 medium carrots, skinned and cut uniformly like the butternut squash
  • 1/4 cup olive oil
  • 1 to 2 chipotle peppers in adobo sauce, reserving 2 tablespoons of adobo sauce (freeze remaining peppers from can)
  • 1 tablespoon honey (or maple syrup)
  • 1 clove of garlic, minced
  • salt and pepper
  • lime and cilantro (optional)

Instructions

  1. Preheat oven to 400 F. Spray a roasting pan with nonstick spray.
  2. Combine olive oil through garlic in a small bowl. Stir well. Start with one chipotle pepper. Taste the glaze, if you want it spicier, add another one.
  3. In a medium-large bowl, toss the diced root vegetables and the glaze together. Spread onto roasting pan in an even layer. Sprinkle with salt and pepper.
  4. Roast for 50 minutes. Remove and enjoy warm. Sprinkle with fresh squeezed lime and cilantro, if desired.

Kale and Mushroom Grilled Cheese Sandwich

I love cheese. I especially love MELTED cheese. So a grilled cheese sandwich is one of my all time favorite sandwiches…plus it is super quick. But think outside the box of your normal buttered bread and american cheese. I love melted goat cheese…creamy and tangy. I also threw on some raw milk cheddar.

I’m always looking for a way to sneak veggies into things. It’s a sick obsession that I have. My other obsession being ketchup, but that’s another story. Kale is fresh green that is available in the winter when spinach is scarce. If you boil kale, it will become soft. However, if you roast or grill kale, it takes on a new consistency…crispy and crunchy. To a sandwich, crisp kale adds a great change. But if you don’t have kale, feel free to mix up the veggies with what you have on hand or with what is in season.

Kale and Mushroom Grilled Cheese Sandwich (serves 1)

Ingredients

  • whole grain bread
  • handful of kale
  • baby bella mushrooms, sliced
  • dijon mustard
  • crumbled goat cheese
  • raw milk white cheddar
  • salt and pepper

Instructions

  • Spray a griddle pan with nonstick spray.  Spread butter on both sides of bread or spray both sides with nonstick spray.
  • Place veggies on griddle. Mushrooms and kale will take about 5 minutes. Place the bread on the griddle pan. Toast the bread about 1 to 2 minutes. Flip bread. Spread the toasted side with dijon mustard and then sprinkle the cheese on top. Put the hot sautéed veggies on top of the cheese. Salt and pepper. Top with the other slice of bread. Toast the sandwich on both sides for another minute or so.

Peanut Butter Banana Muffins

Now, I looooove banana bread, but sometimes you need a bit of a change. Peanut butter meet banana. I dig these in the morning, in the afternoon, a snack before a run, a night snack…. Yes, make these puppies. If you like sweet muffins, feel free to increase the honey or sugar.

Peanut Butter Banana Muffins (serves 12)

These muffins are adapted from Mark Bittman’s recipe for muffins in “How To Cook Everything” and the “Food Matters Cookbook“. And inspired by Joy the Baker’s recipe for Peanut Butter Banana Bread.

Ingredients

  • 1 cup whole wheat pastry flour
  • 1 cup all purpose flour
  • 1/2 teaspoon salt
  • 3 teaspoons baking powder
  • 1/2 cup honey (or brown sugar)
  • 2 to 3 ripe bananas, mashed (about 1 cup)
  • 1/3 cup milk
  • 1 egg, slightly beaten
  • 3 tablespoons butter, melted
  • 1/4 cup organic all natural peanut butter
  • 1/4 cup chopped peanuts (optional)
  • 1/4 turbinado sugar (optional)

Instructions

  1. Heat oven to 375 F. Line 12-cup muffin tin with muffin liners.
  2. Combine dry ingredients in large bowl. Whisk till combined. Set aside.
  3. Combine wet ingredients (honey through egg) in medium bowl. Add butter and peanut butter. Stir until all ingredients are incorporated.
  4. Make a well in the middle of the dry ingredients. Add wet ingredients to the dry ingredients. Mix with wooden spoon or spatula until just combined. Stir in peanuts, if using. Sprinkle the tops of each muffin with turbinado sugar.
  5. Fill muffins 3/4 full. Bake for 20 minutes, or until toothpick inserted in middle of muffin comes out clean. Tops should be lightly browned. Remove from oven and allow to cool for 5 minutes. Cool on wire rack. Eat warm!!!!

The INfamous Crack Pie

This dessert isn’t just famous, it is IN-famous. This dessert is also FAR from healthy, but it is divine. And once you have had one bite, you can easily become addicted…hence the name. SO be careful and don’t say I didn’t warn you! And with a name like Crack Pie, I totally was intrigued and wanted to make this as a birthday surprise for my dear sweet-toothed friend, Marlee.

It has an oatmeal cookie crust and oooooooey gooooooey buttery custardy sweet middle. You will either pass out from sugar overload or come crawling back for more. Personally, I do not have a major sweet tooth and was only able to handle half of a slice, but my husband gladly ate his slice and finished off mine as well. I think I might have to enroll him in a 12-step group to stop his cravings.

This pie is the brain child of the pastry chef Christini Tosi at Momofuku Milk Bar in New York. It makes two 10-inch pies (I used 9-inch pies and adjusted the cook time to take into account the thicker filling). It can be kept refrigerated covered for up to 5 days or even frozen for up to a month.

Can you tell which two eggs in the above picture are farm fresh from cage free chickens? I only had two left and had to supplement with store-bought eggs.

Be careful if you make this recipe….it’ll make people fall in deep smit for you.

Crack Pie (slightly adapted from this recipe), serves 16

Ingredients

Oat Cookie for the Crust:

  • 8 tablespoons butter, room temperature
  • 1/3 cup light brown sugar, packed tightly
  • 3 tablespoons granulated sugar
  • 1 egg yolk
  • 1/2 cup flour
  • 1 1/2 cup rolled oats
  • 1/8 teaspoon baking powder
  • Pinch of baking soda
  • 1/2 teaspoon kosher salt
  • Cooking spray
Pie Crust:
  • Crumbled oat cookie from above
  • 1/4 teaspoon salt
  • 4 tablespoons butter, melted
Pie Filling:
  • 1 1/3 cup granulated sugar
  • 2/3 cup light brown sugar, packed tightly
  • 1/4 cup milk powder
  • 1 tablespoon ground cornmeal
  • 1 1/2 teaspoon kosher salt
  • 16 tablespoons butter, melted
  • 3/4 cup heavy cream
  • 1/2 teaspoon vanilla extract
  • 8 egg yolks*

Insructions:

(Make sure that the egg whites are completely removed from the egg yolks. According to Christina Tosi, any amount of egg white in the mixture will ruin the consistency of the dense, custardy pie filling. The easiest, and best way to separate an egg is to use your hands, as shown in the picture below. Doing this by hand allows you to feel whether all of the egg white has been separated and removed from the yolk.)

To make the oat cookie for the crust:

  1. Preaheat oven to 350 degrees F.
  2. Combine the butter and sugars in the bowl of a stand mixer fitted with the paddle attachment and cream together on medium-high for 2-3 minutes, until fluffy and pale yellow in color. Scrape down the sides of the bowl with a spatula. On low speed, add the egg yolk and increase the speed to medium-high and beat for 1-2 minutes, until the sugar granules fully dissolve and the mixture is a pale white.
  3. Mix flour, oats, baking powder, baking soda, and salt in a separate medium bowl. Add the flour mixture to the butter and sugar mixture and mix on low speed. Mix for 1 minute or until the dough comes together and all dry ingredients have been incorporated. The dough will be a slightly fluffy, fatty mixture in comparison to your average cookie dough. Scrape down the sides of the bowl.
  4. Spray a cookie sheet with cooking spray. Place the cookie dough in the center of the pan, spreading it out with a spatula until it is ¼-inch thick. It will not cover the entire pan.
  5. Bake for 15 minutes, until it resembles an oatmeal cookie. The cookie will be buffed with a slightly caramelized top. Cool the oat cookie completely before using. To make this ahead of time, wrap well in plastic and refrigerate for up to 1 week.

To make the filling:

  1. Combine the sugar, brown sugar, milk powder, ground corn meal, and salt in the bowl of a stand mixer fitted with the paddle attachment and mix on low speed until evenly blended. According to Christina Tosi, a stand mixer IS A MUST. Hand whisking supposedly will not provide you with the same consistency as a stand mixer. Add the melted butter and paddle for 2-3 minutes until all the dry ingredients are moist.
  2. Add the heavy cream and vanilla and continue mixing on low for 2-3 minutes until any white streaks from the cream have completely disappeared into the mixture. Scrape down the sides of the bowl with a spatula.
  3. Add the egg yolks, paddling them into the mixture just to combine; be careful not to aerate the mixture, but be certain the mixture is glossy and homogenous. Mix on low speed until it is. The filling should be used immediately. But it can also be stored in an airtight container in the refrigerator for up to 1 week.

To construct the pie:

  1. Preheat the oven to 350 degrees F.
  2. Put the oat cookie from above in a food processor with the melted butter and salt. Pulse the food processor until the cookie is broken down into a wet sand. The ground cookie mixture should be moist enough to form into a ball. If it is not moist enough to do so, melt an additional 1-1 ½ tablespoons butter and knead it in.
  3. Divide the oat cookie crust evenly between two 10-inch pie tins. Using your fingers and the palms of your hands, press the oat cookie crust firmly into each pie tin, making sure the bottom and sides of the tin are evenly covered. Use the pie shells immediately, or wrap well in plastic and store at room temperature for up to 5 days or in the refrigerator for up to 2 weeks.
  4. Put both pie shells on a sheet pan. Divide the crack pie filling evenly between the crust, filling the pies to ¾ of the way full. I recommend baking them separately. Bake for 15 minutes only. The pies should be golden brown on top but will still be very jiggly.
  5. Open the oven door and reduce the oven temperature to 325 degrees, keeping the pie in the oven during this cool down process. When the oven reaches 325 degrees, close the door and bake the pies for 5 to 10 minutes longer. The pies should still be jiggly in the bull’s-eye center but not around the outer edges.
  6. Gently take the pan with the pie on it out of the oven. Transfer the pie to a cooling rack. Once slightly cooled, transfer the pies to the refrigerator. Then freeze your pies for at least 3 hours, or overnight, to condense the filling for a dense final product. According to the recipe, freezing is the signature technique and result of a perfectly executed crack pie.
  7. If not serving the pies right away, wrap well in plastic wrap. In the fridge, these pies will keep fresh for up to 5 days; in the freezer, they will keep for 1 month. Transfer the pies from the freezer to the refrigerator to defrost a minimum of 1 hour before you’re ready to get in there.
  8. Serve cold, decorated with confectioners’ sugar, either passing it through a fine sieve or dispatching pinches with your fingers.

Curried Butternut Squash Soup

This is a creamy soup that feels totally indulgent.  It’s the type of soup that you would think had a boat load of cream and butter, but has none. You can load up on seconds and your body will thank you for the extra nutrients.  Plus, it takes less than 30 minutes to throw together and it’s so smooth. I use an immersion blender to puree the soup after the butternut squash is cooked, but you could also transfer the soup to a blender in batches. Just be careful of hot splattering soup….I speak from experience. Nothing like getting hot soup in the eye and face.

The prime difficulty in this soup is carving that dang butternut squash. Cut the squash in half, remove and discard the seeds. Cut the squash into disks. Then, trim off the skin. Dice the flesh in 1- to 1/2-inch cubes. If you can’t find butternut squash or are in a time crush, luckily, many grocery stores sell frozen pre-cut butternut squash that will work like a charm.

I still had a honken huge butternut squash left from my garden that I harvested early in the fall. Winter squash and sweet potatoes are my favorite thing to grow because they keep for so long. I can hoard my fall-harvested crop in our basement throughout the cold winter. They are like little treasures when it is so barren and cold outside. Throwing this squash into a bowl of warm and comforting soup, reminds me that in a few months, spring will come back and I will soon be able to start planning my garden, growing plants, working the soil, and eagerly anticipating my yield. I don’t think about the part where the stupid squirrels eat my yield and the sun scorches up the ground.

Anyways, you should make this soup. Any good curry powder will do. You could also go a thai route and throw in some red or green thai curry paste and some coconut milk. Dang…why didn’t I do that. Next time. next time.

Curried Butternut Squash Soup (serves 6 to 8)

Ingredients

  • 1 Tablespoon olive oil or coconut oil
  • 1 medium to large onion, diced
  • 1 carrot, diced
  • 1 celery stick, diced
  • 2 cloves of garden, minced
  • 1 1/2 Tablespoons curry powder (depending on how spicy you prefer)
  • 1 butternut squash (4 cups), diced
  • 1 quart vegetable or chicken stock (low sodium)
  • salt and pepper
  • greek yogurt (optional)
Instructions
  1. Heat oil in dutch oven or large pan over medium-high heat. Add onion, carrot, and celery. Sauté for 5 minutes, or until onions are translucent.
  2. Add garlic and curry powder. Saute for 1 minute or until spices are fragrant. Add butternut squash and broth. Bring to a boil. Cook for approximately 20 minutes or until squash is cooked through.
  3. Use an immersion blender to puree the soup or transfer the soup to a blender in small batches. Once the soup is completely pureed, add salt and pepper to taste.
  4. Ladle into bowls. Top with a tablespoon of greek yogurt.

Spinach Cheese Balls

If you are looking for sneaking some veggies into an appetizer or if you need a great appetizer for your vegetarian friends, these spinach cheese balls are REDICULOUS. I think they have taken the place of my beloved sausage balls. Plus they are SUPER easy to whip up. I have made these three times during Christmas.

These taste so good and are packed with good greens that I didn’t feel too bad eating two or three or ten. Don’t judge!

I think these spinach cheese balls would be great on a sandwich, or in spaghetti as a vegetarian option for meatballs. You can make these ahead of time and freeze prior to baking. Pop the frozen balls in an oven preheated to 350 and bake for 20 to 25 minutes. They taste great when served with marinara sauce too.

Spinach Cheese Balls

Ingredients

  • 1 frozen package of spinach (10 oz), thawed and thoroughly drained
  • 2 cups of shredded mozzarella
  • 1/4 cup parmesan cheese, shredded
  • 1/4 cup whole wheat pastry flour or all-purpose flour (may need more depending on moistness of spinach)
  • 1/4 cup bread crumbs
  • 1/2 teaspoon garlic salt
  • 2 teaspoon italian seasoning
  • 1 egg, beaten
  • fresh ground pepper
  • Marinara sauce for dipping

Instructions

  1. Preheat oven to 400F. Spray a rimmed baking sheet with nonstick spray or line with parchment paper.
  2. Mix all ingredients (expect marinara dipping sauce) in a medium bowl. Shape into 1 inch balls. Place on baking sheet and bake for 15 to 20 minutes.