Picnic Perfect Herby Deviled Eggs

Picnic Perfect Herby Deviled Eggs / Big Eats Tiny Kitchen

I’m constantly looking for easier and more efficient ways to do things. Must be the engineer in me. Well today, I have an amazing genius picnic tip.

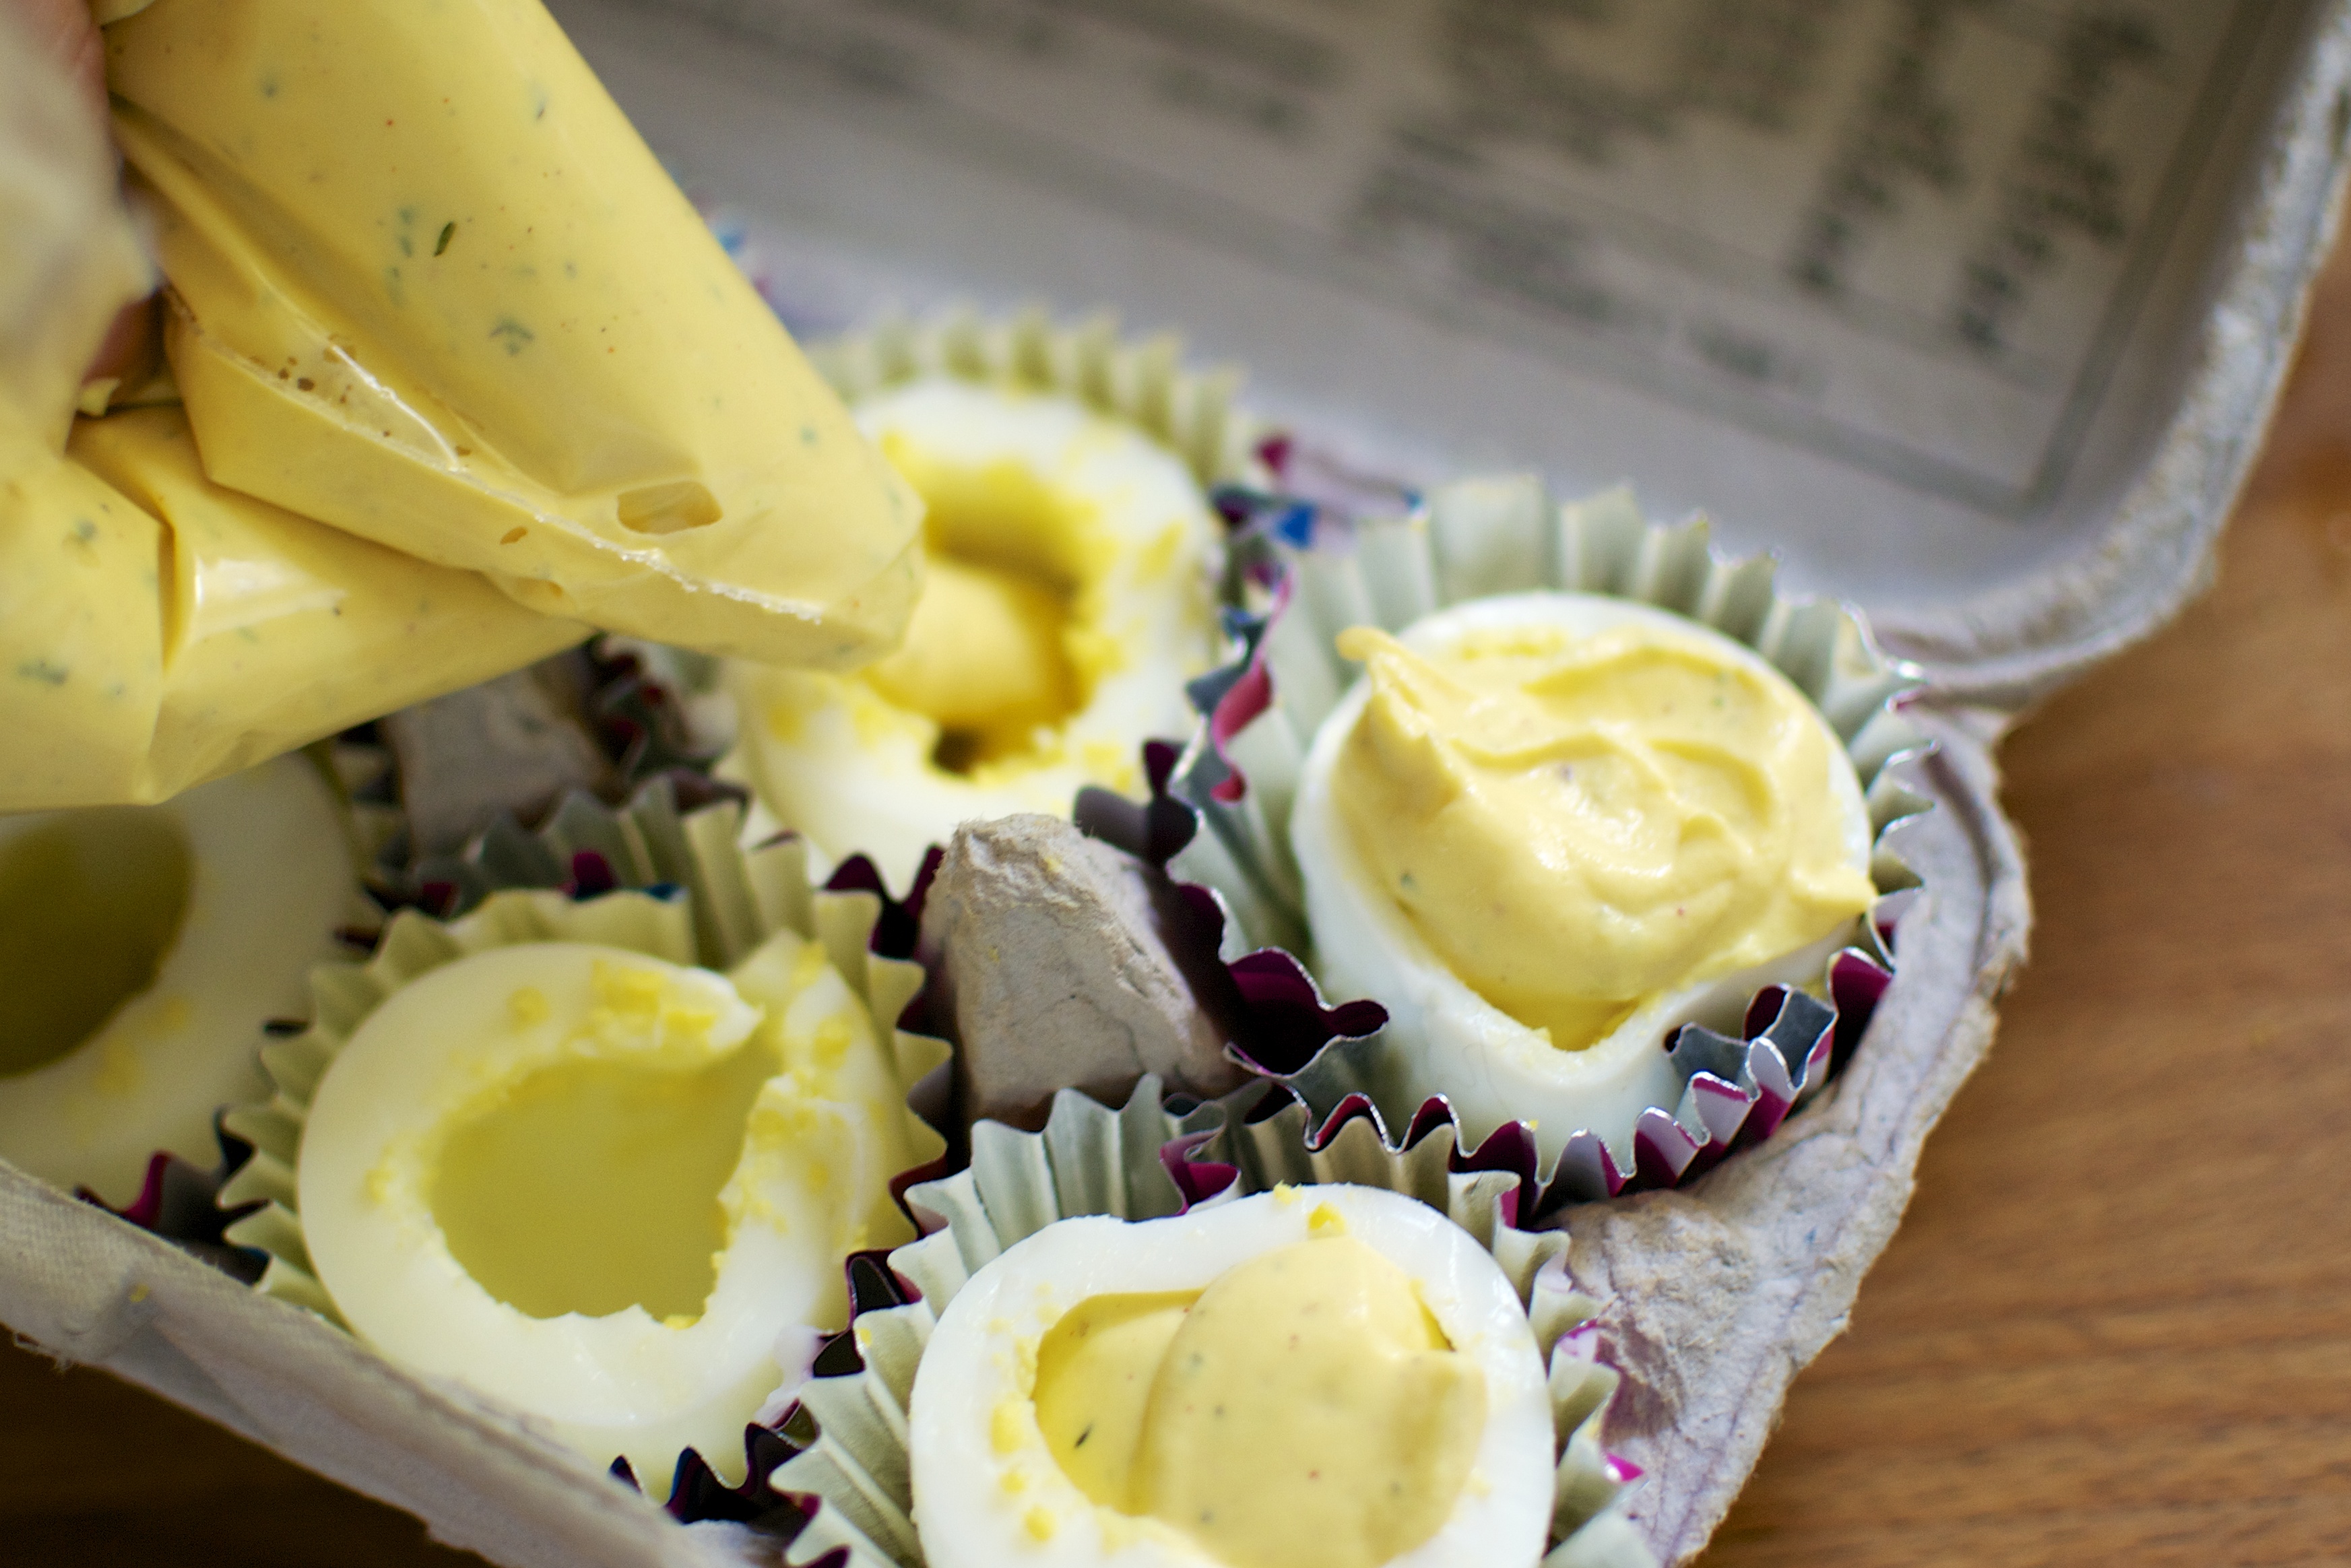
Use an egg carton to transport deviled eggs. Genius!

This weekend we had a tasty picnic with friends to celebrate the 4th of July. My hubby and I rode our bikes to the park and brought along some snacks, including deviled eggs. My solution to transport the deviled eggs was to use the egg carton as the perfect transport container.

I placed separate muffin liners in the carton to make these a less messy picnic dish. I also decided to use nearly the whole egg instead of cutting them in half. I cut the top third of the egg off and scooped out the yolk. The yolks were then mixed with greek yogurt (instead of mayo), herbs, salt, and Dijon mustard. I then scooped the yolk mixture into a baggy, cut off the edge, and pipetted the mixture into each egg white. Fancy pants picnic dish!

Picnic Perfect Herby Deviled Eggs / Big Eats Tiny Kitchen

I unfortunately do not have very many pictures of these puppies since I was running behind and had to rush to get these beauties loaded up in the egg carton and then head out on my bike to the picnic. But I will tell you that I will definitely be repeating this process for future deviled eggs that will be accompanying me to potlucks and picnics.

The only downside to this recipe is that deviled eggs go waaaay too fast. Womp Womp.

Herby Deviled Eggs (Grain Free, Gluten Free)

  • Servings: 12
  • Difficulty: Easy
  • Print

Ingredients

  • 12 eggs
  • 1/3 cup greek yogurt
  • 1/4 teaspoon sea salt
  • 1 teaspoon minced chives (some reserved to sprinkle on top)
  • 1 teaspoon minced parsley
  • 1 teaspoon Dijon mustard

Instructions

  1. Place eggs in a medium saucepan and add cold water until the eggs are covered by 1 inch of water. Bring to a rolling boil. Remove saucepan from heat, cover, and then let stand for 11 minutes. Drain the pot and run cod water over the boiled to cool them.
  2. Meanwhile, place remaining ingredients into the bowl of a food processor and mix together. Reserve some chives and parsley for sprinkling on top.
  3. Peel all of the eggs. To transport easily to a picnic, make whole deviled eggs by cutting off the top third of the egg. Remove yolks carefully with small spoon or butter knife, leaving the whites fully intact. Transfer yolks to bowl of food processor with greek yogurt mixture. Process until smooth.
  4. For easy picnic transport, line egg carton with individual muffin liners. Place intact egg whites into each separate muffin tin liner. Place egg yolk mixture into a sealable plastic back (like a ziplock). Cut the corner tip off of the bag for easy pipetting into each egg white. Sprinkle with remaining herbs. Place plastic wrap on top of filled eggs and refrigerate up to 8 hours.

Advertisement

Cauliflower Pizza Crust (Grain Free, Gluten Free, Paleo)

Pizza, beer, and a movie is my idea of a perfect date night.  I’ve been hunting around for a good grain free pizza crust recipe.  Who knew cauliflower would come to the rescue!

DSC_0317

Cauliflower is like the working mother of five or even fifteen.  It can transform into so many different things…mash it, roast it, puree it, rice it, grill it. And now I’m adding one more thing to the list…crust it…that is, pizza crust, my friends. I was really amazed at how much this tasted like pizza.

DSC_0294DSC_0300DSC_0309

Get out your handy dandy food processor and rice that cauliflower. Combine the riced cauliflower with eggs, seasonings, and some almond flour.  Preheating a pizza stone and applying the cauliflower pizza “dough” onto the preheated stone helps produce a crisper crust. Prebake to get a golden crust. Then top with whatever toppings you choose.  I have included my easy homemade pizza sauce recipe as well.  Friday pizza night is back on!

DSC_0315

Cauliflower Pizza Crust (slightly adapted from Love and Lemons)

  • 1 cauliflower, diced in 1/2-inch pieces
  • 2 eggs
  • 1/2 teaspoon each of garlic powder, onion powder, salt
  • 1 teaspoon each of oregano and parsley
  • 3/4 cup almond flour

Homemade Pizza Sauce

  • 1 6 oz can of organic tomato paste
  • 1 cup of water
  • 1 tablespoon each of oregano, basil, and parsley
  • 1 teaspoon each of garlic powder and onion powder
  • 1/4 teaspoon ground black pepper
  • salt to taste

Instructions

  1. 1. Preheat oven to 450 degrees. Place a pizza stone in the oven and allow to preheat.
  2. Chop cauliflower into 1/2-inch pieces. Place cauliflower flourettes into the food processor and pulse for a “riced” consistency. Don’t go too far or you will puree it. Remove from food processor and place the riced cauliflower into a microwave save bowl. Microwave for 3 minutes.
  3. Add remaining ingredients and mix  to form into a wet ball. If it is too sticky to handle, add more almond flour. Gently knead it a few times to help it come together. Remember…this is cauliflower, NOT all purpose flour so it will not resemble typical pizza dough.
  4. Remove the preheated pizza stone from the oven or use a baking sheet. Place parchment paper on top of the stone or baking sheet. Press the cauliflower “dough” ball onto the pizza stone or baking sheet lined with parchment paper. Gently mold it into a 1/4-inch thick circle.
  5. Bake at 450 F for 20 to 25 minutes until golden brown.
  6. For the pizza sauce, combine all ingredients into a medium bowl. Top the baked pizza crust with the homemade pizza sauce.Then top with your favorite ingredients. We topped ours with cheese (not paleo, but I really wanted some melty cheese), pepperoni, jalapeño, and mushrooms.
  7. Bake for about 10 minutes.

DSC_0305

Paleo Cranberry and Apple Cobbler

My heart is heavy on this last day of December and this last day of 2012. I’m staying in my pajamas and watching the snow fall. The snow falls so peaceful outside my window, yet I know that sometimes there is no peace and life is just not fair.  

DSC_0234

My thoughts go out to everyone who has lost someone this year. My thoughts go out to those that are lost. My thoughts go out to those that are enduring hardships that are unfathomable. 

There are so many cruel and unfair things that occur and I always ask “why?”…but sometimes there is no reason. It’s just the way it is.  I only hope that there is something better that hopefully will come out of tragedy.

DSC_0239

DSC_0253

So I make this cobbler for my friends that are struggling right now, my friends that are enduring an unfathomable loss, my friends that are lost in life.  I make this cobbler to hopefully bring comfort into their hearts and to warm their souls.

Paleo Cranberry and Apple Cobbler (Grain Free, Gluten Free, and Diary Free) (adapted from Beeckman 1802 Heirloom Cookbook)

Filling:

  • 12 oz bag of fresh cranberries
  • 3 medium apples, cored and diced
  • 1/4 cup crystallized ginger, diced
  • 1 cup water
  • 1/3 cup honey
  • 2 tablespoons arrowroot powder

Topping:

  • 1 cup almond flour
  • 1/4 cup chopped walnuts
  • 1 teaspoon ground cinnamon
  • 1/8 teaspoon sea salt
  • 1/4 cup coconut oil, melted

Instructions:

  1. Preheat oven to 350F.  Grease a 9X9-inch baking dish with butter, coconut oil or nonstick spray.  Set aside.
  2. In a medium saucepan, combine cranberries, apples, crystallized ginger, water, and honey. Heat over medium heat until the mixture begins to boil and the cranberries pop. Cook for 5 to 10 minutes.  Remove from heat and stir in arrowroot powder. Pour the hot cranberry mixture into the baking dish and set aside.
  3. In a separate medium bowl, combine all of the topping ingredients. Mix well.  Spoon the topping mixture evenly over the filling.
  4. Bake at 350F for 30 to 40 minutes. The cobbler will begin to bubble and the topping should lightly brown.  Remove from oven and allow to cool for a few minutes.  Best when served with vanilla coconut ice cream!

Flourless Brownie Bites (Grain Free)

Merry Christmas!

I hope you all are having a wonderful and cozy day.  My husband I made the trek from KC down to Oklahoma to visit my family.  My brother had back surgery a week ago and has been recovering.  It was wonderful getting to spend time with all of us together.

DSC_0282

We cooked, we ate, we laughed, we made our gingerbread house, and we watched christmas movies on repeat while my bro was horizontal in bed recovering. He’s getting around better and was able to eat dinner with us and walk around with his walker.

DSC_0301

We had to leave a day early because Oklahoma freaks out over the mere mention of a slight chance of snow. So thinking Snowmaggeddon is on its way, we had to make a mad dash up north to Kiley’s family’s house in Tulsa last night to try to miss this “massive” snow storm. We woke up this morning to clear skies and no snow. Womp womp.  But at least we are safe and sound in Tulsa with Kiley’s family now with the warmth of coffee and a fire in the fireplace.  We hope you and your families are warm, cozy, and enjoying time together and slowing down this season.

DSC_0324

I’m whipping up a batch of flourless bite-sized brownies. I love the tiny size for snacking.  There is no flour, only cocoa powder, melted chocolate, honey, eggs, and butter or coconut oil! They are super easy and can be topped with anything you have on hand. Yes…even bacon.  I topped some with bacon (it was a hit), some with crystallized ginger, others with toasted walnuts, and some with salted caramel (my fave). The recipe is inspired by the flourless brownies in my new favorite cookbook, Practical Paleo. The recipe is found below.

DSC_0302

Also, if you are looking for some last minute quick gluten-free recipes to make for Christmas dinner, I’ve gathered up a few of my favorites….

Gluten-Free Breakfast:

DSC_0173

Mexican Breakfast Casserole (Grain Free and Dairy Free)

Crustless Quiche (Grain Free and Dairy Free)

Pumpkin-Apple Muffins (Grain Free and Dairy Free)

German-Style Apple Walnut Pancake (Grain Free and Dairy Free)

Gluten-Free Appetizers:

DSC_0309

Spinach-Cheese Balls (Vegetarian and Grain Free)

Buffalo Chicken Meatballs (Grain Free and Dairy Free)

Nutty Coconut Date Balls (Vegetarian, Grain Free, and Dairy Free)

Gluten-Free Side Dishes:

DSC_0273

Kale Salad with Cranberries, Pecans, and Apples (Gluten Free and Vegan)

Roasted Cauliflower 

Grilled Delicata Squash with Kale (Gluten Free and Vegetarian)

Gluten-Free Desserts:

Ginger Chocolate Chip

Chewy Ginger Chocolate Chip Cookies (Gluten Free, Grain Free, and Dairy Free)

Fudge Brownies (Gluten Free and Vegan)

DSC_0334

Flourless Brownie Bites (adapted from Practical Paleo)

Makes 30 brownie bites

Ingredients

  • 4 ounces dark chocolate (I use 85% cocoa from Trader Joes), melted and cooled
  • 1/2 cup coconut oil or butter, melted and cooled
  • 1/2 cup honey or maple syrup
  • 1/2 cup unsweetened cocoa powder, sifted
  • 1 teaspoon vanilla extract
  • 3 eggs, beaten
  • 1/4 teaspoon salt
  • 1/4 teaspoon baking soda
  • Toppings or mix-ins: bacon, walnuts, crystallized ginger, caramel, unsweetened coconut, flaked salt

Instructions

  1. Preheat oven to 350F. Grease mini muffin tin with butter, coconut oil, or nonstick spray. Set aside.
  2. To melt the dark chocolate bar, break into small pieces and place in a microwave-safe bowl. Microwave on high at 30 second intervals, stirring in between, until the chocolate is melted. It takes me 2 minutes.
  3. In a medium-sized bowl, combine the melted dark chocolate, melted coconut oil (or butter), maple syrup, vanilla, and eggs. Slowly sift the cocoa powder over the wet ingredients, whisking it evenly to ensure there are no lumps. Stir in salt and baking soda.
  4. Spoon the brownie batter into the mini muffin tins (about 1 1/2 tablespoons per muffin tin), filling about 3/4ths full. Top the batter with the topping of your choice (chopped bacon pieces, walnuts, ginger, coconut, caramel pieces, kosher salt). Bake for 20 to 25 minutes, or until a toothpick inserted into the center comes out clean.

Homemade Microwaved Seasoned Popcorn – BBQ Style

I love love love to snack. I’m a big fan of all things dippable and munchable. I also love bbq, which is especially great here in KC. So popcorn seasoned with my favorite BBQ rub is great snack item for me during the day when I need a good salty and spicey fix. I was pretty excited to find out that the second recipe in the Food Matters Project was Seasoned Popcorn, chosen by CookieandKate.

Years ago to save money, I quite buying bagged popcorn and started buying whole unpopped kernel corn. I began popping my own popcorn in a glass container or small brown paper bag (lunch-size), saving oodles of money and eliminating preservatives. Also, I had a tendency to mow down an entire massive bag of butter-laden popcorn, only to find myself incredibly thirsty with orange-stained fingers and unaware that I had ingested 6-servings in one sitting.

So if you are buying packages popcorn…stop! Popping your own is so simple, easy, and you can change up the seasoning to suit your snacking desires. Use 2 tablespoons of unpopped corn per person. Place the corn kernels and salt in a brown paperbag and fold over a few times. Microwave on high for about 3 minutes, or until there are 4 seconds between pops. Open the bag carefully because steam will build up.

Along with BBQ seasoning, I also like to top popcorn with shredded parmesan cheese, cracked pepper, and salt. I spray the popcorn with nonstick spray to help the topping stick. You can also melt some butter and pour over…so much better than butter flavor!

Check out the featured recipe for Seasoned Popcorn by Kate of CookieandKate. Go to the FMP website to see other great ideas for popcorn seasonings!

Homemade Microwaved Seasoned Popcorn (serves 2), from The Food Matters Cookbook by Mark Bittman

Note: The seasonings for popcorn can be limitless. For a sweet fix, top with cinnamon sugar. For a spicy kick, try curry powder. Cheesy? go for parmesan cheese or nutritional yeast (found in most health food stores, giving a good cheesy flavor).

Ingredients

  • 1/4 cup kernel corn
  • 1/4 teaspoon sea salt
  • topping of choice (shredded parmesan, cracked pepper, cinnamon sugar, bbq seasoning..etc).

Instruction

  • Place popcorn and salt in paperbag or glass lidded container. If in a paperbag, fold the top over several times.
  • Microwave on high for 3 to 4 minutes (or until there are 4 seconds between pops).
  • Be careful when opening the container because steam will have built up. Toss the popcorn with the seasonings.