Gluten Free Buffalo Turkey Meatballs

I have to admit that I am really not that big of a fan of chicken wings. Don’t get me wrong, I love the flavor. It’s mainly the work that goes into gnawing on a bone for just a measly morsel of meat.  But, I also get why most guys like them…they feel like authentic cavemen. This is probably the same reason why they dig ribs too.  And turkey legs.

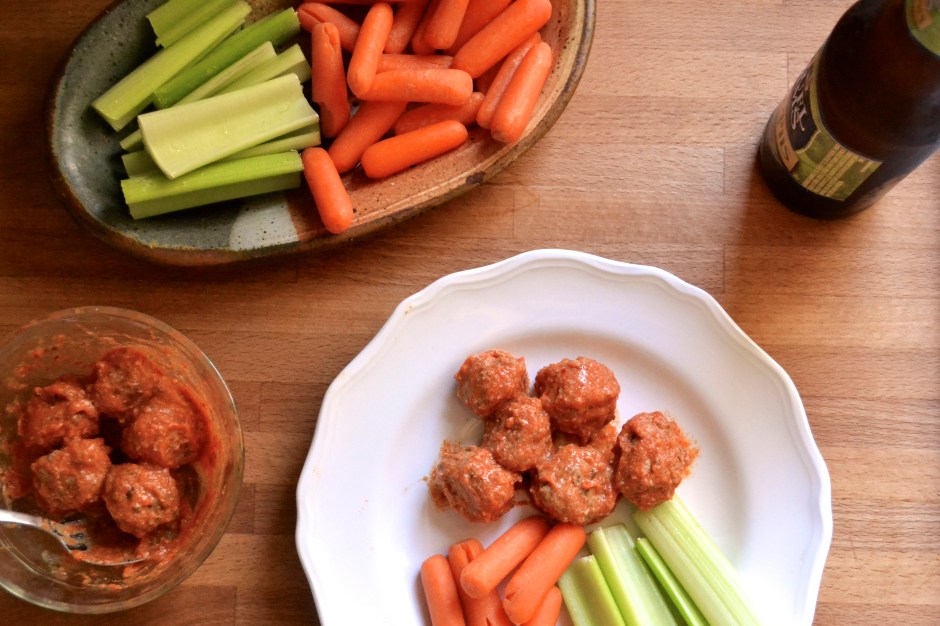
So what better way to get the meat AND the buffalo flavor without the mess? Meatballs. Buffalo Meatballs. These mini meatballs are perfect if you have a gaggle of people coming over at different times, because you can keep them warm and saucy in a crock pot.  They are an easy finger food and a HUGE hit!

I recommend using Frank’s hot sauce. It’s the best buffalo sauce that I’ve found. You can make these meatballs with either ground chicken or ground turkey.  However, I should note that ground chicken is a bit harder to form into balls. I used ground turkey in this recipe and found them to be easier to mold and deeeeelicious. Adding a tad bit of coconut milk to the buffalo sauce adds creaminess.  Don’t worry, it doesn’t impart a coconut flavor at all. But you could easily sub melted butter for the coconut milk, if you are into that sort of thing.

Gluten Free Buffalo Turkey Meatballs 

Makes about 70 mini meatballs

Ingredients

  • 2 lbs ground turkey (or chicken)
  • 1 large egg
  • 1/2 cup dried parsley
  • 1 Tablespoon smoked paprika
  • 1 teaspoon salt
  • 3 Tablespoons + 1/2 cup Frank’s hot sauce
  • 1 teaspoon garlic powder
  • 1/2 cup almond meal*
  • 1/4 cup coconut milk (or melted butter)

*Note – If you do not have almond meal, you can either use 1/4 cup of oat flour or 1/2 cup of bread crumbs.  However, these alternatives are not gluten-free, unless you use gluten-free oats and/or gluten-free bread crumbs.

Instructions

  1. Preheat the oven to 450F. Spray two 9X13-inch baking dishes with nonstick spray. Set aside.
  2. Combine the ground turkey, egg, 3 tablespoons of hot sauce, parsley, paprika, salt, garlic powder, and almond meal in a large mixing bowl and mix by hand until thoroughly incorporated.
  3. Roll the mixture into 3/4-inch round balls. Place the meatballs in the prepared baking dish.  Line them up carefully, keeping them in even rows vertically and horizontally to form a grid. The meatballs should be touching one another.
  4. Roast at 450F for 15 to 20 minutes, or until the meatballs are firm and cooked through. A meat thermometer should read 165°F in the center of the meatball.
  5. Carefully transfer the cooked meatballs into a warmed crock pot.  Add the remaining Frank’s hot sauce (1/2 cup) and coconut milk (or melted butter) to the crock pot. Toss to coat the meatballs. The meatballs are ready when the sauce is warmed or allow to cook on low until your guests arrive!

German-Style Cinnamon Apple Walnut Pancake (Gluten Free)

It is official… I AM DONE!  I took my Professional Engineering (P.E.) exam yesterday and I feel GREAT.  I was so worried that after I finished that 8-hour monster exam, that I would feel drained and crappy and not want to be around anyone….but instead I walked out of that room like Mary Poppins and a bird singing on my shoulder. I was on a high…and still am. Who knows if I passed, but it feels good for it to be over.

I feel like I have new-found freedom. A new life. What should I do with ALL this time…. build a pantry? Finish painting the hallway that I started painting a year ago? Finish painting the back bedroom that I started a year ago?  Clean? no……

Instead, I shall make apple pancakes. And applesauce and apple pie and apple butter. And well, a lot of apple things, because I went apple picking last weekend.  Like nearly everyone that goes apple picking, we got quite zealous and brought home bushels and bushels and bushels of apples. I’ll be handing out loads of apple-themed goods for christmas. Act surprised! Heck…I might just hand you an apple. 🙂 Cheers.

Although I have a big crush on Mr Pumpkin, my true love is the humble Apple.  There are so many varieties.  A variety for all of my moods and emotions…tart or crisp or sweet or complicated. And who can resist that amazing aroma of baked cinnamon apples!? If you can resist it, your sick…weird…you need help.

So, with my loads of free time, I present an aroma therapy, gluten and grain free version of a german-style pancake that is made with coconut flour and loaded with cinnamon apples and walnuts.  It is made in one large oven proof skillet and would be perfect for crowds and the upcoming holidays.  The bottom of the “pancake” is layers of thinly sliced cinnamon spiced apples that bake in the oven while you prepare the batter. After the batter is whipped up, remove the baked apples from the oven, pour the prepared batter on top, sprinkle with nuts, place back into the oven, and let the holiday spirit and aroma fill your house. No fuss. Sit back. Sip that coffee. Then you can pull out a piping hot pancake that everyone gets to enjoy…..at the same time.

Oh…and don’t forget the real maple syrup, people. No Log Cabin! I mean it.  The pancake itself is not that sweet. It has natural sweetness from the apples, but it provides ample opportunity to manually sweeten your pancake slice with the goodness of fresh maple syrup and a dollop of coconut butter. Mmmm.

Note: This pancake is made with coconut flour. Coconut flour can not be substituted one for one with other flours. Because it does not contain gluten, it is dense and requires a poop ton of eggs to lighten and fluff up the recipe. Coconut flour can be found in most health food stores, online, and the health food section of most grocers.  It’s very healthy and packed with nutrients and fiber. It does not impart an overwhelming flavor of coconut to the pancake. It is the perfect balance of nuttiness. Don’t be scared….try something new!

German-Style Cinnamon Apple Walnut Pancake (adapted from the Foodie and The Family)

Serves 8

Ingredients

  • 2 medium apples, sliced thin with skins on (I used fresh picked Fuji)
  • 1 + 1/8 teaspoon ground cinnamon
  • 1/2 + 1/8 teaspoon ground nutmeg
  • 3 tablespoons coconut oil, melted and divided (or unsalted butter)
  • 4 tablespoons coconut palm sugar (or honey, maple syrup), divided
  • 6 eggs, beaten
  • 3/4 cup milk (or almond milk, coconut milk)
  • 2 teaspoons gluten-free vanilla
  • 1/4 cup coconut flour
  • 1/2 teaspoon baking soda
  • pinch of salt
  • 1/4 cup walnut pieces
  • 1/4 cup unsweetened shredded coconut (optional)

Instructions

  1. Preheat the oven to 375 F. Place 10-inch cast iron skillet in oven to preheat the skillet.
  2. Core apples, but keep skins on. Slice the apples thinly with a mandolin slicer at about 1/8-inch thick. To the apples, add coconut palm sugar (or honey or maple syrup), 1 teaspoon of cinnamon and 1/2 teaspoon of nutmeg. Toss to coat with sugar and spices.
  3. Remove the preheated skillet from oven. Add 1 tablespoon of coconut oil  or butter to the skillet and allow to melt. Toss sliced apples into the skillet and stir to coat the apples with melted coconut oil. Spread the apples evenly along the bottom of the skillet. Place the skillet with the apples back into the preheated oven to bake while you prepare the batter (about 10 minutes).
  4. In a large bowl, whisk eggs, milk, melted coconut oil (or butter), vanilla, and coconut sugar. In a separate medium bowl, add coconut flour, 1/8 teaspoon nutmeg, 1/8 teaspoon cinnamon, salt, and baking soda. Add dry ingredients to wet ingredients. Mix well to combine or until there are no lumps.
  5. Remove skillet with baked apples from oven. Stir apples and redistribute evenly along the bottom of the skillet. Pour batter mixture evenly over the prepared baked apples. Sprinkle with walnuts and unsweetened coconut.
  6. Place the skillet back into the oven. Bake for 25 to 30 minutes at 375 F, or until top is golden brown.
  7. Remove skillet from oven. Serve with fresh maple syrup and homemade coconut butter!

Gluten Free Pumpkin Blondies

These gluten free blondies are closely related to my Paleo Fudge Brownies which have almond butter as the base ingredient.  For these Pumpkin Blondies, I wanted the pumpkin flavor to be front and center stage.  Pureed canned pumpkin plus pumpkin pie spices give them an amazing fall flavor that will blow your mind.

I’ve made these several times for dinner parties and group gatherings. I have to say that I prefer them with dark chocolate chunks, unsweetened shredded coconut, and just slightly undercooked (about 25 minutes), where they end up more like gooey pumpkin chocolate chip cookie bars.  However, if you prefer to not eat your blondies with messy gooey hands (freaks), then cook these puppies until they are fully set up (about 30 minutes).

Note – if you are using salted almond butter, reduce the quantity of salt or leave out entirely. Similarly, if your nut butter is sweetened, then reduce the quantity of honey equivalently. You could easily sub another type of nut butter for the almond butter. If you do not have pumpkin pie spice blend, then sub cinnamon. 

Pumpkin Blondies (Grain Free, Gluten Free, Paleo Friendly, Dairy Free, Refined Sugar Free) adapted from This Primal Life

Serves 16

Ingredients

  • 1 cup unsalted almond butter
  • 1 cup pureed pumpkin (canned or fresh)
  • 1 egg
  • 1/3 cup honey (or maple syrup)
  • 1 teaspoon baking soda
  • 1/4 teaspoon salt
  • 1 teaspoon pumpkin pie spice blend
  • 1/3 cup dark chocolate chips (optional)
  • 1/2 cup shredded unsweetened coconut (optional)

Instructions

  1. Preheat oven to 350F. Spray an 8″x8″ pan with nonstick spray. Set aside.
  2. In a medium bowl, combine almond butter and pumpkin. Mix until combined. Add egg and honey. Mix well. Stir in baking soda, salt, and pumpkin pie spices. Stir in chocolate chips and 1/4 cup coconut. Top the remaining 1/4 cup shredded coconut.
  3. Pour into prepared pan. Bake in preheated oven for 25 to 30 minutes or until toothpick comes out clean. Remove from oven and allow to cool for 5 to 10 minutes. Best when eaten warm!

Nutty Coconut Date Balls

I love snacks. I would much rather eat several small meals than huge ones. Maybe because I loooove food and the thought of eating different types of food all day is quite a treat to me.

Also, being a runner, I get hunger pains and need a quick fix!  Eating my arm ain’t pretty, folks. You don’t want to see me get HANGRY.

This is basically my version of the coconut Lara bar.  These little balls are all over the food blogosphere, but I had never had a chance to make them until now.  For Food Matters Project Monday, Cheese Please chose Cheese-Nut Balls from Mark Bittman’s Food Matters Cookbook.  My hubby is dairy free, so I swapped out the cheese for dates and made individual snack bites.  These Nutty Coconut Date Balls are perfect little energy snack bites. The dates taste like caramel goodness with smacks of coconut.  Feel free to roll them into balls or press them into a sheet pan and cut them like bars. They make great travel food!

Coconut Pecan Date Balls

Ingredients

  • 1 cup dates, pitted
  • 3/4 cup chopped nuts (such as raw unsalted walnuts, pecans, macadamia nuts, almonds and/or cashews)
  • 1/2 cup shredded unsweetened coconut
  • 1/8 tsp sea salt
  • 1/8 tsp ground cinnamon

Instructions

  1. Add the dates one at a time through the feed tube of the food processor while it is running. The dates will turn into a date paste.
  2. Add the nuts. Process until the consistency appears like cake crumbs, but it will easily stick together when you press the mixture between your fingers.
  3. Add salt and coconut. Pulse until mixed.
  4. You can either make these into bars or balls. If making into balls, simply remove the blade from the food processor and take one tablespoon at a time of the mixture and roll it between your palms until a ball forms.  To make bars (like larabars), put the mixture into a shallow baking pan and press the mixture into it. Seal and store in an airtight container in the fridge until you are ready to serve it.   These will last up to 2 weeks in the fridge or longer in the freezer.

Spiced Zucchini and Apple Cake and an Anniversary

Seven years ago today, I walked down the isle to Johnny Cash’s Ring of Fire and married a crazy man. I call him crazy only because he fell in love with me. What is even crazier is that he has continued to love me amazingly. He is my best friend. I’m one lucky gal. The luckiest in fact.

We make an odd pair. A great team, but an odd pair. He is total left brain and spontaneous and fun and boisterous and ADD and passionate and people oriented. Me? None of those things. Opposite. This man allows me to be crazy and anal retentive. He has taught me to go with the flow…well…to TRY to go with the flow. I’m a Type A engineer…I do as good as I can. I’ve come a long way.

Case in point – On our first anniversary, we took a road trip from Oklahoma to Nantucket. My cousin lived there and we decided to head up there to see her. We were broke (I was getting layed off from my job and going back to school to get my masters). We decided to camp the whole way and eat packed food. We had a tight budget. Well, correction…I had a tight budget.

We spent the first night at a friend’s place in Chicago. We ate turkey sandwiches that night at their house. Budget accomplished. Check. Next day, we headed to New York. Around 9 am it became apparent that we have left our turkey meat in Chicago. Kiley was hungry. I offered him the only option we had….mustard sandwich. He was not a fan. He pulled over to get a sausage biscuit. “But…that’s not a part of the budget,” I said. He asks if I want one. And of course I said no…because it was not in the budget…I mean, in my defense that dollar could make or break this thing, people!!!! SO there he is…eating his hot and steamy and fresh and awesome breakfast sausage biscuit…and there I am…eating my cold and floppy and soggy mustard sandwich. My mustard sandwich was awesome. He was totally jealous.

Do you now know why I think he is crazy….for putting up with me! Seriously.

But that was year 1…and now, 7 years later, he has totally relaxed. Ha…I mean, I have relaxed. A bit. We now own a 1974 VW camper van called Annabelle that we “drive” all over America. Well, sometimes we do not drive her back (she gets towed)…but it’s always a good time and always an adventure.

Right now we are on yet another adventure. This time Kiley surprised me with a train ride to Hermann, Missouri….Missouri’s very own wine country. It’s a quaint German town nestled on the banks of the Missouri River an hour or so west of St Louis. So cheers and I hope you are having a wonderful Monday, because I am.

Oh…this cake! I nearly forgot with all the gooshy anniversary talk. Typically on Mondays I present a Food Matter’s Project (FMP) recipe. Today’s recipe was Apricot Polenta Cake which appears to be rather easy and tasty. However, apricots are not around right now at the market and Kiley does not eat grains…so no polenta. Womp womp. But, in an attempt to stick with the “cake” theme of the FMP, I baked this lovely zucchini spice cake. It is adapted from one of my new favorite flood blogs, Against All Grains. She cooks great recipes for individuals that have sensitivities to grains and dairy. This cake is adapted from her zucchini bread recipe which is made with almond flour. My adaptation amps up with fall spices (cinnamon, ginger, nutmeg) and tops it with local apples.

Enjoy this cake for breakfast, dessert, snack, or on a road trip (slices are coming with us on the train). Take it from me, these cake slices are SO much better than eating mustard sandwiches. 😛

Almond Flour Zucchini and Apple Cake (adapted from Against All Grains)

Ingredients

  • 1.5 cups blanched almond flour
  • 1 Tablespoon ground cinnamon
  • 1 teaspoon baking soda
  • 1/2 teaspoon salt
  • 1/2 teaspoon ground nutmeg
  • 1/2 teaspoon ground ginger
  • 3 eggs
  • 1/4 cup maple syrup
  • 2 Tablespoons coconut oil
  • 1 to 2 cups shredded, unpeeled zucchini
  • 2 apples (dice one apple and thinly slice the other to place on top)

Instructions

  1. Preheat oven to 350F. Spray an 8-inch or 9-inch cake pan with nonstick spray. Set aside.
  2. Combine the dry ingredients (almond flour through ginger) in a small bowl. Set aside.
  3. In a separate medium bowl, mix wet ingredients (eggs through oil) and beat for about 1 minute. Stir in zucchini and one of the diced apples.
  4. Slowly add the dry ingredients to the wet ingredients. Mix until all of the dry ingredients have been incorporated.
  5. Pour into prepared pan. Place sliced apple on top in a circle pattern. Bake at 350F for 35 to 40 minutes or until the middle is set. A toothpick comes out clean when the cake is done.

Pumpkin and Apple Almond Flour Muffins (Grain Free)

So I have a crush. And not a little one. A BIG one…a huge, gushy, get red, giggle, snort, blow chocolate milk out of my nose kind of crush. His name…. Pumpkin…that’s Mr. Pumpkin. Ya….you know him. You all love him.  He’s like the Matthew McConaughey of fall produce.  Whatever he is in, it’s golden, perfect, never disappoints and always shirtless.

Such is my crush….mmmmm pumpkin. I’ve been collecting and dreaming about amazing recipes: pumpkin bourbon ice cream, pumpkin bars, pumpkin bread, pumpkin coconut soup, pumpkin latte, pumpkin butter, pumpkin oatmeal, pumpkin pancakes, pumpkin smoothie, pumpkin cheesecake, pumpkin curry. The list goes on and on and on and on, people. It’s bad. I’ve got a pumpkin fever!

And then I stumbled upon this great pumpkin muffin recipe made with almond flour. As soon as the calendar hit September 1st, my oven went on and in went these delicious pumpkin muffins.  I had just picked up some local golden delicious apples at the market and decided to throw one into the mix. I’d been dreaming of these puppies and boy howdy they did not disappoint…much like Matthew McConaughey.  Pull the muffin liner off and they too will be shirtless. Whoah!

I honestly have to say these are hands down the best pumpkin muffins I have had…gluten free or not. It’s a double bonus that they are not only gluten free but grain free. So if you are on the fence about experimenting with almond flour, give these puppies a go. You will forever be in deep smit. You can even eat them shirtless. I won’t tell.

I should note that I made these with my newest purchase of Honeyville blanched almond flour.  I’m super impressed with the light texture.  Trader Joe’s offers almond meal and it is made from unblanched (skins still on) almonds. Bob’s Redmill also sells almond flour. Although Bob’s is blanched,  it has a more coarse texture but still tastes gooooooood. So if you are looking for a lighter texture to baked goods, I’d invest in a better almond flour such as Honeyville or go to Nuts.com.  Store your flour in the fridge or freezer. I also think Whole Foods offers bulk almond flour.   Another option is to regrind Bob’s almond flour in a coffee grinder. Just be careful to not let it process to long or you will end up with almond butter. DOH!

Pumpkin and Apple Almond Flour Muffins (Grain Free) (Slightly adapted from the Urban Poser)

Ingredients

  • 1/2 cup pumpkin puree
  • 2 large eggs, beaten
  • 1/3 cup maple syrup (or honey)
  • 2 Tablespoons coconut oil, melted
  • 3 Tablespoons apple sauce
  • 1 diced apple, leave skin on if organic
  • 2 1/2 cups blanched almond flour (I use Honeyville or go to Nuts.com)
  • 1/2 tsp baking soda
  • 1/4 tsp salt
  • 1 Tablespoon ground cinnamon
  • 1/2 teaspoon ground nutmeg
  • 1/4 teaspoon ground ginger
  • 1/8 teaspoon ground cloves
  • 1/4 cup of walnuts or pecans
Instructions
  1. Preheat oven to 350F. Spray 12 cup muffin tin or place muffin liners within tin. Set aside.
  2. In a large mixing bowl, combine wet ingredients (eggs, pumpkin, maple syrup, coconut oil, and applesauce). Combine until well mixed. Add diced apple. Set aside.
  3. In a separate bowl, combine dry ingredients (almond flour, baking soda, salt, and spices). If you do not have blanched finely ground almond flour, you may need to regrind your almond flour in a blender.
  4. Add the dry ingredients to the wet ingredients. Mix until combined where there are no visible lumps. Add nuts and mix until combined. The batter will be rather thick.
  5. Spoon the batter into the prepared muffin liners or muffin tin. Fill to about 2/3 full, smoothing the tops with the bottom of a spatula or spoon.
  6. Bake in 350F preheated oven for 25 to 30 minutes or until golden brown. Check doneness by inserting a toothpick into the center of a muffin. It will come out clean when done. Allow to cool on a rack, if you dare. Dive in. These freeze well.

Raw Zucchini Salad with Sesame Ginger Sauce

This weekend was a bit tough for me to study. The fall air poured through our open windows. Every time I opened my book, other things called my name: the farmers market, flea market, the garden, zucchini bread, OU football, wine, lunch, wine, dinner, cleaning the bathroom, going for a 7 mile run, getting my toes painted, more wine, walking my dog, another glass of wine….are you seeing a pattern?  Maybe it was the wine that made it difficult? Naaaaaah.

While at the farmers market this weekend, we picked up a poop ton of sweet potatoes, zucchini, peaches, and apples!  So, when this week’s Food Matters Project recipe was Edamame Cakes with Soy Drizzle I decided to take this asian-inspired recipe to Zucchini Land and use up my new bounty of zucchini! This raw salad is uber easy, so fresh and quite beautiful too.  Use the shredder attachment of a food processor to make quick work of shredding up these veggies! Save those knuckles, people!

Note: Don’t add the sesame-ginger dressing until you are ready to serve the salad. The zucchini tends to “weep” and get soggy if it sits with the dressing on it for too long.

To see the original Food Matters Project recipe for Edamame Cakes with Soy Drizzle, check out Life with the Lushers. And be sure to see what the other bloggers came up with here.

Raw Zucchini Salad with Sesame Ginger Sauce

Serves 4 to 6 as a side

Raw Zucchini Salad Ingredients

  • 1 large zucchini, shredded (about 3 cups)
  • 1 red bell pepper, julienned
  • 1 carrot, shredded
  • 1 scallion, green and white parts chopped
  • 1/4 cup cilantro, chopped

Sesame-Ginger Sauce

  • 1 tablespoon coconut aminos or soy sauce
  • 1 tablespoon apple cider vinegar or rice wine vinegar
  • 1 teaspoon sesame oil
  • 1 teaspoon fresh grated ginger
  • 1 clove of garlic minced
  • juice of 1/2 fresh lime
  • salt and pepper to taste

Instructions

  1.  If you have a food processor with a shredding attachment, it will make shredding the zucchini and carrot a breeze. Place the shredded zucchini in a colander and allow to drain for about 30 minutes. Slice the red bell pepper really thin. Combine the zucchini, carrot, bell pepper, and cilantro in a medium bowl. Set aside.
  2. In a small bowl, mix sesame-ginger sauce ingredients and set aside.
  3. When you are ready to serve the salad, add the sesame-ginger sauce to the zucchini mixture. Season with salt and pepper. Serve immediately sprinkled with sesame seeds.

Grilled Delicata Squash with Kale

Do you smell that? Ya…that’s fall people. IT is HERE! Well almost.  The weather man is taunting us. There are 90s in the forecast for the coming week but I have my fingers in my ears and I am not listening because my windows are open, it is in the 60s outside, and I am ready to pull out my BOXES O’ SWEATERS! Yes…that was plural….boxes.

Mmmmmmmmm….sweaters.

Also… winter squash is edging its way onto farmer’s tables at the market. Pumpkins, gourds, acorn squash, butternut squash, spaghetti squash, cinderella pumpkins.

Mmmmm…pumpkin. Oh, be ready people…pumpkin recipes are going to blow this place up! We are going to be swimming in pumpkin at this hacienda. But until then, let’s get back to winter squash, shall we?

One of my favorite winter squash varieties is the delicata squash. It is slightly larger than an acorn squash, but smaller than a butternut.  And did I mention that it is SOOO much easier to cut in half due to the thinner outside skin. The other beauty to this squash (besides those awesome trendy stripes) is that the skin is edible after it is cooked!  Now don’t get me wrong. I love butternut squash like the next bloke, but carving off all that stupid skin and hacking and chopping and nearly taking off my fingers and ear lobes in the process to just get a few measly cups makes me a bitter woman. More bitter than normal. And that’s bitter, people.

The inside flesh is smooth and similar to butternut in texture.  It caramelizes when roasted or grilled.  This dish can easily be adapted for roasting in an oven.  In an oven preheated to 425F, Roast for about 40 minutes. Around 30 or 35 minutes, keep an eye on them and test with a fork. They are done when the fork slides through with no resistance, like a potato.

You could serve the squash alone, but I topped them on top of a fresh lacinato kale salad. A perfect fall salad! Now, where’s my sweater?


Grilled Delicata Squash with Kale

Serves 4 as a side

Ingredients

  • 1 delicata squash, deseeded, halved and sliced in 1/2-inch slices (keep skin on)
  • olive oil
  • salt and pepper
  • 1 bunch of kale (or swiss chard), stems or ribs removed and leaves cut into 1-inch strips and gently massaged. (Read this article to see why and how to massage that beautiful kale.)
  • feta (leave off for vegan and paleo)

Instructions

  1. Prepare and heat grill for direct grill method.
  2. Toss squash slices in olive oil and season with salt and pepper. Grill over medium heat for 5 minutes. Then carefully flip to the other side. Continue grilling for another 5 minutes.
  3. Meanwhile, back on the ranch, add kale strips to a medium bowl. Sprinkle with salt and gently massage so that the kale slightly breaks down and becomes dark in color.
  4. Divide kale between 4 bowls. Place grilled squash rings on top of kale. Top with crumbled feta.

Cauliflower Tabbouleh

This is such a fresh and easy no cook salad and is inspired by the Food Matter’s Project.  I chose to use cauliflower that has been “riced” in a food processor instead of using the traditional bulgur.  Bulgur is a type of cracked wheat and is considered a whole grain. But in our recent quest to give up gluten, I used cauliflower as a stand in for grains and DAAAANG it’s good.  The fresh herbs and lemon make this a perky salad that is perfect for taking to a picnic, potluck, or for a labor day cookout!!!!!  Get on it.  Thanks to Sarah of Simply Whole Kitchen for choosing the Tabbouleh recipe for this week’s edition of Food Matters Project.  

So a small explanation on why we have gone gluten free….

For most of my husband’s life, he has been plagued with the worst seasonal allergies.  He should be the Bubble Boy. He was getting shots weekly until it became too costly, but then the weekly doses of Allergra D weren’t much cheaper either.  Migraines soon followed, nearly once a month…sometimes two or three a month.  They were debilitating and vomit-inducing. Appetizing, I know. 

Months ago, he eliminated grains and dairy from his diet, choosing a “paleo” life-style (only eating meat, vegetables, fruit, and nuts and eliminating grains, dairy, legumes).  Since going “primal”, I have been amazed at all the positive aspects.  His allergies? Vanished…his migraines? GONE. It was a miracle. His allergies were the result of inflammation caused by sensitivities to gluten, grains, and dairy.

Seeing his amazing transformation, I soon began to wonder if gluten was having an affect on me too.  I recently dived into gluten free living and have found that I feel a lot better when I do not consume wheat products.

Soooooooo, whether you have gluten sensitivities or not, I guarantee that you will enjoy this gluten and grain free tabbouleh salad during the final day of a great long weekend.

Cauliflower Tabbouleh (Grain Free)

Inspired by Roost and Mark Bittman

Serves 6 as a side dish

Ingredients

  • 1/2 head of cauliflower, discard stalk and dice florets into 1/2-inch pieces
  • 1/2 cup fresh parsley
  • 1/4 cup fresh mint
  • 1 to 2 cups of kale
  • 2 Tablespoons fresh lemon juice
  • 1 Tablespoon olive oil
  • 2 scallions, green and white parts diced
  • 1/2 cup diced sweet bell pepper (1/4-inch pieces)
  • 1/2 cup diced fresh tomatoes
  • 1/2 cup diced cucumber
  • 1/4 to 1/2 teaspoon salt (to taste)
  • fresh cracked pepper

Instructions

  1. Get out your food processor…don’t have one? I recommend investing in a good one because mine is my best friend! Sorry Guinness. Cut the cauliflower into 1/2-inch to 1/4 inch pieces before adding to the food processor.  Add diced cauliflower to food processor bowl. Pulse until the cauliflower resembles rice. Scrape the “riced” cauliflower into a medium bowl and set aside.  May need to do this in batches to ensure that all of the cauliflower is evenly “riced”.
  2. In the bowl of the food processor (no need to clean out) add packed parsley, mint, kale leaves, lemon juice, and olive oil. Process for about 1 minute. Add herb mix to the riced cauliflower. Gently stir to incorporate.
  3. Add the remaining ingredients (tomatoes, cucumbers, diced peppers, scallions) to the cauliflower-herb mixture. Gently stir to combine. Season with salt and pepper to taste.

Chocolate Banana Pie with Coconut Macaroon Crust (Grain Free and Dairy Free)

I have been known to sneak odd ingredients into foods….black beans in brownies, or cashews in “cheese” cake, or even cauliflower in mac n’ cheese.  

Today, my magic trick is with chocolate….bananas….coconut…and…. wait for it…. avocados….in a pie.   What? yes…. It can’t be done you say…CHALLENGE ACCEPTED.

Stay with me on this one, people. I was skeptical too. There are several avocado chocolate mouse/pudding recipes out there in the vast blogosphere. After reading many of these odd recipes, I decided to give it a go and put it into a pie form.  Because everyone needs a good pie every once and a while….or two. 

I pureed two avocados with coconut milk, ripe bananas, soaked dates, a smidge of agave nectar, and some good cocoa. The pudding filling was so silky and creamy and rich….you would think there was a load of butter and cream in this fabulous pie….but no, just the magical avocado. To keep it grain free, but still giving it TONS of flavor, I concocted a coconut macaroon crust. Swoooooon!  So good. The macaroon crust recipe is a keeper.

Chocolate + banana is a match made in heaven to me. Nothing gets better. So I added sliced bo-naners in the base of the pie. I imagine these would be awesome as small tartlets, using a muffin tin instead of an entire pie. Go surprise your taste buds. Throw together this pie and you never have to feel guilty…. You are welcome!

Chocolate Banana Pie with Coconut Macaroon Crust (Grain Free, Gluten Free, Dairy Free, Paleo-Friendly)

Serves 8 to 10

Macaroon Crust Ingredients:

  • 2 cups unsweetened shredded coconut
  • 2 egg whites
  • 1 tablespoon honey (or maple syrup)
  • 1/4 teaspoon kosher salt

Macaroon Crust Instructions:

  1. Preheat oven to 350 F. Spray a 9″ pie pan with nonstick spray or coconut oil. Set aside.
  2. Place all ingredients into your food processor. Pulse until combined. Mixture should hold together when you squeeze it between your fingers. Don’t process for too long or you will end up with a coconut butter-type puree.
  3. Dump the coconut mixture into the prepared pie pan. Press out the mixture evenly into the bottom of the pie pan to about an 1/8-inch to 1/4-inch thick.
  4. Bake in preheated oven until lightly browned, 15 to 20 minutes. Remove from oven and allow to cool to room temperature.

Chocolate Filling Ingredients:

  • 1/2 cups dates, soaked in hot water for at least 10 minutes
  • 2 avocados
  • 2 bananas (one is for the filling and the other is to be layered inside the pie)
  • 1 1/2 cups coconut milk (light or full fat)
  • 1/2 cup unsweetened cocoa powder
  • 1/4 teaspoon kosher salt
  • 1 teaspoon vanilla extract
  • 1 tablespoon honey (or maple syrup)
  • Optional toppings: dark chocolate shavings, unsweetened coconut flakes, slivered almonds, sliced fruit

Chocolate Filling Instructions:

  1. Place soaked dates, avocados, one of the bananas, and the coconut milk in a good food processor. Blend until smooth.
  2. Add cocoa powder, salt, vanilla extract, and honey. Blend until smooth.
  3. Once the crust is cooled and filling is made, layer slices of the remaining banana in the bottom of the pie crust. Add chocolate filling and spread with a spatula to smooth. Optional toppings include flaked unsweetened coconut or dark chocolate shavings. Refrigerate pie for a few hours until cool and set up. Serves 8 to 10.