Gluten Free Pumpkin Blondies

These gluten free blondies are closely related to my Paleo Fudge Brownies which have almond butter as the base ingredient.  For these Pumpkin Blondies, I wanted the pumpkin flavor to be front and center stage.  Pureed canned pumpkin plus pumpkin pie spices give them an amazing fall flavor that will blow your mind.

I’ve made these several times for dinner parties and group gatherings. I have to say that I prefer them with dark chocolate chunks, unsweetened shredded coconut, and just slightly undercooked (about 25 minutes), where they end up more like gooey pumpkin chocolate chip cookie bars.  However, if you prefer to not eat your blondies with messy gooey hands (freaks), then cook these puppies until they are fully set up (about 30 minutes).

Note – if you are using salted almond butter, reduce the quantity of salt or leave out entirely. Similarly, if your nut butter is sweetened, then reduce the quantity of honey equivalently. You could easily sub another type of nut butter for the almond butter. If you do not have pumpkin pie spice blend, then sub cinnamon. 

Pumpkin Blondies (Grain Free, Gluten Free, Paleo Friendly, Dairy Free, Refined Sugar Free) adapted from This Primal Life

Serves 16

Ingredients

  • 1 cup unsalted almond butter
  • 1 cup pureed pumpkin (canned or fresh)
  • 1 egg
  • 1/3 cup honey (or maple syrup)
  • 1 teaspoon baking soda
  • 1/4 teaspoon salt
  • 1 teaspoon pumpkin pie spice blend
  • 1/3 cup dark chocolate chips (optional)
  • 1/2 cup shredded unsweetened coconut (optional)

Instructions

  1. Preheat oven to 350F. Spray an 8″x8″ pan with nonstick spray. Set aside.
  2. In a medium bowl, combine almond butter and pumpkin. Mix until combined. Add egg and honey. Mix well. Stir in baking soda, salt, and pumpkin pie spices. Stir in chocolate chips and 1/4 cup coconut. Top the remaining 1/4 cup shredded coconut.
  3. Pour into prepared pan. Bake in preheated oven for 25 to 30 minutes or until toothpick comes out clean. Remove from oven and allow to cool for 5 to 10 minutes. Best when eaten warm!

Nutty Coconut Date Balls

I love snacks. I would much rather eat several small meals than huge ones. Maybe because I loooove food and the thought of eating different types of food all day is quite a treat to me.

Also, being a runner, I get hunger pains and need a quick fix!  Eating my arm ain’t pretty, folks. You don’t want to see me get HANGRY.

This is basically my version of the coconut Lara bar.  These little balls are all over the food blogosphere, but I had never had a chance to make them until now.  For Food Matters Project Monday, Cheese Please chose Cheese-Nut Balls from Mark Bittman’s Food Matters Cookbook.  My hubby is dairy free, so I swapped out the cheese for dates and made individual snack bites.  These Nutty Coconut Date Balls are perfect little energy snack bites. The dates taste like caramel goodness with smacks of coconut.  Feel free to roll them into balls or press them into a sheet pan and cut them like bars. They make great travel food!

Coconut Pecan Date Balls

Ingredients

  • 1 cup dates, pitted
  • 3/4 cup chopped nuts (such as raw unsalted walnuts, pecans, macadamia nuts, almonds and/or cashews)
  • 1/2 cup shredded unsweetened coconut
  • 1/8 tsp sea salt
  • 1/8 tsp ground cinnamon

Instructions

  1. Add the dates one at a time through the feed tube of the food processor while it is running. The dates will turn into a date paste.
  2. Add the nuts. Process until the consistency appears like cake crumbs, but it will easily stick together when you press the mixture between your fingers.
  3. Add salt and coconut. Pulse until mixed.
  4. You can either make these into bars or balls. If making into balls, simply remove the blade from the food processor and take one tablespoon at a time of the mixture and roll it between your palms until a ball forms.  To make bars (like larabars), put the mixture into a shallow baking pan and press the mixture into it. Seal and store in an airtight container in the fridge until you are ready to serve it.   These will last up to 2 weeks in the fridge or longer in the freezer.

Green Chile and Bacon Frittata

My posts have been a bit brief lately because I am getting closer and closer to taking my Professional Engineering (P.E.) exam.  ONE MONTH!!!  October 26th can’t come quick enough. I am stressing and wish I had more time to prepare, but I just want to get this thing over with.  I’ve locked myself in my “Ladies’ Parlor” for way too long.

What is the Ladies’ Parlor, you ask?

Well, men get their “Man Caves”… so I have taken over my spare bedroom  upstairs and turned it into the Ladies’ Parlor.  My “Ladies’ Parlor” is awesome and fun and has chairs and proper lady drinks and tea cakes and sandwiches and long gloves and long cigarrettes and NO BOYS ALLOWED

Actually, I lie. It is none of those things…YET. 

At this point, it is a study dungeon. Ugh.  It has a sad table and a sad lamp and a sad chair.  But after October 26th…it will DEFINITELY have a cocktail bar. Hell…why don’t I have one of those now? That would most definitely help me through those long nights. 

You know what else gets me through these long days….a solid breakfast. I have to have eggs in the morning. I looooove eggs. What’s better than eggs? Eggs + Bacon.  And the only thing better than that combo, is Eggs + Bacon + Fresh Roasted Green Chiles. I’m serious, folks. Do it.

If you are from the midwest, this time of year is when you look forward to fresh roasted hatch green chiles!  I always stock up and throw several bags in the freezer to enjoy through the winter. Get them while the gettin is goooood.

I threw in some fresh roasted hatch green chiles into a frittata and it was majical. Put them on anything…burgers, eggs, sandwiches, burritos, quesadillas, stew! Ladies’ Parlor Approved!

Green Chile and Bacon Frittata

Serves 4

Ingredients

  • 8 eggs
  • 2 roasted hatch mild green chiles (deseeded, skin removed, and chopped)
  • 1 tomato, diced
  • 1/4 cup canadian bacon or 4 slices of bacon (cooked and chopped into pieces)
  • Optional toppings: avocado, fresh salsa, cilantro

Instructions

  1. Preheat oven to 400 F. Butter or spray a nonstick skillet (or cast iron skillet). Set aside.
  2. In a medium bowl, whisk eggs and sprinkle with a pinch of salt and pepper.
  3. In the prepared skillet, scatter the green chiles, tomatoes, and cooked bacon evenly on the bottom.  Pour the egg mixture on top. Place in the oven for 15 to 20 minutes. (Note, I have an oooold oven, so keep an eye on this, my times may be off a bit because my oven is a beast). Remove when set.

Brats with Roasted Cauliflower and Apples

For our wedding anniversary, Kiley and I spent a few restful days in Hermann, MO. It’s a quaint German town in eastern Missouri. We relaxed, we drank, we ate. It was perfect.

While there, we stocked up on some amazing smoked knackwurst. So good.

Because this week’s Food Matters Project recipe was Whole Cauliflower with Sausage, I decided to use our fresh knackwurst and roast up some cauliflower and local apples.  Apples and brats are great together. This is a great one pot or rather a one roasting pan meal.

Enjoy the fall flavors! Oh, and check out the original recipe at Food Fascination.

Brats with Roasted Cauliflower and Apples

Serves 4

Ingredients

  • 4 brats, polish sausage, or chicken sausage, cut into 1/2-inch rounds
  • 1 head of cauliflower, cut into florets
  • 2 apples, cored and cut into 8 pieces each
  • 1/2 onion, sliced thinly
  • 1 tablespoon olive oil

Instructions

  1. Preheat oven to 425F. Add sausage slices to roasting pan. Toss cauliflower, apple slices, and onions with olive oil in medium bowl. Add to roasting pan.
  2. Roast sausages, cauliflower, apples, and onions for 30 to 35 minutes at 425F or until cauliflower is browned and sausages are cooked through.

Roasted Beets with Apples and Greens

I have a confession.

I have a Friday ritual.

I cry.

I cry every damn Friday morning…not because I want to cry. No, I cry because Story Corps comes on NPR’s Morning Edition every Friday morning while I am on my way to work. And I’m not a cryer, folks,…I’m tough…I’m strong…I do what I want….Rargh!!!!

But on Fridays, there I am….crying at the stop sign or crying by a playground or crying in the parking lot of my office.  I have mascara smeared across my face because this little old man is being interviewed by his granddaughters and he is talking about his wife of 70+ years that just passed away and he remembers dancing with her the first day that they met and how beautiful she was and how she sparkled and now life just doesn’t have that sparkle anymore because she was his sparkle and….damnit…here those stupid tears come again.

This morning those tears streamed down again as I heard an amazing story of a young woman that was homeless in highschool. She shared a room in a Chicago shelter with 6 other family members. She rode the bus 1.5 hrs one way every day to school. She currently is in college, working hard and continuing to take care of her family.  And here those tears come again…it kills me knowing how common this story is. So many Americans are well below the poverty line. So many children are homeless. They have so much to overcome and many are able to but many do not have the chance.

So here is where I give an interweb high five *BAM* to all you educators (my husband included) for fighting for these kids and working long hours and believing and loving and opening your homes and hearts. Keep trucking, because what you do matters.

Doh! There I go again. Telling ya’ll a story and forgetting to go into much detail on the featured recipe.  So lets talk beets and fall apples!  A dear friend of mine from grad school sent me a recipe for an apple and kale saute.  I drooled and immediately made it the next night but added two roasted beets that I had bought at the market. Winner!

Roasting beets is super duper easy. It is way better than boiling…ew!  Read below for a short tutorial on roasting and removing the outer skin of the beet. I always run my roasted beets under running water and the skins rub off easily. Oh and USE THOSE GREENS!!!!  I added the beet greens with the kale. The tart apples and earthy roasted beets are a perfect pair. A dijon vinegerette drizzled on top really seals the deal!  Serve as a side with grilled salmon, pork chops, or chicken. Or for a vegetarian or vegan dish, serve over quinoa and maybe add some toasted walnuts. Mmmmm fall.

Roasted Beets with Apples and Greens (adapted from Whole Foods Market)

Serves 4 as a side

Ingredients

  • 1 bunch of beets with beet greens (about 1 lb)
  • 2 small apples
  • 1/4 medium red onion, thinly sliced
  • 1 bunch of kale, stems removed
  • 1 Tablespoon olive oil, divided
  • 1 Tablespoon apple cider vinegar, divided
  • 1 teaspoon stone ground mustard or dijon mustard
  • salt and pepper to taste

Instructions

  1. Preheat oven to 400 F. Let’s roast some beets! Remove greens from beets. Set beet greens aside to use later. Scrub beets well and do not dry off. Wrap beets loosely in aluminum foil. If beets are similar size, then they can all be wrapped together. If the beets are very large, then wrap them separately. Transfer the wrapped beets to a baking sheet and roast for 1 hour for large beets and 45 minutes for smaller beets. Beets are done when a fork slides easily to the middle of the beet. Allow the beets to cool for 5 minutes, or cool enough to handle. Hold the beets under running water and rub the outer skin away easily. Note – if the skin doesn’t come off easily then it is likely that the beets need to cook a little longer.  Peel and slice all the beets. Set aside.
  2. While the beets are roasting in the oven and they have about 20 minutes until they are done, start cooking the rest of your ingredients. Wash and remove the stems from the beet greens and kale.
  3. Heat 1/2 Tablespoon of olive oil in a skillet. Saute red onion for 5 minutes or until translucent and browned. Add thinly sliced apples and cook for 5 minutes, stirring frequently. Add 1/2 tablespoon of apple cider, kale, and beet greens. Place lid on top of skillet and allow to steam for about 5 minutes, stirring frequently. Remove from heat when greens are wilted.
  4. In a small bowl, mix remaining 1/2 tablespoon olive oil, 1/2 tablespoon apple cider vinegar, and mustard. Set aside.
  5. Divide the kale and apple mixture among 4 plates. Place sliced beats on top of kale and apples. Season with salt and pepper. Drizzle with vinaigrette. Serve warm or at room temperature. Note – If you don’t use all of the roasted beets, they can be stored whole or sliced for up to a week in the refrigerator.

Spiced Zucchini and Apple Cake and an Anniversary

Seven years ago today, I walked down the isle to Johnny Cash’s Ring of Fire and married a crazy man. I call him crazy only because he fell in love with me. What is even crazier is that he has continued to love me amazingly. He is my best friend. I’m one lucky gal. The luckiest in fact.

We make an odd pair. A great team, but an odd pair. He is total left brain and spontaneous and fun and boisterous and ADD and passionate and people oriented. Me? None of those things. Opposite. This man allows me to be crazy and anal retentive. He has taught me to go with the flow…well…to TRY to go with the flow. I’m a Type A engineer…I do as good as I can. I’ve come a long way.

Case in point – On our first anniversary, we took a road trip from Oklahoma to Nantucket. My cousin lived there and we decided to head up there to see her. We were broke (I was getting layed off from my job and going back to school to get my masters). We decided to camp the whole way and eat packed food. We had a tight budget. Well, correction…I had a tight budget.

We spent the first night at a friend’s place in Chicago. We ate turkey sandwiches that night at their house. Budget accomplished. Check. Next day, we headed to New York. Around 9 am it became apparent that we have left our turkey meat in Chicago. Kiley was hungry. I offered him the only option we had….mustard sandwich. He was not a fan. He pulled over to get a sausage biscuit. “But…that’s not a part of the budget,” I said. He asks if I want one. And of course I said no…because it was not in the budget…I mean, in my defense that dollar could make or break this thing, people!!!! SO there he is…eating his hot and steamy and fresh and awesome breakfast sausage biscuit…and there I am…eating my cold and floppy and soggy mustard sandwich. My mustard sandwich was awesome. He was totally jealous.

Do you now know why I think he is crazy….for putting up with me! Seriously.

But that was year 1…and now, 7 years later, he has totally relaxed. Ha…I mean, I have relaxed. A bit. We now own a 1974 VW camper van called Annabelle that we “drive” all over America. Well, sometimes we do not drive her back (she gets towed)…but it’s always a good time and always an adventure.

Right now we are on yet another adventure. This time Kiley surprised me with a train ride to Hermann, Missouri….Missouri’s very own wine country. It’s a quaint German town nestled on the banks of the Missouri River an hour or so west of St Louis. So cheers and I hope you are having a wonderful Monday, because I am.

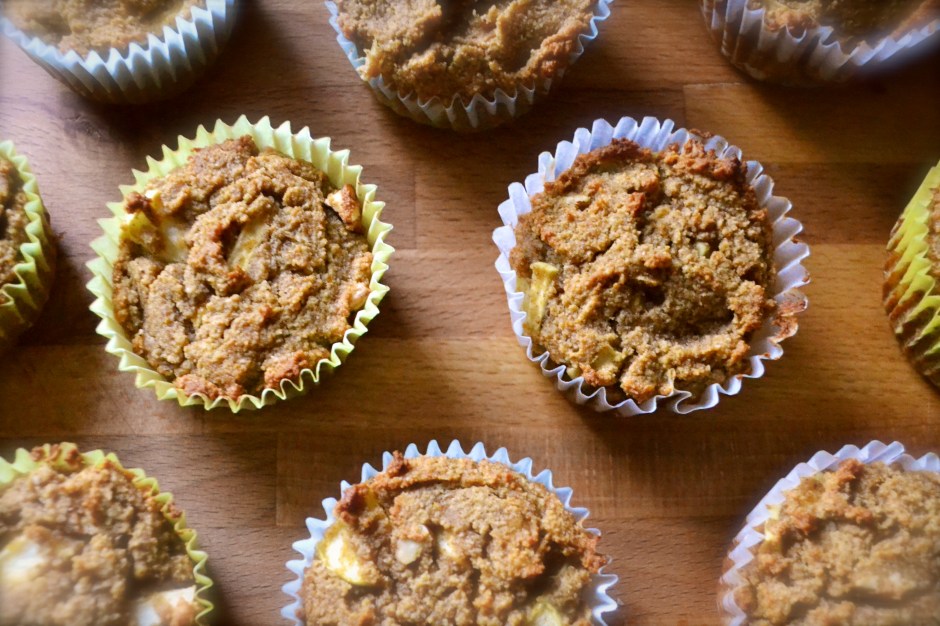
Oh…this cake! I nearly forgot with all the gooshy anniversary talk. Typically on Mondays I present a Food Matter’s Project (FMP) recipe. Today’s recipe was Apricot Polenta Cake which appears to be rather easy and tasty. However, apricots are not around right now at the market and Kiley does not eat grains…so no polenta. Womp womp. But, in an attempt to stick with the “cake” theme of the FMP, I baked this lovely zucchini spice cake. It is adapted from one of my new favorite flood blogs, Against All Grains. She cooks great recipes for individuals that have sensitivities to grains and dairy. This cake is adapted from her zucchini bread recipe which is made with almond flour. My adaptation amps up with fall spices (cinnamon, ginger, nutmeg) and tops it with local apples.

Enjoy this cake for breakfast, dessert, snack, or on a road trip (slices are coming with us on the train). Take it from me, these cake slices are SO much better than eating mustard sandwiches. 😛

Almond Flour Zucchini and Apple Cake (adapted from Against All Grains)

Ingredients

  • 1.5 cups blanched almond flour
  • 1 Tablespoon ground cinnamon
  • 1 teaspoon baking soda
  • 1/2 teaspoon salt
  • 1/2 teaspoon ground nutmeg
  • 1/2 teaspoon ground ginger
  • 3 eggs
  • 1/4 cup maple syrup
  • 2 Tablespoons coconut oil
  • 1 to 2 cups shredded, unpeeled zucchini
  • 2 apples (dice one apple and thinly slice the other to place on top)

Instructions

  1. Preheat oven to 350F. Spray an 8-inch or 9-inch cake pan with nonstick spray. Set aside.
  2. Combine the dry ingredients (almond flour through ginger) in a small bowl. Set aside.
  3. In a separate medium bowl, mix wet ingredients (eggs through oil) and beat for about 1 minute. Stir in zucchini and one of the diced apples.
  4. Slowly add the dry ingredients to the wet ingredients. Mix until all of the dry ingredients have been incorporated.
  5. Pour into prepared pan. Place sliced apple on top in a circle pattern. Bake at 350F for 35 to 40 minutes or until the middle is set. A toothpick comes out clean when the cake is done.

Pumpkin and Apple Almond Flour Muffins (Grain Free)

So I have a crush. And not a little one. A BIG one…a huge, gushy, get red, giggle, snort, blow chocolate milk out of my nose kind of crush. His name…. Pumpkin…that’s Mr. Pumpkin. Ya….you know him. You all love him.  He’s like the Matthew McConaughey of fall produce.  Whatever he is in, it’s golden, perfect, never disappoints and always shirtless.

Such is my crush….mmmmm pumpkin. I’ve been collecting and dreaming about amazing recipes: pumpkin bourbon ice cream, pumpkin bars, pumpkin bread, pumpkin coconut soup, pumpkin latte, pumpkin butter, pumpkin oatmeal, pumpkin pancakes, pumpkin smoothie, pumpkin cheesecake, pumpkin curry. The list goes on and on and on and on, people. It’s bad. I’ve got a pumpkin fever!

And then I stumbled upon this great pumpkin muffin recipe made with almond flour. As soon as the calendar hit September 1st, my oven went on and in went these delicious pumpkin muffins.  I had just picked up some local golden delicious apples at the market and decided to throw one into the mix. I’d been dreaming of these puppies and boy howdy they did not disappoint…much like Matthew McConaughey.  Pull the muffin liner off and they too will be shirtless. Whoah!

I honestly have to say these are hands down the best pumpkin muffins I have had…gluten free or not. It’s a double bonus that they are not only gluten free but grain free. So if you are on the fence about experimenting with almond flour, give these puppies a go. You will forever be in deep smit. You can even eat them shirtless. I won’t tell.

I should note that I made these with my newest purchase of Honeyville blanched almond flour.  I’m super impressed with the light texture.  Trader Joe’s offers almond meal and it is made from unblanched (skins still on) almonds. Bob’s Redmill also sells almond flour. Although Bob’s is blanched,  it has a more coarse texture but still tastes gooooooood. So if you are looking for a lighter texture to baked goods, I’d invest in a better almond flour such as Honeyville or go to Nuts.com.  Store your flour in the fridge or freezer. I also think Whole Foods offers bulk almond flour.   Another option is to regrind Bob’s almond flour in a coffee grinder. Just be careful to not let it process to long or you will end up with almond butter. DOH!

Pumpkin and Apple Almond Flour Muffins (Grain Free) (Slightly adapted from the Urban Poser)

Ingredients

  • 1/2 cup pumpkin puree
  • 2 large eggs, beaten
  • 1/3 cup maple syrup (or honey)
  • 2 Tablespoons coconut oil, melted
  • 3 Tablespoons apple sauce
  • 1 diced apple, leave skin on if organic
  • 2 1/2 cups blanched almond flour (I use Honeyville or go to Nuts.com)
  • 1/2 tsp baking soda
  • 1/4 tsp salt
  • 1 Tablespoon ground cinnamon
  • 1/2 teaspoon ground nutmeg
  • 1/4 teaspoon ground ginger
  • 1/8 teaspoon ground cloves
  • 1/4 cup of walnuts or pecans
Instructions
  1. Preheat oven to 350F. Spray 12 cup muffin tin or place muffin liners within tin. Set aside.
  2. In a large mixing bowl, combine wet ingredients (eggs, pumpkin, maple syrup, coconut oil, and applesauce). Combine until well mixed. Add diced apple. Set aside.
  3. In a separate bowl, combine dry ingredients (almond flour, baking soda, salt, and spices). If you do not have blanched finely ground almond flour, you may need to regrind your almond flour in a blender.
  4. Add the dry ingredients to the wet ingredients. Mix until combined where there are no visible lumps. Add nuts and mix until combined. The batter will be rather thick.
  5. Spoon the batter into the prepared muffin liners or muffin tin. Fill to about 2/3 full, smoothing the tops with the bottom of a spatula or spoon.
  6. Bake in 350F preheated oven for 25 to 30 minutes or until golden brown. Check doneness by inserting a toothpick into the center of a muffin. It will come out clean when done. Allow to cool on a rack, if you dare. Dive in. These freeze well.

Raw Zucchini Salad with Sesame Ginger Sauce

This weekend was a bit tough for me to study. The fall air poured through our open windows. Every time I opened my book, other things called my name: the farmers market, flea market, the garden, zucchini bread, OU football, wine, lunch, wine, dinner, cleaning the bathroom, going for a 7 mile run, getting my toes painted, more wine, walking my dog, another glass of wine….are you seeing a pattern?  Maybe it was the wine that made it difficult? Naaaaaah.

While at the farmers market this weekend, we picked up a poop ton of sweet potatoes, zucchini, peaches, and apples!  So, when this week’s Food Matters Project recipe was Edamame Cakes with Soy Drizzle I decided to take this asian-inspired recipe to Zucchini Land and use up my new bounty of zucchini! This raw salad is uber easy, so fresh and quite beautiful too.  Use the shredder attachment of a food processor to make quick work of shredding up these veggies! Save those knuckles, people!

Note: Don’t add the sesame-ginger dressing until you are ready to serve the salad. The zucchini tends to “weep” and get soggy if it sits with the dressing on it for too long.

To see the original Food Matters Project recipe for Edamame Cakes with Soy Drizzle, check out Life with the Lushers. And be sure to see what the other bloggers came up with here.

Raw Zucchini Salad with Sesame Ginger Sauce

Serves 4 to 6 as a side

Raw Zucchini Salad Ingredients

  • 1 large zucchini, shredded (about 3 cups)
  • 1 red bell pepper, julienned
  • 1 carrot, shredded
  • 1 scallion, green and white parts chopped
  • 1/4 cup cilantro, chopped

Sesame-Ginger Sauce

  • 1 tablespoon coconut aminos or soy sauce
  • 1 tablespoon apple cider vinegar or rice wine vinegar
  • 1 teaspoon sesame oil
  • 1 teaspoon fresh grated ginger
  • 1 clove of garlic minced
  • juice of 1/2 fresh lime
  • salt and pepper to taste

Instructions

  1.  If you have a food processor with a shredding attachment, it will make shredding the zucchini and carrot a breeze. Place the shredded zucchini in a colander and allow to drain for about 30 minutes. Slice the red bell pepper really thin. Combine the zucchini, carrot, bell pepper, and cilantro in a medium bowl. Set aside.
  2. In a small bowl, mix sesame-ginger sauce ingredients and set aside.
  3. When you are ready to serve the salad, add the sesame-ginger sauce to the zucchini mixture. Season with salt and pepper. Serve immediately sprinkled with sesame seeds.

Grilled Delicata Squash with Kale

Do you smell that? Ya…that’s fall people. IT is HERE! Well almost.  The weather man is taunting us. There are 90s in the forecast for the coming week but I have my fingers in my ears and I am not listening because my windows are open, it is in the 60s outside, and I am ready to pull out my BOXES O’ SWEATERS! Yes…that was plural….boxes.

Mmmmmmmmm….sweaters.

Also… winter squash is edging its way onto farmer’s tables at the market. Pumpkins, gourds, acorn squash, butternut squash, spaghetti squash, cinderella pumpkins.

Mmmmm…pumpkin. Oh, be ready people…pumpkin recipes are going to blow this place up! We are going to be swimming in pumpkin at this hacienda. But until then, let’s get back to winter squash, shall we?

One of my favorite winter squash varieties is the delicata squash. It is slightly larger than an acorn squash, but smaller than a butternut.  And did I mention that it is SOOO much easier to cut in half due to the thinner outside skin. The other beauty to this squash (besides those awesome trendy stripes) is that the skin is edible after it is cooked!  Now don’t get me wrong. I love butternut squash like the next bloke, but carving off all that stupid skin and hacking and chopping and nearly taking off my fingers and ear lobes in the process to just get a few measly cups makes me a bitter woman. More bitter than normal. And that’s bitter, people.

The inside flesh is smooth and similar to butternut in texture.  It caramelizes when roasted or grilled.  This dish can easily be adapted for roasting in an oven.  In an oven preheated to 425F, Roast for about 40 minutes. Around 30 or 35 minutes, keep an eye on them and test with a fork. They are done when the fork slides through with no resistance, like a potato.

You could serve the squash alone, but I topped them on top of a fresh lacinato kale salad. A perfect fall salad! Now, where’s my sweater?


Grilled Delicata Squash with Kale

Serves 4 as a side

Ingredients

  • 1 delicata squash, deseeded, halved and sliced in 1/2-inch slices (keep skin on)
  • olive oil
  • salt and pepper
  • 1 bunch of kale (or swiss chard), stems or ribs removed and leaves cut into 1-inch strips and gently massaged. (Read this article to see why and how to massage that beautiful kale.)
  • feta (leave off for vegan and paleo)

Instructions

  1. Prepare and heat grill for direct grill method.
  2. Toss squash slices in olive oil and season with salt and pepper. Grill over medium heat for 5 minutes. Then carefully flip to the other side. Continue grilling for another 5 minutes.
  3. Meanwhile, back on the ranch, add kale strips to a medium bowl. Sprinkle with salt and gently massage so that the kale slightly breaks down and becomes dark in color.
  4. Divide kale between 4 bowls. Place grilled squash rings on top of kale. Top with crumbled feta.

Cauliflower Tabbouleh

This is such a fresh and easy no cook salad and is inspired by the Food Matter’s Project.  I chose to use cauliflower that has been “riced” in a food processor instead of using the traditional bulgur.  Bulgur is a type of cracked wheat and is considered a whole grain. But in our recent quest to give up gluten, I used cauliflower as a stand in for grains and DAAAANG it’s good.  The fresh herbs and lemon make this a perky salad that is perfect for taking to a picnic, potluck, or for a labor day cookout!!!!!  Get on it.  Thanks to Sarah of Simply Whole Kitchen for choosing the Tabbouleh recipe for this week’s edition of Food Matters Project.  

So a small explanation on why we have gone gluten free….

For most of my husband’s life, he has been plagued with the worst seasonal allergies.  He should be the Bubble Boy. He was getting shots weekly until it became too costly, but then the weekly doses of Allergra D weren’t much cheaper either.  Migraines soon followed, nearly once a month…sometimes two or three a month.  They were debilitating and vomit-inducing. Appetizing, I know. 

Months ago, he eliminated grains and dairy from his diet, choosing a “paleo” life-style (only eating meat, vegetables, fruit, and nuts and eliminating grains, dairy, legumes).  Since going “primal”, I have been amazed at all the positive aspects.  His allergies? Vanished…his migraines? GONE. It was a miracle. His allergies were the result of inflammation caused by sensitivities to gluten, grains, and dairy.

Seeing his amazing transformation, I soon began to wonder if gluten was having an affect on me too.  I recently dived into gluten free living and have found that I feel a lot better when I do not consume wheat products.

Soooooooo, whether you have gluten sensitivities or not, I guarantee that you will enjoy this gluten and grain free tabbouleh salad during the final day of a great long weekend.

Cauliflower Tabbouleh (Grain Free)

Inspired by Roost and Mark Bittman

Serves 6 as a side dish

Ingredients

  • 1/2 head of cauliflower, discard stalk and dice florets into 1/2-inch pieces
  • 1/2 cup fresh parsley
  • 1/4 cup fresh mint
  • 1 to 2 cups of kale
  • 2 Tablespoons fresh lemon juice
  • 1 Tablespoon olive oil
  • 2 scallions, green and white parts diced
  • 1/2 cup diced sweet bell pepper (1/4-inch pieces)
  • 1/2 cup diced fresh tomatoes
  • 1/2 cup diced cucumber
  • 1/4 to 1/2 teaspoon salt (to taste)
  • fresh cracked pepper

Instructions

  1. Get out your food processor…don’t have one? I recommend investing in a good one because mine is my best friend! Sorry Guinness. Cut the cauliflower into 1/2-inch to 1/4 inch pieces before adding to the food processor.  Add diced cauliflower to food processor bowl. Pulse until the cauliflower resembles rice. Scrape the “riced” cauliflower into a medium bowl and set aside.  May need to do this in batches to ensure that all of the cauliflower is evenly “riced”.
  2. In the bowl of the food processor (no need to clean out) add packed parsley, mint, kale leaves, lemon juice, and olive oil. Process for about 1 minute. Add herb mix to the riced cauliflower. Gently stir to incorporate.
  3. Add the remaining ingredients (tomatoes, cucumbers, diced peppers, scallions) to the cauliflower-herb mixture. Gently stir to combine. Season with salt and pepper to taste.