Portland Food Tour

20120618-064812.jpg

Sorry, friends. There has been an extended delay in my posts because I am vacationing in Portland, the city of roses, curbside compost service, breweries on every corner, and brunch hot spots! Portland holds a close place in my heart….and stomach. We come up here often and are always inspired by the progressive nature toward bike lanes and general public transit. They also have a vibrant food scene which utilizes farm to table concepts in nearly every restaurant, featuring the freshest seasonal produce.

Our friends that we stayed with were the best hosts and took us to some of the most delicious and unique places in town…. No pepto donuts at voodoo. If you happen to travel to PDX soon, here are some of the places we went and are highly recommended by my stomach! All of these locations had gluten-free and vegetarian options.

20120618-064741.jpg

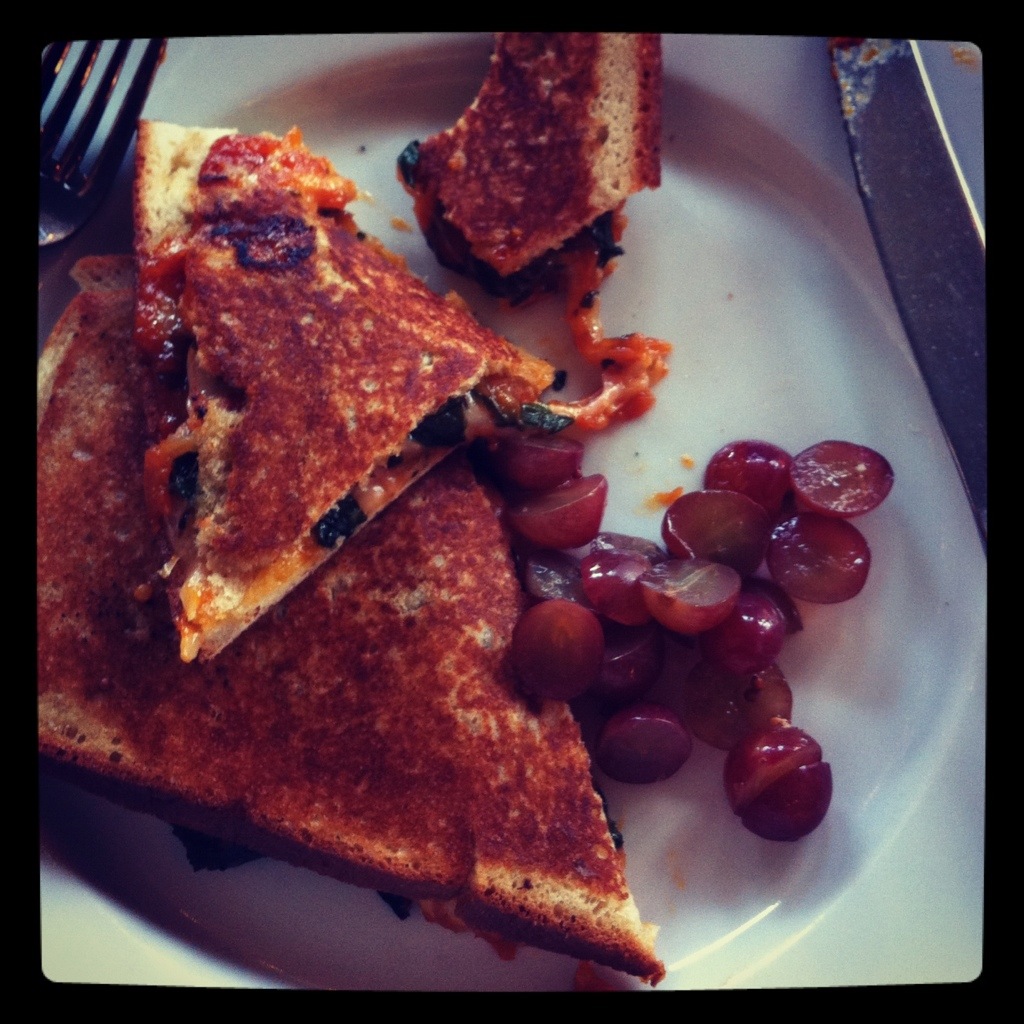
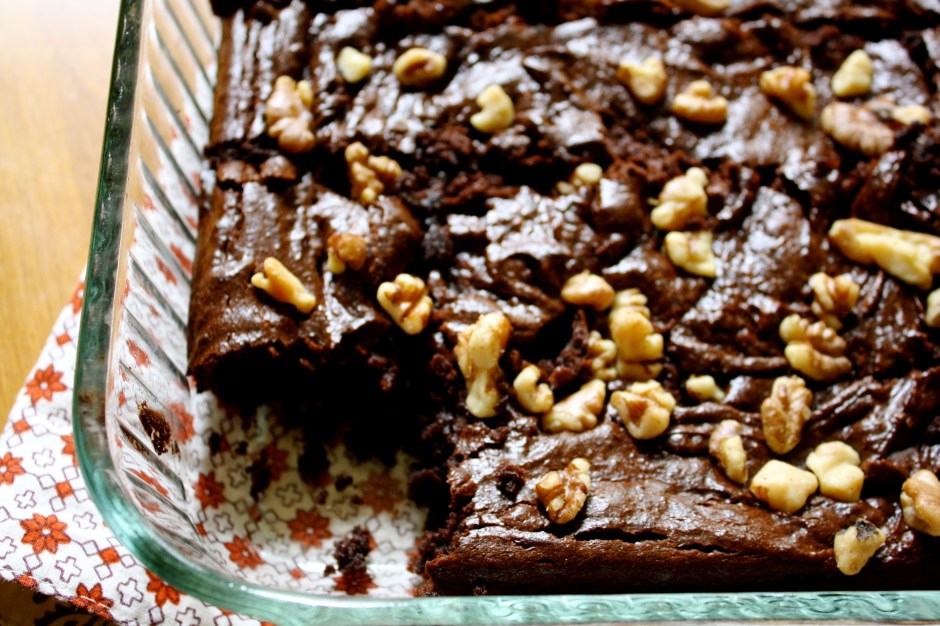
Clyde Common – simply amazing. It is a bit pricey but we went for lunch and it was very affordable. My swiss, kale, and apricot jam panini was life changing. And did I mentions the side of pickled grapes. Ya, pickled grapes. This dish has inspired me to try to create something similar when we get back to KC. Especially since today’s Food Matter’s Project recipe is a dessert panini (Cherry Chocolate Panini) by Margarita of Let’s Cook and Be Friends. Check it out.

20120618-065030.jpg

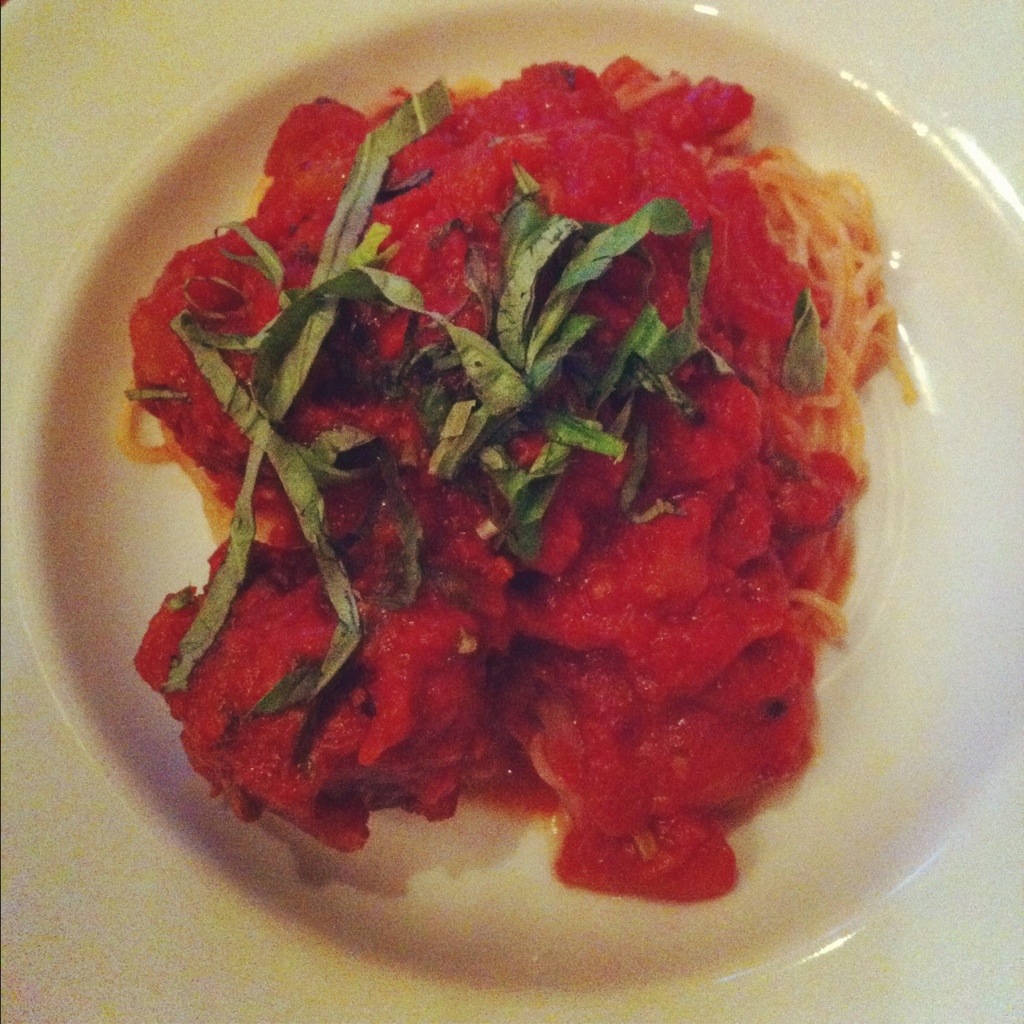
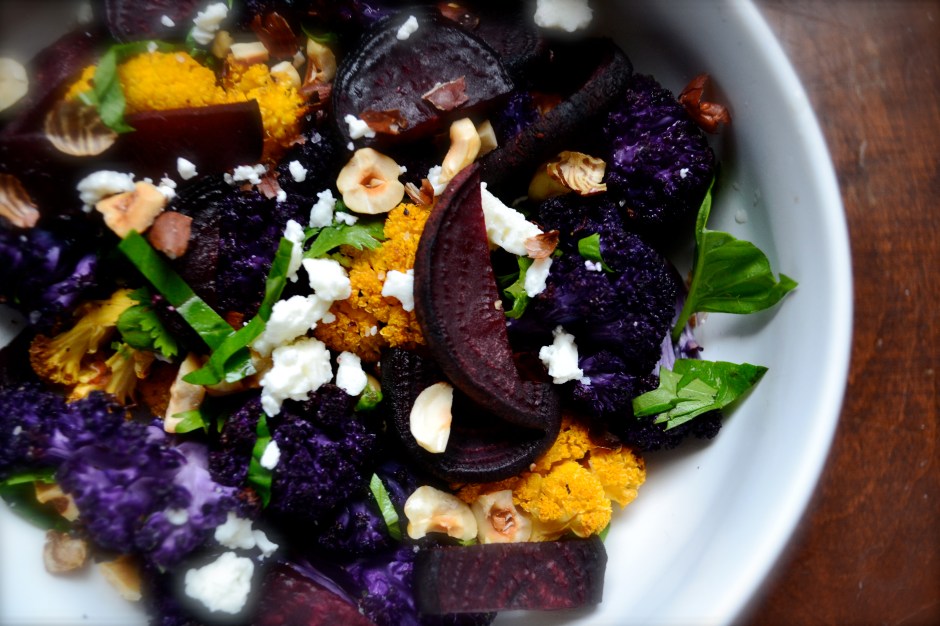
Portobello – this is actually one of my favorite restaurants that I have ever eaten at….and it’s vegan. They are inventive, inspiring, fresh, and never disappoint. I had spaghetti and beet-balls. HOLY CRAP. I can’t tell you how good those damn beet-balls were. But one thing is for certain: I am making some when we get home. Sage and caraway seeds gave them a distinct sausage flavor. Ten thumbs up! This dish inspired me to incorporate beets into black bean burgers that I made last night….recipe to come when we get back.

20120618-064856.jpg

Beaterville Cafe and Bar – great diner with awesome gluten free biscuits. Located walking distance from our friend’s house, we ate here a few times and it was consistently great. Huge omelets, so come hungry!

Bijou Cafe – best french-style omelette of goat cheddar and local mushrooms. Unfortunately, I did not get a picture of it because I was so hungry.   It was ridiculously delicious.

Tasty n’ Sons – worth the hype and again, no picture because I was so hungry when the food arrived that I hoovered my grilled asparagus and poached egg directly in my open mouth. The spring frittata had spring peas, mint, and feta. Kiley had the steak and eggs over a cornmeal pancake with jalapeño butter. The drinks were great….grapefruit mimosa is my new brunch drink of choice. Mmmmm.

20120618-070555.jpg

Bridgeport Brewpub – best brewery and beer in town, in my book. That is a hard thing to do in a town with over 100 microbrews. Grab a seat on the patio and a pint straight from the tap. So good. I recommend the IPA.

20120618-064921.jpg

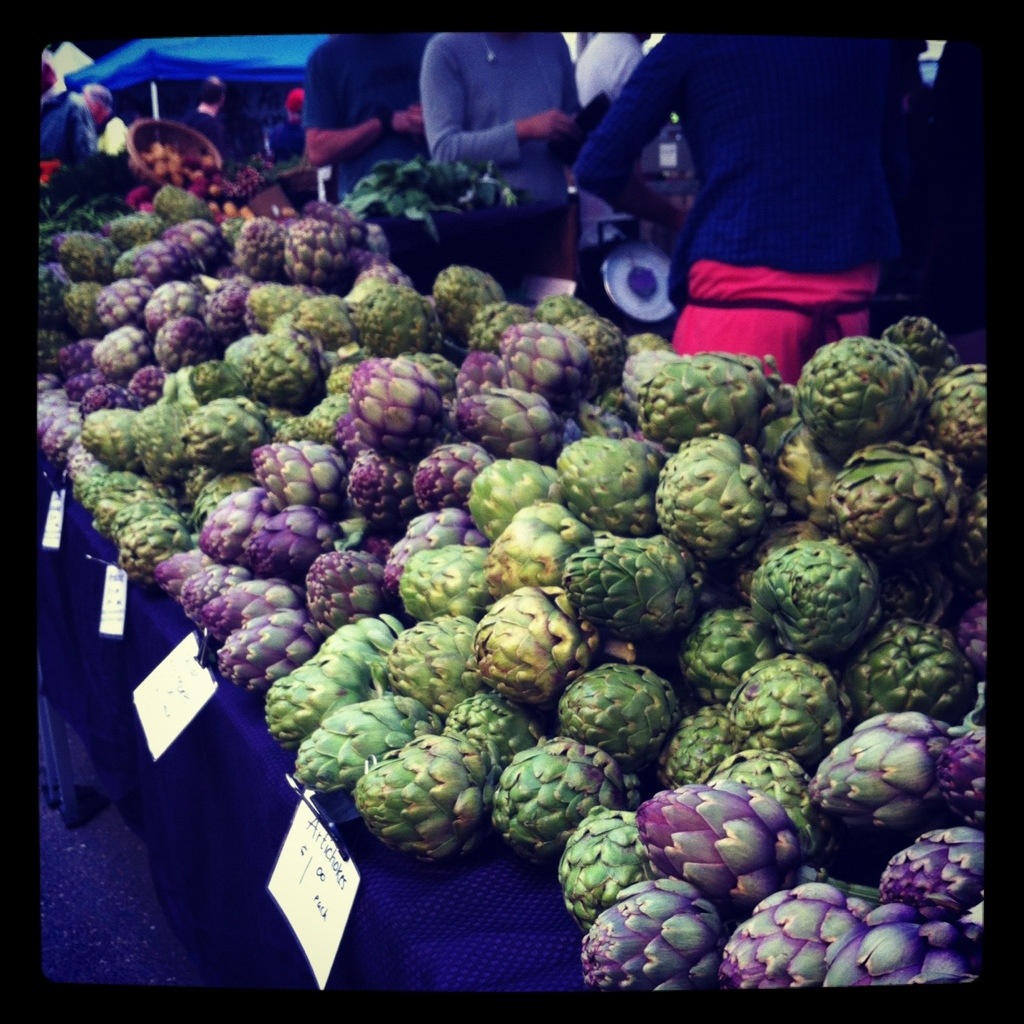
Portland Saturday Farmer’s Market – don’t miss the farmers market on Saturday mornings on the PSU campus. It is the best I have seen.

Baked Curry-Spiced Falafel Sliders

Hellooooo summer. I went on a lazy bike ride one evening this weekend and watched families grill on their patios, kids running through water sprinklers, in promptu baseball games in neighborhood streets, old couples walking hand in hand down the trail by our house, and dogs playing fetch with their owners. Lightning bugs danced around me and the first chirps of cicadas filled the air. It was magical and classic.

The change between seasons and its effect on people is so curious to me. During the short cold days of winter, we stay tucked away in our homes, hybernating and watching reality TV. But as spring and summer hit, bringing with them longer and warmer days, people bloom like the vegetables and flowers in gardens.  They open up their homes and patios to their freinds and family, communing with one another and experiencing the outdoors. Neighborhoods turn into blockparties every night. It sometimes feels like a scene out of a Norman Rockwell painting. 

Another awesome thing about summer versus winter is that food turns from heafty casseroles to finger foods! And oh how I looooove finger foods. Huge burgers leave me lethargic, but sliders….I can have two DIFFERENT kinds. This is perfect for a gal like me that can not make up her mind when it comes to food or anything really.

If you are looking for a handy dandy finger food to take or serve at a party, these falafel sliders are perf.  This recipe is adapted from “Braised Chickpea Fritters and Vegetables” from Mark Bittman’s Food Matters Cookbook and was chosen as part of the Food Matters Project by Lena of Mrs Garlic Head.

I adapted them to be spiced with curry and carrots, plus turned them into a picnic totin finger food. The curry kick makes them a winner for even meat lovers.  For this falafel, use uncooked chickpeas that have soaked overnight. You will need a good food processor to create the chickpea “flour” and mix in the additional ingredients. Baking the falafel makes them a bit crumbly, but still delicious. If you prefer, you can pan fry them in a bit of olive oil or coconut oil. The leftovers can either be frozen or refridgerated. I ate the leftovers cumbled over a delicious kale salad.

Baked Curry-Spiced Falafel Sliders

Ingredient

  • 1 cup dried chickpeas, rinsed, picked over and soaked for at least one hour and up to overnight (do not cook and do not substitute canned beans)
  • 1 small red onion, quartered
  • 1 cup fresh cilantro
  • 3 garlic cloves
  • 1 tablespoon ground cumin
  • 1 teaspoon curry powder
  • 1 teaspoon kosher salt
  • 1/2 teaspoon freshly ground black pepper
  • 1/2 teaspoon baking soda
  • 2 medium carrots
  • coconut oil or olive oil
  • Slider fixings (12 whole grain rolls or pita, cucumbers, crumbled feta, cilantro, cucumber-mint raita*)

Instructions

  1. Preheat oven to 375F.  Oil a roasting pan with 1 to 2 tablespoons of olive oil or coconut oil.
  2. In a food processor, combine soaked and drained chickpeas, onion, cilantro, garlic cloves, cumin, curry powder, carrots, baking powder, salt, and pepper. Process until smooth, about 1 to 2 minutes.
  3. Scoop out 1 tablespoon at a time and shape the falafel into small 1-inch patties at 1/4 inch thick. Place each falafel pattie in the well oiled roasting pan.
  4. Bake for 10 minutes. Remove the roasting pan and flip the patties carefully. Place the roasting pan back into the oven (middle rack) for another 10 minutes. The patties will be light brown.
  5. Assemble your sliders with small whole grain rolls or pita flats, sliced cucumbers, red peppers, and cucumber-mint raita (recipe below).

*Cucumber-Mint Raita

  • 1 cup greek yogurt
  • 1 cup of peeled and diced cucumber, pressed with a paper towel to remove excess moisture
  • 1 tablespoon fresh lime or lemon juice
  • 1 tablespoon fresh mint leaves, chopped
  • pinch of garlic powder
  • Salt to taste

Instructions – Mix above ingredients together in a medium bowl. Season with salt to taste.

Roasted Cauliflower and Beet Salad with Hazelnuts

Nothing is wrong with your eyes or your computer. Yes, this is PURPLE cauliflower…and yellow cauliflower.

Stunning. I know I just took your breath away. I’ll give you a moment to regroup.

And no, it doesn’t taste different. But daaaaaaaaang she is sexy. This is like cauliflower royale, people!  Be jealous. If you don’t have fun easter egg-colored cauliflower like me, well using the plain ol’ hum drum white works just as well.

I know at first glance that this salad sounds like every child’s dream come true…haha….first, it has beets in it and second, cauliflower. Torture.  But with all the fun colors, it’s like a party in your mouth.

Seriously, you know that I’m a HUGE fan of roasted cauliflower. If you have never tried cauliflower roasted…holy cow go do it now. These gems turn into popcorn-candy-goodness when roasted with just a drizzle of olive oil and seasoned with salt n’ peppa. The same goes for beets….boiling beets is gross…quit.  And for that matter, quit boiling vegetables in general. Makes them mushy and it’s wrong. Except for potato salad. I mean, it’s okay to boil potatoes that are going INTO potato salad. If you are boiling potato salad, you have serious problems.

But I digress, go roast those beets because it caramelizes those beet sugars. Yes, caramel….yummy red caramel.  Warning…I do recommend roasting beets in a separate pan to keep from making your cauliflower look like a hot bloody and beaten mess. Not recommended.

Now let’s talk about hazelnuts, also known as filberts. I’m totally digging these suckers lately. They add a bit of sweetness and crunch to this side dish. Buy them raw and roast them yourself in an oven heated to 350°F for 10 minutes. Hazelnuts are packed with folate, vitamin E, essential minerals, B-complex groups, linoleic acid, blah blah blah…their good and good for you.

Go spread your wings, try something new, and give this dish a whirl.

Roasted Cauliflower and Beet Salad with Hazelnuts

Serves 4 as a side

Ingredients

  • 1 medium head of cauliflower (2 lbs), cut into 1-inch wide florets
  • 2 to 3 small to medium beets, scrubbed clean, greens removed (reserving for another use), and cut into 1/4-inch rounds
  • 1 tablespoon of olive oil
  • salt and pepper
  • 1/3 cup of roasted hazelnuts, chopped
  • 2 to 3 tablespoons basil, chopped
  • 2 tablespoons crumbled feta

Instructions

  1. Preheat oven to 400°F. Get out two roasting pans. In one pan, place the cauliflower and drizzle with olive oil and salt and pepper. Place in the oven.
  2. In the other pan, line with aluminum foil. Place the sliced beets on the aluminum foil in the pan. Drizzle the beets with olive oil and season with salt. Cover the beets with another sheet of aluminum foil.
  3. Roast the beets and the cauliflower for 30 to 45 minutes. Poke a beet with a fork and if the fork goes in easily, the beets are tender and cooked. Remove both pans from the oven.
  4. Add the roasted vegetables to a bowl. Top with roasted hazelnuts, feta, and sprinkle with basil. Serve warm.

Grilled Salmon and Vegetable Bundles

Tired. That’s me.

Just tired and drained. I have visions of grandeur as I drive home from work of repainting my back room or organizing my library or, hell, doing laundry. But I can barely get the gumption to fix dinner sometimes.

On days when I am tired or pressed for time, I usually cook fish. I always keep some good fish like wild caught salmon or tilapia in the freezer. Frozen fish thaws out quickly and can be grilled or broiled in a flash.

My typical grill method is to throw the filets and some fresh veggies drizzled with olive oil, salt, pepper, and lemon juice into aluminum foil packets.  Sprinkle with fresh herbs, such as dill or basil or tarragon, or top with dijon mustard and lemon juice. Seal your packets and then grill for about 10 minutes or until the fish flakes when you put a fork in it.

Grilling everything in handy dandy foil packets is like unwrapping a gift that your grill has made for you. Thank you!  Some people call these “hobo” packets.  I don’t know too many hobos and therefore, I do not know whether this is their preferred cooking method.

When picking salmon, I recommend buying skin-on wild-caught Alaskan sock-eye salmon. It’s bright coraly pink in color, not light pink like farm-raised. Salmon is rich in selenium and omega-3s! So eat up!

Grilled Salmon and Vegetable Bundles

Serves 2 to 3

Ingredients

  • 2 (6 oz) skin-on wild alaskan sock-eye salmon filets, thawed
  • olive oil
  • 2 cups of fresh seasonal vegetables (snap peas, beets, tomatoes, onions, carrots, squash, asparagus, garlic, eggplant, etc)
  • fresh herbs (dill, tarragon, parsley, or basil)
  • 1 tablespoon of dijon mustard
  • salt, pepper, and lemon juice

Instructions

  1. Preheat your grill.
  2. In a bowl, combine your vegetables. Drizzle with 1 tablespoon of olive oil. Season with salt, pepper, and fresh herbs.
  3. Spread 1/2 tablespoon of dijon mustard on each filet. Sprinkle with fresh herbs and salt and pepper.
  4. Lay out 2 aluminum foil sheets at 1 foot each. Place one salmon filet on each foil sheet. Divide veggies among each foil packet. Place another foil sheet on top of each packet and seal around the edges.
  5. Place foil bundles on preheated grill. Grill for about 10 minutes. Filet will flake when fork is inserted into fish and pulled back. Vegetables should be tender. Remove from heat and chow down!

Paleo Fudge Brownies (Gluten Free and Vegan)

I’m going to let you in on a weird little fact about me…I prefer ketchup over chocolate. Chocolate has never been a major craving of mine.

*gasp*

I know…so weird.  This probably isn’t the best lead in sentence to convince you to make these brownies….I promise they do not taste like ketchup. Total let down, I know. womp womp.

Actually, chocolate…well, milk chocolate is too sweet for me. However, recently I have become a huge fan of gooooood dark chocolate.  That is, dark chocolate with at least 72% cacao…preferably with 85% cacao. And bonus….it’s good for you. And sometimes you just need some good melty chocolate. So I decided to find a way to turn this awesome dark chocolate into a flourless brownie so that my gluten free hubby could also partake. I’m a doll, I know. Also, if he helps eat them, then I don’t fall asleep with the whole pan in bed. Don’t judge!

Although I have dabbled in flourless and gluten free brownies before, these Paleo Fudge Brownies take the cake…pun intended. They taste amazing and are gluten free, grain free, dairy free, vegan, peanut free, soy free, and processed sugar free. Which also makes them a great dessert to take to cookouts if you have anyone that may have food allergies or sensitivities.

I like these better than conventional brownies that are loaded with flour and sugar and butter (blasphemy, I know), which typically leave me in a coma. And even my sweet-toothed, chocolate-loving hubby adores these.

Instead of flour, the base for this fudge-tastic brownie is almond butter!  You could use any nut butter that you have on hand.  Just make sure that it is unsweetened and all natural. They are sprinkled inside with melted chunks of good dark chocolate (SWOON) and topped with toasted walnuts. Are you drooling yet?

When baking these puppies, make sure you do NOT overcook them. If overcooked, they will taste like brownie croutons, which are still edible, but not as delightful as fuuuuuuudgy brownies. If you slightly undercook them, I guarantee you will take them to bed with you. No judging here.

Added bonus, my friends…they are good for you, and are packed with protein, dark chocolate, and omega-3s from the flax meal and walnuts.

You are welcome!

Paleo Fudge Brownies (slightly adapted from Elana’s Pantry)

Makes 16 brownies

Ingredients

  • 1 small banana
  • 3 pitted dates
  • 1 cup almond butter
  • 2 tablespoons ground flax seeds, mixed with 3 tablespoons of water to form a paste (or 1 egg to make it nonvegan)
  • 2 tablespoons of coconut oil or grapeseed oil
  • 2 tablespoons of unsweetened applesauce
  • 2 tablespoons of agave nectar (or honey for nonvegans)
  • 1 tablespoon of vanilla extract
  • 1/2 cup cacao powder
  • 1/4 teaspoon sea salt
  • 1/2 teaspoon baking soda
  • 1/4 cup chopped dark 85% cocoa chocolate bar
  • 1/4 to 1/2 cup of chopped walnuts

Instructions

  1. Preheat oven to 350°F. Spray an 8X8 inch baking dish with nonstick spray or grease well with butter or coconut oil.
  2. Pull out your food processor. If you don’t have one, use a stand mixer and substitute another banana (two total) for the dates. The dates will not break down in a stand mixer, only a good food processor. Combine the banana(s), dates (if using a food processor), almond butter, and ground flax seed mixture.
  3. Pulse in coconut oil, apple sauce, agave nectar, and vanilla until the mixture is smooth.
  4. Add cocoa powder, salt, and baking soda. Pulse to combine.
  5. Stir in chopped dark chocolate.
  6. Transfer batter into a well greased 8×8 inch pyrex baking dish. Top with chopped walnuts.
  7. Bake at 350°F for 30 minutes. Let cool for about 5 minutes, if you dare, before cutting and serving. (Note – Try not to drool on the brownies while cutting.)

Black Bean and Chard Breakfast Tacos

Greens are overflowing the farmer’s markets and my garden. Now is the time to load up on fresh leafy greens like chard, kale, mustard greens, and lettuce.

It was a shock to the system to arrive home from vacationing in cold South Dakota (highs in the 40s) and arrive in KC with heat indices topping at 100 degrees!!!! Today has been full of harvesting my spring plants and planting summer crops of basil, cilantro, beets, green beans, tomatoes, strawberries, and more chard. I can’t get enough! Plus, adding greens makes me feel not so guilty when I partake in one (or three) brews for Memorial Day celebrations and maybe an extra hunk of dark chocolate. Shhhh!

So back to those lovely greeeeeens. This is why today’s Food Matter’s recipe, Beens N’ Greens Burritos (chosen by Good Things Grow) is perfect for this time of year. I slightly adapted the recipe as a breakfast dish, adding a poached egg and serving it on corn tortillas instead of flour. I prefer corn tortillas to flour (even whole wheat flour tortillas), because they are less processed and typically have less than 5 ingredients. Corn tortillas also topically have more protein, fiber, and less carbs than their flour brethren.

This is basically the same as my Huevos Racheros recipe, but with the addition of swiss chard. Yum. Great start to the day!

Black Bean and Chard Breakfast Tacos

Serves 4

Ingredients

  • 2 teaspoons of olive oil
  • 1/2 onion, diced
  • 1 bunch (about one pound) of swiss chard (or kale or spinach), washed and cut into 1-inch strips (removing stems)
  • 1/2 teaspoon smoked paprika
  • salt and pepper
  • 4 corn tortillas
  • 4 eggs
  • 1 cup cooked black beans
  • 1/4 cup crumbled feta
  • cilantro
  • salsa or pico de gallo
Instructions
  1. Heat olive oil over medium-high heat in a skillet. Add onion and sauté for 5 minutes or until translucent.
  2. Add chard and sauté for an additional 5 to 10 minutes, or until chard wilts. Add black beans and heat through. Remove from heat and set aside.
  3. Cook eggs to your liking. I prefer poached…mmmm.
  4. Heat tortillas by either throwing them in the microwave for 15 to 30 seconds or over the stove in a pan with with a tad bit of olive oil.
  5. Place one tortilla on each plate. Divide chard/black bean mixture among each plate. Top with cooked egg, feta, and cilantro. Dive in!

Filling an Empty Glass

20120526-100341.jpg

Sometimes it takes getting away to rejuvenate the soul. My husband is a teacher and the end of the year finds him pretty worn thin. Recently, my glass has been nearly empty, leaving me in a cloudy funk. A road trip across America helps us slow down and center ourselves.

So far during our 2012 road trip to South Dakota, it has successfully lifted our spirits. The highlights have included:
1. Hitting a huge male wild pheasant, denting the roof of Annabelle (our 1974 VW camper) and having the poor pheasant lodged in between the poptop shell and the roof of the bus. We still have feathers all over the place. Eeew!
2. Driving through most of the major storms in SD, nearly setting sail and doubling up on wool socks and thermals as the temps plummeted to the low 30s. Thankfully Kiley upgraded us from a campsite to a cabin to escape the oncoming SNOW storm.
3. Coming within 30 feet of a wild bison herd on an evening hike. They stopped eating as we came around the corner and just looked right at us, daring us to come closer….hell no. Kiley tried to maintain Indian-silent footsteps, but I just pooped my pants….not literally. 😉
4. Eating the best bison dishes which includes: bison meatloaf, pulled bison, bison burger, bison tips with eggs, bison jerky, bison smoothies (just kidding)…But seriously, I think I have had my meat allotment for the next month! However, my husband is in caveman heaven.
5. Exploring a huuuuuge cave with awesome geologic features called box works.
6. Roasting marshmallows, playing dominos, and drinking irish coffees and downing multiple bottles of wine with my best friend.

20120526-201759.jpg

20120526-202444.jpg

Also, during this Memorial Day weekend, I encourage you to not only remember those that are no longer with us, but also let those that are still here know how much they mean to you and how their presence makes your life better. That will be my mission moving forward because I am one lucky lady.

20120526-211315.jpg

Grilled Yellow Beets and Beet Greens, Camping Edition

20120523-144825.jpg

A few years ago, my husband and I flew to Eugene, Oregon and purchased a 1974 VW camper van and drove it back across the US, taking small highways and traveling through small towns until we made it to our home 8 days later in KC. We have lovingly named our bus the Annabelle Lee, because she is like our great ship that takes us every year in search of America. Annabelle is stocked with a couch that folds out to a full size bed, an ice box, a sink, collapsible tables, and a pop top. She is truly the best camping mobile anyone could ask for. She is part of our family.

The beauty of Annabelle is that she makes you take life a bit slower and enjoy the scenery more. She takes us back to a simple time, where people traveled on the blue highways and not interstates, finding the unique mom and pop shops and ice cream parlors that defined small American towns. She makes you leave “Generica” and the big box retail stores behind and realize that all you need in life is the ones that you love. When we travel, people look at her and smile. You can’t help it. We feel like we are traveling in a parade with people waiving, truckers honking, and trains whistling. It’s true.

Every year we set out for a great American road trip, usually heading north to escape the summer hot box. Two years ago it was Minnesota. Last year, we drove to Wisconsin, the land of beer and cheese curds!!!!

This year for our annual trip, we are headed….yes, north and west to Custer State Park. We are in search of great buffalo, blue highways, a good root beer float, slower times, good beer, hiking trails, and each others company.

The other thing I love about camping is camping food! No, not hot dogs. I love grilled chicken hobo packets, eggs and bacon in the morning with gritty coffee, and grilled bananas and marshmallows at night. This year I tried something new. I grilled some fresh beets and beet greens that we found at a farmer’s market to go along with the grilled lamb burgers the other night. So good. If you are a beet virgin like me, jump on this! And if you love beets, like my husband, you will want to devour the whole batch. So easy and you don’t waste any part of the beet. Winner winner. and it’s puuuuurty!

Grilled Yellow Beets and Beet Greens
Serves 2

Ingredients
One bundle of fresh beets (about 5 small beets), sliced 1/4-inch thick and greens removed
Beet greens, washed and sliced in 1-inch strips
1 tablespoon olive oil
1/2 medium onion, sliced
Salt and pepper

Instructions
1. Heat grill.
2. Pull out a 2 foot sheet of aluminum foil. Fold in half. Open and spray with nonstick spray. Place sliced beets and onions in the middle of the fold. Drizzle with olive oil, salt and pepper. Place beet greens on top. Fold packet in half again, making a pocket. Fold all edges and seal.
3. Place on indirect heat on a grill for 10 to 15 minutes. Opening packet every five minutes and stirring veggies.
4. Remove from grill. Enjoy!

20120523-144748.jpg

Spicy Mango and Coconut Quinoa Salad

Fresh. Sweet. Spicy. Sassy.

No, not me…this quinoa salad. Well…yes, me too, but also this salad.

This dish is basically mango salsa mixed with quinoa…oh and flaked coconut, because we all need more flaked coconut in our lives.  Flaked coconut makes me feel fancy and on vacation. Adding it to this salad was just an extra bonus.

I’m a huge fan of quinoa salads. They are probably my second fav next to kale salads.  Quinoa is an amazing grain, or seed rather, packed full of protein and fiber.  This quinoa salad feeds 4 to 6 as a side dish. It’s great served along side grilled wild alaskan salmon.  To make a more substantial meal and serve it as a main course, the addition of 1/2 cup of roughly chopped roasted salted peanuts or almonds will add protein and make it a bit more hearty.  

This recipe started out as just mango salsa, which was adapted from this week’s Food Matters Project recipe, Mexican-Style Fruit Salad with Grilled or Broiled Fish which was chosen by Food and Frederick.  However, my salsa was taken to superhuman status after I was inspired by the Mango and Coconut Black Rice Salad in my new fav cookbook, Plenty from London’s Ottolenghi.  Holy cow, I have never seen such great veg-tastic food porn in my life. It’s gorgeous. It’s inspiring. It’s a must. I love this book, like I love mason jars….and that’s a lot of love people. Because, seriously, mason jars are about the most useful thing in the world. And duct tape. But duct tape is not beautiful.

Spicy Mango and Coconut Quinoa Salad

Serves 6 as a side dish

Ingredients

  • 2 cups of cooked quinoa* (see note on cooking instructions)
  • 1 jalapeño, seeds removed and diced
  • 2 green onions, diced
  • 1 red bell pepper, thinly sliced
  • grated zest and juice of 1 lime
  • 2 tablespoons of chopped fresh mint
  • 1/4 cup of chopped fresh cilantro
  • 1/4 cup of chopped fresh basil
  • 1 large mango (or 2 small mangos), chopped into 1/2-inch chunks
  • 1/4 cup flaked unsweetened coconut

Instructions

  1. Add all ingredients, except the diced mango and flaked coconut, into a bowl. Toss to combine.
  2. Add mango and coconut, and stir just to mix. Do not over stir or the mango pieces will disintegrate and become too mushy. Taste and adjust the seasonings.

*Cooking Quinoa- Rinse 1 cup of uncooked quinoa thoroughly, until water is no longer milky. Place rinsed quinoa in a saucepan with 2 cups of water or broth. Cook on medium-high heat until it comes to a rolling boil. Reduce heat, cover and simmer for 15 minutes or until tender and the water has been cooked out. Remove from heat and fluff with a fork. I like to double this, cooking extra to eat throughout the week.

Raw Cashew Cream Pie (Gluten-Free)

I love to experiment…especially with food.  Of course, nothing makes me happier than a successful creation and seeing other people enjoy it.  It’s my inner 80 yr old grandma, I show my love by feeding you.  So if you need love and are hungry, then come over…I got plenty to spare. 🙂

But here’s the caveat….I always try to make recipes a bit more “healthy” by swapping out refined sugar for natural sugars like honey, agave nectar or maple syrup. Recently I have been experimenting with gluten-free and dairy-free foods in a quest to tackle allergen free cooking for my husband.

Recently I stumbled upon a secret that vegans and nondairy consumers have known for quite some time….cashew “cheese”. Soak raw unsalted cashews overnight (or at least 4 hrs), puree them in a STRONG food processor or Vita-mix blender, and holy hell, you will get a beautiful cashew custard cream sauce that can be used in a multitude of ways. Ya. I’m not kidding. Those crazy vegans are totally on to something.  Cashew cream is the base for this Raw Cashew Cream Pie which is basically a vegan cheesecake.

I have struggled with calling this dessert a cheesecake, because really…it isn’t. I wish there was a better name for it, maybe Casheesecake?  Cheeshew pie? Come on people…help me out.  I have settled with Cashew Cream Pie. If you have something better, throw it out there and we will discuss it over a slice.

Well whatever it is, it’s deeeelicious. The crust is a combination of pureed Medjool dates (pitted of course), almonds, pecans, cocoa powder, and salt. I’ve experimented with three different flavor variations: (1) Raspberry and Vanilla, (2) Strawberry and Lemon, and (3) Chocolate and Banana. My favorite so far is the Raspberry and Vanilla, but all were fabulous. Because this dessert contains no processed sugars or gluten and is low carb, it will not spike your glucose or sit heavy on your gut (or butt) like most cheesecakes. It’s light yet so filling due to the protein from the nuts.

I hope you enjoy this refreshing and healthier take on cheesecake.

Raw Cashew Cream Pie (adapted from My New Roots), serves 8

Ingredients

Crust:

  • 1/2 cup nuts (I used half almonds and half pecans)
  • 1/2 cup dates, pitted
  • 1 Tbsp cocoa powder
  • 1/4 tsp kosher salt

Vanilla Cashew Cream Filling:

  • 1 1/2 to 2 cups (pre-soaked) raw unsalted cashews, soaked overnight
  • 1/4 cup fresh lemon juice
  • 1/4 cup coconut oil, melted
  • 1/4 cup maple syrup (honey or agave nectar would also work)
  • 1 teaspoon of pure vanilla extract

Flavor Options:

  • Berry – Reserve half of vanilla filling and add 1 cup of fresh or frozen berries, such as blueberries, strawberries, blackberries, or raspberries (if using frozen berries, make sure they are thawed and well drained).
  • Banana – Reserve half of vanilla filling and add 1 to 2 ripe pureed bananas.
  • Chocolate – Reserve half of the vanilla filling and add 2 to 4 tablespoons of cocoa powder.
  • Lime – Replace the lemon juice with lime juice.

Instructions

  1. In a food processor, place nuts, salt, and pitted dates and pulse until the ingredients combine into a paste.  The mixture should hold together when you pinch a small amount between your fingers.  Place saran wrap in a 7″ pie pan (spring form pans work best but aren’t necessary) or 8×8″ square baking dish. Spoon crust mixture into pan and press evenly and firmly, making sure that the edges are well packed. Wash and rinse the food processor.
  2. Microwave the coconut oil in a small pyrex dish for 30 seconds until mostly melted. Whisk in maple syrup to combine.
  3. In the most powerful food processor or blender that you own (a Vitamix blender works great but I have a Cuisinart Pro Plus food processor that processed this mixture like a champ and a half), place cashews, maple syrup, coconut oil, lemon juice, and vanilla and blend on high for several minutes or until very smooth.
  4. For a plain vanilla layer, pour half of the mixture onto the crust and smooth with a spatula. With the remaining filling, add berries or banana or chocolate into the processor and blend on high until smooth. Pour this mixture onto the first layer of filling. Place in freezer for about 2 hours or until solid.
  5. To serve, remove from freezer about 30 minutes before serving.  Heat a smooth and sharp knife under hot water and cut the pie into 8 slices.  Store any remaining pie in the freezer.