Breakfast Bruschetta with Swiss Chard

The markets and my garden are overflowing with lush swiss chard. Chard is a great source of iron, folate, zinc, Vitamin A, Vitamin C, and Vitamin E…to name just a few. This powerhouse green should be on your plate as much as possible and it has been making an appearance in nearly all of my meals lately since I just harvested THREE huge bags of it. Want some?

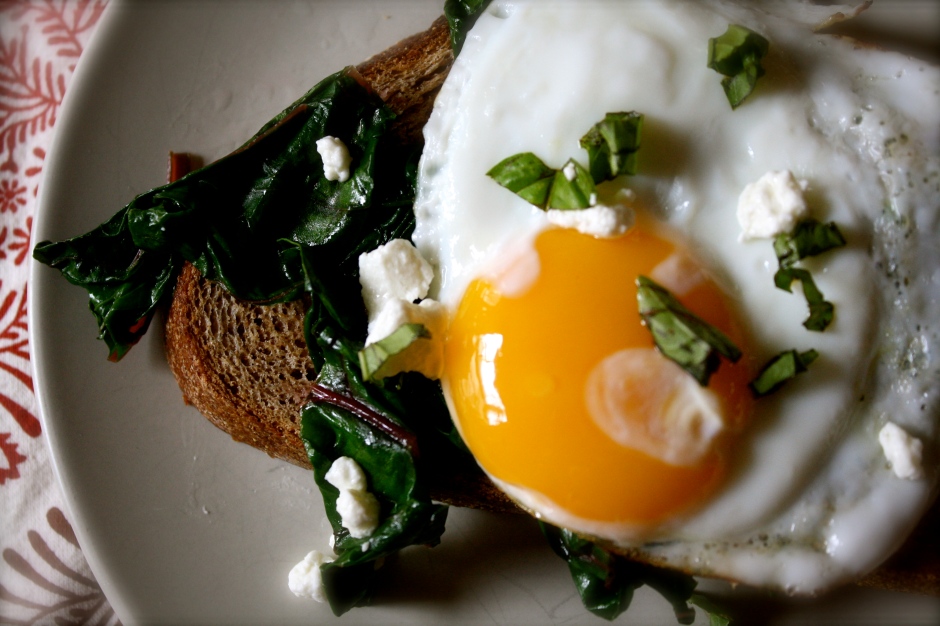
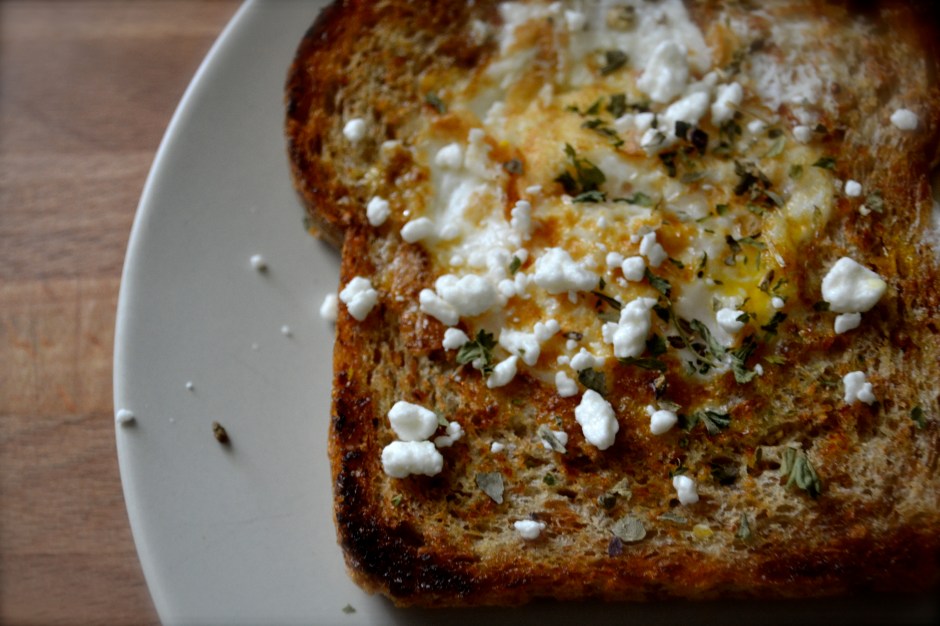
This week for the Food Matter’s Project, Laura of Chef Laura at Home chose Mark Bittman’s Bruschetta recipe. Bruschetta consists of roasted bread topped with good olive oil, rubbed with crushed garlic, salt and pepper, and then topped with whatever your little hungry heart desires.  Typically, the toppings consist of either a tomato basil salad, or white beans, or cured meats, or cheese, or in my case…sautéed CHARD and an egg. My pictures show a fried egg, but I also tried this dish with a fabulous poached egg (my first attempt at poaching eggs and damn it was easier than I thought). The secret to poached eggs is buying good fresh eggs.

To make bruschetta, drizzle a slice of good rustic whole grain bread with good olive oil (because you deserve the best). Toast the bread under a broiler for a few minutes. When the bread is done, rub one or both sides with a clove of mashed garlic.  Now you are ready to top it to your liking.  To see what some of the other FMP bloggers chose to top their bruschetta with, go here.

Breakfast Bruschetta with Swiss Chard

Serves 2

Ingredients

  • 2 slices of good rustic bread (I used whole wheat sour dough)
  • 3 teaspoons of olive oil
  • 1 clove of garlic, mashed
  • 2 eggs (poached, fried, or soft scrambled)
  • A large handful of swiss chard (or any leafy green such as spinach or kale), chopped
  • 1 teaspoon of lemon juice
  • salt and pepper

Instructions

  1. Heat broiler on high. Drizzle bread with olive oil (1 teaspoon per slice of bread). Place bread on cookie sheet on the top rack of the oven just beneath the broiler. Depending on the thickness and size of your bread, broil for 1 to 3 minutes per side. Keep an eye on them because the edges will brown quickly and you will be eating croutons for breakfast instead of toasted bread.  Remove from oven and rub a clove of garlic on one or both sides of the warm toasted bread.
  2. While toasting the bread, heat the remaining teaspoon of olive oil in a sauté pan over medium heat. Place chard in pan and sauté for 3 to 5 minutes, until chard is wilted. Drizzle with lemon juice. Season with salt and pepper.
  3. Cook the eggs to your liking. Go here for a step by step tutorial on making the perfect poached eggs. So easy and good.
  4. Place toasted bread on plate. Top with sautéed chard and poached egg. Season with salt and pepper.  I topped mine with fresh slivered basil and goat cheese also. Mmmm.

Egg in a Basket

Unfortunately, I am traveling and living out of a hotel right now doing field work for my job. YAY…I actually feel like a wild lion that had been put in a zoo for years and is finally able to go home to the jungle. Except my “jungle” is a landfill construction site…oooooh! Hot, I know.

Anyways, because of my recent “being let back into the wilds of field work” and living out of a suitcase, I was not able to complete the Food Matters Project’s weekly challenge….Roasted Asparagus and White Bean Soup chosen by Adrienn Eats.  Sound delicious, so be sure to check out the recipes on the FMP site, here.

Instead…I present you with one of my all time favorite and easiest breakfasts…..egg in a basket.  Take a piece of GOOD bread, generally 1/2-inch to 1-inch thick. Cut out a circle. Heat some butter in a pan. Throw your bread in the pan. Break the egg into your “basket”. Cook. Flip. Eat. Well…put it on a plate, THEN eat it. Mmmmm.

Have I mentioned to you that I looooove breakfast. And I loooooove eggs. And since I love a good juicy runny egg….and toast, it seems only natural to cook the two together. At the same time. Using fun shapes.

Like Mrs Pac man…

This breakfast takes 5 minutes…..or less….literally.  So try it out, have some fun.

Sorry for the short post, but so is life from a hotel with a terrible internet connection.

Egg in a Basket

Serves 2

Ingredients

  • Nonstick spray or 1 tablespoon of butter
  • 2 slice of good whole grain bread (thicker slices serve as better “baskets”, but mine was 1/2-inch thick and worked fine)
  • 2 eggs
  • a pinch of fresh herbs (such as basil, parsley, tarragon, chives)
  • goat cheese or shredded parmesan cheese (optional)
  • salt and pepper

Instructions

  1. Cut out a small circle inside your toast using a biscuit cutter, fun cookie cutter shape, or simply the top of a jelly jar (should be about a 2-inch diameter circle).
  2. Spray a skillet with nonstick olive oil spray. Heat the skillet for a minute, but don’t let the spray start smoking. If you are using butter, heat 1 tbsp of butter over medium-high heat until the butter begins to foam and subside, but not smoking.
  3. Lower the heat to medium-low. Place the slices of bread in the skillet (may need to do this one at a time depending on the size of your skillet or griddle pan), quickly break the egg in the whole filling with egg white first then carefully add the yolk.
  4. Cook for about 2 minutes, until the bottoms of the egg-baskets are set and golden brown. Add the bread cut-outs to the pan and allow to toast on both sides.
  5. Flip carefully and cook for an additional 1 to 2 minutes for runny eggs or 3 minutes for firmer eggs. Make sure to flip your bread cut-outs too.
  6. Remove from skillet. Top with salt and pepper. If you are feeling fancy shmancy, add some fresh herbs and goat cheese crumbles.

Easy Whole Wheat Pizza Dough

Years ago, the Jimy Lahey (the owner of Sullivan Street Bakery) released his amazing no-knead method for making bread. It does require planning and allowing the flour-salt-yeast-water mixture to sit in a warm draft-free environment and ferment for 12 to 24 hours.  But it is simply and I have made several amazing batches of bread this way.  Mark Bittman adopted Jim Lahey’s method in the Food Matters Cookbook, slightly adapting it to a whole wheat version of pizza dough. In fact, the March issue of Bon Apetit did the cover story on Lahey’s no-knead pizza dough.

It really doesn’t take much time. In the morning, throw 3 cups of whole wheat flour (I used half white whole wheat and half whole wheat pastry flour), some salt, and 1/2 teaspoon of yeast in a bowl then add 1 1/2 cups of water. Stir with a wooden spoon. Put plastic wrap over it. Set aside. Done.

The pizza dough will be ready for you to work your magic once you get home from work. It will have bubbles on top from the fermentation process. Place the dough on a floured surface and work into small individual pizzas.

No need to spend extra “dough” on take out. Make this a fun experience with kids or friends or yourself. As you can see, I had two great helpers tonight in making individual pizzas. The kids chose their own toppings and they even experimented with an interesting guacamole pizza. Hrmmm.

If you don’t use all of the dough, or change your mind on dinner that night, the pizza dough will keep in the fridge for up to 3 days or in the freezer for up to a month.

See what everyone did with this recipe at the Food Matters Project. The original recipe was chosen by Niki of Salt and Pepper.

Easy Whole Wheat Pizza Dough

Notes: I recommend investing in a good pizza stone! It makes a difference.

Makes: 2  10″ pizzas or 4 individual mini pizzas

Dough Ingredients

  • 3 cups whole wheat flour (I used whole wheat white flour and whole wheat pastry flour)
  • 1 teaspoon fine sea salt
  • 1/2 teaspoon active yeast
  • Optional Toppings (olive oil, spicy tomato sauce, fresh mushrooms, goat cheese, fresh herbs, etc.)

Instructions

  1. Place flour, salt, and yeast in a medium bowl. Add 1 1/2 cups of luke warm water. Stir with a wooden spoon until mixture comes together. Should resemble biscut dough. Cover with plastic wrap. Set aside in a warm draft-free spot for at least 8 hours, but preferably 12 to 18 hours. The longer it sits, the better the taste. The dough will keep in the refridgerator for up to 3 days at this point.
  2. When you are ready to cook the dough, preheat oven to 500 to 550 F (or as high as it will go), placing a rack in the upper third portion of the oven and place a pizza stone on the rack. Preheat oven for at least 30 minute (45 minutes to 1 hour is preferable to recreate wood-fired pizza). If you are not using a pizza stone and are using a baking sheet, there is no need to preheat the baking sheet.
  3. Meanwhile, put the dough on a floured work surface. Shape into a rectangle and divide into several small pizzas, gently molding into appropriate sizes.  Dust with flour and set aside on rimless baking sheet or pizza peel that has about 1/4 cup of corn meal on the baking sheet (easy to slide the uncooked pizza dough off). Allow dough to rest while oven preheats
  4. Top pizza with desired toppings (sauce, cheese, veggies). Remember, the lighter the toppings, the better this will be. Loading a pizza with too many toppings can result in a soggy pizza.
  5. To transfer the pizza from the rimless baking sheet to the hot pizza stone in the oven, use small and quick back-forth motions. Slide the pizza from the rimless baking sheet (or pizza peel) onto the hot stone.  Bake pizza for 8 to 10 minutes, then broil on high for 2 minutes, or until bottom is crisp and top is melted and done.
  6. Using the rimless baking sheet, remove pizza from hot stone and  transfer to a work surface to slice. If you have another pizza to cook, allow the pizza stone to reheat under the broiler or at 550 F for 5 minutes. Repeat steps 5 and 6 with remaining pizzas.

Braised Chicken in Sweet and Sour Rhubarb Sauce

If you have only had rhubarb in pies and cobblers, you should branch out and try adding it to the main course.  Today’s recipe was chosen by Culinary Adentures with Camilla for week 10 of the Food Matters Project. The original recipe is Braised Fish in Rhubarb Sauce from Mark Bittman’s Food Matters Cookbook, where white fish is cooked in a carmely/lime/rhubarb sauce. Instead of fish, I decided to use this recipe to make a natural sweet and sour chicken dish using rhubarb as the sour and honey as the sweet. Unfortunately, rhubarb has not quite hit the markets yet, but luckily I had some frozen and tucked away from my rhubarb crop last year.

While most rhubarb you see in the grocery stores and markets are a beautiful red, I unknowingly bought a green and a red variety of rhubarb to plant in my garden.  Rhubarb, like asparagus, is a  perennial plant, coming back year after year to give you great tart goodness.  The stalk of the rhubarb plant is edible, while the leaf is poisonous.  Because rhubarb plants love sun, be sure to plant them in a good sunny well drained area that will not be disturbed.  You will not be dissappointed. You can freeze the rhubarb by cutting the stalk into 1/2 to 1-inch pieces and freezing them in a single layer on a cookie sheet. Once they are frozen, place them in a ziploc bag for future use.  In today’s recipe, I used frozen green rhubarb from last years crop.

Because of rhubarb’s pucker power, it needs to be balanced with some sweetness….honey.   I also added the juice of two oranges to balance out the sauce.  The result…awesome and healthy! I loved that it was not loaded down with artificial flavors and processed sugar.  It was fresh and healthy. However, as far as looks go….it would never win a beauty contest. My rhubarb is green….so the sauce looked a bit like green mash.  I only added 2 tablespoons of honey, which was enough for me…..but I think my husband would have preferred it to be more on the sweet side and less on the sour side. But that’s why he has me…I’m sweet enough for everything. (BAH!)

So even if your guests or kids sneer their nose at the site of the slime chicken you are serving (I know I’m selling this dish to you guys, no wonder I’m an engineer and not a salesman), once they taste it…seriously….they will be suprised.

You can use rhubarb in recipes that you would likely also use pineapple. This sauce would be great on pork too.

Check out what the recipes that the FMP food bloggers came up with here. Happy Monday!

Braised Chicken in Sweet and Sour Rhubarb Sauce (adapted from Mark Bittman’s Food Matters Cookbook)

Serves 4

Prep/Cook Time: 30 minutes

Ingredients

  • 1 cup of diced rhubarb (frozen or fresh)
  • juice of 2 oranges (1/2 to 3/4 cup)
  • 2 tablespoons of honey (or more depending on level of sweetness you prefer)
  • 1/2 to 1 teaspoon of fine ground black pepper
  • 1/4 teaspoon of ground ginger
  • 1 tablespoon of coconut oil (or grapeseed oil)
  • 1 medium onion, chopped in 1/2-inch pieces
  • 1 lb of chicken breasts, cut in 1-inch pieces
  • salt and pepper to taste
  • chopped cilantro

Instructions

  1. Place rhubarb, juice of oranges, and honey in a small saucepan and heat over medium-low heat. Stir often and cook for 5 to 10 minutes (do not scorch) or until rhubarb appears mushy and pureed. Stir in ginger and pepper. Remove from heat.
  2. Meanwhile in a medium skillet, heat coconut oil over medium heat. Add onions once coconut oil is completely melted. Saute onions for 5 minutes, or until slightly brown and transluscent. Add chicken and cook until browned on all sides.
  3. Add rhubarb sauce, lower heat to low, and simmer chicken and rhubarb sauce for a 5 minutes, stirring often. Add salt and pepper to taste. Serve topped with cilantro.

Tuna Salad

It has been a very busy week. I went back home to Oklahoma for five days to visit my family. It was a wonderful visit but has left me tired and unable to post this weeks recipe from the Food Matters Project, Cassoulet with Lots of  Veggies, chosen by Keely Marie. Don’t forget to check out the other food bloggers versions here.  I will return next monday with another great FMP recipe.

Instead I present you with an easy tuna salad recipe that I made for a quick lunch since I had nothing else in my cabinets except for a can of tuna and some random salad fixins in the fridge. This is fresh and a great lunch packed with protein. Don’t bother weighing yourself down with processed breads which will only leave you feeling tired in the afternoon.

Tuna Salad

Serves 2

Ingredients 

  • 1 can of dolphin-free, water-packed, low sodium tuna (6 oz)
  • 2 tablespoons of greek yogurt
  • 1/2 cup diced red bell peppers, divided
  • 1/4 cup diced celery
  • 1 green onion, white and green parts
  • 1 tablespoon lemon juice
  • fresh black pepper to taste
  • 4 cups of fresh spinach, rinsed and drained
  • diced veggies (carrot, tomato, cucumber, etc)
  • 2 teaspoons olive oil, divided
  • 1 tablespoon fresh parsley or cilantro, chopped
  • sunflower seeds

Instructions

  1. Mix tuna, greek yogurt, 1/4 cup bell pepper, celery, onion, lemon juice in a medium bowl. Add black pepper to taste.  Set aside or in the refridgerator until you are ready to assemble the salads.
  2. In two bowls, arrange the spinach, remaining 1/4 cup diced bell pepper, and other vegetables that you have on hand. Divide the tuna mixture and place half of it in each bowl on top of the spinach salad.
  3. Drizzle 1 teaspoon of olive oil on each salad. Sprinkle with fresh parsley or cilantro. Top with about 1 teaspoon of sunflower seeds on each salad.
  4. Chow down!

Coq au Vin with Vegetables

It’s Monday and another edition of the Food Matters Project.  I’m a little late in my post, but it has been hard to get behind the stove and cook when it is soooo gorgeous outside. We had nearly six days of straight drab and dreary rain and then the sun popped out this weekend in full spring fashion.  It was grill action time!

Unfortunately, that means I put off my Vegetables au Vin with Coq recipe from the FMP. It was chosen by Evi + Sam of the Fifth Floor Kitchen blog. It is the chicken and veggie version of Julia Child’s Beef Bourginogn, my ALL TIME FAVORITE INDULGENCE DISH. Although I love love love that dish, it takes a friggen lifetime to make.

Mark Bittman’s Vegetables au Vin with Coq takes a fraction of that time, clocking in at 40 minutes to an hour. In his recipe, he uses eggplants, mushrooms, onions, and green beans along with chicken and braised in a red wine sauce. I love recipes that allow me to drink while I cook.

My version uses a whole organic farm raised chicken ($2.50 to $3.50 per pound) which is cheaper than buying organic chicken breasts ($6 to $7 per pound). Use a good pair of kitchen shears to cut the bird up into 4 pieces (breasts and thighs). Save the wings, neck, back, and other parts to use in making homemade chicken stock by throwing those parts in a crockpot, filling with water, adding some carrots or celery for extra flave, and turning on low to cook overnight. Bam…homemade stock.

Instead of eggplant, I stuck with carrots, celery, mushroom, onions, green beans, and spring peas. Because green beans and spring peas do not take long to cook, I add them at the very end so that they aren’t mushy. Use a fruity wine, such as Pinot Noir.

Coq a Vin with Vegetables (adapted from Mark Bittman’s Food Matters Cookbook)

Ingredients

  • 2 tablespoon of olive oil
  • 1 whole chicken, cut into 4 pieces
  • 1 onion, chopped
  • 1 lb baby bella mushrooms, roughly chopped
  • 2 celery stalks, chopped
  • 2 medium carrots, chopped
  • 3 garlic cloves, minced
  • 2 cups chicken stock (preferable homemade)
  • 2 cups fruity red wine (such as pinot noir)
  • 2 bay leaves
  • 1 tablespoon fresh thyme, chopped
  • 2 tablespoon fresh parsley, chopped
  • 1 tablespoon sweet cream organic butter
  • 1 teaspoon fresh cracked pepper
  • 1 lb frozen green beans
  • 1 cup of frozen green peas

Instructions

  1. In a Dutch oven or large pot, add 1 tablespoon of olive oil and heat over medium-high heat. Add the chicken, turning and rotating as necessary. Once all sides are browned, remove the chicken from the pan.
  2. Add the rest of the olive oil, onions, carrots, celery, and mushrooms. Cook the vegetables for about 15 minutes, stirring occasionally, until they being to turn brown. Stir in the garlic and sauté for 1 to 2 minutes.
  3. Add the stock, wine, bay leaves, and herbs. At this time, return the chicken to the pot. Bring the liquid to a boil, then lower the temperature and allow it to cook for about 20 minutes. The chicken should be cooked through at this point, if not, cook for another 5-10 minutes.
  4. Remove the chicken from the pan and add butter to the liquid. Allow it to cook until it is reduced by half, and becomes saucy and thick. Add the green beans and peas. Cook for about 5 minutes. Sprinkle in pepper, or any additional salt. Remove the bay leaves.
  5. If you’re making this dish ahead, refrigerate it at this point. If you’ll be eating it soon (or when you’re reheating), then add the chicken back into the pot and allow to warm up for about 5 minutes. Garnish the dish with parsley when serving.

Curried Tomato and Sweet Potato Soup

It is SPRING! Hope you had a great weekend.

Happy Food Matters Monday. Today’s fabulous recipe is brought to you by the FMP project. The original recipe, Curried Tomato Soup with Hard Boiled Eggs, was chosen by Joanne of Eats Well With Others. This is a simple and delicious version of tomato soup.

Although tomatoes are definitely not in season right now, I luckily still had two mason jars of canned tomatoes in my cellar that I had canned this past summer.  You can easily substitute regular canned tomatoes.

The original recipe called for 3 cups of tomatoes, 2 potatoes, cauliflower, and hard boiled eggs.  Sorry, but the hard boiled eggs on top of a soup kind of freaked me out. If you want to give it a go, try it. I tried to poach an egg in the soup, and it turned out ok. But I probably wouldn’t do it again…but that’s just me.

My version has sweet potatoes that I had stored from the market and a mix of kale and swiss chard from my garden.  This just goes to show you how versatile this recipe, and most recipes, are. You can substitute whatever you have on hand or whatever is in season for most vegetables.

Curry powder and sweet potatoes are a match made in heaven!

Adding coconut milk gives his soup added creaminess.

I also pureed the soup using an immersion or hand blender which makes this soup ever more creamier. You can leave it chunky, if you prefer.

You could also reduce the amount of water in the recipe (use 1 cup instead of 3) and serve this over basmati rice!

Curried Tomato and Sweet Potato Soup (Adapted from Mark Bittman’s Food Matters Cookbook)

Time: 30 minutes

Serves: 4

Ingredients:

  • 2 tablespoons coconut oil (or vegetable oil)
  • 1 medium onion, diced
  • 1 garlic clove, minced
  • 1/2 teaspoon ground ginger (or 1 tablespoon of fresh grated ginger)
  • 2 tablespoons of curry powder
  • 1 teaspoon ground cumin
  • 1/2 teaspoon red pepper flakes
  • 1/2 teaspoon honey
  • 2 sweet potatoes, peeled and diced
  • 1 medium carrot, diced
  • 1 cup lite coconut milk
  • 3 cups vegetable broth or water
  • 3 cups of diced tomatoes (2 cans) with juice
  • 1 bunch of kale (1 to 2 cups), ribs removed and sliced in 1 inch ribbons
  • 4 tablespoons of chopped cilantro
  • salt and pepper to taste

Ingredients:

  1. Heat coconut oil in a heavy dutch oven over medium-high heat until melted. Add onions and cook for 3 to 5 minutes or until onions are translucent. Add garlic, ginger, curry powder, cumin, and red pepper flakes. Cook for an addition 1 minute or until spices become fragrant.
  2. Add diced sweet potatoes and carrot. Stir and cook for 2 minutes, coating potatoes.
  3. Add coconut milk, vegetable broth (or water), and diced tomatoes with juice. Bring to a boil. Lower heat and simmer with lid on pot for 15 to 20 minutes or until potatoes are tender.
  4. Use an immersion blender (hand blender) or a regular blender (or food processor) to puree most of the soup. If using an immersion blender, place the immersion blender into the pot and puree the soup until your get the desired consistency. If you are using a regular blender, remove a few cups at a time and puree in batches. Be careful to not splatter the hot soup. Add the pureed soup back to the pot.
  5. Add kale and cook over medium-low heat for an additional 5 to 10 minutes or until kale is tender. Add salt and pepper to taste.
  6. Ladle into 4 bowls. Top with chopped cilantro.

Sloppy Joes

I love hugs. Nothing is better than a hug when you feel alone, or scared, or stressed. I wish I could bottle hugs…sounds goofy, but it would be a best seller.  You’d buy one, right?   

Like handshakes, hugging can also be done incorrectly. The back pat…what is that! Some people are born huggers….their arms swallow you and pull you in.  With a hug, they show you how much you mean to them. 

To me, a good Sloppy Joe is like an awesome bear hug. The canned variety…well that’s a back pat…bleh.  

This Sloppy Joe recipe is adapted from Ellie Krieger. It was one of the first things that my husband started cooking for me after we got married. It is sweetened with molasses, spiced with jalapenos, and veggie-chunked with bell peppers and beans. Yes Beans. This is definite cowboy food.

They are so harty that we usually eat these puppies open faced with a fork. 

Ya Ya Ya, I know. What fun is it to eat it with a fork, you say. Well take it from me, I can’t eat ANYTHING without it ending up in my lap, hair, and behind my knees (weird, I know). So I must resort to a fork to keep from ruining ALL of my clothes. Or I  should just wear a bib.

Ok. I’ll wear a bib even when I use a fork. Don’t judge!

 Sloppy Joes  (adapted from Ellie Krieger)

Notes: The ingredient list looks long, but don’t get overwhelmed. It is super easy and the ingredients are located in your cupboard or fridge.

Makes: 4 servings

Prep/Cook Time: 30 minutes

Ingredients

  • 1 pound ground beef
  • 1 onion, diced
  • 1 bell pepper (any color that you have…I prefer yellow or red), diced
  • 1 jalepeno, diced (deseed if you are making this for kids or non-cowboys)
  • 3 cloves of garlic, minced
  • 1 6 oz can of tomato paste
  • 2 cups of water
  • 1 tablespoon molasses
  • 1 tablespoon worcestershire sauce
  • 1 tablespoon dijon mustard (or 1 teaspoon of mustard powder)
  • 1 tablespoon red wine vinegar
  • 2 cups (or one 15 oz can) of black beans or kidney beans
  • 3/4 teaspoon salt (or to taste)
  • 1/4 teaspoon ground black pepper
  • 4 whole wheat hamburger buns or whole grain bread

Instructions

  1. Brown ground beef in skillet over medium heat until no longer pink. Drain any grease from pan.
  2. Add onions, pepper, and jalapeño and cook until onions are translucent. Add minced garlic and cook for an additional minute.
  3. Mix tomato paste, water, molasses, worcestershire sauce, dijon mustard, and red wine vinegar in a small bowl until combined. Add to the skillet with the ground beef mixture. Simmer over medium-low heat for 10 minutes.
  4. Add beans, salt, and pepper. Heat until beans are warmed through, about 5 minutes. Remove from heat.
  5. Serve over whole wheat hamburger buns.

Salmon Patties with Cilantro-Lime Sauce

The weather can’t quite decide what it wants to do….warm, cold, warm….snow. And sometimes, this change occurs all in one day.  Sometimes I feel just as spastic as the weather. Unable to decide what to do, what to wear, what to cook….what type of apples to buy. Too many choices just clogs my brain up. Going into the bulk bin isle of Whole Foods is overwhelming to me. So many different types of beans, flours, sugars, grains, nuts, and snacks.

Sometimes it is best to keep things simple. So, in an attempt for simplicity, I present these salmon patties. Simple. Fresh. Quick. Healthy.

Using canned wild salmon makes these uber easy.  If you don’t have oat bran on hand, you can whirl some oatmeal in a food processor or use bread crumbs. Mix all the ingredients in a medium bowl, form into small palm-sized patties, and sauté in a grill pan for about 3 to 4 minutes on each side. Done!

I also whipped up a greek yogurt sauce with cilantro and lime to serve on the side. But these salmon patties are so flavorful and fresh tasting that you really don’t need the sauce.

Salmon Patties with Cilantro-Lime Sauce

Makes: 2 servings

Prep/Cook Time: 15 minutes

Salmon Patty Ingredients

  • 1 (6 oz) can of canned wild salmon, drained and flaked
  • 1 scallion, thinly sliced (1 teaspoon of green parts set aside)
  • 1/4 cup of diced sweet red bell pepper (optional)
  • 1 tablespoon fresh cilantro or parsley, chopped
  • 1 egg white
  • 1 tablespoon lemon juice
  • 2 to 3 tablespoons oat bran (or oatmeal that has been processed into a fine meal from a food processor)
  • 1/8 teaspoon each of salt and pepper
  • sesame seeds (optional)

Cilantro-Lime Sauce Ingredients

  • 1/2 cup of plain greek yogurt
  • 1 tablespoon fresh cilantro
  • 1 teaspoon of reserved sliced scallion (green parts)
  • 2 teaspoons lime juice
  • pinch of salt

Instructions – Salmon Patties

  1. In medium bowl, combine all salmon patty ingredients (salmon through pepper). Stir. If mixture is too wet, then add additional oat bran.
  2. Form into small patties, about 2 inches in diameter and 1/2 inch thick. This should make about 4 to 6 small patties. Sprinkle patties with sesame seeds. Smaller patties cook faster and stay together better. Plus they are just cute.  Place patties on a plate. You can allow the patties to chill for an hour, if you have time. It isn’t necessary.
  3. Preheat griddle pan or skillet over medium heat. Spray with nonstick spray. Cook patties until golden brown on each side, about 3 to 4 minutes on each side.

Instructions – Cilantro-Lime Sauce

  1. Combine all of the sauce ingredients (yogurt through lime juice). Add salt to taste. Serve cilantro-lime sauce on the side of the salmon patties, about 2 tablespoons per person.

Huevos Rancheros with Black Beans

I loooooove breakfast. Lazy Sunday morning breakfast dates with my husband are the best thing on earth.  Our favorite breakfast joint back in Norman was a fabulous place called Turquoise Cafe. They were fresh, inventive, and used local ingredients. Brunch items included oatmeal brûlée, amazing huevos rancheros, and blue corn migas. I’d stab someone’s eye out with a spork for those migas or huevos. Ya, you heard me. Don’t stand in front of me and a good brunch, buddy.

But alas, Turquoise is no more (sniff sniff). It closed shortly after we moved due to some unfortunate circumstances. But, I still crave that food with a vengeance.

I have yet to find any breakfast joint in KC that comes close to Turquoise. We have searched near and far, and still nothing.

I set out to try to recreate the Huevos from that restaurant and I do believe that I have it down to a science, and, in my opinion, have perfected the recipe. Huevos Rancheros (Rachers Eggs) is a basic mexican breakfast that usually consists of fried eggs, tortillas, and cooked salsa.

I like to serve my huevos over black beans. This dish is SO freaking easy and quick. On a busy night, I often will whip this up for dinner. It seriously takes less than 10 minutes to put this meal together.

All you need is eggs, tortillas, cheese, black beans, and salsa. I think cilantro is a huge bonus but not a must. Luckily, my cilantro never gave up the ghost over our lackluster winter and I was able to run out there and nab some to sprinkle on the eggs.

Heat your oven to 350F and place tortillas with a sprinkle of cheese into the oven to melt the cheese. Use whatever cheese you have on hand: cheddar, pepper jack, goat cheese, or even parmesan….seriously.

I like to add a bit of ground cumin to black beans for a good earthy flavor, but it isn’t necessary if you do not have the spice. Add a bit of salsa to your black beans and heat in the microwave while the tortillas are warming in the oven. After the cheese is melted on the tortillas, put the tortillas on oven-proof serving plates and then place a bit of black beans down the middle of each tortilla. Lower the oven temp to 200 F and place the prepared plates in the oven to keep warm while making the eggs.

Fry or scramble some huevos (eggs) to top off the dish. I like my eggs over-medium with a great runny yolk. I recommend getting local, cage-free and farm fresh eggs, if possible. They taste and look so different than traditional store-bought eggs with amazing orange yolks instead of yellow. Mmmmm…love some good orange-yoked eggs for breakfast, lunch, and dinner.

Huevos Rancheros with Black Beans

Note: On the serving size, I usually eat one egg and one tortilla whereas my husband eats two eggs and two tortillas. So, adjust your portion size according to your crowd.

Serves 2 

Ingredients

  • 2 to 4 huevos (eggs)
  • 2 to 4 corn tortillas
  • 2 cups (1 15oz can) of black beans
  • 1/4 teaspoon ground cumin
  • 1/4 to 1/2 cup of cheese (whatever you have on hand)
  • 1/2 cup prepared salsa
  • Toppings – cilantro, green onions, extra cheese
  • salt and fresh cracked pepper

Instructions

  1. Preheat oven to 300 F. Place tortillas on a baking sheet. Spray tortillas on both sides with nonstick spray. Sprinkle a couple tablespoons of shredded cheese on each tortilla. Place in preheated oven. Once the cheese is melted (about 2 minutes), remove from oven. Reduce oven temp to 200F.
  2. Mix black beans, 1/4 cup salsa, cumin, and 1/8 teaspoon of salt in a medium microwavable bowl. Microwave (or heat on the stove in a saucepan) for about 2 minutes, or until warmed through. Stir.
  3. Place 1 to 2 cheese-topped tortillas on each serving plate. Place about 1/3 to 1/2 cup of warmed black beans down the middle of each melted cheese-topped tortilla. Set aside or place oven-proof plates in 200F oven to keep warm.
  4. Cook eggs over medium (or however you desire). Remove warmed plates from oven. Place one egg on top of black beans. Sprinkle with cilantro, green onions, and extra cheese. Serve with salsa.