Roasted Cauliflower and Beet Salad with Hazelnuts

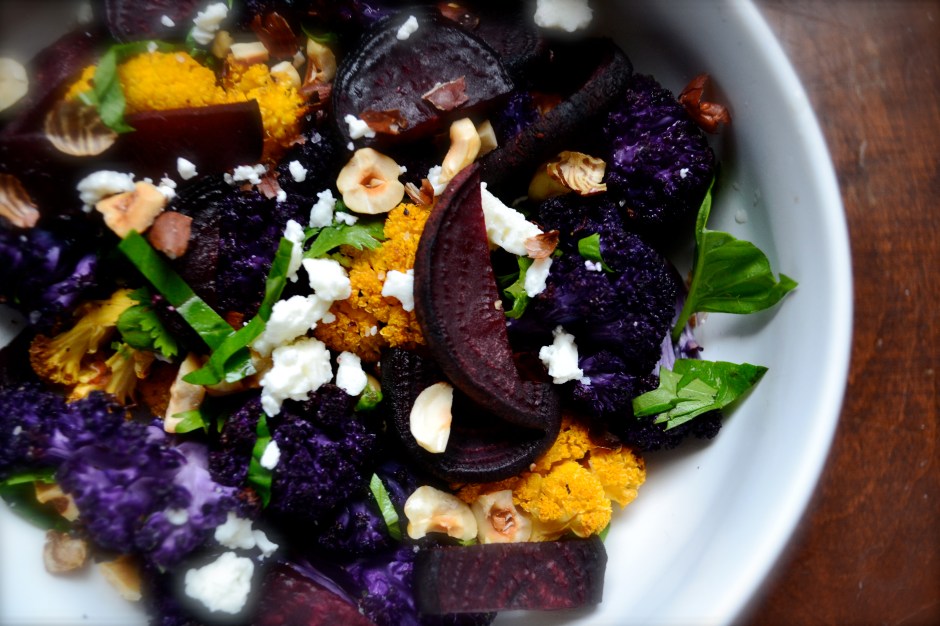
Nothing is wrong with your eyes or your computer. Yes, this is PURPLE cauliflower…and yellow cauliflower.

Stunning. I know I just took your breath away. I’ll give you a moment to regroup.

And no, it doesn’t taste different. But daaaaaaaaang she is sexy. This is like cauliflower royale, people!  Be jealous. If you don’t have fun easter egg-colored cauliflower like me, well using the plain ol’ hum drum white works just as well.

I know at first glance that this salad sounds like every child’s dream come true…haha….first, it has beets in it and second, cauliflower. Torture.  But with all the fun colors, it’s like a party in your mouth.

Seriously, you know that I’m a HUGE fan of roasted cauliflower. If you have never tried cauliflower roasted…holy cow go do it now. These gems turn into popcorn-candy-goodness when roasted with just a drizzle of olive oil and seasoned with salt n’ peppa. The same goes for beets….boiling beets is gross…quit.  And for that matter, quit boiling vegetables in general. Makes them mushy and it’s wrong. Except for potato salad. I mean, it’s okay to boil potatoes that are going INTO potato salad. If you are boiling potato salad, you have serious problems.

But I digress, go roast those beets because it caramelizes those beet sugars. Yes, caramel….yummy red caramel.  Warning…I do recommend roasting beets in a separate pan to keep from making your cauliflower look like a hot bloody and beaten mess. Not recommended.

Now let’s talk about hazelnuts, also known as filberts. I’m totally digging these suckers lately. They add a bit of sweetness and crunch to this side dish. Buy them raw and roast them yourself in an oven heated to 350°F for 10 minutes. Hazelnuts are packed with folate, vitamin E, essential minerals, B-complex groups, linoleic acid, blah blah blah…their good and good for you.

Go spread your wings, try something new, and give this dish a whirl.

Roasted Cauliflower and Beet Salad with Hazelnuts

Serves 4 as a side

Ingredients

  • 1 medium head of cauliflower (2 lbs), cut into 1-inch wide florets
  • 2 to 3 small to medium beets, scrubbed clean, greens removed (reserving for another use), and cut into 1/4-inch rounds
  • 1 tablespoon of olive oil
  • salt and pepper
  • 1/3 cup of roasted hazelnuts, chopped
  • 2 to 3 tablespoons basil, chopped
  • 2 tablespoons crumbled feta

Instructions

  1. Preheat oven to 400°F. Get out two roasting pans. In one pan, place the cauliflower and drizzle with olive oil and salt and pepper. Place in the oven.
  2. In the other pan, line with aluminum foil. Place the sliced beets on the aluminum foil in the pan. Drizzle the beets with olive oil and season with salt. Cover the beets with another sheet of aluminum foil.
  3. Roast the beets and the cauliflower for 30 to 45 minutes. Poke a beet with a fork and if the fork goes in easily, the beets are tender and cooked. Remove both pans from the oven.
  4. Add the roasted vegetables to a bowl. Top with roasted hazelnuts, feta, and sprinkle with basil. Serve warm.

Grilled Salmon and Vegetable Bundles

Tired. That’s me.

Just tired and drained. I have visions of grandeur as I drive home from work of repainting my back room or organizing my library or, hell, doing laundry. But I can barely get the gumption to fix dinner sometimes.

On days when I am tired or pressed for time, I usually cook fish. I always keep some good fish like wild caught salmon or tilapia in the freezer. Frozen fish thaws out quickly and can be grilled or broiled in a flash.

My typical grill method is to throw the filets and some fresh veggies drizzled with olive oil, salt, pepper, and lemon juice into aluminum foil packets.  Sprinkle with fresh herbs, such as dill or basil or tarragon, or top with dijon mustard and lemon juice. Seal your packets and then grill for about 10 minutes or until the fish flakes when you put a fork in it.

Grilling everything in handy dandy foil packets is like unwrapping a gift that your grill has made for you. Thank you!  Some people call these “hobo” packets.  I don’t know too many hobos and therefore, I do not know whether this is their preferred cooking method.

When picking salmon, I recommend buying skin-on wild-caught Alaskan sock-eye salmon. It’s bright coraly pink in color, not light pink like farm-raised. Salmon is rich in selenium and omega-3s! So eat up!

Grilled Salmon and Vegetable Bundles

Serves 2 to 3

Ingredients

  • 2 (6 oz) skin-on wild alaskan sock-eye salmon filets, thawed
  • olive oil
  • 2 cups of fresh seasonal vegetables (snap peas, beets, tomatoes, onions, carrots, squash, asparagus, garlic, eggplant, etc)
  • fresh herbs (dill, tarragon, parsley, or basil)
  • 1 tablespoon of dijon mustard
  • salt, pepper, and lemon juice

Instructions

  1. Preheat your grill.
  2. In a bowl, combine your vegetables. Drizzle with 1 tablespoon of olive oil. Season with salt, pepper, and fresh herbs.
  3. Spread 1/2 tablespoon of dijon mustard on each filet. Sprinkle with fresh herbs and salt and pepper.
  4. Lay out 2 aluminum foil sheets at 1 foot each. Place one salmon filet on each foil sheet. Divide veggies among each foil packet. Place another foil sheet on top of each packet and seal around the edges.
  5. Place foil bundles on preheated grill. Grill for about 10 minutes. Filet will flake when fork is inserted into fish and pulled back. Vegetables should be tender. Remove from heat and chow down!

Paleo Fudge Brownies (Gluten Free and Vegan)

I’m going to let you in on a weird little fact about me…I prefer ketchup over chocolate. Chocolate has never been a major craving of mine.

*gasp*

I know…so weird.  This probably isn’t the best lead in sentence to convince you to make these brownies….I promise they do not taste like ketchup. Total let down, I know. womp womp.

Actually, chocolate…well, milk chocolate is too sweet for me. However, recently I have become a huge fan of gooooood dark chocolate.  That is, dark chocolate with at least 72% cacao…preferably with 85% cacao. And bonus….it’s good for you. And sometimes you just need some good melty chocolate. So I decided to find a way to turn this awesome dark chocolate into a flourless brownie so that my gluten free hubby could also partake. I’m a doll, I know. Also, if he helps eat them, then I don’t fall asleep with the whole pan in bed. Don’t judge!

Although I have dabbled in flourless and gluten free brownies before, these Paleo Fudge Brownies take the cake…pun intended. They taste amazing and are gluten free, grain free, dairy free, vegan, peanut free, soy free, and processed sugar free. Which also makes them a great dessert to take to cookouts if you have anyone that may have food allergies or sensitivities.

I like these better than conventional brownies that are loaded with flour and sugar and butter (blasphemy, I know), which typically leave me in a coma. And even my sweet-toothed, chocolate-loving hubby adores these.

Instead of flour, the base for this fudge-tastic brownie is almond butter!  You could use any nut butter that you have on hand.  Just make sure that it is unsweetened and all natural. They are sprinkled inside with melted chunks of good dark chocolate (SWOON) and topped with toasted walnuts. Are you drooling yet?

When baking these puppies, make sure you do NOT overcook them. If overcooked, they will taste like brownie croutons, which are still edible, but not as delightful as fuuuuuuudgy brownies. If you slightly undercook them, I guarantee you will take them to bed with you. No judging here.

Added bonus, my friends…they are good for you, and are packed with protein, dark chocolate, and omega-3s from the flax meal and walnuts.

You are welcome!

Paleo Fudge Brownies (slightly adapted from Elana’s Pantry)

Makes 16 brownies

Ingredients

  • 1 small banana
  • 3 pitted dates
  • 1 cup almond butter
  • 2 tablespoons ground flax seeds, mixed with 3 tablespoons of water to form a paste (or 1 egg to make it nonvegan)
  • 2 tablespoons of coconut oil or grapeseed oil
  • 2 tablespoons of unsweetened applesauce
  • 2 tablespoons of agave nectar (or honey for nonvegans)
  • 1 tablespoon of vanilla extract
  • 1/2 cup cacao powder
  • 1/4 teaspoon sea salt
  • 1/2 teaspoon baking soda
  • 1/4 cup chopped dark 85% cocoa chocolate bar
  • 1/4 to 1/2 cup of chopped walnuts

Instructions

  1. Preheat oven to 350°F. Spray an 8X8 inch baking dish with nonstick spray or grease well with butter or coconut oil.
  2. Pull out your food processor. If you don’t have one, use a stand mixer and substitute another banana (two total) for the dates. The dates will not break down in a stand mixer, only a good food processor. Combine the banana(s), dates (if using a food processor), almond butter, and ground flax seed mixture.
  3. Pulse in coconut oil, apple sauce, agave nectar, and vanilla until the mixture is smooth.
  4. Add cocoa powder, salt, and baking soda. Pulse to combine.
  5. Stir in chopped dark chocolate.
  6. Transfer batter into a well greased 8×8 inch pyrex baking dish. Top with chopped walnuts.
  7. Bake at 350°F for 30 minutes. Let cool for about 5 minutes, if you dare, before cutting and serving. (Note – Try not to drool on the brownies while cutting.)

Grilled Yellow Beets and Beet Greens, Camping Edition

20120523-144825.jpg

A few years ago, my husband and I flew to Eugene, Oregon and purchased a 1974 VW camper van and drove it back across the US, taking small highways and traveling through small towns until we made it to our home 8 days later in KC. We have lovingly named our bus the Annabelle Lee, because she is like our great ship that takes us every year in search of America. Annabelle is stocked with a couch that folds out to a full size bed, an ice box, a sink, collapsible tables, and a pop top. She is truly the best camping mobile anyone could ask for. She is part of our family.

The beauty of Annabelle is that she makes you take life a bit slower and enjoy the scenery more. She takes us back to a simple time, where people traveled on the blue highways and not interstates, finding the unique mom and pop shops and ice cream parlors that defined small American towns. She makes you leave “Generica” and the big box retail stores behind and realize that all you need in life is the ones that you love. When we travel, people look at her and smile. You can’t help it. We feel like we are traveling in a parade with people waiving, truckers honking, and trains whistling. It’s true.

Every year we set out for a great American road trip, usually heading north to escape the summer hot box. Two years ago it was Minnesota. Last year, we drove to Wisconsin, the land of beer and cheese curds!!!!

This year for our annual trip, we are headed….yes, north and west to Custer State Park. We are in search of great buffalo, blue highways, a good root beer float, slower times, good beer, hiking trails, and each others company.

The other thing I love about camping is camping food! No, not hot dogs. I love grilled chicken hobo packets, eggs and bacon in the morning with gritty coffee, and grilled bananas and marshmallows at night. This year I tried something new. I grilled some fresh beets and beet greens that we found at a farmer’s market to go along with the grilled lamb burgers the other night. So good. If you are a beet virgin like me, jump on this! And if you love beets, like my husband, you will want to devour the whole batch. So easy and you don’t waste any part of the beet. Winner winner. and it’s puuuuurty!

Grilled Yellow Beets and Beet Greens
Serves 2

Ingredients
One bundle of fresh beets (about 5 small beets), sliced 1/4-inch thick and greens removed
Beet greens, washed and sliced in 1-inch strips
1 tablespoon olive oil
1/2 medium onion, sliced
Salt and pepper

Instructions
1. Heat grill.
2. Pull out a 2 foot sheet of aluminum foil. Fold in half. Open and spray with nonstick spray. Place sliced beets and onions in the middle of the fold. Drizzle with olive oil, salt and pepper. Place beet greens on top. Fold packet in half again, making a pocket. Fold all edges and seal.
3. Place on indirect heat on a grill for 10 to 15 minutes. Opening packet every five minutes and stirring veggies.
4. Remove from grill. Enjoy!

20120523-144748.jpg

Raw Cashew Cream Pie (Gluten-Free)

I love to experiment…especially with food.  Of course, nothing makes me happier than a successful creation and seeing other people enjoy it.  It’s my inner 80 yr old grandma, I show my love by feeding you.  So if you need love and are hungry, then come over…I got plenty to spare. 🙂

But here’s the caveat….I always try to make recipes a bit more “healthy” by swapping out refined sugar for natural sugars like honey, agave nectar or maple syrup. Recently I have been experimenting with gluten-free and dairy-free foods in a quest to tackle allergen free cooking for my husband.

Recently I stumbled upon a secret that vegans and nondairy consumers have known for quite some time….cashew “cheese”. Soak raw unsalted cashews overnight (or at least 4 hrs), puree them in a STRONG food processor or Vita-mix blender, and holy hell, you will get a beautiful cashew custard cream sauce that can be used in a multitude of ways. Ya. I’m not kidding. Those crazy vegans are totally on to something.  Cashew cream is the base for this Raw Cashew Cream Pie which is basically a vegan cheesecake.

I have struggled with calling this dessert a cheesecake, because really…it isn’t. I wish there was a better name for it, maybe Casheesecake?  Cheeshew pie? Come on people…help me out.  I have settled with Cashew Cream Pie. If you have something better, throw it out there and we will discuss it over a slice.

Well whatever it is, it’s deeeelicious. The crust is a combination of pureed Medjool dates (pitted of course), almonds, pecans, cocoa powder, and salt. I’ve experimented with three different flavor variations: (1) Raspberry and Vanilla, (2) Strawberry and Lemon, and (3) Chocolate and Banana. My favorite so far is the Raspberry and Vanilla, but all were fabulous. Because this dessert contains no processed sugars or gluten and is low carb, it will not spike your glucose or sit heavy on your gut (or butt) like most cheesecakes. It’s light yet so filling due to the protein from the nuts.

I hope you enjoy this refreshing and healthier take on cheesecake.

Raw Cashew Cream Pie (adapted from My New Roots), serves 8

Ingredients

Crust:

  • 1/2 cup nuts (I used half almonds and half pecans)
  • 1/2 cup dates, pitted
  • 1 Tbsp cocoa powder
  • 1/4 tsp kosher salt

Vanilla Cashew Cream Filling:

  • 1 1/2 to 2 cups (pre-soaked) raw unsalted cashews, soaked overnight
  • 1/4 cup fresh lemon juice
  • 1/4 cup coconut oil, melted
  • 1/4 cup maple syrup (honey or agave nectar would also work)
  • 1 teaspoon of pure vanilla extract

Flavor Options:

  • Berry – Reserve half of vanilla filling and add 1 cup of fresh or frozen berries, such as blueberries, strawberries, blackberries, or raspberries (if using frozen berries, make sure they are thawed and well drained).
  • Banana – Reserve half of vanilla filling and add 1 to 2 ripe pureed bananas.
  • Chocolate – Reserve half of the vanilla filling and add 2 to 4 tablespoons of cocoa powder.
  • Lime – Replace the lemon juice with lime juice.

Instructions

  1. In a food processor, place nuts, salt, and pitted dates and pulse until the ingredients combine into a paste.  The mixture should hold together when you pinch a small amount between your fingers.  Place saran wrap in a 7″ pie pan (spring form pans work best but aren’t necessary) or 8×8″ square baking dish. Spoon crust mixture into pan and press evenly and firmly, making sure that the edges are well packed. Wash and rinse the food processor.
  2. Microwave the coconut oil in a small pyrex dish for 30 seconds until mostly melted. Whisk in maple syrup to combine.
  3. In the most powerful food processor or blender that you own (a Vitamix blender works great but I have a Cuisinart Pro Plus food processor that processed this mixture like a champ and a half), place cashews, maple syrup, coconut oil, lemon juice, and vanilla and blend on high for several minutes or until very smooth.
  4. For a plain vanilla layer, pour half of the mixture onto the crust and smooth with a spatula. With the remaining filling, add berries or banana or chocolate into the processor and blend on high until smooth. Pour this mixture onto the first layer of filling. Place in freezer for about 2 hours or until solid.
  5. To serve, remove from freezer about 30 minutes before serving.  Heat a smooth and sharp knife under hot water and cut the pie into 8 slices.  Store any remaining pie in the freezer.

A Tale of Two Salsas: Basic Salsa and Rhubarb Salsa

Oh salsa…so quick. So easy. It makes the best of times. (too cliche?)

With just a few ingredients, you can make dip-heaven. Salsa can take any dish up a notch or three.  Tomatoes are just a starting point for basic salsa. Later in this post, I’ll let you in on some secrets on how to use seasonal produce to make different types of salsa.  Basically, I’m going to change your life.

Yes, it is true.  I love to dip things. I often choose a meal based on its “dipability”.  Don’t judge! It’s one of my oddities….Ok many oddities, but people…it’s a party at every meal!!! And having a great basic salsa recipe is key for anyone to have tucked up their sleeve to pull out for impromptu events.

Because this was my week to host for the Food Matters Project and because of my love for all things dip-able, I chose the easy fresh salsa recipe from Mark Bittman’s the Food Matters Cookbook.  Paaaahrtay!  If you have never made fresh salsa, you are doing it today (or as soon as you can). Ya, I know you may have other crap planned, but guess what….salsa calls….”make me”.  And it’s easy. Dip it or throw it on tacos, or a salad, or on a spoon. Fresh salsa is perfect party food (for my solo party) or perfect to bring along for such occasions as Cinco de Mayo or you can bring it to my house for me to dip!

Garden tomatoes make the best salsa. But even when tomatoes are out of season, you can use canned tomatoes, which is what I did. Mark Bittman’s basic salsa is technically pico de gallo.  I chose to puree the salsa since I used canned tomatoes and because I like the smooth consistency. However, you can leave it chunky, if you prefer.

So let’s break it down. Really there are a few base ingredients that go into making salsa.

Onions + jalapeño + cilantro + lime juice (or any acidic juice really…vinegar works well too).

From this basic formula, you can add several ingredients to make fresh salsa.  Tomatoes are the basic salsa, of course. It will keep for up to a week in the fridge. But I doubt it will even linger that long. I used this salsa on top of eggs, on top of a spinach mushroom quesadilla (so dippable), and with homemade tortilla chips.

But, if you are feeling adventurous, there are other ingredients that you can add to salsa besides tomatoes….. such as seasonal fruit, black beans, or corn.

With spring in full force, RHUBARB has finally flooded the farmers market!!!!  To take full advantage of rhubarb at its peak, I decided to also try to make a rhubarb salsa.  I know, I know, I know…what about rhubarb pie, rhubarb tart?  Just trust me and branch out from the sweet desserts. Rhubarb salsa beckons you. I was so impressed with the outcome. Using the basic salsa recipe as a starting point, I replaced the tomatoes with rhubarb and sweet bell pepper, and then added a tad bit of honey mixed with apple cider vinegar and lime juice. The tartness in the rhubarb salsa is balanced by the sweet honey and complimented by the spicy kick from the jalapeño.

I ate this on fish tacos (so devine and sorry no pictures….they disappeared in my mouth). I also topped my fresh spring salad with it. Heavenly.

In summer, swap out tomatoes for peaches or mangos. In the fall, use granny smith or any other tart variety of apples. You can also swap orange or lemon juice for the lime juice.  Seriously, the options are endless when making salsa. After you make these salsa recipes, you are going to be in deep smit with them. You are welcome.

Don’t forget to check out the other FMP bloggers creations!

Basic Salsa (from the Food Matters Cookbook by Mark Bittman)

  • 1 1/2 cups of tomatoes (or 1 15 oz canned tomatoes, undrained)
  • 1/2 white or red onion
  • 1 jalapeño, seeds removed and diced
  • 1/4 cup to 1/2 cup of cilantro, diced
  • 2 tablespoons of lime juice
  • 1 garlic clove, minced
  • salt and pepper to taste
Instructions for Basic Salsa
  1. Combine all ingredients in a food processor. Puree until well combined.
  2. Taste and add salt/pepper. Chill covered for at least 30 minutes.
Rhubarb Salsa 
  • 1 stalk of rhubarb (1 to 1 1/2 cups), diced
  • 1/4 cup of sweet bell pepper, diced
  • 2 tablespoons of diced white or red onion
  • 2 tablespoons of diced scallions
  • 1 jalapeño, seeds removed and diced
  • 1 to 2 tablespoons of cilantro, diced
  • 1 tablespoon of lime juice
  • 1 tablespoon of apple cider vinegar
  • 2 teaspoons of honey
  • 1/4 teaspoon kosher salt
  • pepper to taste
Instructions for Rhubarb Salsa
  1. Heat 2 cups of water in a saucepan to boiling. Blanch rhubarb by placing in the boiling water for 10 to 20 seconds. Quickly remove the rhubarb and place in a colander. Run cold water over the rhubarb to stop the cooking process. Blot the rhubarb with a paper towel to dry.
  2. In a separate bowl, combine the bell pepper, onion, scallions, jalapeño, and cilantro. Add rhubarb and mix ingredients.
  3. In a small separate bowl, dissolve the honey in the lime juice and apple cider vinegar. Drizzle this dressing over the rhubarb salsa and stir. Add the salt and pepper. Mix well.
  4. Chill for at least 30 minutes.

Roasted Spring Vegetables

The beauty in growing your own vegetables or getting them from a local community supported agriculture (CSA) group or farmers market, is that you get to try vegetables and varieties of vegetables that you never imagined. For example, check out these sexy carrots that I grew. Ya, that’s right, they are sexy. Vibrant and multi-colored! Ultimate food porn in my book. It’s hard to find carrots this gorgeous in a typical grocery store.

I grew these yellow, purple, and white carrots in my tiny garden that is located on the side of my house in the only patch of lawn that gets sun. The rainbow of colors affirms the awesome amount of antioxidants and minerals that are in these puppies. They are so sweet that eating them straight from the garden is a pure treat and nearly desert. If you don’t have space for a raised bed, you could probably even grow these carrots in containers on your patio. Just make sure that the container is tall enough so that the carrots can develop a root structure. Otherwise, they will be stubby. Womp womp.

The May issue of Bon Appetit features a very flexible recipe for roasted spring vegetables. This recipe inspired me to roast up these fresh carrots instead of gnawing on all of them raw. I also had some fresh spring onions, dinosaur kale, and baby bella mushrooms that were needing to be used up. The result was phenomenal. The roasting process brings out the natural sweetness in the carrots especially. And side note…if you have never roasted kale, Go DO IT NOW. It turns out crunchy like chips. Combined with a good dose of sea salt, kale chips taste like you just landed on healthy heaven.

Try purchasing carrots with the tops still attached. They are fresher and sweeter. And don’t throw away those carrot tops!!!! Wash, chop, and use them in salads and soups or in a carrot green pesto.

I doubt there is anything that can’t be improved by roasting.

Roasted Spring Vegetables (adapted from Bon Appetit)

Yield: 2 servings

Prep/Cook Time: 30 minutes

Ingredients

  • 2 lbs of fresh spring vegetables (carrots, spring onions, kale, radishes, asparagus, peas, mushrooms)
  • 1 tablespoon olive oil
  • 3 unpeeled garlic cloves
  • 1 teaspoon fresh herbs (such as thyme, rosemary, parsley, or basil)
  • kosher salt and fresh cracked pepper

Instructions

  1. Preheat oven to 450 F. Spray a roasting pan with nonstick spray or drizzle with olive oil.
  2. Remove greens from carrots and reserve for another use. Place carrots, garlic, onions, mushrooms, and whatever other vegetables you have on hand in a medium bowl. Drizzle with olive oil. Sprinkle herbs, salt, and pepper on vegetables and stir to coat. Spread vegetables in a single layer on the prepared rimmed roasting pan.
  3. Roast in preheated oven, stirring halfway through the cooking process, for 20 minutes or until the vegetables are golden brown, tender, and slightly charred in a few areas.
  4. Remove from oven and serve immediately.

Healthy Triple Coconut Muffins (Gluten Free)

Last week, I saw amazing whole wheat banana coconut muffins on one of my favorite blogs, Cookie and Kate. Ever since then, I couldn’t stop thinking about trying to make a gluten-free version. And voila…I DID IT. I used coconut flour instead of whole wheat flour based on a gluten-free banana muffin recipe from Elana’s Pantry. These babies are SUPER moist too.

But first, let’s have a chat about fat. Good fat that is…not just cute baby sausage leg fat. I’m talking about good fats in the foods that we eat. The fat free craze that took over the nation created a fear of fats that is unjustified. The food industry began taking out real ingredients and injecting fillers and sugars to replace the fats.  Buying no fat items does not mean that  it is healthy, this is a bit of a myth….go for whole foods and you’ll be good and much more satisfied! Look on the ingredient list. If it says it is no or low fat, and there are more than five ingredients and you can’t pronounce most these ingredients….it’s not a real food.

These muffins have triple coconut in them…coconut oil, coconut flour, and shredded coconut. If you look at the nutritional facts of this muffin, there are approximately 130 calories, 7 g of fat, 2 g protein, and 3 g of fiber!  Let’s get real about coconut and the good fat that it provides.

Coconut Oil – contains saturated fat, but in the form of medium-chain triglycerides (or MCTs) which are easily digested, absorbed, and utilized in the body. This is because these molecules are smaller than those from long-chain triglycerides (or LCTs), which are the type of fat normally consumed from plant and animal sources. Basically, MCTs require less energy and fewer enzymes to break down for digestion, making them an excellent choice of fat for active people and athletes as MCTs digest immediately to produce energy and stimulate metabolism (instead of carb loading!). They are also ideal for those who suffer from digestive disorders and are often given in hospitals to provide nourishment for critically ill people who have trouble digesting fat. SO eat up! And it’s tasty too.  Coconut oil is also stable at high temperatures and is the best oil to be used for high heat cooking.

Coconut Flour – High in fiber, high in protein, and a great gluten-free substitute for flour. You can easily find coconut flour at your local grocer in the health foods section or Whole Foods, of course. Bob’s Red Mill is the brand that I use.  Even if you are not gluten free, you can add coconut flour to regular whole wheat muffins or baked goods to add extra protein and fiber into your recipes.

But seriously folks. Despite these being really healthy and good for you, I really think these are my favorite muffins ever….hands down better than any other muffin (including the fresh blueberry muffins from Cook’s Illustrated). I’ve made two batches in one week.

Triple Coconut Muffins

Note: If you have a good food processor, use it when you prepare these muffins….cuts down on tons of prep work. Otherwise you can do this by hand (just takes a little more elbow grease) or with a  stand mixer.

Makes 9 muffins, Serving Size: 1 muffin (135 calories, 17 g carbs, 7 g fat, 2 g protein, 3 g fiber)

Cook/Prep Time: 35 minutes

Ingredients

  • 2 medium bananas
  • 2 eggs
  • 2 tablespoons unsweetened applesauce
  • 1/2 teaspoon vanilla extract
  • 1/4 cup honey or agave nectar
  • 2 tablespoons extra virgin coconut oil, melted
  • 1/4 cup coconut flour
  • 1/2 teaspoon baking powder
  • 1/4 teaspoon sea salt or kosher salt
  • 1/4 cup shredded unsweetened coconut (plus more for sprinkling on top of muffins)

Instructions

  1. Preheat oven to 350F. Set a rack in the middle of the oven. Spray 9 muffins tins with nonstick spray or apply coconut oil inside the tins or line with muffin liners. Set aside.
  2. Add bananas, eggs, applesauce and vanilla to the bowl of the food processor and blend until well mixed and a liquid consistency (about 1 minute).
  3. Meanwhile, heat the coconut oil in a microwave safe bowl in the microwave for 30 second intervals until melted. Add the honey or agave nectar to the melted coconut oil. Mix until combined. With the mixer or food processor turned on and mixing, pour the coconut oil/honey mixture through the feed tube into the banana mixture. This helps keep the coconut oil from solidifying.
  4. Add coconut flour, baking powder, and salt to the mixer or food processor. Pulse or mix for about 1 minute until well combined and no lumps exist. Stir in 1/4 cup shredded coconut.
  5. Pour mixture into 9 greased tins, filling 3/4 full. Apply 1 teaspoon of shredded coconut on top of each muffin.
  6. Bake in middle of the oven in a preheated oven set at 350 for 23 to 28 minutes (takes me 26 minutes). Keep an eye on the coconut topping.  Allow to cool in the muffin tin for about 5 minutes. Then remove and cool on a wire rack (if you can keep from eating the whole pan).

Serving Size: 1 muffin (135 calories, 17 g carbs, 7 g fat, 2 g protein, 3 g fiber)

Braised Chicken in Sweet and Sour Rhubarb Sauce

If you have only had rhubarb in pies and cobblers, you should branch out and try adding it to the main course.  Today’s recipe was chosen by Culinary Adentures with Camilla for week 10 of the Food Matters Project. The original recipe is Braised Fish in Rhubarb Sauce from Mark Bittman’s Food Matters Cookbook, where white fish is cooked in a carmely/lime/rhubarb sauce. Instead of fish, I decided to use this recipe to make a natural sweet and sour chicken dish using rhubarb as the sour and honey as the sweet. Unfortunately, rhubarb has not quite hit the markets yet, but luckily I had some frozen and tucked away from my rhubarb crop last year.

While most rhubarb you see in the grocery stores and markets are a beautiful red, I unknowingly bought a green and a red variety of rhubarb to plant in my garden.  Rhubarb, like asparagus, is a  perennial plant, coming back year after year to give you great tart goodness.  The stalk of the rhubarb plant is edible, while the leaf is poisonous.  Because rhubarb plants love sun, be sure to plant them in a good sunny well drained area that will not be disturbed.  You will not be dissappointed. You can freeze the rhubarb by cutting the stalk into 1/2 to 1-inch pieces and freezing them in a single layer on a cookie sheet. Once they are frozen, place them in a ziploc bag for future use.  In today’s recipe, I used frozen green rhubarb from last years crop.

Because of rhubarb’s pucker power, it needs to be balanced with some sweetness….honey.   I also added the juice of two oranges to balance out the sauce.  The result…awesome and healthy! I loved that it was not loaded down with artificial flavors and processed sugar.  It was fresh and healthy. However, as far as looks go….it would never win a beauty contest. My rhubarb is green….so the sauce looked a bit like green mash.  I only added 2 tablespoons of honey, which was enough for me…..but I think my husband would have preferred it to be more on the sweet side and less on the sour side. But that’s why he has me…I’m sweet enough for everything. (BAH!)

So even if your guests or kids sneer their nose at the site of the slime chicken you are serving (I know I’m selling this dish to you guys, no wonder I’m an engineer and not a salesman), once they taste it…seriously….they will be suprised.

You can use rhubarb in recipes that you would likely also use pineapple. This sauce would be great on pork too.

Check out what the recipes that the FMP food bloggers came up with here. Happy Monday!

Braised Chicken in Sweet and Sour Rhubarb Sauce (adapted from Mark Bittman’s Food Matters Cookbook)

Serves 4

Prep/Cook Time: 30 minutes

Ingredients

  • 1 cup of diced rhubarb (frozen or fresh)
  • juice of 2 oranges (1/2 to 3/4 cup)
  • 2 tablespoons of honey (or more depending on level of sweetness you prefer)
  • 1/2 to 1 teaspoon of fine ground black pepper
  • 1/4 teaspoon of ground ginger
  • 1 tablespoon of coconut oil (or grapeseed oil)
  • 1 medium onion, chopped in 1/2-inch pieces
  • 1 lb of chicken breasts, cut in 1-inch pieces
  • salt and pepper to taste
  • chopped cilantro

Instructions

  1. Place rhubarb, juice of oranges, and honey in a small saucepan and heat over medium-low heat. Stir often and cook for 5 to 10 minutes (do not scorch) or until rhubarb appears mushy and pureed. Stir in ginger and pepper. Remove from heat.
  2. Meanwhile in a medium skillet, heat coconut oil over medium heat. Add onions once coconut oil is completely melted. Saute onions for 5 minutes, or until slightly brown and transluscent. Add chicken and cook until browned on all sides.
  3. Add rhubarb sauce, lower heat to low, and simmer chicken and rhubarb sauce for a 5 minutes, stirring often. Add salt and pepper to taste. Serve topped with cilantro.

Roasted Cauliflower

Cauliflower….oh you bland vegetable. I so often discount you. I generally choose more colorful vegetables over you…but you have shown me the err in my ways. By simply roasting you in an oven, you transform into delicious, addictive, and caramelized veggie poppers.

I drizzled a good olive oil over the florets and sprinkled them with sea salt and fresh cracked pepper. Threw them in a preheated oven that was set at 425 F and roasted them for 35 to 45 minutes. Holy Moses, I PROMISE you will NOT be disappointed. One head should serve 4 as a side, but I have to admit that two of us destroyed an ENTIRE head of cauliflower in one sitting.  Next time I will experiment with other seasonings such as smoked paprika, chili powder, or even curry. Mmmm.

So, quite ignoring cauliflower…go out there and give that veggie a new purpose in life!  You are welcome.

Roasted Cauliflower

Ingredients

  • 1 head of cauliflower, cut into florets
  • 1 to 2 tablespoons of olive oil
  • 1/2 to 1 teaspoon sea salt (or kosher salt)
  • 1/4 teaspoon fresh cracked pepper

Instructions

  1. Preheat oven to 425 F. Oil or spray a roasting pan with nonstick spray.
  2. Put cauliflower in a large bowl. Drizzle olive oil, salt, and pepper over the florets. Mix until well coated. Lay the florets in a single layer on the roasting pan. Place in oven and bake for 35 to 45 minutes, stirring halfway through the cooking time. Pull out of the oven, and try to let them cook before burning your mouth off by eating them directly from the roasting pan (I speak from experience, people).