Mexican Chicken and Lime Soup

I came down with a horrendous cold last week. My head felt like it was in a vice grip.  Thinking about going on a walk made me too tired.  So all I did was lay on the couch, become a Pinterest addict, and watch guilty pleasures including Downton Abbey, Wes Anderson movies, Lady and the Tramp, and, of course, Varsity Blues.

DSC_0224

The two things I wanted to eat were tapioca pudding (a childhood comfort food) and chicken soup…warm brothy chicken soup.  I didn’t get the tapioca (boooh) but I did get chicken soup. I found this Mexican Lime Soup on Pinterest. This amazing brothy and spicy soup hit the spot. 

Note – Be sure to use fresh limes to obtain the 1/4 cup of lime juice. Oh and serve with a fresh avocado. Game changer! I can also see this easily being compiled into a slow cooker and cooked all day.  DSC_0227

Mexican Chicken and Lime Soup (Gluten Free, Grain Free, Dairy Free, Paleo-Friendly, Whole30 Compliant) (slightly adapted from Williams Sonoma)

Serves 4 to 6

Ingredients

  • 4 limes juiced to yield 1/4 cup lime juice, extra slices for serving
  • 1 tablespoon olive oil
  • 1 yellow onion, diced
  • 4 to 6 cloves of garlic, minced
  • 1 red bell pepper, diced
  • 1 jalapeño, seeded and diced
  • 3 cups low sodium organic chicken broth (homemade is best)
  • 3 cups water
  • 1 lb boneless chicken breasts and/or thighs
  • 1 teaspoon dried mexican oregano
  • 1/3 cup diced cilantro
  • salt and pepper to taste

Instructions

  1. In a large heavy pot or dutch oven, heat olive oil over medium heat. Add onion and saute until translucent, about 5 minutes.  Add garlic, red bell pepper, and jalapeño and cook for an additional 2 to 3 minutes, stirring frequently.  
  2. Add broth, water, oregano, and lime juice and bring to a full boil. Add chicken. Bring back to a boil, lower heat to medium-low and cover. Cook for 10 to 15 minutes, or until chicken is cooked through and no longer pink.
  3. Remove cooked chicken from pot with tongs and place on a cutting board. Shred into pieces with two forks. Add the shredded chicken back to pot. Turn off heat and add fresh chopped cilantro. Serve soup with diced avocado, fresh cilantro, and sliced limes.

Slow Cooker Carnitas (Pulled Pork)

Is it just me or is there a juice frenzy going on?  I feel like everywhere I look and read online, everyone has caught the “juicing” bug.   Get the tiger juice master…juice your veggies…green juice…orange juice…juice your juice.

Not me….I personally like to CHEW my food.  Isn’t that what these chompers called teeth are for? chewing? masticating? gnawing?

DSC_0231

So if you are into chewing your food, then you will totally be into these carnitas (mexican-style pulled pork).  But it is the good kind of chewing. I’m not talking about chewing through leather, my friends. I’m talking about chewing tender and juicy fall-apart pork. USE THOSE BEAUTIFUL TEETH!

Want to please a crowd? Serve pulled pork. You’ll be a hero. They’ll write legends about you.  And even better…make it in your handy dandy crockpot.  Win win.  Throw in the roast in the morning…come home to drool-worthy smells.  It’s so versatile.  You can make tacos or taco salad bowls or bbq pulled pork or sliders or add it to chili or even mix it into scrambled eggs for breakfast. 

DSC_0249

DSC_0252

Even if you don’t need to feed a crowd, slow cooking a 4 to 5 lb pork roast will give you dinner options for the full week. Or call me and I’ll be over pronto for dinner. I’ll be your best friend. F-o-r-e-v-e-r!  Hear the crowd roar!  

You may be asking, “But carnitas typically have crisp edges!?!” “How do you get that in a slow cooker?” Oh honey… Easy Peasy!  Just before serving, finish the shredded pork roast under a broiler or high temp oven to get the crisp edges that we love so much.  Ya. This is a little trick that Cook’s Illustrated uses. Those people are geniuses!

You can even freeze the leftovers in small portions for later use.  Quick lunch or quick dinner options right at your awesome finger tips! You will never lose.  See…you are a hero!

DSC_0264

Slow Cooker Carnitas (Pulled Pork) 

Recipe adapted from Gimme Some Oven and Bon Appetit.

Serves 8 to 10

Ingredients

Slow Cooker Pulled Pork Ingredients:

  • 4 to 5 lbs boneless pork roast, cut into 2-inch pieces
  • 1 large white onion, diced
  • 1 Tablespoon chipotle powder (or 1 chipotle in adobo sauce)
  • 1 Tablespoon smoked paprika
  • 1 Tablespoon ground cumin
  • 1 teaspoon chili powder
  • 1 teaspoon dried oregano
  • 1 1/2 teaspoon salt
  • 1 teaspoon black pepper
  • 4 cloves garlic, minced
  • Juice of 2 limes (about 1/4 cup)
  • 1 cup of chicken broth (low sodium)

Instructions

  1. Toss pork in bowl of slow cooker with spices (chipotle powder through black pepper) to coat. Place onion pieces on top of cubed pork. Pour lime juice and chicken broth on top. Cover slow cooker.  Cook on low setting for 6 to 8 hours, or until meat is very tender and falling apart.
  2. Now for the crispy edges. Once the pork is cooked, preheat your broiler to high heat.  Line two baking sheets with aluminum foil. Set aside.
  3. Using a slotted spoon, transfer the pork from the slow cooker to a cutting board.   RESERVE THAT BROTH!!!! Use a fork or fingers to shred the pork into bite-sized pieces. Transfer the shredded pork to the prepared baking sheets, spreading it out evenly in a single layer.
  4. Broil one sheet at a time for about 5 minutes, or until the edges of the pork begin crisping up. Remove the sheet from the oven and use tongs to carefully toss the pork. Ladle some of the reserved broth (about 1/4 of a cup) over the pork. Return to the oven and broil an additional 5 minutes to finish the crisping processes.  Pull from oven. Repeat this process with the second pan.
  5. Transfer crisp carnitas to a platter and ladle more reserved juice on top.  For taco bowls, serve with avocado slices, cilantro sprigs, fresh lettuce, jalapeños, fresh salsa, and sliced red bell peppers, if desired.

Paleo Eggplant Lasagna

I’ll tell you a little secret.

The easiest way to get to my heart is to make me lasagna.

Yes, it is sad, but there is an expressway right to the center of my heart via layers of ricotta cheese, meat sauce, and ribbons of lasagna noodles.  I would eat it for breakfast, second breakfast, lunch, dinner, dessert…second dessert.

But alas, I have not had lasagna in so long.  My gluten sensitivity has slammed that door shut. Oh lasagna….*sigh* I miss you dearly.

DSC_0285

Growing up, my mom would make lasagna and homemade strawberry cake for my birthday.  It was a several hour affair.  Making the perfect lasagna is like building a log cabin.  There are so many steps, but it is so worth it in the end:

  • Boiling noodles;
  • Making the ricotta mixture;
  • Grating the mozzarella and parmesan cheese;
  • Making the fresh tomato and meat sauce;
  • Constructing the masterpiece;
  • Baking the amazing masterpiece for an hour;
  • THEN waaaaaaaaaaiting for it cool down!!!!!

UUUgh.  The roof of my mouth suffered many times from not being able to wait. But then…there it was. *Chorus Line Dancers* *Jazz Hands* “Ladies and Gents…I present to you….The Great Laaaasagnaaaaaa.” I dove head first into that big slice of layered heaven.  I always looked forward to that meal. Again…a moment of silence for my dear lasagna.

A few years ago, my husband surprised me with a homemade spinach lasagna for my birthday.  This man does not really cook…but he made it from scratch.  Oh it was delicious. It was comfort rolled up in layers of sauciness.  But that was the last time I had lasagna.  TWO YEARS.

DSC_0300

My birthday is at the end of the month and my innate need for lasagna has been getting strong.  I dream about it. I smell it in the air….in my car. I’m serious. I seriously started thinking that maybe I just smelled like lasagna?  Maybe I emit oregano and basil fumes.  I guess there are worse things to smell like.

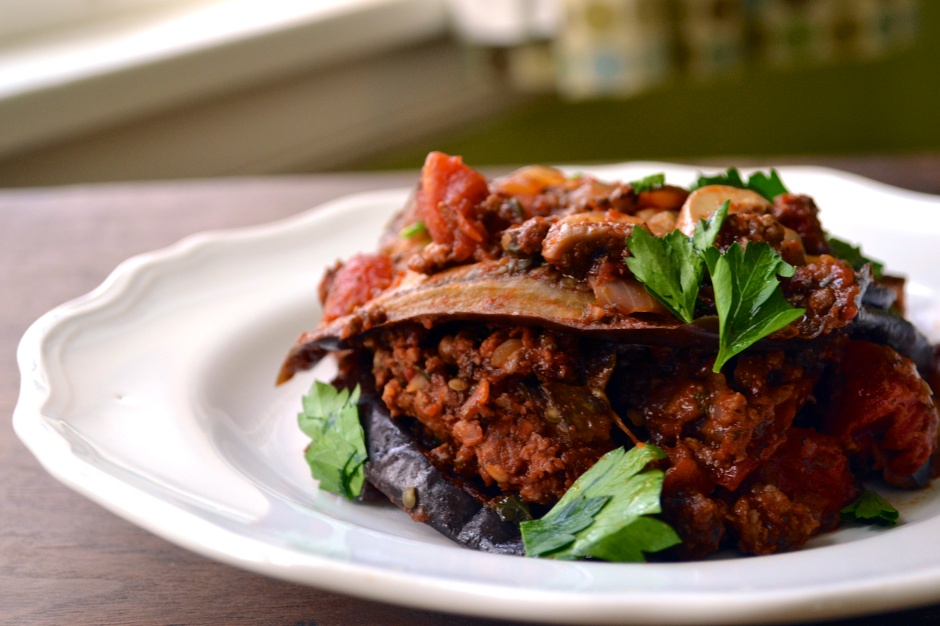
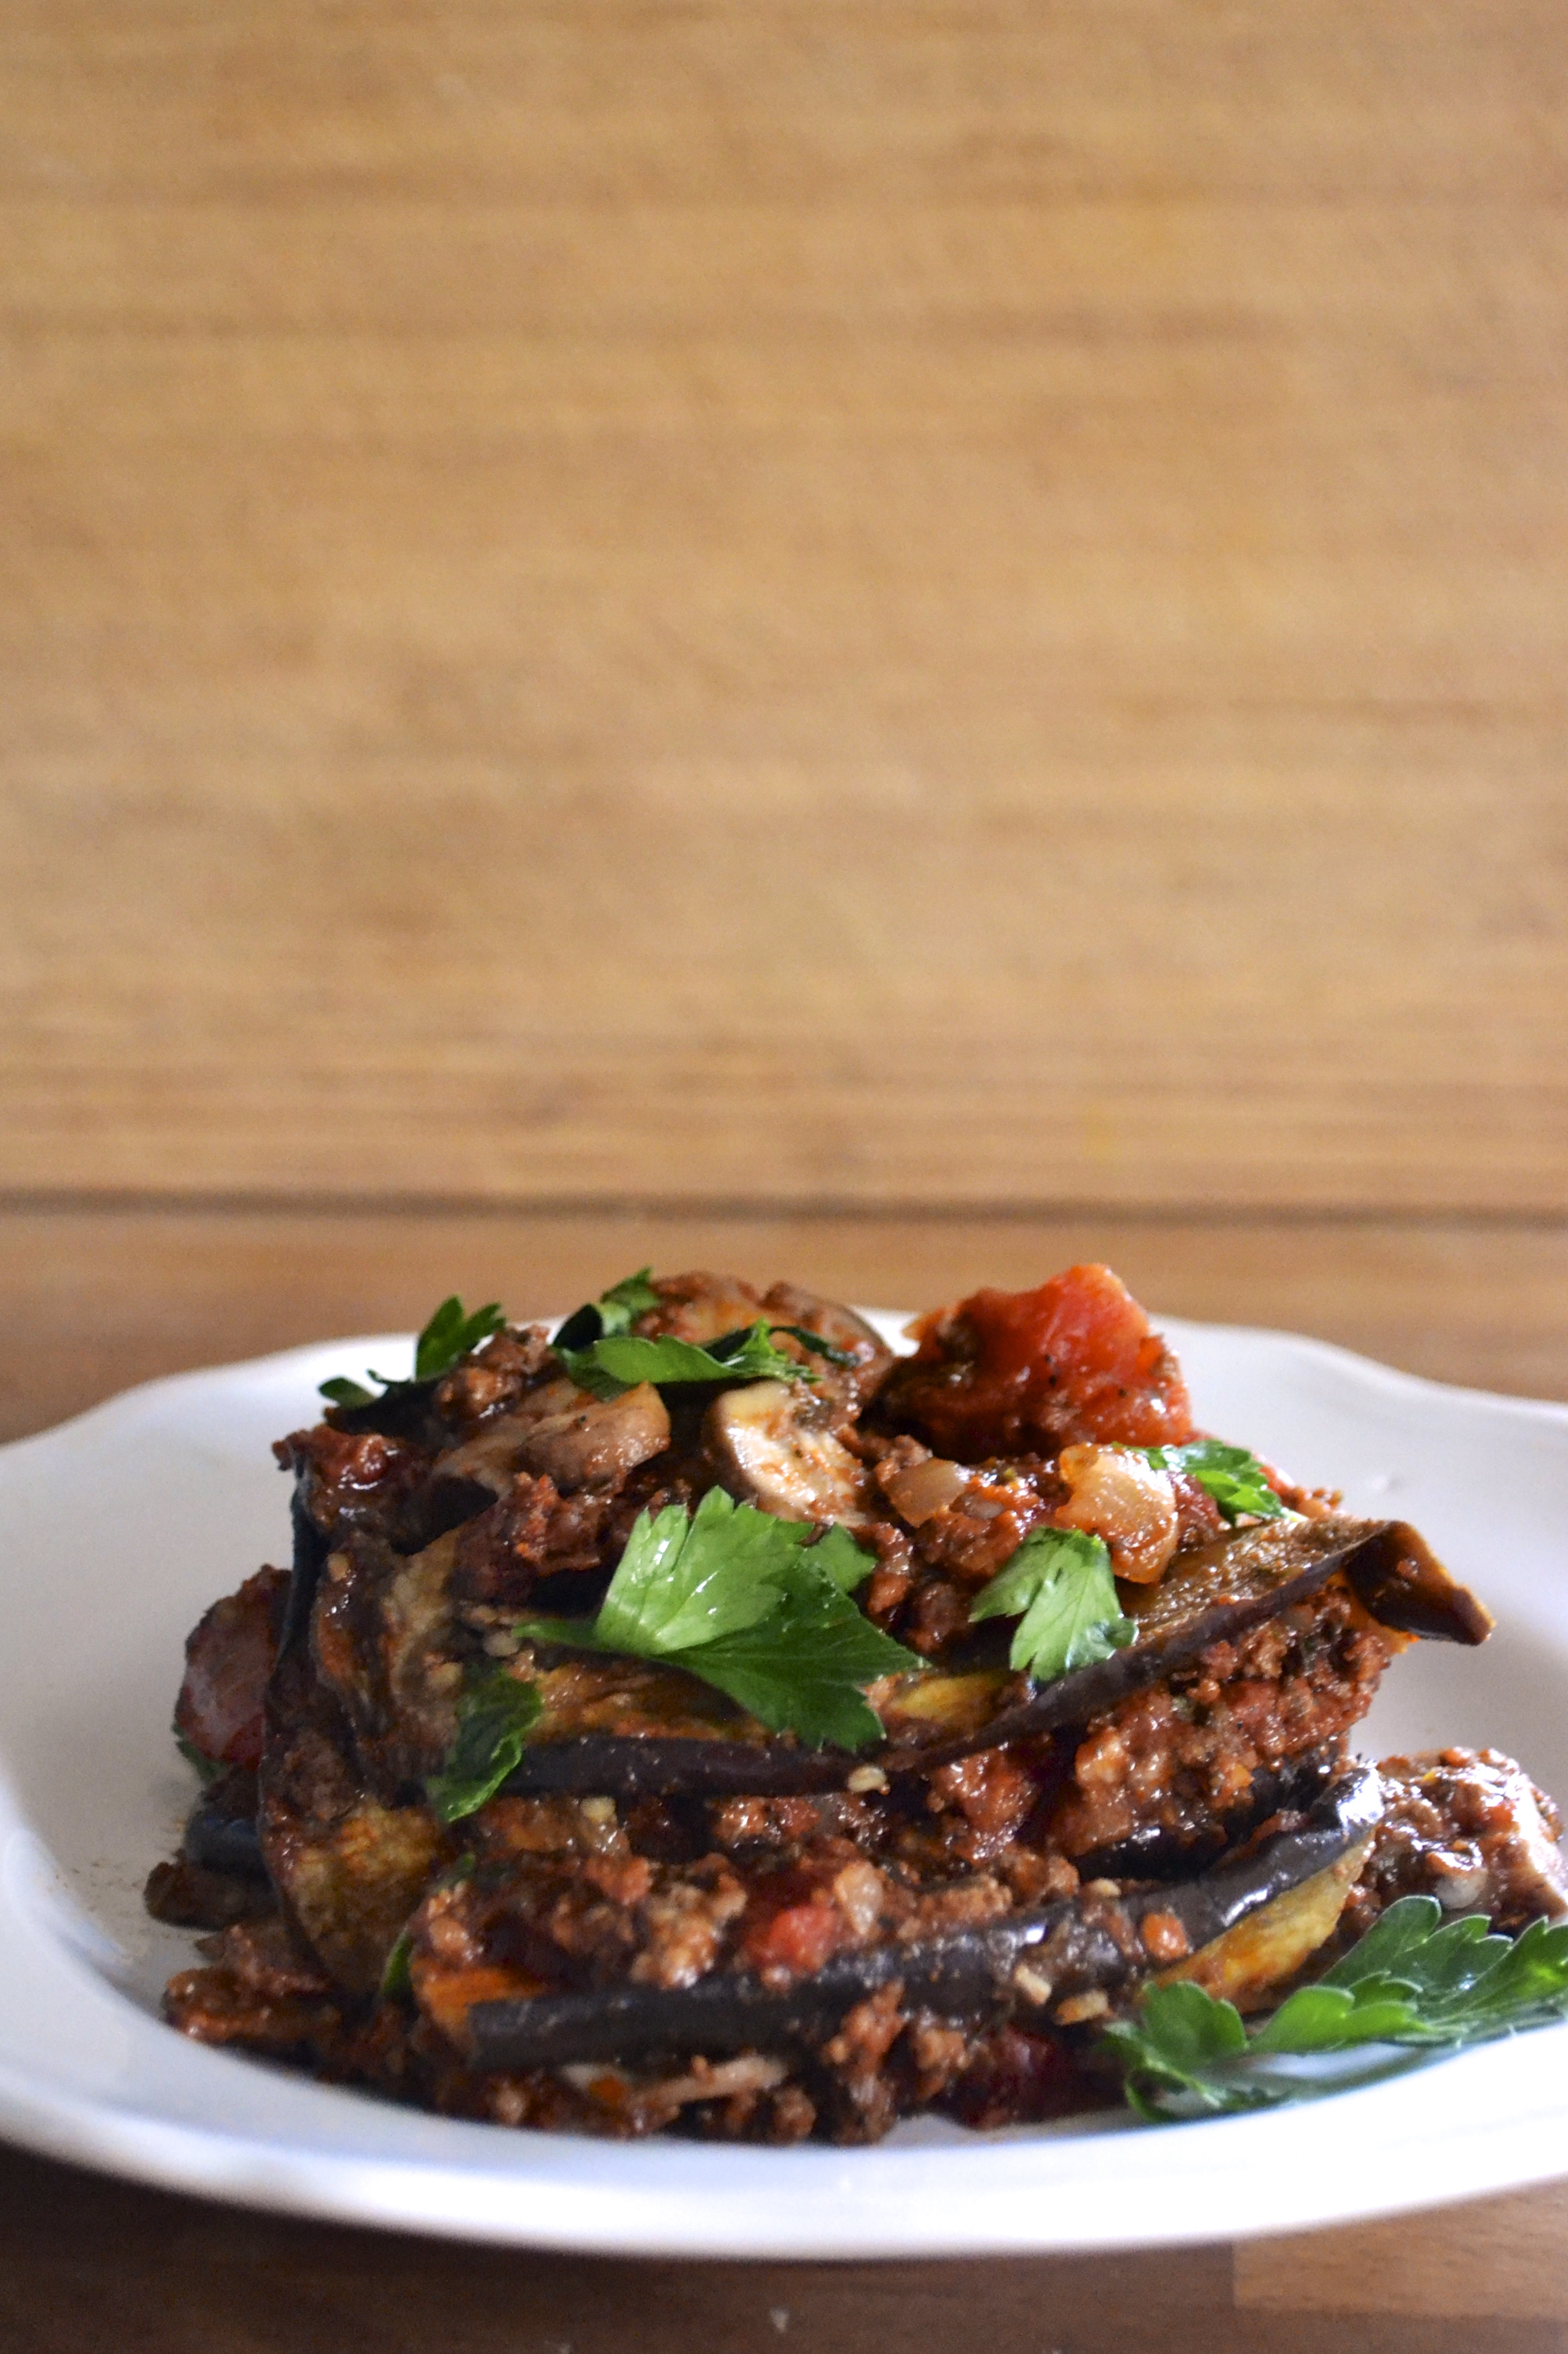
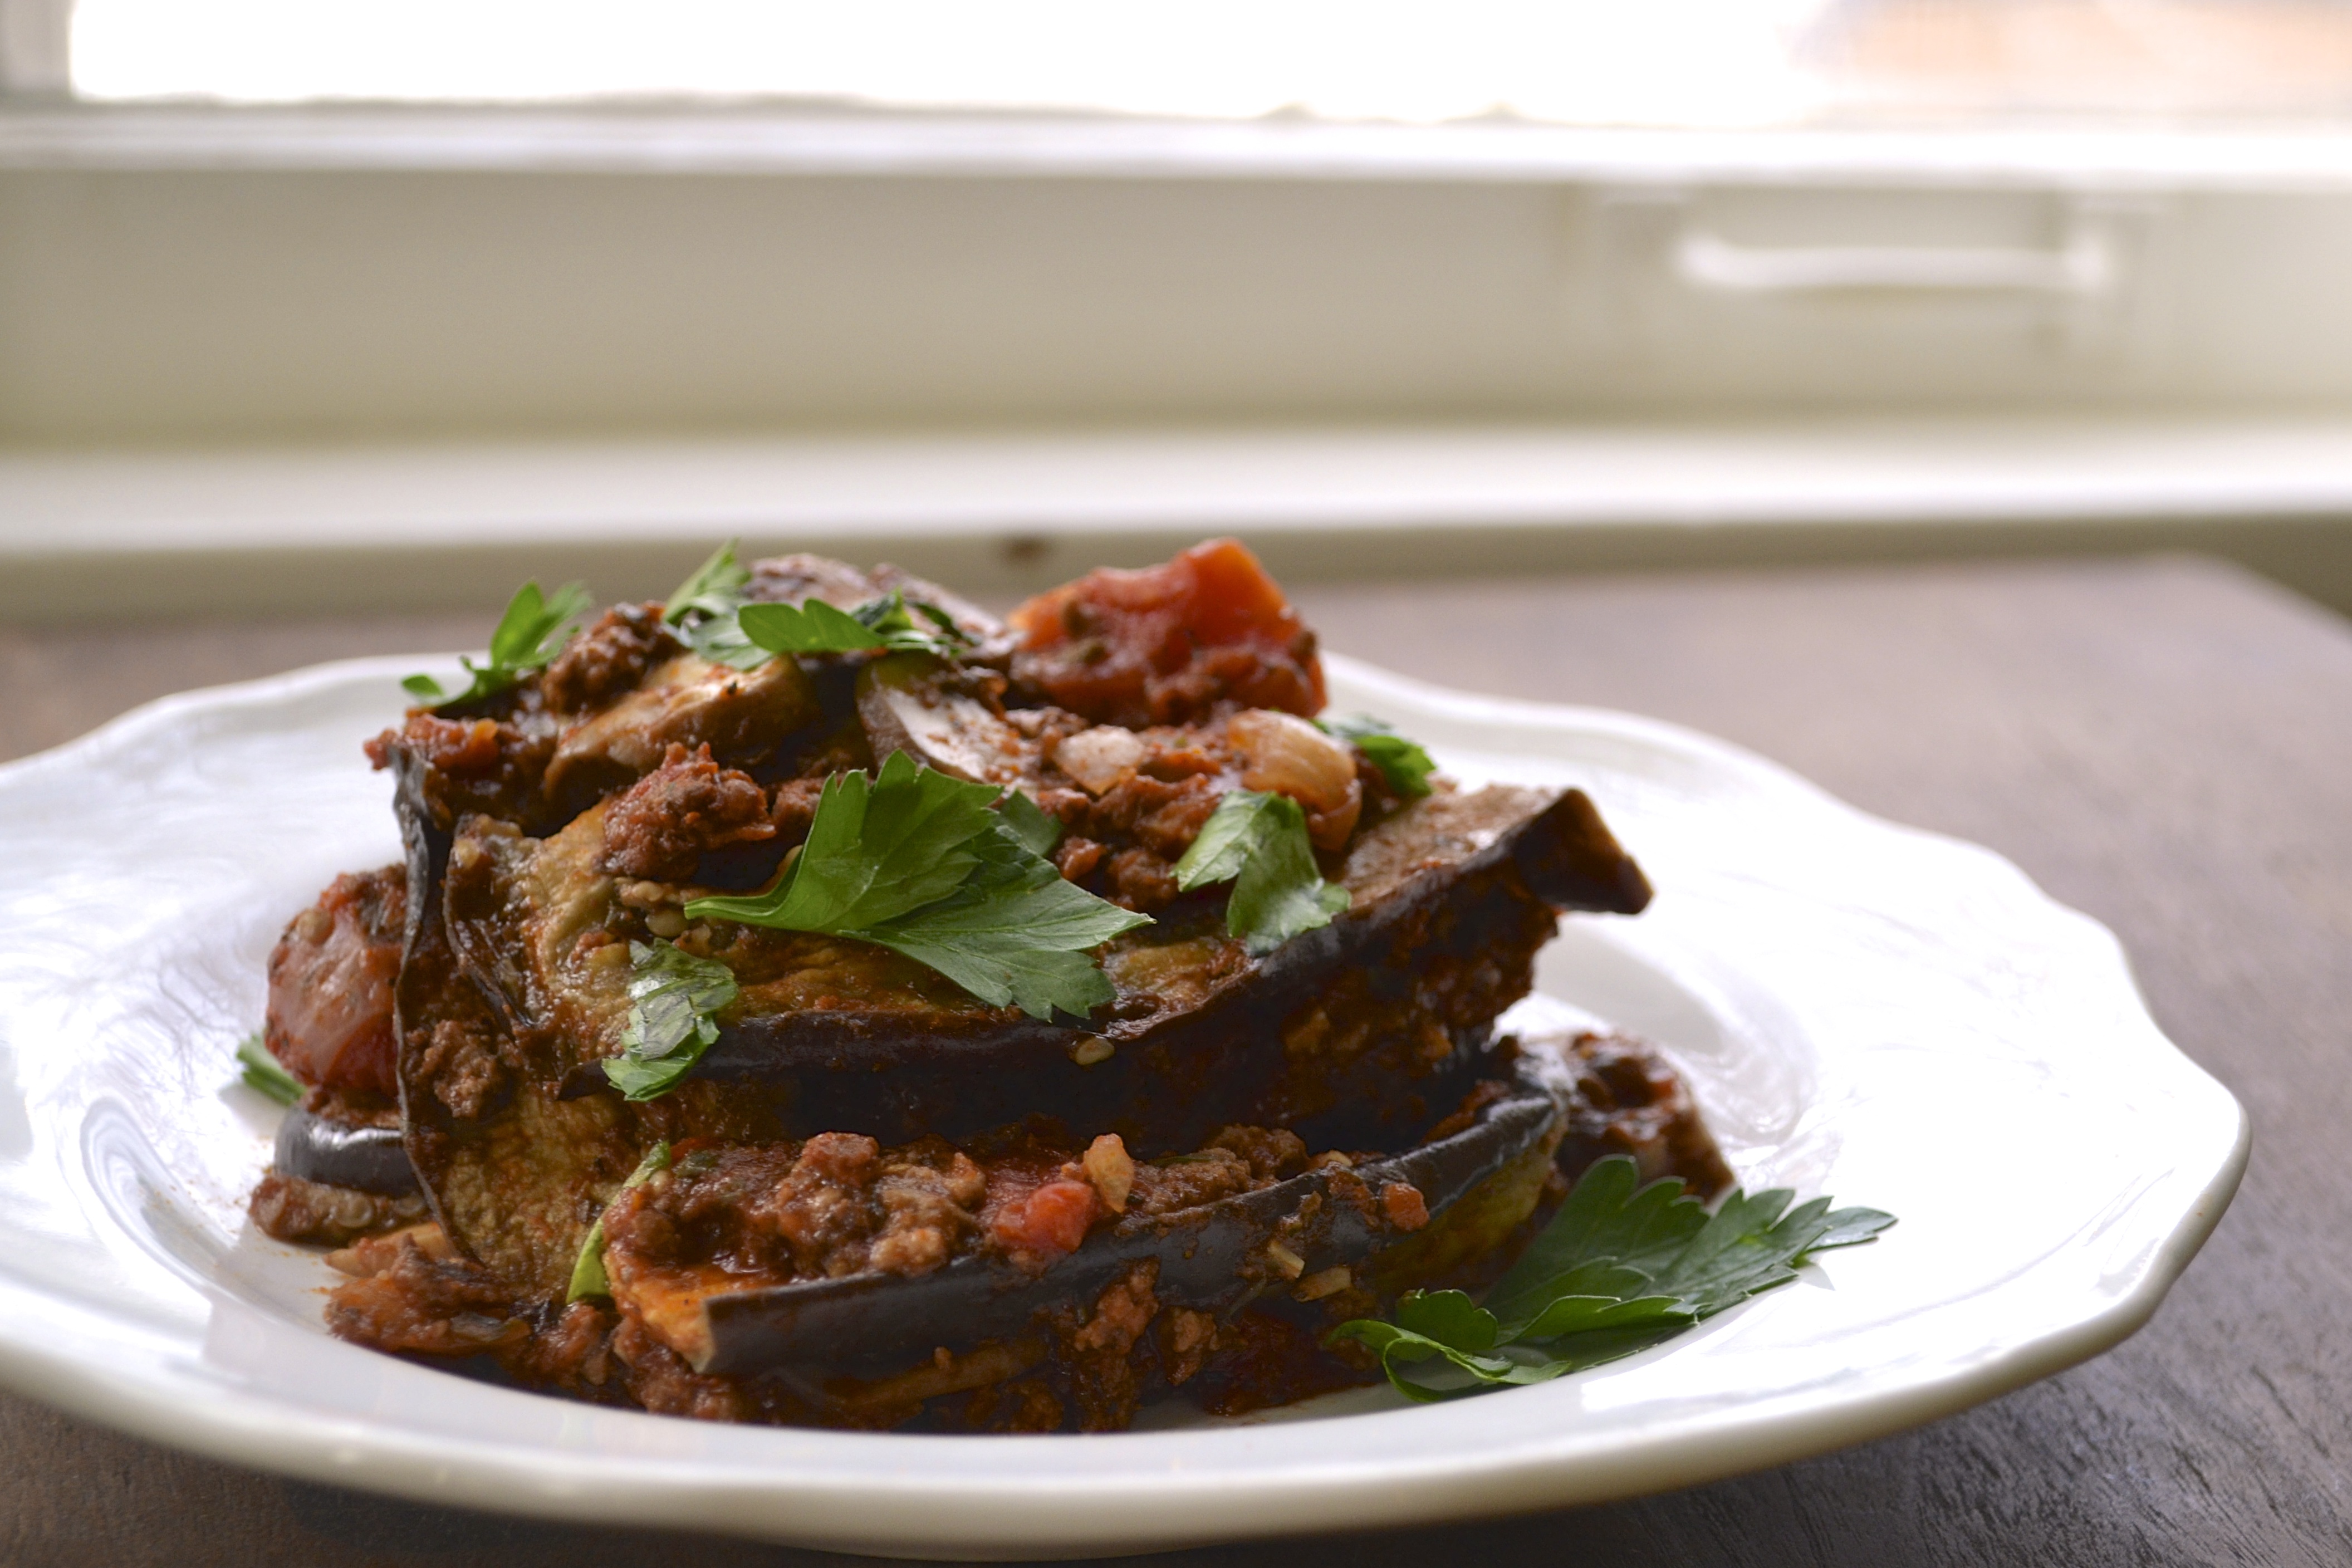
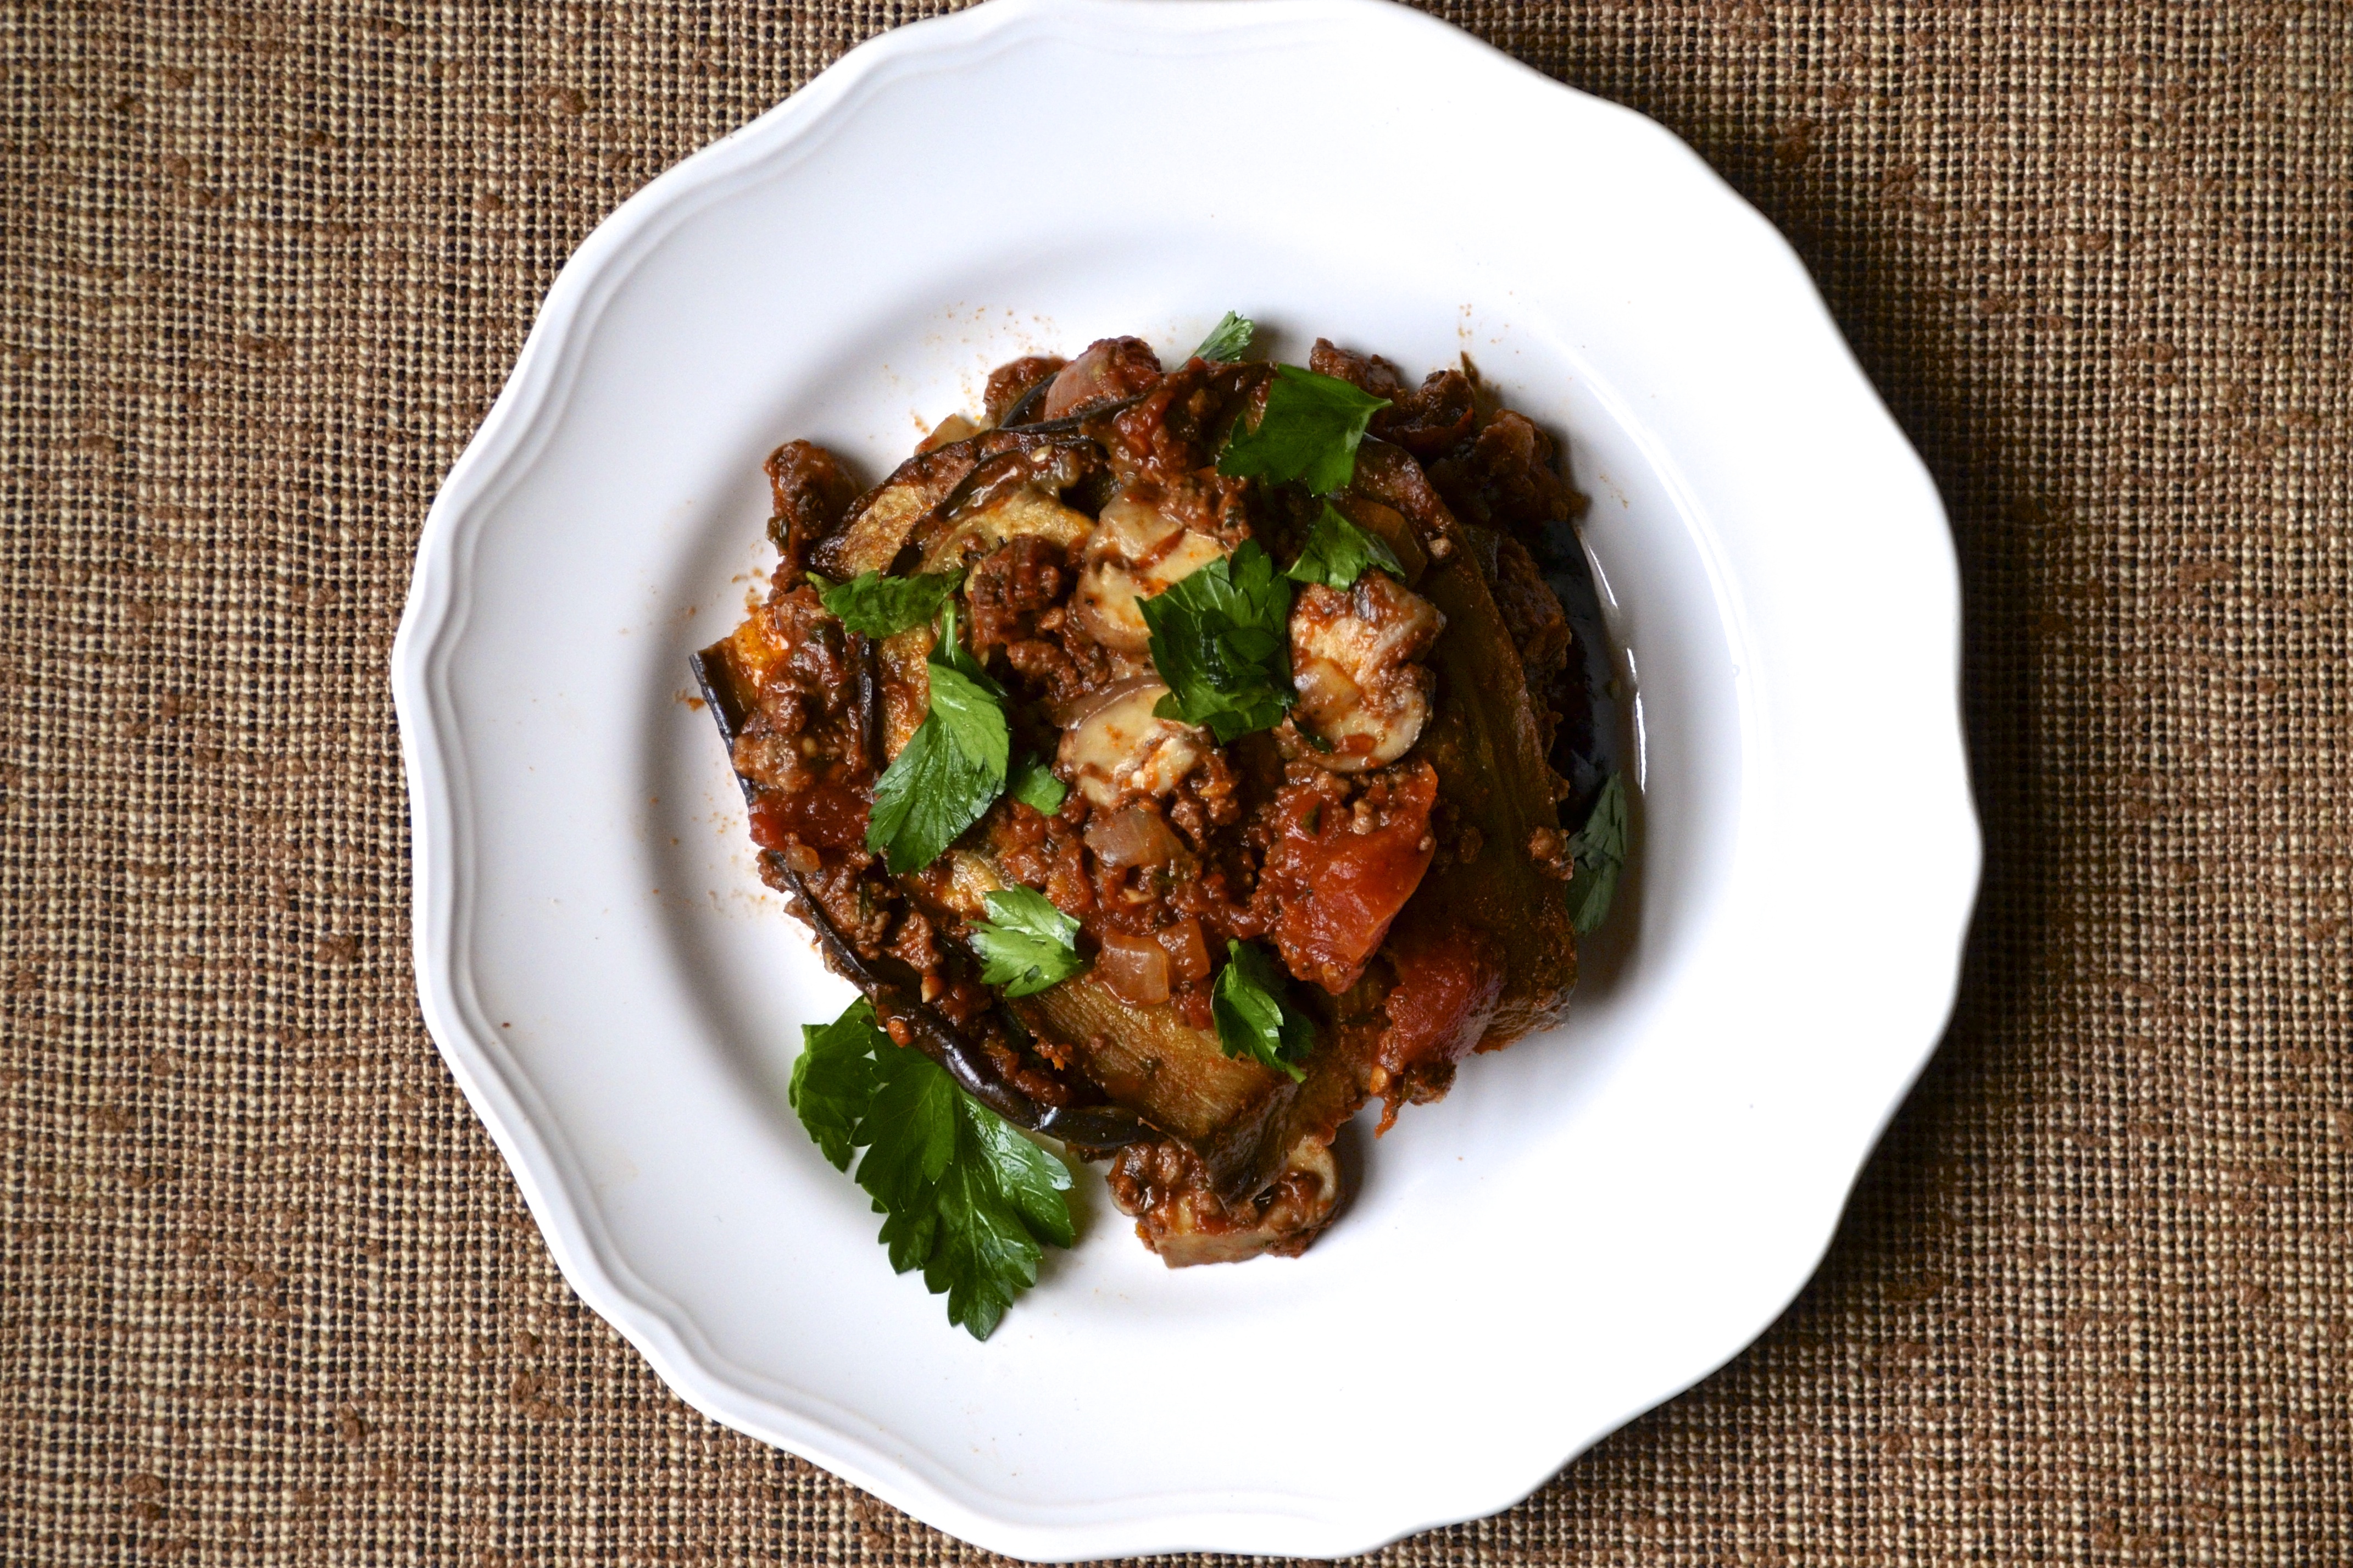
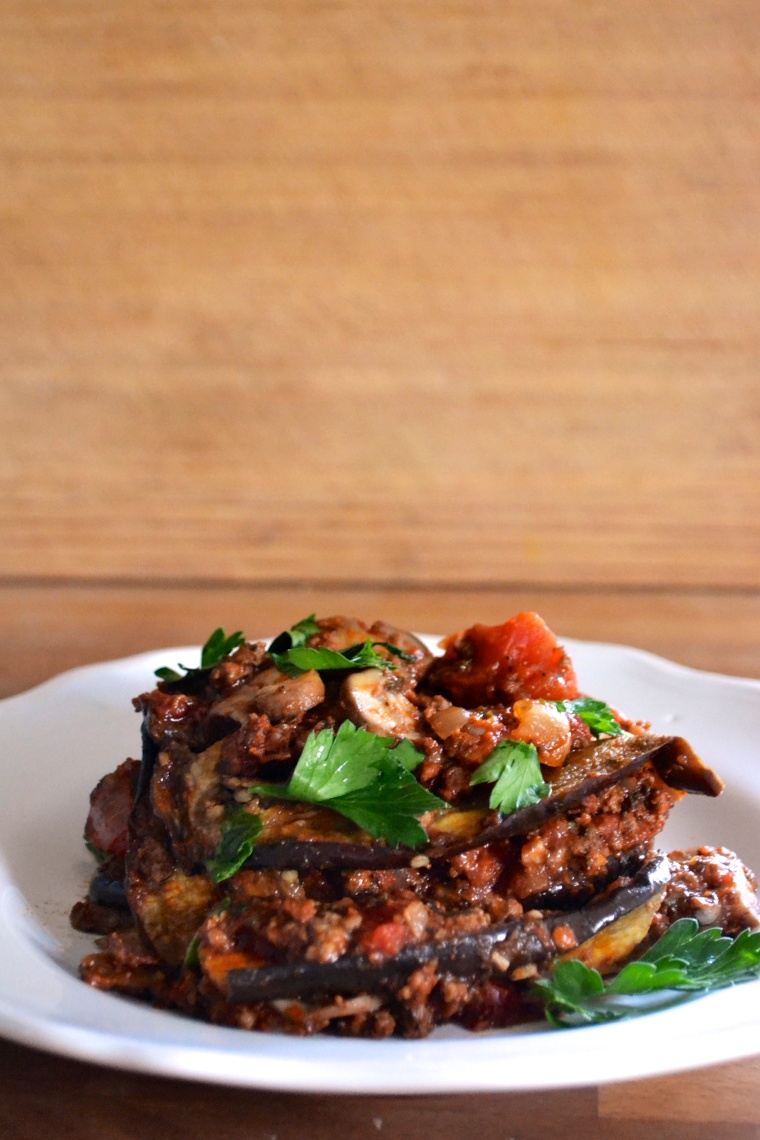
Anyways, I decided to remedy my lasagna cravings by using strips of eggplant in place of the noodles.  I made an amazing and deliciously thick batch of meat sauce chunked with large pieces of mushrooms. Although there is no cheese or ricotta (blasphemy….I know…if you are a lasagna purist…please, turn your eyes), this cooked up to be layered, saucy, meaty heaven.  If you eat dairy, you could easily add a layer of cheese to this.

Slice the eggplant lengthwise in 1/4-inch thick slices. I prebaked my eggplant “noodles” in an oven at 375F for 10 minutes while I was making the sauce.  I haven’t tried making this without prebaking the eggplant. I’m sure it would work but would just require longer baking time once it is fully constructed.  After prebaking the eggplant slices and whipping up the meat sauce, the lasagna is ready to be BUILT!

  • Start with a layer of meat sauce in the bottom of a 9″ X 13″ baking dish.
  • Then place 3 to 4 slices of eggplant in a single layer across the bottom of the pan.
  • Add another portion of meat sauce,
  • Then add another layer of eggplant (stacking on top of the first layer).
  • Top the whole thing with the remaining sauce.
  • Bake at 375F for 25 to 30 minutes, or until bubbly and heated through.

Bonus features of my version of lasagna are that it takes a fraction of the time since there are no noodles to cook and no cheese to shred.  It also cooks in half the time. You could easily sub zucchini and/or yellow squash for the eggplant.

DSC_0281

Paleo Eggplant Lasagna (Grain Free, Gluten Free, Dairy Free)

Serves 6 to 8

Ingredients

  • 1 large globe eggplant, cut lengthwise into 8 1/4-inch slices
  • olive oil
  • 1 lb ground grass-fed beef
  • 1 medium onion, diced
  • 10 oz whole baby bella mushrooms, sliced
  • 4 to 6 cloves of garlic, minced
  • 2 15 oz cans of diced tomatoes (undrained)
  • 6 oz can of tomato paste
  • 1 tablespoon dried oregano
  • 1 tablespoon dried basil
  • 1 teaspoon dried thyme
  • 1 teaspoon kosher salt
  • 1/2 teaspoon ground black pepper
  • 1/4 cup fresh parsley (plus more for garnish)

Instructions

  1. Preheat oven to 375 F.  Spray two baking sheets with nonstick spray or line with parchment paper.  Set aside.
  2. Place eggplant pieces on prepared baking sheets in single layer. Brush both sides of eggplant slices with olive oil. Bake until eggplant slices are tender and beginning to brown, about 5 minutes per side. Watch closely and remove eggplant slices as needed if they are cooking too quickly or not long enough.   Remove baking sheets from oven and cool eggplant while preparing sauce. Eggplant can be roasted 1 day ahead and refrigerated.
  3. In a large sauce pan or pot, brown ground beef over medium heat.  Drain excess grease. Return pan to heat and add onion, garlic, and mushrooms.  Stirring frequently, brown and cook until onions and mushrooms are tender, about 5 to 10 minutes.  Add 2 cans of diced tomatoes with juice, tomato paste, oregano, basil, salt, pepper, and parsley.  Bring to a simmer. Allow to simmer for about 10 minutes, stirring frequently. Sauce can be made several days ahead and refrigerated.
  4. Spread 1/3 of the meat sauce (about 2 cups) in the bottom of a 9″ X 13″ glass pan.  Layer 4 slices of eggplant on top of the sauce.  Spread another 1 to 2 cups of sauce on top of the eggplant slices.  Arrange a second layer of eggplant slices directly on top of the first layer, stacking them. Spoon remaining sauce on top. This can be made 1 day ahead. Cover with foil and refrigerate until ready to cook.
  5. Bake eggplant lasagna until heated through, about 20 to 30 minutes if freshly made or 40 minutes if refrigerated. Serve hot topped with fresh parsley or basil.

*Nutritional Information (based on 8 total servings), 1 serving = 209 calories, 15 g carbohydrates, 11 grams fat, 15 grams protein

Flourless Brownie Bites (Grain Free)

Merry Christmas!

I hope you all are having a wonderful and cozy day.  My husband I made the trek from KC down to Oklahoma to visit my family.  My brother had back surgery a week ago and has been recovering.  It was wonderful getting to spend time with all of us together.

DSC_0282

We cooked, we ate, we laughed, we made our gingerbread house, and we watched christmas movies on repeat while my bro was horizontal in bed recovering. He’s getting around better and was able to eat dinner with us and walk around with his walker.

DSC_0301

We had to leave a day early because Oklahoma freaks out over the mere mention of a slight chance of snow. So thinking Snowmaggeddon is on its way, we had to make a mad dash up north to Kiley’s family’s house in Tulsa last night to try to miss this “massive” snow storm. We woke up this morning to clear skies and no snow. Womp womp.  But at least we are safe and sound in Tulsa with Kiley’s family now with the warmth of coffee and a fire in the fireplace.  We hope you and your families are warm, cozy, and enjoying time together and slowing down this season.

DSC_0324

I’m whipping up a batch of flourless bite-sized brownies. I love the tiny size for snacking.  There is no flour, only cocoa powder, melted chocolate, honey, eggs, and butter or coconut oil! They are super easy and can be topped with anything you have on hand. Yes…even bacon.  I topped some with bacon (it was a hit), some with crystallized ginger, others with toasted walnuts, and some with salted caramel (my fave). The recipe is inspired by the flourless brownies in my new favorite cookbook, Practical Paleo. The recipe is found below.

DSC_0302

Also, if you are looking for some last minute quick gluten-free recipes to make for Christmas dinner, I’ve gathered up a few of my favorites….

Gluten-Free Breakfast:

DSC_0173

Mexican Breakfast Casserole (Grain Free and Dairy Free)

Crustless Quiche (Grain Free and Dairy Free)

Pumpkin-Apple Muffins (Grain Free and Dairy Free)

German-Style Apple Walnut Pancake (Grain Free and Dairy Free)

Gluten-Free Appetizers:

DSC_0309

Spinach-Cheese Balls (Vegetarian and Grain Free)

Buffalo Chicken Meatballs (Grain Free and Dairy Free)

Nutty Coconut Date Balls (Vegetarian, Grain Free, and Dairy Free)

Gluten-Free Side Dishes:

DSC_0273

Kale Salad with Cranberries, Pecans, and Apples (Gluten Free and Vegan)

Roasted Cauliflower 

Grilled Delicata Squash with Kale (Gluten Free and Vegetarian)

Gluten-Free Desserts:

Ginger Chocolate Chip

Chewy Ginger Chocolate Chip Cookies (Gluten Free, Grain Free, and Dairy Free)

Fudge Brownies (Gluten Free and Vegan)

DSC_0334

Flourless Brownie Bites (adapted from Practical Paleo)

Makes 30 brownie bites

Ingredients

  • 4 ounces dark chocolate (I use 85% cocoa from Trader Joes), melted and cooled
  • 1/2 cup coconut oil or butter, melted and cooled
  • 1/2 cup honey or maple syrup
  • 1/2 cup unsweetened cocoa powder, sifted
  • 1 teaspoon vanilla extract
  • 3 eggs, beaten
  • 1/4 teaspoon salt
  • 1/4 teaspoon baking soda
  • Toppings or mix-ins: bacon, walnuts, crystallized ginger, caramel, unsweetened coconut, flaked salt

Instructions

  1. Preheat oven to 350F. Grease mini muffin tin with butter, coconut oil, or nonstick spray. Set aside.
  2. To melt the dark chocolate bar, break into small pieces and place in a microwave-safe bowl. Microwave on high at 30 second intervals, stirring in between, until the chocolate is melted. It takes me 2 minutes.
  3. In a medium-sized bowl, combine the melted dark chocolate, melted coconut oil (or butter), maple syrup, vanilla, and eggs. Slowly sift the cocoa powder over the wet ingredients, whisking it evenly to ensure there are no lumps. Stir in salt and baking soda.
  4. Spoon the brownie batter into the mini muffin tins (about 1 1/2 tablespoons per muffin tin), filling about 3/4ths full. Top the batter with the topping of your choice (chopped bacon pieces, walnuts, ginger, coconut, caramel pieces, kosher salt). Bake for 20 to 25 minutes, or until a toothpick inserted into the center comes out clean.

Crustless Quiche (Gluten Free and Dairy Free)

DSC_0193

Christmas morning we always eat QUICHE! THE great Christmas Quiche!  It’s a tradition.

We brew coffee, throw the great Christmas quiche in the oven, and unwrap presents. The quiche bakes and fills the house with wonderful smells.  Unfortunately, I can’t have the tasty pastry crust since I have a gluten sensitivity.  So…..we are going crustless.

DSC_0203

I found a few recipes for almond flour based crusts, which I have tried and love. But going crustless is uber eeeeazy peeeeazy and allows me to focus on what really matters…enjoying my family unwrapping presents!

You can throw this quiche together in the morning, or you can put it together the night before.  There are so many variations of this….add meat, add mushrooms, add other veggies that you have on hand.  The original recipe is adapted from my newest cookbook that my husband gave me, Practical Paleo.

Before we go any further, I have to tell you that I LOVE this cookbook.

If you are still trying to figure out what to get someone, this is an awesome gift for a anyone wanting to learn to cook with whole foods. The author, Diane Sanfilippo, also blogs at balanced bites. She gives a wonderful detailed approach on how to heal and treat certain allergies, digestive health, blood-sugar regulation, thyroid health, cancer recovery, auto immune disorders, migraines, hormone imbalances, etc. Her recipes are delicious, inspiring, and wholesome.

DSC_0205

This crustless quiche originally had zucchini and carrots. I used chopped spinach instead of zucchini. For Christmas, instead of throwing in raw spinach, I will saute the spinach with mushrooms and peppers before adding it eggs. Then I will throw it in the oven, grab a huge cup of coffee, and watch everyone unwrap their presents.

Crustless Quiche (Gluten Free and Dairy Free)

(adapted from Practical Paleo)

Serves 6 to 8

Ingredients

  • 12 eggs, beaten
  • 2 cups of spinach, chopped
  • 1 medium carrot, shredded
  • 1/2 teaspoon salt
  • 1/8 teaspoon ground sage (optional)

Instructions

  1. Preheat oven to 375F. Grease a 9X13 baking dish with either butter, coconut oil, or nonstick spray.  Set aside.
  2. Mix everything together in a large bowl. Pour into the prepared baking dish.  For the swirled effect, stir the mixture with a spoon or fork before baking.
  3. Bake for approximately 45 minutes or until a knife inserted in the middle comes out clean.

Gluten Free Buffalo Turkey Meatballs

I have to admit that I am really not that big of a fan of chicken wings. Don’t get me wrong, I love the flavor. It’s mainly the work that goes into gnawing on a bone for just a measly morsel of meat.  But, I also get why most guys like them…they feel like authentic cavemen. This is probably the same reason why they dig ribs too.  And turkey legs.

So what better way to get the meat AND the buffalo flavor without the mess? Meatballs. Buffalo Meatballs. These mini meatballs are perfect if you have a gaggle of people coming over at different times, because you can keep them warm and saucy in a crock pot.  They are an easy finger food and a HUGE hit!

I recommend using Frank’s hot sauce. It’s the best buffalo sauce that I’ve found. You can make these meatballs with either ground chicken or ground turkey.  However, I should note that ground chicken is a bit harder to form into balls. I used ground turkey in this recipe and found them to be easier to mold and deeeeelicious. Adding a tad bit of coconut milk to the buffalo sauce adds creaminess.  Don’t worry, it doesn’t impart a coconut flavor at all. But you could easily sub melted butter for the coconut milk, if you are into that sort of thing.

Gluten Free Buffalo Turkey Meatballs 

Makes about 70 mini meatballs

Ingredients

  • 2 lbs ground turkey (or chicken)
  • 1 large egg
  • 1/2 cup dried parsley
  • 1 Tablespoon smoked paprika
  • 1 teaspoon salt
  • 3 Tablespoons + 1/2 cup Frank’s hot sauce
  • 1 teaspoon garlic powder
  • 1/2 cup almond meal*
  • 1/4 cup coconut milk (or melted butter)

*Note – If you do not have almond meal, you can either use 1/4 cup of oat flour or 1/2 cup of bread crumbs.  However, these alternatives are not gluten-free, unless you use gluten-free oats and/or gluten-free bread crumbs.

Instructions

  1. Preheat the oven to 450F. Spray two 9X13-inch baking dishes with nonstick spray. Set aside.
  2. Combine the ground turkey, egg, 3 tablespoons of hot sauce, parsley, paprika, salt, garlic powder, and almond meal in a large mixing bowl and mix by hand until thoroughly incorporated.
  3. Roll the mixture into 3/4-inch round balls. Place the meatballs in the prepared baking dish.  Line them up carefully, keeping them in even rows vertically and horizontally to form a grid. The meatballs should be touching one another.
  4. Roast at 450F for 15 to 20 minutes, or until the meatballs are firm and cooked through. A meat thermometer should read 165°F in the center of the meatball.
  5. Carefully transfer the cooked meatballs into a warmed crock pot.  Add the remaining Frank’s hot sauce (1/2 cup) and coconut milk (or melted butter) to the crock pot. Toss to coat the meatballs. The meatballs are ready when the sauce is warmed or allow to cook on low until your guests arrive!

Nutty Coconut Date Balls

I love snacks. I would much rather eat several small meals than huge ones. Maybe because I loooove food and the thought of eating different types of food all day is quite a treat to me.

Also, being a runner, I get hunger pains and need a quick fix!  Eating my arm ain’t pretty, folks. You don’t want to see me get HANGRY.

This is basically my version of the coconut Lara bar.  These little balls are all over the food blogosphere, but I had never had a chance to make them until now.  For Food Matters Project Monday, Cheese Please chose Cheese-Nut Balls from Mark Bittman’s Food Matters Cookbook.  My hubby is dairy free, so I swapped out the cheese for dates and made individual snack bites.  These Nutty Coconut Date Balls are perfect little energy snack bites. The dates taste like caramel goodness with smacks of coconut.  Feel free to roll them into balls or press them into a sheet pan and cut them like bars. They make great travel food!

Coconut Pecan Date Balls

Ingredients

  • 1 cup dates, pitted
  • 3/4 cup chopped nuts (such as raw unsalted walnuts, pecans, macadamia nuts, almonds and/or cashews)
  • 1/2 cup shredded unsweetened coconut
  • 1/8 tsp sea salt
  • 1/8 tsp ground cinnamon

Instructions

  1. Add the dates one at a time through the feed tube of the food processor while it is running. The dates will turn into a date paste.
  2. Add the nuts. Process until the consistency appears like cake crumbs, but it will easily stick together when you press the mixture between your fingers.
  3. Add salt and coconut. Pulse until mixed.
  4. You can either make these into bars or balls. If making into balls, simply remove the blade from the food processor and take one tablespoon at a time of the mixture and roll it between your palms until a ball forms.  To make bars (like larabars), put the mixture into a shallow baking pan and press the mixture into it. Seal and store in an airtight container in the fridge until you are ready to serve it.   These will last up to 2 weeks in the fridge or longer in the freezer.

Chocolate Banana Pie with Coconut Macaroon Crust (Grain Free and Dairy Free)

I have been known to sneak odd ingredients into foods….black beans in brownies, or cashews in “cheese” cake, or even cauliflower in mac n’ cheese.  

Today, my magic trick is with chocolate….bananas….coconut…and…. wait for it…. avocados….in a pie.   What? yes…. It can’t be done you say…CHALLENGE ACCEPTED.

Stay with me on this one, people. I was skeptical too. There are several avocado chocolate mouse/pudding recipes out there in the vast blogosphere. After reading many of these odd recipes, I decided to give it a go and put it into a pie form.  Because everyone needs a good pie every once and a while….or two. 

I pureed two avocados with coconut milk, ripe bananas, soaked dates, a smidge of agave nectar, and some good cocoa. The pudding filling was so silky and creamy and rich….you would think there was a load of butter and cream in this fabulous pie….but no, just the magical avocado. To keep it grain free, but still giving it TONS of flavor, I concocted a coconut macaroon crust. Swoooooon!  So good. The macaroon crust recipe is a keeper.

Chocolate + banana is a match made in heaven to me. Nothing gets better. So I added sliced bo-naners in the base of the pie. I imagine these would be awesome as small tartlets, using a muffin tin instead of an entire pie. Go surprise your taste buds. Throw together this pie and you never have to feel guilty…. You are welcome!

Chocolate Banana Pie with Coconut Macaroon Crust (Grain Free, Gluten Free, Dairy Free, Paleo-Friendly)

Serves 8 to 10

Macaroon Crust Ingredients:

  • 2 cups unsweetened shredded coconut
  • 2 egg whites
  • 1 tablespoon honey (or maple syrup)
  • 1/4 teaspoon kosher salt

Macaroon Crust Instructions:

  1. Preheat oven to 350 F. Spray a 9″ pie pan with nonstick spray or coconut oil. Set aside.
  2. Place all ingredients into your food processor. Pulse until combined. Mixture should hold together when you squeeze it between your fingers. Don’t process for too long or you will end up with a coconut butter-type puree.
  3. Dump the coconut mixture into the prepared pie pan. Press out the mixture evenly into the bottom of the pie pan to about an 1/8-inch to 1/4-inch thick.
  4. Bake in preheated oven until lightly browned, 15 to 20 minutes. Remove from oven and allow to cool to room temperature.

Chocolate Filling Ingredients:

  • 1/2 cups dates, soaked in hot water for at least 10 minutes
  • 2 avocados
  • 2 bananas (one is for the filling and the other is to be layered inside the pie)
  • 1 1/2 cups coconut milk (light or full fat)
  • 1/2 cup unsweetened cocoa powder
  • 1/4 teaspoon kosher salt
  • 1 teaspoon vanilla extract
  • 1 tablespoon honey (or maple syrup)
  • Optional toppings: dark chocolate shavings, unsweetened coconut flakes, slivered almonds, sliced fruit

Chocolate Filling Instructions:

  1. Place soaked dates, avocados, one of the bananas, and the coconut milk in a good food processor. Blend until smooth.
  2. Add cocoa powder, salt, vanilla extract, and honey. Blend until smooth.
  3. Once the crust is cooled and filling is made, layer slices of the remaining banana in the bottom of the pie crust. Add chocolate filling and spread with a spatula to smooth. Optional toppings include flaked unsweetened coconut or dark chocolate shavings. Refrigerate pie for a few hours until cool and set up. Serves 8 to 10.

Spring Roll Salad with Thai Dressing

What a weekend. Some friends of ours few into town from Austin. We had a great time catching up and showing them around the KC area.  The great cool down finally hit KC and made it perfect to ride bikes to our favorite restaurants.  We also ventured to Weston, MO, where we had fabulous brew in a century old Irish brewery tucked 4 stories BELOW ground.  It’s dank and musty and serves up a perfect pint of local brews.

Sunday brought warmer temps in the upper 90s. We found relief from the heat by checking out the Negro League Baseball Museum in the 18th and Vine district. If you are ever in the KC area, I highly recommend the museum.

We also were able to grill and cook some good food over the weekend. I made this great salad, which basically is a deconstructed version of thai spring rolls. The recipe is inspired by Mark Bittman’s Summer Rolls from the Food Matters Cookbook. This recipe was chosen by Alyssa of Every Day Maven as part of the Food Matters Project. It has been over six months since the beginning of the Food Matter’s Project, which consists of a group of food bloggers choosing recipes from Mark Bittman’s huuuuge, 500+ recipe cookbook “The Food Matters Cookbook” and cooking through them. 

I absolutely adore the freshness of well made spring rolls. The fresh cilantro and basil make the dish.  The herby salad is served with a thai-inspired dressing that contains almond butter instead of peanut butter.  Feel free to sub peanut butter instead, if you do not have any peanut allergies. This salad is quick and fresh and can be topped with shrimp or chicken for a complete meal.

The thai dressing would also be great for dipping. Add water after mixing all the ingredients. I found that after refigerating the sauce for a day, I had to add a few tablespoons of water to make it more of a dressing consistency. 

Spring Roll Salad with Thai Dressing (Gluten Free, Grain Free, Dairy Free)

Thai Dressing Ingredients:

  • 2 tablespoons almond butter
  • 2 tablespoons lime juice
  • 1 tablespoon rice wine vinegar
  • 1 teaspoon sesame oil
  • 1/4 teaspoon ground ginger
  • 1/2 cup coconut milk (full fat or light)
  • 1/4 teaspoon salt
  • 1 to 3 tablespoons of water (add one tablespoon at a time until desired consistency)

Spring Roll Salad Ingredients:

  • 6 cups lettuce, chopped
  • 2 carrots, shredded
  • 4 green onions, green and white parts chopped
  • 1/2 cup sweet bell peppers, chopped
  • 1 cucumber, diced
  • 1/4 cup of chopped fresh cilantro
  • 1/4 cup of chopped fresh basil
  • 1 avocado, diced
  • 1/4 cup chopped roasted cashews
  • sesame seeds

Instructions:

  1. In a small bowl whisk all dressing ingredients together until smooth. Place in a container and refrigerate.
  2. Add all the salad ingredients, except avocado and cashews, into a large bowl. Toss until all ingredients are well mixed. Top with diced avocados, sesame seeds, and diced cashews. Serve each salad with 2 tablespoons of sauce.


Make Ahead Mexican Breakfast Casserole (Gluten Free, Grain Free, and Dairy Free)

A typical weekday morning involves me making a mad dash to get ready and out the door in time. I typically try to squeeze in a morning run, pushing my timeframe and running out the door with barely my hair fixed and DEFINITELY nothing ironed and praying that I thought ahead the night before to pack something for breakfast to eat on the road or in the office.

Most people suffer from the dash and go morning routine. Whether it is because you try to cram a morning workout in or get your kids ready or are just hitting that snoozypooze buttom one too many times, a healthy breakfast is likely the last on your list. I find that if I don’t eat a good solid, protein rich breakfast, the rest of my day has me STARVING AND EATING MY ARMS. Try going the rest of your day with only bloody nubs….not good. Gross, I know. I used to toast whole grain bread and slather almond butter on it for a quick breakfast, but lately I’ve been trying to eliminate gluten and grains from my diet.  Finding quick make-ahead gluten and grain free breakfast alternatives has been the hardest challenge. Until now….

As a fabulous solution to the gluten and grain free breakfast conundrum (and to preserving my poor arms from being eaten), I present to you the great make ahead breakfast casserole! (Imagine glitter flying around right now and echoing god-like voices because this thing is awesome…like you just-won-a-trip-to-Bali awesome or you are-smaller-than-your-favorite-skinny-jeans awesome or you have-a-years-supply-of-ketchup awesome….or is that just me? fine…just me…well it would be friggin awesome.)

I call it “make ahead” for two reasons:

(1) All of the ingredients can be combined the evening or day before, refridgerated, and then baked the morning you plan to serve, and/or

(2) the casserole can be baked ahead of time and the leftovers taste just as delish as if it were fresh baked.

Whip one of these casseroles up on a Sunday evening…go ahead, eat B for D (breakfast for dinner)… and then eat the leftovers for breakfast throughout the week. Brilliant! This gluten-free casserole serves a crowd (10 at least) or it can feed 2 peeps for a full week. It is also a great way to use up excess ground beef!

This recipe is really just a building block. Any meat or veggies could be interchanged. I shredded a sweet potato as the starch.  But if you have picky eaters in your house and they are not down with the sweet potato, then go tell them to make their own breakfast…OR you could be nice and use a shredded potato instead. This casserole is not too spicy but could be amped up by adding an additional jalapeño and chili powder, or using chorizo sausage instead of the ground beef.

Make Ahead Mexican Breakfast Casserole (Gluten Free, Grain Free, Dairy Free, Paleo-Friendly)

Serves 8 to 10 

Ingredients

  • 12 eggs, whisked
  • 1/2 medium onion, diced
  • 1 lb ground beef
  • 1 sweet potato*, shredded with skin on
  • 1 jalapeno, deseeded and chopped
  • 2 cloves of garlic, minced
  • 1 teaspoon chili powder
  • 1 teaspoon smoked paprika
  • 1 teaspoon salt
  • 2 cups diced fresh tomatoes (or 1 can of diced tomatoes, drained)
  • 2 cups fresh spinach (or chard or any leafy green you choose)

*Note – if you have picky eaters in your house, you can substitute regular potatoes for the sweet potato. And if you are _really_ in a pinch, you can substitute frozen hashbrowns.

Instructions

  1. Preheat oven to 375 F. Spray a 9″X13″ baking dish with nonstick spray and set aside.
  2. Whisk eggs in a medium bowl and set aside.
  3. Shred sweet potato using a food processor with shredding attachment or by hand. Set aside.
  4. Cook ground beef in a large skillet over medium-high heat until no pink remains. Break into crumbly pieces using a spatula. Drain off extra grease. Add onion, shredded sweet potato, garlic, jalapeño, chili powder, salt, and paprika into skillet. Cook until onions are translucent (about 5 to 7 minutes).  Add tomatoes and spinach into skillet and cook for about 2 minutes or until spinach begins to wilt.
  5. Pour beef and sweet potato mixture into the prepared 9″X13″ pan and spread evenly along the bottom. Pour whisked eggs over the top, making sure to mix the eggs into the sweet potato mixture with a spoon or spatula. (The casserole can be made ahead 1 day in advance up to this point and covered and refrigerated. Remove from fridge 15 minutes before cooking.)
  6. Place in preheated oven and bake for 30 to 40 minutes or until middle of casserole is set (not jiggly) and edges are lightly browned. Remove from oven and allow to cool for 5 minutes. Feeds a crowd of 8 to 10 or it feeds 2 people over the course of a week!!!!