Grain-Free Hazelnut-Pecan Delights

First things first. I have some amazing news. I received my official notification in the mail that I passed my Professional Engineering exam!!!!  A grueling exam that I studied for nearly half a year for last year. It consumed me, but was worth it.  I now am a certified P.E., which has been a huge goal of mine. CHECK that off my bucket list.

DSC_0218

But now that I have checked that huuuuuge goal off of my list, I find myself at a bit of a loss. Where do I focus my energy next?  I’m a goal-oriented person and it only seems proper to set new goals. But aside from the small goals of “read more books” or “travel more”, I just can’t seem to figure out where to point my laser beams. So, if you have any ideas, I’m game.

At this point, I’m trying to tackle small things that include: (1) Organizing my “office” (junk room), or (2) Thinking about hanging pictures that have never been hung, or (3) Properly learning to do laundry because reading the labels seems more like reading hieroglyphics and I end up just throwing everything in at once and washing on cold. Evidently when clothes say gentle…they mean it. Booh.

DSC_0237

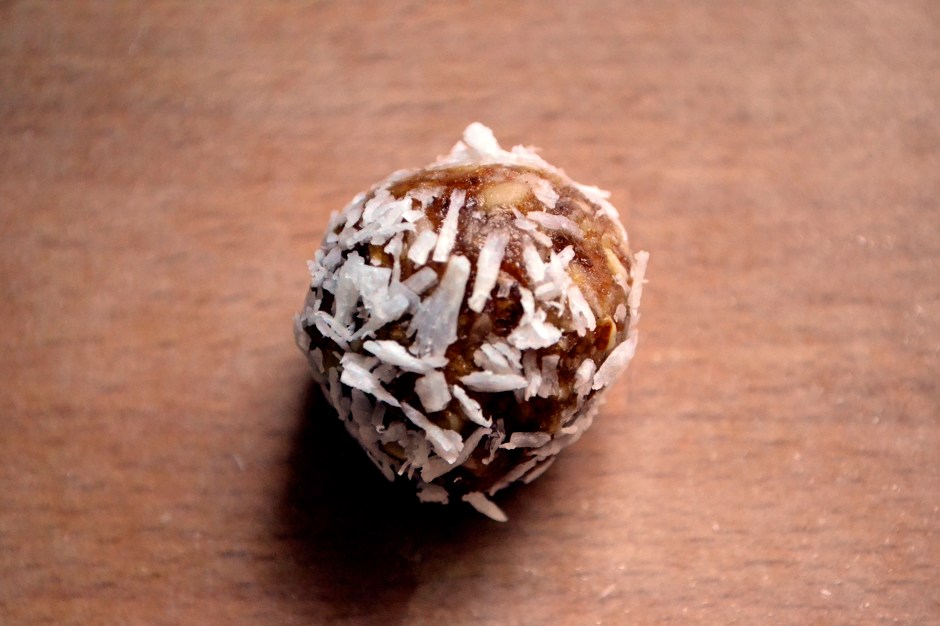
I also have been perfecting cookies….my butt thanks me and my skinny jeans do not. These Hazelnut-Pecan Delights are THE perfect cookie. They are just sweet enough, with a hint of salty, and are chewy and are….well….redonculous. Yes…redonculous, people.

They taste like my favorite Girl Scout cookie….oh that beloved Caramel Delight…and yes…they are soooo delightful.  The bonus with MY cookies is that they are gluten-free, dairy-free, and refined sugar-free. Plus they have hazelnuts and pecans, giving them added protein.

These are perfect to bring to your New Years Eve party, or football Bowl Game watch party, or for your last-hoorah-before-you-go-on-you-2013-fit-back-in-your-jeans party.

DSC_0244

Grain-Free Hazelnut-Pecan Delights

Makes 2 dozen tiny, bite-sized cookies

Ingredients

  • 1 cup hazelnuts
  • 1/2 cup pecans (or other raw nut such as almonds, walnuts)
  • 3 teaspoons ground ginger
  • 1/8 teaspoon fine sea salt
  • 1/4 teaspoon baking soda
  • 2 Tablespoons coconut oil, softened
  • 4 Tablespoons maple syrup or honey
  • 1 Tablespoon unsulphured blackstrap molasses
  • 1/4 cup dark chocolate chips, chopped into tiny pieces
  • 1/3 cup unsweetened shredded coconut

Instructions

  1. Preheat oven to 350F. Line a baking sheet with unbleached parchment paper or a Silpat mat.
  2. In a the bowl of your food processor, add nuts and process for 2 minutes, until finely ground.  Add ground ginger, salt, and baking soda and process until well mixed. Add coconut oil, honey, and molasses and process until a thick cookie dough ball forms. Add chocolate chips and shredded coconut to the food process or and pulse for 15 to 30 seconds to finely chop the chocolate, distributing throughout the cookie batter.
  3. Chill the batter in the refrigerator for at least 30 minutes, making it easier to scoop and form cookies.
  4. I like these cookies tiny and barely bite-sized.  Scoop out the dough in exact, level tablespoons. Then tear those pieces of dough in two before rolling each 1/2 tablespoon of dough into a ball shape.  Place dough a few inches apart on prepared baking sheets.  Use a wet fork to flatten each dough ball into your desired cookie thickness.
  5. Bake for 10 to 12 minutes or until firm around the edges (ovens vary so watch them), but still soft in the center. Allow to cool on the pan for 5 to 10 minutes before transferring to a wire rack to cool completely before serving.

Grain-Free Chewy Ginger Chocolate Chip Cookies

I’m so excited. Christmas is getting closer. We went and picked out our tree a week ago. Even though it feels like Christmas in California (temps are in the 70s!!!), we still decorated the tree, drank bourbon-spiked egg nog, and watched Home Alone.

We pulled out all of our old and favorite childhood ornaments, placing them strategically on each limb.   We have many ornaments that have special meaning, but some are just funny.

Grain Free Ginger Chocolate Chip_04

For instance, we have a ceramic ornament that came from some craft show ages ago that has Santa’s face painted on what appears to be tree bark but instead looks like Santa is floating on poop. We lovingly refer to this ornament as “Terd Santa”. Terd Santa has a high priority placement on the tree. He is usually placed near the 1980 Avon classic Bear Bell (a mama bear whose legs are the swinging bell) and the Headless Paper-mache Angel.

Now that it looks like Christmas has vomited throughout my house, leaving poinsettia and pine cones everywhere….it was time to make it SMELL like it too! I cooked up a batch of ginger chocolate chip cookies to make the house smell of gingerbread and spice.  These are inspired by this amazing cookie that I made last year, which unfortunately contains gluten from the wheat flour. In order to make those cookies grain free, I used almond flour as the base.  If you don’t have almond flour on hand, I have also made these cookies using almond butter, making them slightly more dense and chewy but still scrumptious.

Ginger Chocolate Chip

Even if you are not gluten-free, I seriously recommend this grain free cookies for the following reasons:

(1) The nuts give them protein…GOOD.

(2) They ooze of chocolate…DOUBLE GOOD.

(3) The ginger gives a nice spicy kick in your mouth….YES.

(4) And they are a COOKIE! Hellooooo. Nuff said, peeps.

I made these cookies bite-sized and rolled each one in turbinado sugar. The crunch of the sugar in contrast to the gooey, chewy, chocolatey cookie is divine.  WARNING – these suckers are so easy to pop in your mouth like popcorn. They can be quite addictive.

SO HIDE THEM IF YOU WANT TO EAT ANY!!!!  Because as soon as you tell anyone else that you made them, they will disappear and you may not get any…booooh. At least that is what happens in my house!!!

Ginger Chocolate Chip

Grain-Free Chewy Ginger Chocolate Chip Cookies (Gluten Free, Vegan, Paleo Friendly)

Makes 2 dozen tiny, bite-sized cookies

Ingredients

  • 1½ cups almond flour*
  • 2 Tablespoons coconut oil, softened
  • 4 Tablespoons maple syrup or honey
  • 2 Tablespoons unsulphured blackstrap molasses
  • 3 teaspoons ground ginger
  • 1/8 teaspoon fine sea salt
  • 1/4 teaspoon baking soda
  • 1/4 cup dark chocolate chips or bar, chopped into tiny pieces
  • 1/3 cup turbinado sugar or coconut palm sugar (optional)

Instructions

  1. Preheat oven to 350F. Line a baking sheet with unbleached parchment paper or a Silpat mat. Place the large-grain turbinado sugar or coconut palm sugar in a small bowl and set aside.
  2. In a medium bowl, combine almond flour, coconut oil, maple syrup, ginger, salt, and baking soda. Mix until a thick batter is formed. Chill the batter in the refrigerator for at least 30 minutes which will make it easier to scoop and form cookies.
  3. I like these cookies tiny and barely bite-sized.  Scoop out the dough in exact, level tablespoons. Then tear those pieces of dough in two before rolling each 1/2 tablespoon of dough into a ball shape. From there, grab a small handful of the large-grained sugar that was set aside earlier and roll each ball between your palms to coat the outside of each dough ball.  Place dough a few inches apart on prepared baking sheets.  Use a wet fork to flatten each dough ball into your desired cookie thickness. 
  4. Bake for 7 to 10 minutes or until firm around the edges, but still soft in the center. Allow to cool on the pan for 5 to 10 minutes before transferring to a wire rack to cool completely before serving.
  5. Hide a few for your secret stash!

*NOTE – I use Honeyville almond flour. I have also made these cookies using 1 cup of almond butter instead of the 1.5 cups of almond flour. The cookies tasted great but were a little more dense.  I personally liked them both! So feel free to sub out for almond butter if you do not have access to almond flour.

Roasted Pumpkin Seeds (Pepitas)

Tis’ the season of roasting pumpkins, butternut squash, acorn squash, delicata squash…. We all know what to do with the roasted flesh. Hello pumpkin pie and pumpkin bread.

But, don’t stop there! Roast those seeds. They are delicious as a snack, on a salad, or topping a delicious pumpkin or butternut squash soup!

These were a great addition on our holiday table this year. I used the seeds from the pie pumpkin that was the centerpiece for our Friendsgiving!

Toasted pumpkin seeds are a healthy snack too.  The flavors options are endless: Cajun, BBQ, cinnamon-spice, curry, or simply salt and pepper.

When you scoop out the seeds from the pumpkin or winter squash, wash off the pumpkin goop. Discard stringy fiber from seeds along with any seeds that are split or cracked then transfer to a strainer and rinse well. Drizzle with olive oil, seasoning, and salt. Roast in an oven until golden and BAM. Tasty tasty tasty.

I hope that everyone has a wonderful Thanksgiving.  We are lucky to have amazing friends and family to celebrate and eat delicious food with.  Please be safe this week in your travels! Merry Thanksgiving from Kansas City!

Roasted Pumpkin Seeds

Ingredients

  • Seeds from one medium-sized pumpkin or winter squash (Acorn, Butternut, Hubbard, Delicata) – about 1 cup
  • 2 tsp olive oil
  • 1/2 tsp sea salt
  • 1 to 2 tsp seasoning of choice (Cajun, BBQ, curry, cinnamon n sugar) (optional)

Instructions

  1. Preheat oven to 375. Spray a rimmed baking sheet with nonstick spray.
  2. In a medium-sized bowl, drizzle the olive oil over the pumpkin seeds. Add the seasoning of choice and salt. Toss well. Place seeds in a single layer across a baking sheet.
  3. Bake for 15 to 20 minutes or until seeds are golden. Sprinkle with a bit more seasoning when the seeds come out of the oven. Taste and season with more salt if needed. Makes about 1 cup.

German-Style Cinnamon Apple Walnut Pancake (Gluten Free)

It is official… I AM DONE!  I took my Professional Engineering (P.E.) exam yesterday and I feel GREAT.  I was so worried that after I finished that 8-hour monster exam, that I would feel drained and crappy and not want to be around anyone….but instead I walked out of that room like Mary Poppins and a bird singing on my shoulder. I was on a high…and still am. Who knows if I passed, but it feels good for it to be over.

I feel like I have new-found freedom. A new life. What should I do with ALL this time…. build a pantry? Finish painting the hallway that I started painting a year ago? Finish painting the back bedroom that I started a year ago?  Clean? no……

Instead, I shall make apple pancakes. And applesauce and apple pie and apple butter. And well, a lot of apple things, because I went apple picking last weekend.  Like nearly everyone that goes apple picking, we got quite zealous and brought home bushels and bushels and bushels of apples. I’ll be handing out loads of apple-themed goods for christmas. Act surprised! Heck…I might just hand you an apple. 🙂 Cheers.

Although I have a big crush on Mr Pumpkin, my true love is the humble Apple.  There are so many varieties.  A variety for all of my moods and emotions…tart or crisp or sweet or complicated. And who can resist that amazing aroma of baked cinnamon apples!? If you can resist it, your sick…weird…you need help.

So, with my loads of free time, I present an aroma therapy, gluten and grain free version of a german-style pancake that is made with coconut flour and loaded with cinnamon apples and walnuts.  It is made in one large oven proof skillet and would be perfect for crowds and the upcoming holidays.  The bottom of the “pancake” is layers of thinly sliced cinnamon spiced apples that bake in the oven while you prepare the batter. After the batter is whipped up, remove the baked apples from the oven, pour the prepared batter on top, sprinkle with nuts, place back into the oven, and let the holiday spirit and aroma fill your house. No fuss. Sit back. Sip that coffee. Then you can pull out a piping hot pancake that everyone gets to enjoy…..at the same time.

Oh…and don’t forget the real maple syrup, people. No Log Cabin! I mean it.  The pancake itself is not that sweet. It has natural sweetness from the apples, but it provides ample opportunity to manually sweeten your pancake slice with the goodness of fresh maple syrup and a dollop of coconut butter. Mmmm.

Note: This pancake is made with coconut flour. Coconut flour can not be substituted one for one with other flours. Because it does not contain gluten, it is dense and requires a poop ton of eggs to lighten and fluff up the recipe. Coconut flour can be found in most health food stores, online, and the health food section of most grocers.  It’s very healthy and packed with nutrients and fiber. It does not impart an overwhelming flavor of coconut to the pancake. It is the perfect balance of nuttiness. Don’t be scared….try something new!

German-Style Cinnamon Apple Walnut Pancake (adapted from the Foodie and The Family)

Serves 8

Ingredients

  • 2 medium apples, sliced thin with skins on (I used fresh picked Fuji)
  • 1 + 1/8 teaspoon ground cinnamon
  • 1/2 + 1/8 teaspoon ground nutmeg
  • 3 tablespoons coconut oil, melted and divided (or unsalted butter)
  • 4 tablespoons coconut palm sugar (or honey, maple syrup), divided
  • 6 eggs, beaten
  • 3/4 cup milk (or almond milk, coconut milk)
  • 2 teaspoons gluten-free vanilla
  • 1/4 cup coconut flour
  • 1/2 teaspoon baking soda
  • pinch of salt
  • 1/4 cup walnut pieces
  • 1/4 cup unsweetened shredded coconut (optional)

Instructions

  1. Preheat the oven to 375 F. Place 10-inch cast iron skillet in oven to preheat the skillet.
  2. Core apples, but keep skins on. Slice the apples thinly with a mandolin slicer at about 1/8-inch thick. To the apples, add coconut palm sugar (or honey or maple syrup), 1 teaspoon of cinnamon and 1/2 teaspoon of nutmeg. Toss to coat with sugar and spices.
  3. Remove the preheated skillet from oven. Add 1 tablespoon of coconut oil  or butter to the skillet and allow to melt. Toss sliced apples into the skillet and stir to coat the apples with melted coconut oil. Spread the apples evenly along the bottom of the skillet. Place the skillet with the apples back into the preheated oven to bake while you prepare the batter (about 10 minutes).
  4. In a large bowl, whisk eggs, milk, melted coconut oil (or butter), vanilla, and coconut sugar. In a separate medium bowl, add coconut flour, 1/8 teaspoon nutmeg, 1/8 teaspoon cinnamon, salt, and baking soda. Add dry ingredients to wet ingredients. Mix well to combine or until there are no lumps.
  5. Remove skillet with baked apples from oven. Stir apples and redistribute evenly along the bottom of the skillet. Pour batter mixture evenly over the prepared baked apples. Sprinkle with walnuts and unsweetened coconut.
  6. Place the skillet back into the oven. Bake for 25 to 30 minutes at 375 F, or until top is golden brown.
  7. Remove skillet from oven. Serve with fresh maple syrup and homemade coconut butter!

Nutty Coconut Date Balls

I love snacks. I would much rather eat several small meals than huge ones. Maybe because I loooove food and the thought of eating different types of food all day is quite a treat to me.

Also, being a runner, I get hunger pains and need a quick fix!  Eating my arm ain’t pretty, folks. You don’t want to see me get HANGRY.

This is basically my version of the coconut Lara bar.  These little balls are all over the food blogosphere, but I had never had a chance to make them until now.  For Food Matters Project Monday, Cheese Please chose Cheese-Nut Balls from Mark Bittman’s Food Matters Cookbook.  My hubby is dairy free, so I swapped out the cheese for dates and made individual snack bites.  These Nutty Coconut Date Balls are perfect little energy snack bites. The dates taste like caramel goodness with smacks of coconut.  Feel free to roll them into balls or press them into a sheet pan and cut them like bars. They make great travel food!

Coconut Pecan Date Balls

Ingredients

  • 1 cup dates, pitted
  • 3/4 cup chopped nuts (such as raw unsalted walnuts, pecans, macadamia nuts, almonds and/or cashews)
  • 1/2 cup shredded unsweetened coconut
  • 1/8 tsp sea salt
  • 1/8 tsp ground cinnamon

Instructions

  1. Add the dates one at a time through the feed tube of the food processor while it is running. The dates will turn into a date paste.
  2. Add the nuts. Process until the consistency appears like cake crumbs, but it will easily stick together when you press the mixture between your fingers.
  3. Add salt and coconut. Pulse until mixed.
  4. You can either make these into bars or balls. If making into balls, simply remove the blade from the food processor and take one tablespoon at a time of the mixture and roll it between your palms until a ball forms.  To make bars (like larabars), put the mixture into a shallow baking pan and press the mixture into it. Seal and store in an airtight container in the fridge until you are ready to serve it.   These will last up to 2 weeks in the fridge or longer in the freezer.

Roasted Beets with Apples and Greens

I have a confession.

I have a Friday ritual.

I cry.

I cry every damn Friday morning…not because I want to cry. No, I cry because Story Corps comes on NPR’s Morning Edition every Friday morning while I am on my way to work. And I’m not a cryer, folks,…I’m tough…I’m strong…I do what I want….Rargh!!!!

But on Fridays, there I am….crying at the stop sign or crying by a playground or crying in the parking lot of my office.  I have mascara smeared across my face because this little old man is being interviewed by his granddaughters and he is talking about his wife of 70+ years that just passed away and he remembers dancing with her the first day that they met and how beautiful she was and how she sparkled and now life just doesn’t have that sparkle anymore because she was his sparkle and….damnit…here those stupid tears come again.

This morning those tears streamed down again as I heard an amazing story of a young woman that was homeless in highschool. She shared a room in a Chicago shelter with 6 other family members. She rode the bus 1.5 hrs one way every day to school. She currently is in college, working hard and continuing to take care of her family.  And here those tears come again…it kills me knowing how common this story is. So many Americans are well below the poverty line. So many children are homeless. They have so much to overcome and many are able to but many do not have the chance.

So here is where I give an interweb high five *BAM* to all you educators (my husband included) for fighting for these kids and working long hours and believing and loving and opening your homes and hearts. Keep trucking, because what you do matters.

Doh! There I go again. Telling ya’ll a story and forgetting to go into much detail on the featured recipe.  So lets talk beets and fall apples!  A dear friend of mine from grad school sent me a recipe for an apple and kale saute.  I drooled and immediately made it the next night but added two roasted beets that I had bought at the market. Winner!

Roasting beets is super duper easy. It is way better than boiling…ew!  Read below for a short tutorial on roasting and removing the outer skin of the beet. I always run my roasted beets under running water and the skins rub off easily. Oh and USE THOSE GREENS!!!!  I added the beet greens with the kale. The tart apples and earthy roasted beets are a perfect pair. A dijon vinegerette drizzled on top really seals the deal!  Serve as a side with grilled salmon, pork chops, or chicken. Or for a vegetarian or vegan dish, serve over quinoa and maybe add some toasted walnuts. Mmmmm fall.

Roasted Beets with Apples and Greens (adapted from Whole Foods Market)

Serves 4 as a side

Ingredients

  • 1 bunch of beets with beet greens (about 1 lb)
  • 2 small apples
  • 1/4 medium red onion, thinly sliced
  • 1 bunch of kale, stems removed
  • 1 Tablespoon olive oil, divided
  • 1 Tablespoon apple cider vinegar, divided
  • 1 teaspoon stone ground mustard or dijon mustard
  • salt and pepper to taste

Instructions

  1. Preheat oven to 400 F. Let’s roast some beets! Remove greens from beets. Set beet greens aside to use later. Scrub beets well and do not dry off. Wrap beets loosely in aluminum foil. If beets are similar size, then they can all be wrapped together. If the beets are very large, then wrap them separately. Transfer the wrapped beets to a baking sheet and roast for 1 hour for large beets and 45 minutes for smaller beets. Beets are done when a fork slides easily to the middle of the beet. Allow the beets to cool for 5 minutes, or cool enough to handle. Hold the beets under running water and rub the outer skin away easily. Note – if the skin doesn’t come off easily then it is likely that the beets need to cook a little longer.  Peel and slice all the beets. Set aside.
  2. While the beets are roasting in the oven and they have about 20 minutes until they are done, start cooking the rest of your ingredients. Wash and remove the stems from the beet greens and kale.
  3. Heat 1/2 Tablespoon of olive oil in a skillet. Saute red onion for 5 minutes or until translucent and browned. Add thinly sliced apples and cook for 5 minutes, stirring frequently. Add 1/2 tablespoon of apple cider, kale, and beet greens. Place lid on top of skillet and allow to steam for about 5 minutes, stirring frequently. Remove from heat when greens are wilted.
  4. In a small bowl, mix remaining 1/2 tablespoon olive oil, 1/2 tablespoon apple cider vinegar, and mustard. Set aside.
  5. Divide the kale and apple mixture among 4 plates. Place sliced beats on top of kale and apples. Season with salt and pepper. Drizzle with vinaigrette. Serve warm or at room temperature. Note – If you don’t use all of the roasted beets, they can be stored whole or sliced for up to a week in the refrigerator.

Raw Zucchini Salad with Sesame Ginger Sauce

This weekend was a bit tough for me to study. The fall air poured through our open windows. Every time I opened my book, other things called my name: the farmers market, flea market, the garden, zucchini bread, OU football, wine, lunch, wine, dinner, cleaning the bathroom, going for a 7 mile run, getting my toes painted, more wine, walking my dog, another glass of wine….are you seeing a pattern?  Maybe it was the wine that made it difficult? Naaaaaah.

While at the farmers market this weekend, we picked up a poop ton of sweet potatoes, zucchini, peaches, and apples!  So, when this week’s Food Matters Project recipe was Edamame Cakes with Soy Drizzle I decided to take this asian-inspired recipe to Zucchini Land and use up my new bounty of zucchini! This raw salad is uber easy, so fresh and quite beautiful too.  Use the shredder attachment of a food processor to make quick work of shredding up these veggies! Save those knuckles, people!

Note: Don’t add the sesame-ginger dressing until you are ready to serve the salad. The zucchini tends to “weep” and get soggy if it sits with the dressing on it for too long.

To see the original Food Matters Project recipe for Edamame Cakes with Soy Drizzle, check out Life with the Lushers. And be sure to see what the other bloggers came up with here.

Raw Zucchini Salad with Sesame Ginger Sauce

Serves 4 to 6 as a side

Raw Zucchini Salad Ingredients

  • 1 large zucchini, shredded (about 3 cups)
  • 1 red bell pepper, julienned
  • 1 carrot, shredded
  • 1 scallion, green and white parts chopped
  • 1/4 cup cilantro, chopped

Sesame-Ginger Sauce

  • 1 tablespoon coconut aminos or soy sauce
  • 1 tablespoon apple cider vinegar or rice wine vinegar
  • 1 teaspoon sesame oil
  • 1 teaspoon fresh grated ginger
  • 1 clove of garlic minced
  • juice of 1/2 fresh lime
  • salt and pepper to taste

Instructions

  1.  If you have a food processor with a shredding attachment, it will make shredding the zucchini and carrot a breeze. Place the shredded zucchini in a colander and allow to drain for about 30 minutes. Slice the red bell pepper really thin. Combine the zucchini, carrot, bell pepper, and cilantro in a medium bowl. Set aside.
  2. In a small bowl, mix sesame-ginger sauce ingredients and set aside.
  3. When you are ready to serve the salad, add the sesame-ginger sauce to the zucchini mixture. Season with salt and pepper. Serve immediately sprinkled with sesame seeds.

Grilled Delicata Squash with Kale

Do you smell that? Ya…that’s fall people. IT is HERE! Well almost.  The weather man is taunting us. There are 90s in the forecast for the coming week but I have my fingers in my ears and I am not listening because my windows are open, it is in the 60s outside, and I am ready to pull out my BOXES O’ SWEATERS! Yes…that was plural….boxes.

Mmmmmmmmm….sweaters.

Also… winter squash is edging its way onto farmer’s tables at the market. Pumpkins, gourds, acorn squash, butternut squash, spaghetti squash, cinderella pumpkins.

Mmmmm…pumpkin. Oh, be ready people…pumpkin recipes are going to blow this place up! We are going to be swimming in pumpkin at this hacienda. But until then, let’s get back to winter squash, shall we?

One of my favorite winter squash varieties is the delicata squash. It is slightly larger than an acorn squash, but smaller than a butternut.  And did I mention that it is SOOO much easier to cut in half due to the thinner outside skin. The other beauty to this squash (besides those awesome trendy stripes) is that the skin is edible after it is cooked!  Now don’t get me wrong. I love butternut squash like the next bloke, but carving off all that stupid skin and hacking and chopping and nearly taking off my fingers and ear lobes in the process to just get a few measly cups makes me a bitter woman. More bitter than normal. And that’s bitter, people.

The inside flesh is smooth and similar to butternut in texture.  It caramelizes when roasted or grilled.  This dish can easily be adapted for roasting in an oven.  In an oven preheated to 425F, Roast for about 40 minutes. Around 30 or 35 minutes, keep an eye on them and test with a fork. They are done when the fork slides through with no resistance, like a potato.

You could serve the squash alone, but I topped them on top of a fresh lacinato kale salad. A perfect fall salad! Now, where’s my sweater?


Grilled Delicata Squash with Kale

Serves 4 as a side

Ingredients

  • 1 delicata squash, deseeded, halved and sliced in 1/2-inch slices (keep skin on)
  • olive oil
  • salt and pepper
  • 1 bunch of kale (or swiss chard), stems or ribs removed and leaves cut into 1-inch strips and gently massaged. (Read this article to see why and how to massage that beautiful kale.)
  • feta (leave off for vegan and paleo)

Instructions

  1. Prepare and heat grill for direct grill method.
  2. Toss squash slices in olive oil and season with salt and pepper. Grill over medium heat for 5 minutes. Then carefully flip to the other side. Continue grilling for another 5 minutes.
  3. Meanwhile, back on the ranch, add kale strips to a medium bowl. Sprinkle with salt and gently massage so that the kale slightly breaks down and becomes dark in color.
  4. Divide kale between 4 bowls. Place grilled squash rings on top of kale. Top with crumbled feta.

Cauliflower Tabbouleh

This is such a fresh and easy no cook salad and is inspired by the Food Matter’s Project.  I chose to use cauliflower that has been “riced” in a food processor instead of using the traditional bulgur.  Bulgur is a type of cracked wheat and is considered a whole grain. But in our recent quest to give up gluten, I used cauliflower as a stand in for grains and DAAAANG it’s good.  The fresh herbs and lemon make this a perky salad that is perfect for taking to a picnic, potluck, or for a labor day cookout!!!!!  Get on it.  Thanks to Sarah of Simply Whole Kitchen for choosing the Tabbouleh recipe for this week’s edition of Food Matters Project.  

So a small explanation on why we have gone gluten free….

For most of my husband’s life, he has been plagued with the worst seasonal allergies.  He should be the Bubble Boy. He was getting shots weekly until it became too costly, but then the weekly doses of Allergra D weren’t much cheaper either.  Migraines soon followed, nearly once a month…sometimes two or three a month.  They were debilitating and vomit-inducing. Appetizing, I know. 

Months ago, he eliminated grains and dairy from his diet, choosing a “paleo” life-style (only eating meat, vegetables, fruit, and nuts and eliminating grains, dairy, legumes).  Since going “primal”, I have been amazed at all the positive aspects.  His allergies? Vanished…his migraines? GONE. It was a miracle. His allergies were the result of inflammation caused by sensitivities to gluten, grains, and dairy.

Seeing his amazing transformation, I soon began to wonder if gluten was having an affect on me too.  I recently dived into gluten free living and have found that I feel a lot better when I do not consume wheat products.

Soooooooo, whether you have gluten sensitivities or not, I guarantee that you will enjoy this gluten and grain free tabbouleh salad during the final day of a great long weekend.

Cauliflower Tabbouleh (Grain Free)

Inspired by Roost and Mark Bittman

Serves 6 as a side dish

Ingredients

  • 1/2 head of cauliflower, discard stalk and dice florets into 1/2-inch pieces
  • 1/2 cup fresh parsley
  • 1/4 cup fresh mint
  • 1 to 2 cups of kale
  • 2 Tablespoons fresh lemon juice
  • 1 Tablespoon olive oil
  • 2 scallions, green and white parts diced
  • 1/2 cup diced sweet bell pepper (1/4-inch pieces)
  • 1/2 cup diced fresh tomatoes
  • 1/2 cup diced cucumber
  • 1/4 to 1/2 teaspoon salt (to taste)
  • fresh cracked pepper

Instructions

  1. Get out your food processor…don’t have one? I recommend investing in a good one because mine is my best friend! Sorry Guinness. Cut the cauliflower into 1/2-inch to 1/4 inch pieces before adding to the food processor.  Add diced cauliflower to food processor bowl. Pulse until the cauliflower resembles rice. Scrape the “riced” cauliflower into a medium bowl and set aside.  May need to do this in batches to ensure that all of the cauliflower is evenly “riced”.
  2. In the bowl of the food processor (no need to clean out) add packed parsley, mint, kale leaves, lemon juice, and olive oil. Process for about 1 minute. Add herb mix to the riced cauliflower. Gently stir to incorporate.
  3. Add the remaining ingredients (tomatoes, cucumbers, diced peppers, scallions) to the cauliflower-herb mixture. Gently stir to combine. Season with salt and pepper to taste.

Marinated Fig and Spinach Salad

I was a fig virgin a year ago….a fresh fig virgin. Mr Newton destroyed figs in my opinion. Those weird “cookies” were the only sweets in my house when I was young and I stayed waaaaaaaay away from them. Looking back, I guess that was a good thing. So maybe I should thank Mr Newton and my mom. Only having access to those piss poor “cookies” curbed my sweet tooth, that’s for sure.

Late last summer, I noticed fresh figs at the store.  They popped up like a secret and without any warning. My curiosity got the best of me and I brought home a small basket of fresh figs, unsure what to expect.  Cutting into that dark flesh revealed such a surprise. The lush pink center of a fresh cut fig is so beautiful. I ate the whole basket in one day.  I went back…bought more and brought them to anyone and everyone I could. I was a fig prophet. I wanted to yell from the rooftops and spread the word. “Behold…the FIG. It will save your life.” I couldn’t believe that I had been blind to this fruit in its raw form for 30 years.

Although dried figs are available in stores year round, fresh figs are available in late summer.  There are numerous varieties with the Black Mission fig being one of the more common varieties found in stores.  Each variety differs in color and texture.  They are a great source of potassium (helps regulate blood pressure), calcium, and fiber!  So if you can get your hands on some fresh figs right now…do it. Profess the amazingness of figs. Eat them fresh and feel like royalty. Bake them and feel indulgent!

This past week I was lucky enough to get my hungry paws on a FLAT OF FIGS!!!!  After gorging myself on plain raw figs, I marinated a few and added them to this amazing spinach salad.  Although I loved the added flavor of the marinated figs, this salad would be fabulous with just the fresh figs and the balsamic-dijon dressing drizzled on top.

Ooooh…and a side note, the balsamic-dijon marinade/dressing is prime!  I whip up an extra large batch and store it in a ball jam-size jar with a lid and take it to work with me for my lunch salads.  Addictive! It’s also good drizzled on sautéed mushrooms and baked chicken.

Hope everyone has a great Labor Day weekend!!!!

Marinated Fig and Spinach Salad

Serves 2

Ingredients

  • 1/4 cup of balsamic vinegar
  • 1 teaspoon of dijon mustard
  • dash of salt
  • 1/4 cup of olive oil
  • 6 fresh figs, stems removed and quartered
  • 4 handfuls of fresh spinach
  • 2 tablespoon of toasted walnuts, coarsely chopped
  • crumbled goat cheese (optional)
  • fresh cracked pepper

Instructions

  1. Mix vinegar, dijon mustard, and salt in a small bowl.  Add olive oil, whisking constantly. Add figs and stir gently. Allow to marinate for about 10 to 20 minutes while you are preparing other things.
  2. Divide spinach between two bowls. Place figs on top of spinach and drizzle with marinade. Top each bowl with 1/2 tablespoon of walnuts and fresh cracked pepper. Sprinkle with crumbled goat cheese, if that’s yo thang.