Gluten Free Chocolate Chip Zucchini Muffins

Gluten Free Chocolate Chip Zucchini Muffins // Big Eats Tiny Kitchen

Remember that time that you thought you tasted the best zucchini bread ever?

I think you were wrong. I’m so sorry to bust your bubble… but….

THIS gluten free zucchini bread recipe that I am presenting to you today is literally the best zucchini bread I have eeeever had. literally.

Ever. Had.

I’m serious. And I sort of think of my self as a zucchini bread expert. Not to brag, but I’m a bit of a big deal in the zucchini world. Just saying.

Gluten Free Chocolate Chip Zucchini Muffins // Big Eats Tiny Kitchen Gluten Free Chocolate Chip Zucchini Muffins // Big Eats Tiny Kitchen

But back to these muffins. These are soooooo good. And they are gluten free and only made with two types of flour: oat flour and almond flour. Ya. Gettyup!

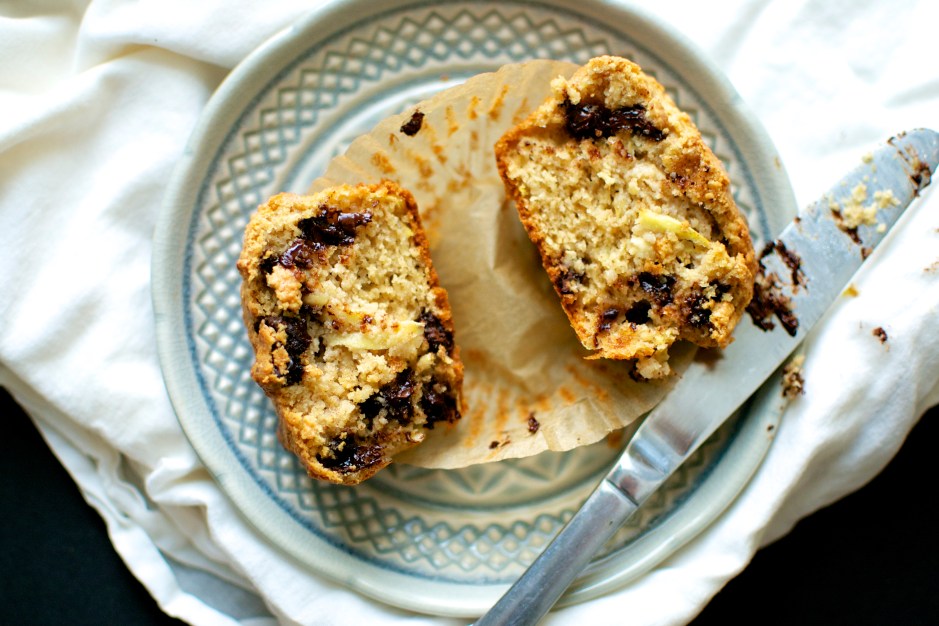
After my first bite of these gluten free zucchini and chocolate chip studded muffins that are sweetened with pure maple syrup…I had to sit down, regain composure, and do a double take…and then shove the rest of it in my mouth. Gluten free eaters and gluten lovers alike will be amazed. They are moist, light, and fluffy.

Gluten Free Chocolate Chip Zucchini Muffins // Big Eats Tiny Kitchen

Gluten Free Chocolate Chip Zucchini Muffins // Big Eats Tiny Kitchen

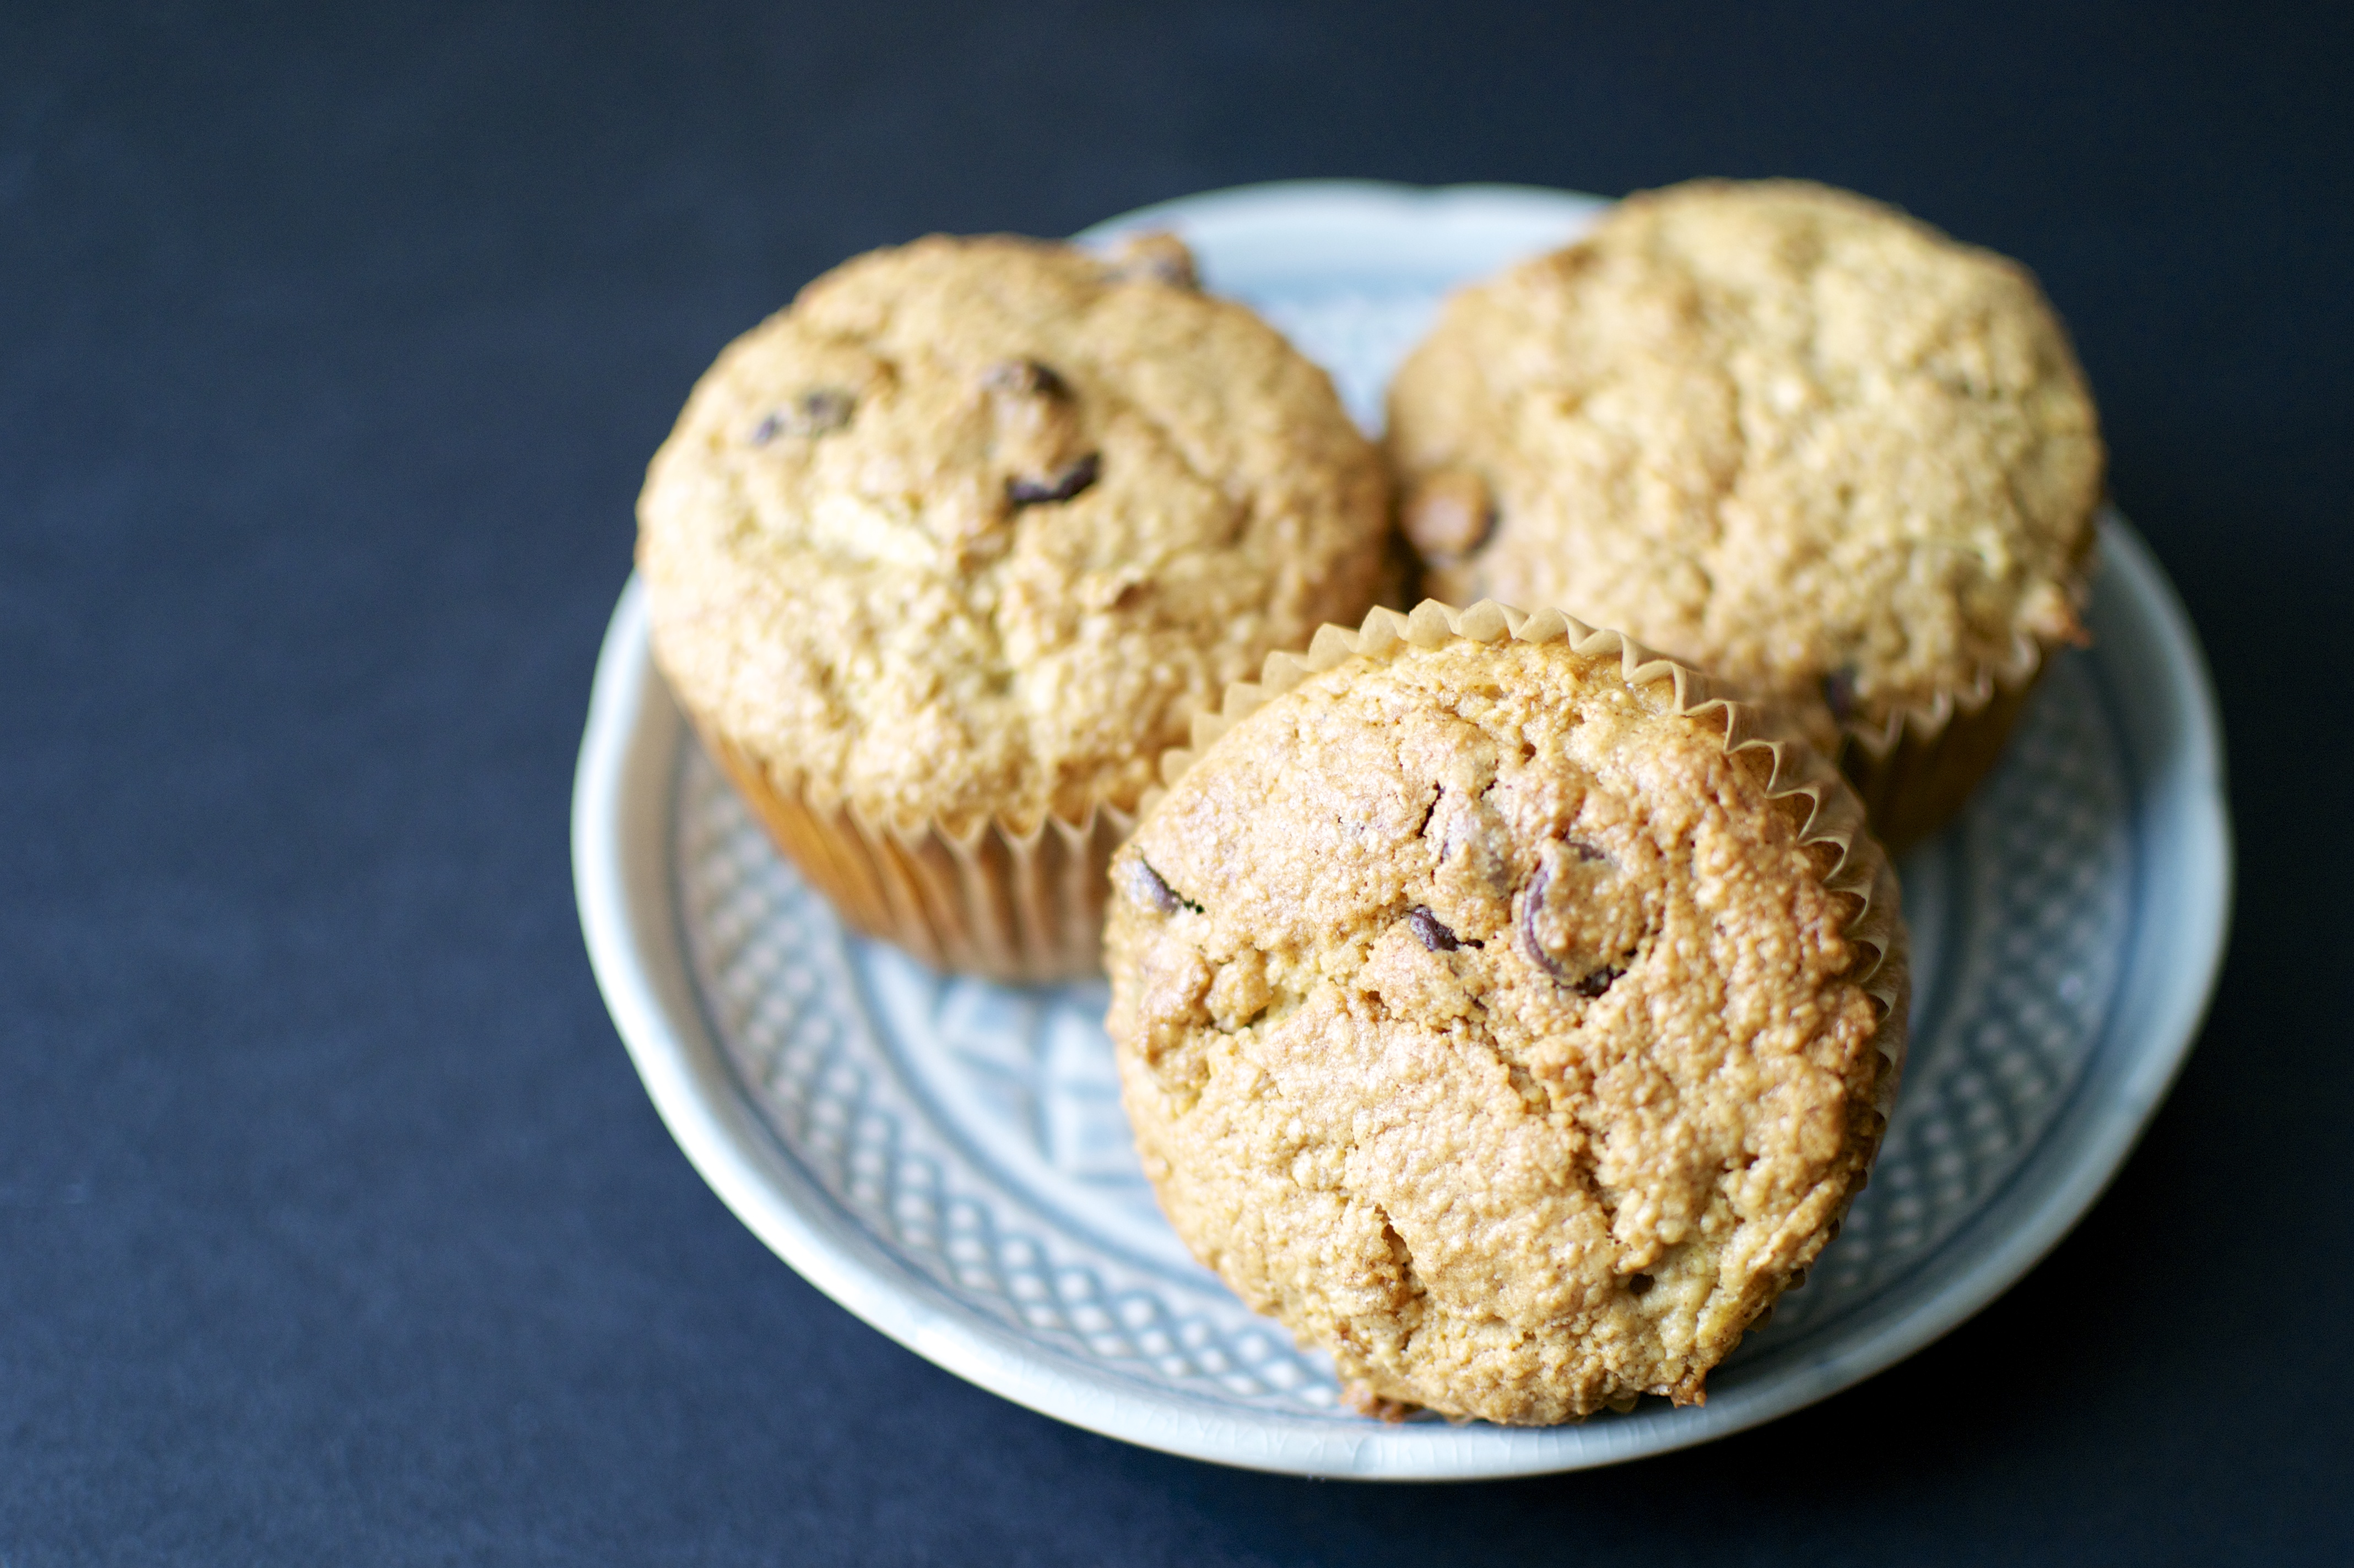
I was really really really sad when I was finished with my muffin. It was the “watch your childhood best friend move away and all you could do is run to your room and write a letter as soon as possible so that she had it waiting for her when she got to her new home” kind of sad. And then I realized how thankful I was that there were 11 muffins left…shhhhhhh! I can’t say it too loud, or others will here and come steal my little precious precious precious zucchini muffins and their melty delicious chocolate chip bitsies.

Snack time just got a HUGE boost. You are welcome!

Gluten Free Chocolate Chip Zucchini Muffins // Big Eats Tiny Kitchen

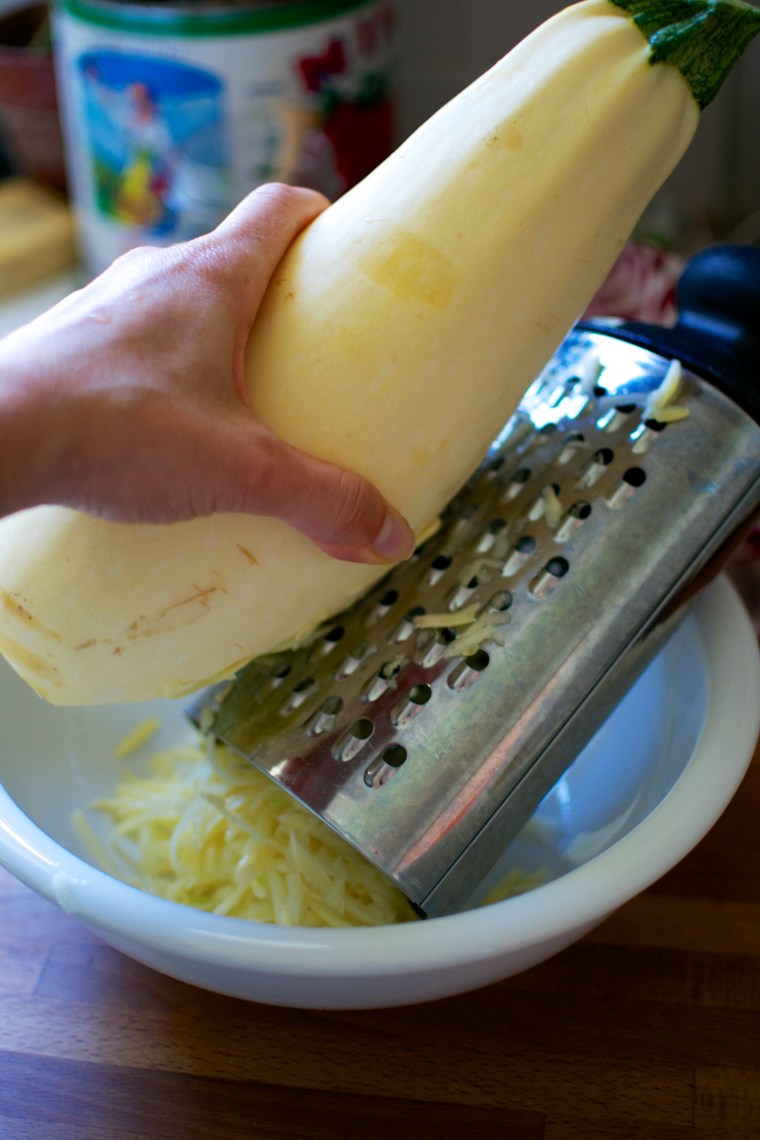
Note – I made these muffins with a white skinned zucchini that I bought at the farmers market. Although the white skinned version was easier to shred, I missed the green flecks of zucchini skin in my muffins. But if you have pick eaters in your family, removing the skin of the zucchini or using a white skinned zucchini is a great way to add this vegetable to muffins without them knowing. Muahahha.

Gluten Free Chocolate Chip Zucchini Muffins // Big Eats Tiny Kitchen

Gluten Free Chocolate Chip Zucchini Muffins (Gluten Free and Dairy Free Option)

  • Servings: 12
  • Difficulty: Easy/Medium
  • Print

Ingredients

  • 2 cups grated zucchini meat (try to avoid the seeds)
  • 2 cups GF oat flour (grind 2 cups of GF rolled oats in a food processor to a fine oat flour)
  • 1 cup almond flour
  • 2 teaspoons baking powder
  • 1/2 teaspoon kosher salt
  • 1 teaspoon ground cinnamon
  • 4 eggs, at room temperature
  • 1/2 cup maple syrup (or honey)
  • 6 Tablespoons butter, softened (or melted and cooled coconut oil)
  • 1/4 cup plain greek yogurt (or applesauce)
  • 2 teaspoons pure vanilla extract
  • 1/2 cup dark chocolate chips

Instructions

  1. Remove items from refrigerator to come to room temperature.
  2. Preheat oven to 350 F. Place paper liners in 12-cup muffin tin. Set aside.
  3. Shred zucchini (with or without skin) in a bowl. Press with a clean towel to remove excess moisture. Set aside covered and allowing to drain.
  4. Place oat flour and almond flour, baking powder, salt, and cinnamon in a large bowl. Whisk together and set aside.
  5. In the bowl of a food processor or mixer, beat eggs for 1 to 2 minutes or until frothy. Add maple syrup and butter and process an additional minute until well incorporated. Add greek yogurt and vanilla. Pulse until combined.
  6. Add wet ingredients to dry ingredients. Mix together until just combined (don’t over mix). Gently stir in shredded zucchini and chocolate chips. Allow to rest for 1 minute.
  7. Fill muffin tins to 3/4 full. Place muffin tin on middle rack in preheated oven. Back for 35 to 40 minutes, or until tops are browned and slightly cracked. Remove from oven and allow to cool on cooling rack for at least 30 minutes (if you can!). Get ready for zucchini muffin heaven!

Note –

1. This recipe was inspired and adapted from Edible Perspectives Zucchini Chocolate Chip Cake.

2. Dairy Free – sub out the greek yogurt for applesauce and use coconut oil instead of butter. Dairy free chocolate chips can also be used in place of the regular chocolate chips.

3. These muffins will freeze well for up to 3 months. To thaw, place in microwave for 30 second intervals. Makes a quick and easy breakfast or after school/work snack.

Advertisement

Margarita Sherbet Popsicles

Margarita Sherbet Popsicles // Big Eats Tiny Kitchen

Summer colds are the worst. I guess a cold is never great to have, but it feels especially terrible when the weather is great outside but all you want to do is roll up in a ball of sheets and kleenex and NyQuil and watch The Notebook over and over and over.

Margarita Sherbet Popsicles // Big Eats Tiny Kitchen

Margarita Sherbet Popsicles

Recently I was knocked out with a cold virus that lasted over TWO weeks. I couldn’t shake it.  Just when I thought that I was getting better, it knocked me back down with a terrible hacking cough, or a sore throat from hell, or a migraine that felt like my head was run over by a ’64 Gran Turino.

When I’m sick there are a few “prescriptions” that I do religiously:

1. Saltwater gargle (it’s awful…but works)

2. Tea with honey

3. Lime popsicles

I decided to amp up my old store-bought lime popsicles and make my own…because OBVIOUSLY that is going to make me better. Why would going to a doctor or actually getting help do me any good?

Nope, I need the healing powers of lime juice, honey, and tequila…of course.

Margarita Sherbet Popsicles

Margarita Sherbet Popsicles

And these are sherbet popsicles…or sherbERRRT as I pronounce it. I used whole milk, but full fat coconut milk would work wonderfully to make these both dairy free and paleo-friendly treats. Also, the tequila is optional (why?), especially if these will be snacked on my some tiny tots.

Margarita Sherbet Popsicles // Big Eats Tiny Kitchen

Margarita Sherbet Popsicles

  • Servings: 6
  • Difficulty: Easy
  • Print

Ingredients

  • 3 limes, zested and juiced (1/2 cup lime juice and 1 Tablespoon lime zest)
  • 1/3 cup honey
  • 2 cups whole milk (or full fat coconut milk for dairy free)
  • 2 to 4 tablespoons silver tequila (optional)
  • 1/8 teaspoon salt

Instructions

  1. Whisk lime juice, lime zest, honey, and milk in a medium bowl until completely combined. Add tequila and salt to taste.
  2. Pour into popsicle molds, leaving 1/4 inch of space at the top for expansion.  Freeze for at least 4 hours. **See note below about molds.
  3. When ready to eat, run a bit of hot water over the popsicle mold and the popsicles will release!

**Note about popsicle molds – I have a simple popsicle mold that I bought at target. It comes with its own handles for each popsicle. However, this time I decided to use sticks and see how it would work for those of you without specific molds. I put the filled mold in the freezer for 1.5 hours until it began to firm up. Then I stuck the popsicle sticks into the mold. No need to soak the sticks ahead of time. 

Plum Sorbet

Plum Sorbet / Big Eats Tiny Kitchen

This week, I was the lucky recipient of a metric boat load of bite-sized cherry plums from a friend’s plum tree in her front yard!!!

So, what would YOU do with sacks and sacks of fresh tasty plums?  Well, besides pop them directly in your mouth…which happened a lot around here.

Plum Sorbet / Big Eats Tiny Kitchen

I decided to try something new….

Plum sorbet, ya’ll! Come and get it! It’s muggy and sticky outside. That means it is perfect weather for a tangy scoop of honey-sweetened Plum sorbet! And it’s dairy free!

You could easily replace the plums in this recipe with another in season fruit, like blueberries or strawberries or peaches! This is So delicious.

Plum Sorbet / Big Eats Tiny Kitchen

These plums that I used were perfectly tart and the honey provided juuuuust enough sweet balance. Also, I added a splash or two or three of champagne in the sorbet! Booze it up! Champagne or white wine in the sorbet provide the finished product a bubbly tang and help with the scoopability! Boom Boom!

Wait. This would be great as a Champagne Float! What? Yes please! If that is not a thing, it should be. Tip that pinky up, honey. Put your fancy hats on and get a big ol’ scoop of Plum Sorbet! Cheers!

DSC_0067

Plum Sorbet

  • Servings: 6
  • Difficulty: Easy
  • Print

Ingredients

  • 2 to 3 cups sliced plums, pits removed
  • 1/4 cup honey
  • pinch of salt
  • 1/3 cup champagne or white wine (or water)
  • 1/3 cup water

Instructions

  1. Add all ingredients to a blender or food processors. Purée until the mixture becomes smooth. Pour the plum puree through a fine mesh sieve to catch large pieces of skin. Place mixture into refrigerator for 30 minutes (or overnight) to chill.
  2. Place the plum purée into the bowl of a chilled ice cream machine and process according to the manufacturer’s instructions. It will take about 25 to 30 minutes. While the mixture is churning away, place a glass container into the freezer that will be big enough to place the processed sorbet into. After the sorbet is finished, either serve immediately or place into the air tight pre-chilled container and freeze for at least 2 hours to firm up.  The wine will help keep the sorbet from getting icy and will assist with scoopability if serving at a later time. Allow to sit out at room temperature for about 5 minutes after removing from the freezer, then scoop away!

Chili Verde Pork Stew (Paleo, Gluten Free, Dairy Free)

Chile Verde Pork Stew - Big Eats Tiny Kitchen

So let’s say you over did it during the holidays. And if you DIDN’T over do it on the holidays…your will power astounds me…go eat some chocolate caramel doo dads and quite making the rest of us feel guilty. Gaaaaaaaah.

Whether you want to eat healthier, or spend more time with your family, or just take care of yourself and your family, this stew answers all of those resolutions. I’m serious!

Chile Verde Pork Stew - Big Eats Tiny Kitchen

I currently have a massive crush on this Green Chili Verde Pork Stew. It’s dangerous. Dangerous to the point that I find myself preaching about this stew to my friends, my family, my husband, my dog, and then to people who don’t care like my eye doctor (she really should care) or my massage therapist (really, it’s THAT good) or even the kid that just stopped by my house to see if I wanted to have my driveway shoveled of the crap ton of snow that is lingering, but then I become the creepy old lady that says “oh honey it’s so cold out there, maybe you just need this green soup”. Someone help me! Poor kid.

So it’s green (green things are healthy, right) and easy (more time to do other things like stalk pinterest). The pics may not look like much, but I’m telling you that this little stew packs a memorable and heart warming goodness that you will not want to pass up. Tomatillos and hatch chiles gives this stew a tangy and slightly spicy flavor that gets better with every bite.  I used canned chiles and a jar of tomatillo salsa verde. But if you wanted to be even more adventurous, you could use both fresh roasted hatch chiles and fresh roasted tomatillos *cough* (overachiever) *cough*.

Chile Verde Pork Stew - Big Eats Tiny Kitchen

I had a 3 pound pork roast from a local farmer that I needed to use. I’m sure you could also use a pork shoulder or boston butt instead. I prepared this in my dutch oven, but I am quite positive that it would also work in the slow cooker. Either way, the slow cooked pork roast is so fork tender and delicious that it will make you want to inhale the whole pot. But wait…and share it with others. Spread the love. I served this amazing stew for Christmas Eve for weary family as they arrived at our house after a long days drive.  It’s the type of meal that can bubble away for hours until you want to serve it. It can also be made ahead of time and reheated when you want to serve it.

Chile Verde Pork Stew - Big Eats Tiny Kitchen

Chili Verde Pork Stew

Serves 8 to 10

Adapted from Simply Recipes

Ingredients

  • 3 lb pork roast (or pork shoulder or boston butt), trimmed of excess fat and cut into 1-inch cubes
  • 1 teaspoon salt
  • ¼ teaspoon black pepper
  • 2 onions, diced
  • 3 cloves of garlic, minced
  • 4 4 oz cans of mild green hatch chiles
  • 1 16 oz jar of mild salsa verde (tomatillo salsa)
  • 1 tablespoon dried oregano
  • 1 tablespoon ground cumin
  • 2 tablespoons ground coriander
  • 2 bay leaves
  • 1 bunch of cilantro leaves, cleaned and chopped (reserve about ¼ cup for topping the stew)
  • 4 cups of chicken stock

Instructions

  1. Season the pork with salt and pepper.
  2. Heat a large dutch oven over medium high heat. Brown the pork chunks by placing small batches of the pork into the heated dutch oven. Allow to brown on all sides. Lift the pork out of the pan with a slotted spoon and set aside. Drain all but 1 tablespoon of fat from dutch oven. Add onion to dutch oven and cook over medium heat until onions become translucent and browned, about 5 minutes. Add garlic and cook an additional 1 to 2 minutes.
  3. Add pork and remaining ingredients to pot. Bring to a boil and reduce heat to a slight simmer. Cook for 2 to 3 hours, or until the pork is fork tender. Remove bay leaves.  Add additional salt and pepper to taste. Serve with reserved chopped cilantro.

Notes – I haven’t tried it yet, but I’m quite positive that this also could be prepared in a slow cooker.  Brown the pork before placing it into the crockpot. Add all other ingredients on top of the browned pork. Cook on low for at least 8 hours.

Beef Curry with Sweet Potatoes and Cauliflower

There are several people who have had a huge hand in transforming the way I cook and approach food. Michael Pollan has definitely had a hefty part in it.  That is why I was so excited to finally hear him speak this weekend about his new book, Cooked.  He is one of the leading voices of the local food movement, eating “real” food, and getting back into the kitchen and cooking with your family. I love it.

DSC_0032

Before we left Oklahoma and moved to Kansas City, I thought I ate rather healthy. But I was still consuming a lot of processed food.  I think a lot of people think this way, even when they still eat a lot of processed foods because the box saaaaays it’s healthy. Right? and why would a box or advertising lie to me? right? bonjour? But despite cooking “healthy”, I was getting sicker and sicker every day, literally.  Everything I ate seemed to put my stomach into knots or stabbing pain or worse. I began an elimination diet. I came up with a new theory every day. At first I thought it was fatty meat…no meat! Then it was beans.. no beans! then it was dairy…. so I became vegan…. and by the end, I seriously was eating only oatmeal and sweet potatoes for months….MONTHS. 

DSC_0027

And then I read Michael Pollan’s In Defense of Food. At the same time, my cousin Sarah gave me an amazing book by Barbara Kingsolver, Animal Vegetable Miracle. Reading these books were like discovering a deodorant that finally works, or finding the perfect pair of jeans, or realizing that you left ten bucks in your coat pocket last winter!  If you are looking for a summer read, I recommend these books. Life…changed.

I immediately eliminated all processed foods. I was on a hunt for local sources of meat and produce.  Everything changed…for the better. My health improved. My relationship with food was so much better. I discovered vegetables I had never heard of…what the crap is celeriac???? I grew a garden (helloooo rhubarb), learned to can, make pickles, and preserve food anyway possible. I basically got in touch with my inner grandma. I love it.  My inner grandma loves it. My tummy loves it.

DSC_0015Sweet_potatoes

Fresh produce doesn’t always require a lot of spices because their natural flavor is enough. However, during this odd time between winter and spring, fresh produce includes greens, or peas, or tubers, or something that was canned from last year’s garden.  Don’t be afraid by the long list of ingredients in this curry recipe. I promise this meal comes together rather quickly and yields an amazingly fresh and flavorful meal.  Serve with rice or, for a grain free option, make ‘riced’ cauliflower (recipe below).

DSC_0022

Beef Curry with Sweet Potatoes and Cauliflower (adapted from Food & Wine, January 2012)

Serves 4 to 6

Ingredients

  • 1 Tablespoon coconut oil
  • 1 lb grass-fed sirloin steak, cut into 1-inch pieces
  • 1 large or 2 medium onions, about 1 cup diced
  • 3 medium cloves garlic, minced
  • 2 tablespoons madras curry powder
  • 2 teaspoons turmeric
  • 1 teaspoon ground ginger
  • 1/4 teaspoon cayenne
  • 1 teaspoon salt
  • 1 14 0z can diced tomatoes with juice
  • 1 14 oz can unsweetened coconut milk (light okay)
  • 2 tablespoons apple cider vinegar
  • 1 cup water or broth
  • 1 medium sweet potato, 1-inch dice
  • 1 head of cauliflower, chopped into 1/2-inch pieces*
  • 1 1/2 cup frozen peas
  • cilantro (optional)

Instructions

  1. Heat coconut oil in dutch oven over medium-high heat.  Add diced sirloin steak and brown the pieces on all sides, about 5 minutes. 
  2. Add onion, curry powder, turmeric, ginger, and salt and stir frequently until onion is softened (about 5 minutes). Add garlic and stir constantly and cook for an additional minute.
  3. Add canned tomatoes, coconut milk, apple cider vinegar, water, diced sweet potatoes, and half of the diced cauliflower. Bring to a boil. Reduce heat to moderate heat and continue cooking covered until potato and cauliflower are tender (about 15 minutes).
  4. Turn heat to low. Mash some of the potatoes with the back of a spoon.
  5. Stir in frozen peas. Turn heat off and place lid on dutch oven, allowing peas to cook through for a few minutes. Add additional salt, pepper, and cayenne to taste.
  6. Serve in bowls with chopped cilantro and riced cauliflower (or regular rice). Directions for riced cauliflower are provided below.

*Riced Cauliflower – Place the other half of the diced cauliflower into the bowl of the food processor. Pulse for a few seconds at a time until you get rice-sized pieces. Do not over process or it will become puree cauliflower.  Place in a microwaved-safe dish with a lid slightly ajar and microwave for 3 minutes. Stir.

Dijon Ham Steaks with Apples

Snow snow snow snow!!!! Winter is not giving up in Kansas City with predictions of 10 to 15 inches of snow and zero visibility. Plus, we are not just getting metric boat loads of snow, but….(cue deep booming echoing voice) THUNDER SNOW.  It sounds more like an X Men character or superhero name or maybe they should add this as the next movie in the Mad Max movie serious….Return of Thunder Snow….anyone? come on!

Ham steak

DSC_0176

It’s really strange to see the light snow falling and hear booming thunder outside.  They have canceled and closed everything around here including schools, work, gyms, ceremonies. The grocery stores have been like war zones the last few days with people stocking up for Snowmeggedon.  So now there is nothing left to do but hunker down, cook up a hearty breakfast, put a fire in the fireplace, add a roast in the oven to cook low and slow, and cuddle with my favorite boys…Guinness and Kiley.

DSC_0183

Even if you aren’t getting (booming voice) THUNDER SNOOOOOW…. you can still make a heart-warming breakfast that deserves being stranded in a snowy mountain cabin with a warm fire in the fireplace.  My local Community Supported Agriculture (CSA) meat supplier provides us with 12 to 16 oz bone-in ham steaks.  We like to brown these in a cast iron skillet for breakfast.  In the summer, I like to cook these steaks on the grill.  When cooking indoors in a skillet, I cut the ham steak into four equal portions to cook evenly and quicker.  A simple Dijon sauce and butter-sauted apples pair well with the ham. This is even good as a quick dinner.

DSC_0184

Dijon Ham Steaks with Apples (Adapted from Gourmet, 1999)

Serves 4

Ingredients

  • 12 to 16 oz uncooked ham steak (1/4-inch thick), trimmed of fat and cut into 4 portions
  • 1 Tablespoon whole grain mustard
  • 1 Tablespoon Dijon mustard
  • 2 Tablespoons butter
  • 2 small apples (or 1 large), cored and sliced in 1/4-inch slices

Instructions

  1. Preheat oven to 250°F.
  2. In a small bowl, mix whole grain mustard and Dijon mustard. Spread mustard mixture on top of ham steak.
  3. Heat 1 tablespoon butter in a skillet over moderately high heat. Add ham steaks to skillet and sauté until browned (about 5 to 6 minutes). If your ham steak is thicker than 1/4-inch, cook a little longer. Transfer browned ham to a heat-proof dish, loosely covered with foil, and place in preheated oven to keep warm while apples cook.
  4. Add remaining tablespoon butter to skillet and sauté apple slices, turning once, until golden and tender, about 4 minutes total. Remove ham from oven. Top each piece of ham with apple slices. Serve with fried eggs for a fabulous fancy country breakfast.