Gluten Free Pumpkin Blondies

These gluten free blondies are closely related to my Paleo Fudge Brownies which have almond butter as the base ingredient.  For these Pumpkin Blondies, I wanted the pumpkin flavor to be front and center stage.  Pureed canned pumpkin plus pumpkin pie spices give them an amazing fall flavor that will blow your mind.

I’ve made these several times for dinner parties and group gatherings. I have to say that I prefer them with dark chocolate chunks, unsweetened shredded coconut, and just slightly undercooked (about 25 minutes), where they end up more like gooey pumpkin chocolate chip cookie bars.  However, if you prefer to not eat your blondies with messy gooey hands (freaks), then cook these puppies until they are fully set up (about 30 minutes).

Note – if you are using salted almond butter, reduce the quantity of salt or leave out entirely. Similarly, if your nut butter is sweetened, then reduce the quantity of honey equivalently. You could easily sub another type of nut butter for the almond butter. If you do not have pumpkin pie spice blend, then sub cinnamon. 

Pumpkin Blondies (Grain Free, Gluten Free, Paleo Friendly, Dairy Free, Refined Sugar Free) adapted from This Primal Life

Serves 16

Ingredients

  • 1 cup unsalted almond butter
  • 1 cup pureed pumpkin (canned or fresh)
  • 1 egg
  • 1/3 cup honey (or maple syrup)
  • 1 teaspoon baking soda
  • 1/4 teaspoon salt
  • 1 teaspoon pumpkin pie spice blend
  • 1/3 cup dark chocolate chips (optional)
  • 1/2 cup shredded unsweetened coconut (optional)

Instructions

  1. Preheat oven to 350F. Spray an 8″x8″ pan with nonstick spray. Set aside.
  2. In a medium bowl, combine almond butter and pumpkin. Mix until combined. Add egg and honey. Mix well. Stir in baking soda, salt, and pumpkin pie spices. Stir in chocolate chips and 1/4 cup coconut. Top the remaining 1/4 cup shredded coconut.
  3. Pour into prepared pan. Bake in preheated oven for 25 to 30 minutes or until toothpick comes out clean. Remove from oven and allow to cool for 5 to 10 minutes. Best when eaten warm!

Spiced Zucchini and Apple Cake and an Anniversary

Seven years ago today, I walked down the isle to Johnny Cash’s Ring of Fire and married a crazy man. I call him crazy only because he fell in love with me. What is even crazier is that he has continued to love me amazingly. He is my best friend. I’m one lucky gal. The luckiest in fact.

We make an odd pair. A great team, but an odd pair. He is total left brain and spontaneous and fun and boisterous and ADD and passionate and people oriented. Me? None of those things. Opposite. This man allows me to be crazy and anal retentive. He has taught me to go with the flow…well…to TRY to go with the flow. I’m a Type A engineer…I do as good as I can. I’ve come a long way.

Case in point – On our first anniversary, we took a road trip from Oklahoma to Nantucket. My cousin lived there and we decided to head up there to see her. We were broke (I was getting layed off from my job and going back to school to get my masters). We decided to camp the whole way and eat packed food. We had a tight budget. Well, correction…I had a tight budget.

We spent the first night at a friend’s place in Chicago. We ate turkey sandwiches that night at their house. Budget accomplished. Check. Next day, we headed to New York. Around 9 am it became apparent that we have left our turkey meat in Chicago. Kiley was hungry. I offered him the only option we had….mustard sandwich. He was not a fan. He pulled over to get a sausage biscuit. “But…that’s not a part of the budget,” I said. He asks if I want one. And of course I said no…because it was not in the budget…I mean, in my defense that dollar could make or break this thing, people!!!! SO there he is…eating his hot and steamy and fresh and awesome breakfast sausage biscuit…and there I am…eating my cold and floppy and soggy mustard sandwich. My mustard sandwich was awesome. He was totally jealous.

Do you now know why I think he is crazy….for putting up with me! Seriously.

But that was year 1…and now, 7 years later, he has totally relaxed. Ha…I mean, I have relaxed. A bit. We now own a 1974 VW camper van called Annabelle that we “drive” all over America. Well, sometimes we do not drive her back (she gets towed)…but it’s always a good time and always an adventure.

Right now we are on yet another adventure. This time Kiley surprised me with a train ride to Hermann, Missouri….Missouri’s very own wine country. It’s a quaint German town nestled on the banks of the Missouri River an hour or so west of St Louis. So cheers and I hope you are having a wonderful Monday, because I am.

Oh…this cake! I nearly forgot with all the gooshy anniversary talk. Typically on Mondays I present a Food Matter’s Project (FMP) recipe. Today’s recipe was Apricot Polenta Cake which appears to be rather easy and tasty. However, apricots are not around right now at the market and Kiley does not eat grains…so no polenta. Womp womp. But, in an attempt to stick with the “cake” theme of the FMP, I baked this lovely zucchini spice cake. It is adapted from one of my new favorite flood blogs, Against All Grains. She cooks great recipes for individuals that have sensitivities to grains and dairy. This cake is adapted from her zucchini bread recipe which is made with almond flour. My adaptation amps up with fall spices (cinnamon, ginger, nutmeg) and tops it with local apples.

Enjoy this cake for breakfast, dessert, snack, or on a road trip (slices are coming with us on the train). Take it from me, these cake slices are SO much better than eating mustard sandwiches. 😛

Almond Flour Zucchini and Apple Cake (adapted from Against All Grains)

Ingredients

  • 1.5 cups blanched almond flour
  • 1 Tablespoon ground cinnamon
  • 1 teaspoon baking soda
  • 1/2 teaspoon salt
  • 1/2 teaspoon ground nutmeg
  • 1/2 teaspoon ground ginger
  • 3 eggs
  • 1/4 cup maple syrup
  • 2 Tablespoons coconut oil
  • 1 to 2 cups shredded, unpeeled zucchini
  • 2 apples (dice one apple and thinly slice the other to place on top)

Instructions

  1. Preheat oven to 350F. Spray an 8-inch or 9-inch cake pan with nonstick spray. Set aside.
  2. Combine the dry ingredients (almond flour through ginger) in a small bowl. Set aside.
  3. In a separate medium bowl, mix wet ingredients (eggs through oil) and beat for about 1 minute. Stir in zucchini and one of the diced apples.
  4. Slowly add the dry ingredients to the wet ingredients. Mix until all of the dry ingredients have been incorporated.
  5. Pour into prepared pan. Place sliced apple on top in a circle pattern. Bake at 350F for 35 to 40 minutes or until the middle is set. A toothpick comes out clean when the cake is done.

Pumpkin and Apple Almond Flour Muffins (Grain Free)

So I have a crush. And not a little one. A BIG one…a huge, gushy, get red, giggle, snort, blow chocolate milk out of my nose kind of crush. His name…. Pumpkin…that’s Mr. Pumpkin. Ya….you know him. You all love him.  He’s like the Matthew McConaughey of fall produce.  Whatever he is in, it’s golden, perfect, never disappoints and always shirtless.

Such is my crush….mmmmm pumpkin. I’ve been collecting and dreaming about amazing recipes: pumpkin bourbon ice cream, pumpkin bars, pumpkin bread, pumpkin coconut soup, pumpkin latte, pumpkin butter, pumpkin oatmeal, pumpkin pancakes, pumpkin smoothie, pumpkin cheesecake, pumpkin curry. The list goes on and on and on and on, people. It’s bad. I’ve got a pumpkin fever!

And then I stumbled upon this great pumpkin muffin recipe made with almond flour. As soon as the calendar hit September 1st, my oven went on and in went these delicious pumpkin muffins.  I had just picked up some local golden delicious apples at the market and decided to throw one into the mix. I’d been dreaming of these puppies and boy howdy they did not disappoint…much like Matthew McConaughey.  Pull the muffin liner off and they too will be shirtless. Whoah!

I honestly have to say these are hands down the best pumpkin muffins I have had…gluten free or not. It’s a double bonus that they are not only gluten free but grain free. So if you are on the fence about experimenting with almond flour, give these puppies a go. You will forever be in deep smit. You can even eat them shirtless. I won’t tell.

I should note that I made these with my newest purchase of Honeyville blanched almond flour.  I’m super impressed with the light texture.  Trader Joe’s offers almond meal and it is made from unblanched (skins still on) almonds. Bob’s Redmill also sells almond flour. Although Bob’s is blanched,  it has a more coarse texture but still tastes gooooooood. So if you are looking for a lighter texture to baked goods, I’d invest in a better almond flour such as Honeyville or go to Nuts.com.  Store your flour in the fridge or freezer. I also think Whole Foods offers bulk almond flour.   Another option is to regrind Bob’s almond flour in a coffee grinder. Just be careful to not let it process to long or you will end up with almond butter. DOH!

Pumpkin and Apple Almond Flour Muffins (Grain Free) (Slightly adapted from the Urban Poser)

Ingredients

  • 1/2 cup pumpkin puree
  • 2 large eggs, beaten
  • 1/3 cup maple syrup (or honey)
  • 2 Tablespoons coconut oil, melted
  • 3 Tablespoons apple sauce
  • 1 diced apple, leave skin on if organic
  • 2 1/2 cups blanched almond flour (I use Honeyville or go to Nuts.com)
  • 1/2 tsp baking soda
  • 1/4 tsp salt
  • 1 Tablespoon ground cinnamon
  • 1/2 teaspoon ground nutmeg
  • 1/4 teaspoon ground ginger
  • 1/8 teaspoon ground cloves
  • 1/4 cup of walnuts or pecans
Instructions
  1. Preheat oven to 350F. Spray 12 cup muffin tin or place muffin liners within tin. Set aside.
  2. In a large mixing bowl, combine wet ingredients (eggs, pumpkin, maple syrup, coconut oil, and applesauce). Combine until well mixed. Add diced apple. Set aside.
  3. In a separate bowl, combine dry ingredients (almond flour, baking soda, salt, and spices). If you do not have blanched finely ground almond flour, you may need to regrind your almond flour in a blender.
  4. Add the dry ingredients to the wet ingredients. Mix until combined where there are no visible lumps. Add nuts and mix until combined. The batter will be rather thick.
  5. Spoon the batter into the prepared muffin liners or muffin tin. Fill to about 2/3 full, smoothing the tops with the bottom of a spatula or spoon.
  6. Bake in 350F preheated oven for 25 to 30 minutes or until golden brown. Check doneness by inserting a toothpick into the center of a muffin. It will come out clean when done. Allow to cool on a rack, if you dare. Dive in. These freeze well.

Chocolate Banana Pie with Coconut Macaroon Crust (Grain Free and Dairy Free)

I have been known to sneak odd ingredients into foods….black beans in brownies, or cashews in “cheese” cake, or even cauliflower in mac n’ cheese.  

Today, my magic trick is with chocolate….bananas….coconut…and…. wait for it…. avocados….in a pie.   What? yes…. It can’t be done you say…CHALLENGE ACCEPTED.

Stay with me on this one, people. I was skeptical too. There are several avocado chocolate mouse/pudding recipes out there in the vast blogosphere. After reading many of these odd recipes, I decided to give it a go and put it into a pie form.  Because everyone needs a good pie every once and a while….or two. 

I pureed two avocados with coconut milk, ripe bananas, soaked dates, a smidge of agave nectar, and some good cocoa. The pudding filling was so silky and creamy and rich….you would think there was a load of butter and cream in this fabulous pie….but no, just the magical avocado. To keep it grain free, but still giving it TONS of flavor, I concocted a coconut macaroon crust. Swoooooon!  So good. The macaroon crust recipe is a keeper.

Chocolate + banana is a match made in heaven to me. Nothing gets better. So I added sliced bo-naners in the base of the pie. I imagine these would be awesome as small tartlets, using a muffin tin instead of an entire pie. Go surprise your taste buds. Throw together this pie and you never have to feel guilty…. You are welcome!

Chocolate Banana Pie with Coconut Macaroon Crust (Grain Free, Gluten Free, Dairy Free, Paleo-Friendly)

Serves 8 to 10

Macaroon Crust Ingredients:

  • 2 cups unsweetened shredded coconut
  • 2 egg whites
  • 1 tablespoon honey (or maple syrup)
  • 1/4 teaspoon kosher salt

Macaroon Crust Instructions:

  1. Preheat oven to 350 F. Spray a 9″ pie pan with nonstick spray or coconut oil. Set aside.
  2. Place all ingredients into your food processor. Pulse until combined. Mixture should hold together when you squeeze it between your fingers. Don’t process for too long or you will end up with a coconut butter-type puree.
  3. Dump the coconut mixture into the prepared pie pan. Press out the mixture evenly into the bottom of the pie pan to about an 1/8-inch to 1/4-inch thick.
  4. Bake in preheated oven until lightly browned, 15 to 20 minutes. Remove from oven and allow to cool to room temperature.

Chocolate Filling Ingredients:

  • 1/2 cups dates, soaked in hot water for at least 10 minutes
  • 2 avocados
  • 2 bananas (one is for the filling and the other is to be layered inside the pie)
  • 1 1/2 cups coconut milk (light or full fat)
  • 1/2 cup unsweetened cocoa powder
  • 1/4 teaspoon kosher salt
  • 1 teaspoon vanilla extract
  • 1 tablespoon honey (or maple syrup)
  • Optional toppings: dark chocolate shavings, unsweetened coconut flakes, slivered almonds, sliced fruit

Chocolate Filling Instructions:

  1. Place soaked dates, avocados, one of the bananas, and the coconut milk in a good food processor. Blend until smooth.
  2. Add cocoa powder, salt, vanilla extract, and honey. Blend until smooth.
  3. Once the crust is cooled and filling is made, layer slices of the remaining banana in the bottom of the pie crust. Add chocolate filling and spread with a spatula to smooth. Optional toppings include flaked unsweetened coconut or dark chocolate shavings. Refrigerate pie for a few hours until cool and set up. Serves 8 to 10.

Paleo Fudge Brownies (Gluten Free and Vegan)

I’m going to let you in on a weird little fact about me…I prefer ketchup over chocolate. Chocolate has never been a major craving of mine.

*gasp*

I know…so weird.  This probably isn’t the best lead in sentence to convince you to make these brownies….I promise they do not taste like ketchup. Total let down, I know. womp womp.

Actually, chocolate…well, milk chocolate is too sweet for me. However, recently I have become a huge fan of gooooood dark chocolate.  That is, dark chocolate with at least 72% cacao…preferably with 85% cacao. And bonus….it’s good for you. And sometimes you just need some good melty chocolate. So I decided to find a way to turn this awesome dark chocolate into a flourless brownie so that my gluten free hubby could also partake. I’m a doll, I know. Also, if he helps eat them, then I don’t fall asleep with the whole pan in bed. Don’t judge!

Although I have dabbled in flourless and gluten free brownies before, these Paleo Fudge Brownies take the cake…pun intended. They taste amazing and are gluten free, grain free, dairy free, vegan, peanut free, soy free, and processed sugar free. Which also makes them a great dessert to take to cookouts if you have anyone that may have food allergies or sensitivities.

I like these better than conventional brownies that are loaded with flour and sugar and butter (blasphemy, I know), which typically leave me in a coma. And even my sweet-toothed, chocolate-loving hubby adores these.

Instead of flour, the base for this fudge-tastic brownie is almond butter!  You could use any nut butter that you have on hand.  Just make sure that it is unsweetened and all natural. They are sprinkled inside with melted chunks of good dark chocolate (SWOON) and topped with toasted walnuts. Are you drooling yet?

When baking these puppies, make sure you do NOT overcook them. If overcooked, they will taste like brownie croutons, which are still edible, but not as delightful as fuuuuuuudgy brownies. If you slightly undercook them, I guarantee you will take them to bed with you. No judging here.

Added bonus, my friends…they are good for you, and are packed with protein, dark chocolate, and omega-3s from the flax meal and walnuts.

You are welcome!

Paleo Fudge Brownies (slightly adapted from Elana’s Pantry)

Makes 16 brownies

Ingredients

  • 1 small banana
  • 3 pitted dates
  • 1 cup almond butter
  • 2 tablespoons ground flax seeds, mixed with 3 tablespoons of water to form a paste (or 1 egg to make it nonvegan)
  • 2 tablespoons of coconut oil or grapeseed oil
  • 2 tablespoons of unsweetened applesauce
  • 2 tablespoons of agave nectar (or honey for nonvegans)
  • 1 tablespoon of vanilla extract
  • 1/2 cup cacao powder
  • 1/4 teaspoon sea salt
  • 1/2 teaspoon baking soda
  • 1/4 cup chopped dark 85% cocoa chocolate bar
  • 1/4 to 1/2 cup of chopped walnuts

Instructions

  1. Preheat oven to 350°F. Spray an 8X8 inch baking dish with nonstick spray or grease well with butter or coconut oil.
  2. Pull out your food processor. If you don’t have one, use a stand mixer and substitute another banana (two total) for the dates. The dates will not break down in a stand mixer, only a good food processor. Combine the banana(s), dates (if using a food processor), almond butter, and ground flax seed mixture.
  3. Pulse in coconut oil, apple sauce, agave nectar, and vanilla until the mixture is smooth.
  4. Add cocoa powder, salt, and baking soda. Pulse to combine.
  5. Stir in chopped dark chocolate.
  6. Transfer batter into a well greased 8×8 inch pyrex baking dish. Top with chopped walnuts.
  7. Bake at 350°F for 30 minutes. Let cool for about 5 minutes, if you dare, before cutting and serving. (Note – Try not to drool on the brownies while cutting.)

Easy 100% Whole Wheat Seedtastic Bread

So, I have had quite a busy few weeks. I was supposed to have this bread ready to post yesterday for Food Matters Monday, but I failed and got behind. But I totally ate this bread for breakfast, lunch, dinner, and dessert for the last several days.  So without much further ado……

I have always romanticized about owning a bakery….waking up early to bake fresh bread and pastries.  Locals coming to get their fresh baked breads every morning…but then there is the problem with me not being a baker of breads.  I had never quite gotten the knack until I learned the No-Knead meathod that Jim Lahey (of famed Sullivan Street Bakery) founded years ago. Since learning this method, I have never gone back. It’s genius. Throw all the flour, yeast, and salt in a bowl…add water…stir…let the shaggy mess rest for several hours (best if is allowed to rise for 12 to 24 hours)…then pull it out of the bowl, roughly shape into a ball or football, then bake. Bam. Delicous, house warming, belly craving bread. Slather butter on it or PB or eat it plain. Daaang.

No kneading and no waiting to see if your bread has risen and fallen then risen and fallen again…none of it….none. It’ll change your life (and your waistband if you bake too many loaves like me..hehe) and save you a poop ton of money. That’s right…a poop ton. Make your own bread and impress friends and family.

Or impress yourself, because really that is all that matters.

Mark Bittman has also used this no-knead method in his Food Matters Cookbook. His recipe, Real Whole Wheat Bread, was chosen this week for the Food Matters Project by Melissa of the Faux Martha. What is great about this recipe, is that there is so many variations…herbs, seeds, fruit…you name it…you can make it. So stop doubting yourself and make some BREAD. Nothing smells better than fresh baked bread. Mmmm…

Now, although the primary recipe is Mark Bittman’s, my baking method is not technically Mark Bittman’s method. I prefer an artisinal appearance or free form with a crusty exterior. I also like smaller loaves, which is why I divided the recipe below into two beautiful football shaped loaves. You can definitely bake this in a loaf pan if you want. But a few years ago, I found a book at an estate sale called “Health Bread in Five Minutes a Day” by Jeff Hertzberg and Zoe Francois that takes the no-knead method to another level, cooking the bread on a baking stone in a super hot oven (450F) and trying to mimik hearth-style baking. You will get professional looking loaves every time and it is super easy.

Before you jump elbows first into bread baking, here are a few notes about bread and the primary ingredients….

1. Yeast hates hot water…it will kill those suckers. So use luke-warm water. This means that the water feels just a little warm to the touch (no hotter than 100 degrees F). Cold water from the tap will work also, but the initial rise time will take much longer. If your water at home has a funky flavor, I recommend buying distilled or filtered water, because your bread will then get the funk…and not a good funk. Otherwise, tap water will be fine.

2. Make sure your yeast is fresh. Store in the fridge to make it last longer. Initial rise times are slower if you use less yeast (1/2 teaspoon versus 2 teaspoons). If you want to speed up the rise time, increase the quantity of yeast up to a 2 teaspoons (one full packet) for the below recipe. If you double the below recipe, use 1 1/2 tablespoons of yeast. If you plan on making a lot of bread, buying yeast in bulk (a jar instead of those pesky packets) will save you money.

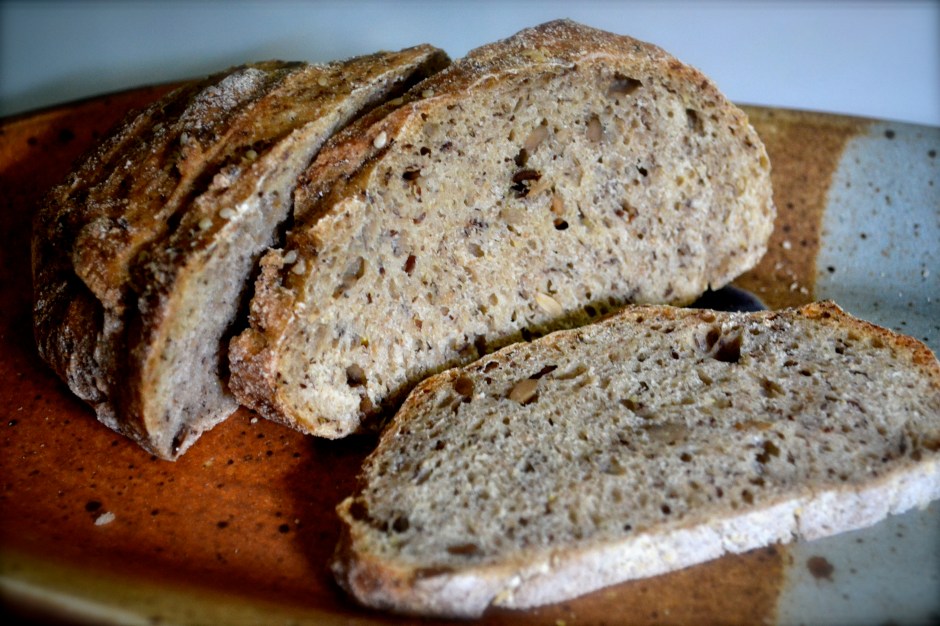
3. Boost nutritional value in your breads by using 100% whole wheat and adding healthy seeds within or on top of the bread. Seeds can include sesame, flaxseed, caraway, pumpkin, sunflower, poppy, and anise. To top the bread, paint the surface of the loaf with water before sprinkling the seeds on the loaf.

4. Baking stone – A baking stone will give you the best results for a professional-looking free form loaf. The stone absorbs excess moisture from the wet dough, allowing the crust to become crisp. Mmmm.  Also the weight of the stone helps with heat retention and provides even heating and heat transfer to the loaf.

Sorry for the excessively long post, but it is worth it!  This is why I’m late in posting it. Also, don’t forget to see what the other FMP foodies did with this recipe at the Food Matters Project home page.

Easy 100% Whole Wheat Seed Bread

Yield: Two 1-lb loaves (or one big mama jamma loaf)

Ingredients (this recipe can easily be doubled to make 4 1-lb loaves in order to feed an army)

  • 3 cups whole wheat flour
  • 2 teaspoons of kosher salt
  • 1/4 cup flaxseed meal
  • 1/4 cup sunflower seeds (optional to add additional seeds such as pumpkin, poppy, sesame)
  • 1/2 teaspoon active yeast
  • 1 1/2 cups lukewarm water (must be less than 100 F)
  • Topping: sesame seeds, poppy seeds, sunflower (or whatever you have on hand)

Instructions (seems like a lot of instructions but it is uber easy)

  1. Combine flour, salt, flaxseed, sunflower seeds, and yeast in a medium 5 qt bowl.
  2. Add water and stir with a wooden spoon till combined. The dough should be wet and shaggy and resemble biscuit dough or batter.  Cover (not airtight) with plastic wrap or damp towel. Allow it to rest at room temperature until it rises and collapses (or flattens on top with bubbles) at least 2 hours, but it is best when left 12 to 24 hours. (If your house is cold, turn the oven on to 200 F then turn it off, placing the  dough on the oven to rise).
  3. The dough can be used immediately after the initial rise, or it can be refrigerated in a lidded (not airtight) container and used over the next week. You can lop off smaller pieces and bake smaller portions, storing the rest in the fridge until you are ready for fresh baked bread.
  4. When you are ready to bake the bread, dust the surface of the refrigerated dough with flour and shape into a ball by stretching the surface of the dough around to the bottom on all four sides, rotating the ball a quater-turn as you go.  At this point you can either place in a loaf pan or bake on a pizza peel for an artisinal loaf. For the artisinal loaf, place the loaf to rest on a greased cookie sheet (can also dust the cookie sheet with cornmeal). Loosely cover the dough with plastic wrap and allow to rest for 1 1/2 hours.
  5. At leasat 30 minutes before baking, preheat oven to 450 F with a baking stone placed on the middle rack of the oven. Place an empty metal broiler tray on the lowest rack, making sure that it won’t interfere with the rising bread.
  6. Just before baking, dust the top of the loaf with flour and then slash the loaf with a razor or serrated knife with 1/4-inch-deep parallel cuts.
  7. Slide the loaf directly onto the hot preheated pizza stone (or you can place the greased cookie sheet directly on the stone if you can’t slide the loaf off of it). Pour 1 cup of hot tap water into the preheated broiler tray and quickly close the oven door.
  8. Bake for 30 to 35 minutes, or until the loaf is browned and firm. Note: If you used a cookie sheet, remove the bread from the cookie sheet at 20 minutes and bake the rest of the way on the pizza stone.
  9. Remove from the oven and allow to cool on a wire rack before slicing and eating.

Easy Whole Wheat Pizza Dough

Years ago, the Jimy Lahey (the owner of Sullivan Street Bakery) released his amazing no-knead method for making bread. It does require planning and allowing the flour-salt-yeast-water mixture to sit in a warm draft-free environment and ferment for 12 to 24 hours.  But it is simply and I have made several amazing batches of bread this way.  Mark Bittman adopted Jim Lahey’s method in the Food Matters Cookbook, slightly adapting it to a whole wheat version of pizza dough. In fact, the March issue of Bon Apetit did the cover story on Lahey’s no-knead pizza dough.

It really doesn’t take much time. In the morning, throw 3 cups of whole wheat flour (I used half white whole wheat and half whole wheat pastry flour), some salt, and 1/2 teaspoon of yeast in a bowl then add 1 1/2 cups of water. Stir with a wooden spoon. Put plastic wrap over it. Set aside. Done.

The pizza dough will be ready for you to work your magic once you get home from work. It will have bubbles on top from the fermentation process. Place the dough on a floured surface and work into small individual pizzas.

No need to spend extra “dough” on take out. Make this a fun experience with kids or friends or yourself. As you can see, I had two great helpers tonight in making individual pizzas. The kids chose their own toppings and they even experimented with an interesting guacamole pizza. Hrmmm.

If you don’t use all of the dough, or change your mind on dinner that night, the pizza dough will keep in the fridge for up to 3 days or in the freezer for up to a month.

See what everyone did with this recipe at the Food Matters Project. The original recipe was chosen by Niki of Salt and Pepper.

Easy Whole Wheat Pizza Dough

Notes: I recommend investing in a good pizza stone! It makes a difference.

Makes: 2  10″ pizzas or 4 individual mini pizzas

Dough Ingredients

  • 3 cups whole wheat flour (I used whole wheat white flour and whole wheat pastry flour)
  • 1 teaspoon fine sea salt
  • 1/2 teaspoon active yeast
  • Optional Toppings (olive oil, spicy tomato sauce, fresh mushrooms, goat cheese, fresh herbs, etc.)

Instructions

  1. Place flour, salt, and yeast in a medium bowl. Add 1 1/2 cups of luke warm water. Stir with a wooden spoon until mixture comes together. Should resemble biscut dough. Cover with plastic wrap. Set aside in a warm draft-free spot for at least 8 hours, but preferably 12 to 18 hours. The longer it sits, the better the taste. The dough will keep in the refridgerator for up to 3 days at this point.
  2. When you are ready to cook the dough, preheat oven to 500 to 550 F (or as high as it will go), placing a rack in the upper third portion of the oven and place a pizza stone on the rack. Preheat oven for at least 30 minute (45 minutes to 1 hour is preferable to recreate wood-fired pizza). If you are not using a pizza stone and are using a baking sheet, there is no need to preheat the baking sheet.
  3. Meanwhile, put the dough on a floured work surface. Shape into a rectangle and divide into several small pizzas, gently molding into appropriate sizes.  Dust with flour and set aside on rimless baking sheet or pizza peel that has about 1/4 cup of corn meal on the baking sheet (easy to slide the uncooked pizza dough off). Allow dough to rest while oven preheats
  4. Top pizza with desired toppings (sauce, cheese, veggies). Remember, the lighter the toppings, the better this will be. Loading a pizza with too many toppings can result in a soggy pizza.
  5. To transfer the pizza from the rimless baking sheet to the hot pizza stone in the oven, use small and quick back-forth motions. Slide the pizza from the rimless baking sheet (or pizza peel) onto the hot stone.  Bake pizza for 8 to 10 minutes, then broil on high for 2 minutes, or until bottom is crisp and top is melted and done.
  6. Using the rimless baking sheet, remove pizza from hot stone and  transfer to a work surface to slice. If you have another pizza to cook, allow the pizza stone to reheat under the broiler or at 550 F for 5 minutes. Repeat steps 5 and 6 with remaining pizzas.

Healthy Triple Coconut Muffins (Gluten Free)

Last week, I saw amazing whole wheat banana coconut muffins on one of my favorite blogs, Cookie and Kate. Ever since then, I couldn’t stop thinking about trying to make a gluten-free version. And voila…I DID IT. I used coconut flour instead of whole wheat flour based on a gluten-free banana muffin recipe from Elana’s Pantry. These babies are SUPER moist too.

But first, let’s have a chat about fat. Good fat that is…not just cute baby sausage leg fat. I’m talking about good fats in the foods that we eat. The fat free craze that took over the nation created a fear of fats that is unjustified. The food industry began taking out real ingredients and injecting fillers and sugars to replace the fats.  Buying no fat items does not mean that  it is healthy, this is a bit of a myth….go for whole foods and you’ll be good and much more satisfied! Look on the ingredient list. If it says it is no or low fat, and there are more than five ingredients and you can’t pronounce most these ingredients….it’s not a real food.

These muffins have triple coconut in them…coconut oil, coconut flour, and shredded coconut. If you look at the nutritional facts of this muffin, there are approximately 130 calories, 7 g of fat, 2 g protein, and 3 g of fiber!  Let’s get real about coconut and the good fat that it provides.

Coconut Oil – contains saturated fat, but in the form of medium-chain triglycerides (or MCTs) which are easily digested, absorbed, and utilized in the body. This is because these molecules are smaller than those from long-chain triglycerides (or LCTs), which are the type of fat normally consumed from plant and animal sources. Basically, MCTs require less energy and fewer enzymes to break down for digestion, making them an excellent choice of fat for active people and athletes as MCTs digest immediately to produce energy and stimulate metabolism (instead of carb loading!). They are also ideal for those who suffer from digestive disorders and are often given in hospitals to provide nourishment for critically ill people who have trouble digesting fat. SO eat up! And it’s tasty too.  Coconut oil is also stable at high temperatures and is the best oil to be used for high heat cooking.

Coconut Flour – High in fiber, high in protein, and a great gluten-free substitute for flour. You can easily find coconut flour at your local grocer in the health foods section or Whole Foods, of course. Bob’s Red Mill is the brand that I use.  Even if you are not gluten free, you can add coconut flour to regular whole wheat muffins or baked goods to add extra protein and fiber into your recipes.

But seriously folks. Despite these being really healthy and good for you, I really think these are my favorite muffins ever….hands down better than any other muffin (including the fresh blueberry muffins from Cook’s Illustrated). I’ve made two batches in one week.

Triple Coconut Muffins

Note: If you have a good food processor, use it when you prepare these muffins….cuts down on tons of prep work. Otherwise you can do this by hand (just takes a little more elbow grease) or with a  stand mixer.

Makes 9 muffins, Serving Size: 1 muffin (135 calories, 17 g carbs, 7 g fat, 2 g protein, 3 g fiber)

Cook/Prep Time: 35 minutes

Ingredients

  • 2 medium bananas
  • 2 eggs
  • 2 tablespoons unsweetened applesauce
  • 1/2 teaspoon vanilla extract
  • 1/4 cup honey or agave nectar
  • 2 tablespoons extra virgin coconut oil, melted
  • 1/4 cup coconut flour
  • 1/2 teaspoon baking powder
  • 1/4 teaspoon sea salt or kosher salt
  • 1/4 cup shredded unsweetened coconut (plus more for sprinkling on top of muffins)

Instructions

  1. Preheat oven to 350F. Set a rack in the middle of the oven. Spray 9 muffins tins with nonstick spray or apply coconut oil inside the tins or line with muffin liners. Set aside.
  2. Add bananas, eggs, applesauce and vanilla to the bowl of the food processor and blend until well mixed and a liquid consistency (about 1 minute).
  3. Meanwhile, heat the coconut oil in a microwave safe bowl in the microwave for 30 second intervals until melted. Add the honey or agave nectar to the melted coconut oil. Mix until combined. With the mixer or food processor turned on and mixing, pour the coconut oil/honey mixture through the feed tube into the banana mixture. This helps keep the coconut oil from solidifying.
  4. Add coconut flour, baking powder, and salt to the mixer or food processor. Pulse or mix for about 1 minute until well combined and no lumps exist. Stir in 1/4 cup shredded coconut.
  5. Pour mixture into 9 greased tins, filling 3/4 full. Apply 1 teaspoon of shredded coconut on top of each muffin.
  6. Bake in middle of the oven in a preheated oven set at 350 for 23 to 28 minutes (takes me 26 minutes). Keep an eye on the coconut topping.  Allow to cool in the muffin tin for about 5 minutes. Then remove and cool on a wire rack (if you can keep from eating the whole pan).

Serving Size: 1 muffin (135 calories, 17 g carbs, 7 g fat, 2 g protein, 3 g fiber)

Warm Hummus Dip with Sweet Potato Chips

Today, I am going to share some recipes that are big money savers and healthy.  You will learn to cook dried beans, prepare a dip from those beans, and make sweet potato chips (from scratch) to transport that bean dip to your mouth.  This is, of course, Food Matters Monday and the main recipe (warm hummus) is brought to you by the Food Matters Project.

Number 1COOK BEANS FROM SCRATCH. Seriously. Easy and cheap. Yes, canned beans are cheap anyways, but cooking your own is cheaper, tastier, and healthier (no added salt and BPA from cans). One pound of dried beans (about 2.5 cups) will make over 6 cups of cooked beans. One pound of dried beans costs the same as one can (less than 2 cups) of beans.  Rinse and pick through 1 pound of dried beans (any variety), removing rocks and bad beans. Soak the beans overnight (at least 8 hours). Drain and rins, refilling the crockpot with the soaked beans and water (no salt) until the water is about 1 inch over the beans.  Cook in your crockpot on low all day while you are at work (8 to 10 hours).  Now, you will have a crap ton of beans. Separate the beans in freezer safe ziplock bags, placing 2 cup portions in each bag. Freeze. Pull them out when you need them in a dish, soup, or dip.

Number 2MAKE YOUR OWN HUMMUS. Stop buying store bought dips. Now. After you have made your own huge pot of garbanzo beans following the directions above, throw three cups of those beans, some of the cooking liquid, two heaping tablespoons of tahini (sesame paste), two tablespoons of olive oil, salt to taste, and several tablespoons of lemon juice into a food processor and whirl until smooth. Done. Hummus can be served both warm or cold. Really. Try it warm. You’ll dig it.

Hummus can be spiced a meriad of ways: roasted garlic, basil, roasted red peppers, curry powder…. I chose to separate my hummus into two dishes, adding smoked paprika to one batch and siracha garlic chili paste to the other. Following Mark Bittman’s recommendations in “Hummus Served Hot”, I warmed the paprika hummus over the stove for a new spin. I loved the creaminess that it added.

Number 3MAKE YOUR OWN CHIPS. I chose to do some sweet potato chips, seasoned with cumin, smoked paprika, and sea salt. So so so so addictive and delicious. They were great alone or dipped in the hummus. It is best to have a mandoline slicer to slice your vegetable about 1/8 inch thick. Also, another tip, keep the chips in a single layer on the baking sheet to keep them from getting soggy. They will crisp up much better when they are not crowded (speaking from experience).

So, branch out and try to make these things from scratch. Best treat in the world. You deserve it.

Check out Naturally Ella for the featured FMP recipe of Hummus Served Hot. Also, don’t forget to stop by the FMP website to see the other delicious spins on this recipe. Have a great Monday!

Warm Hummus Dip with Sweet Potato Chips (adapted from Mark Bittman’s The Food Matters Cookbook)

Hummus Ingredients

  • 3 cups of garbanzo beans (chickpeas)
  • 1/4 cup of reserved cooking liquid from beans (or water)
  • 2 heaping tablespoons of tahini (sesame paste)
  • 2 tablespoons of olive oil
  • 3 tablespoons of lemon juice
  • 1/2 to 3/4 teaspoon of sea salt

Hummus Instructions:

  1. Combine all ingredients in food processor. Process until smooth. Add salt to taste.
  2. Optional mix ins: Saute garlic in olive oil and add garlic-flavored olive oil. Add 1/2 tablespoon smoked paprika.

Sweet Potato Chips Ingredients:

  • 2 sweet potatoes, peeled and sliced on a mandolin slicer 1/8 inch thick
  • 1 tablespoon olive oil
  • 1/4 teaspoon smoked paprika
  • 1/8 teaspoon cumin
  • 1/8 teaspoon cayenne (optional)
  • 1 teaspoon of salt

Sweet Potato Chips Instructions:

  1. Preheat oven to 400 F.
  2. Combine sliced sweet potatoes and remaining ingredients in a medium bowl. Toss until all are covered with seasonings and olive oil.
  3. Place sweet potato chips in a single layer on two nonstick baking sheets, lined with parchment paper or sprayed with nonstick spray.
  4. Place on middle and top racks. Cook for 25 minutes, rotating sheets half way through cooking process.
  5. Remove from oven and allow to cool for 5 minutes. Sprinkle with salt, if necessary.

Flourless Fudge Brownies with Butterscotch Chips (Gluten Free)

I recently realized that I have been taking something small for granted. My thumbs. Ya. Those puppies are really useful.

This past weekend, I cut myself pretty bad on the knuckle of my thumb on my left hand. My whole left hand is bandaged up with butterfly sutures and gauze. Little things like brushing my teeth, tying my running shoes, and drinking coffee have become quite challenging.

So the lesson of the story, don’t take the little things for granted.

Like black beans, for example. I know, I know, I know….weird comparison, but black beans can be used for more than savory dishes like tacos, side dishes, and salads. They are the magic and secret ingredient in my flourless brownies. Shhhhhhhh!

I swear you would NEVER know if I didn’t tell you.  I adapted this recipe from a Whole Foods recipe and swapped the chocolate chips for butterscotch chips. I also cut down the quantity of butter, adding applesauce instead to keep them moist. The consistency of these brownies is more fudge-like.

These sweet treats taste amazing and have protein and fiber. They are so good that you will want to make these to show that you do not take black beans for granted. It’s also a great dessert to serve if you have any friends that have a gluten intolerance. To make this truly gluten free, make sure you use gluten free vanilla extract and gluten free butterscotch chips. Chocolate chips can be swapped for the butterscotch chips.  But seriously folks, go grab that extra can of black beans in your pantry and whirl up a batch of these.

Flourless Fudge Brownies with Butterscotch Chips (Gluten Free) (adapted from Whole Foods Recipes)

Makes: 16 servings

Ingredients

  • 1 15oz can of black beans, rinsed and rained
  • 1/4 cup butter, melted
  • 1/4 cup applesauce
  • 1/4 cup unsweetened cocoa powder
  • 1/2 sugar (I used turbinado sugar)
  • 2 eggs
  • 1 1/2 teaspoons vanilla extract
  • 1/8 teaspoon salt
  • 1/2 cup butterscotch chips

Instructions

  1. Preheat oven to 350 F. Spray an 8X8 dish with nonstick spray and set aside.
  2. Combine black beans, butter, applesauce, cocoa powder, eggs, and salt in a food processor. Puree until smooth.
  3. Remove blade from food processor. Stir in butterscotch chips.
  4. Pour into prepared pan. Bake for 35 minutes or until middle is set. Remove from oven and allow to cool for 5 to 10 minutes.