Sausage, Kale, and Sweet Potato Soup

I love soup. I love soup like I love sweaters…and throws…and wool socks. I mainly love soup because they require little effort and you get a huge piping hot bowl of comfort. This soup is loaded with sweet potatoes and kale, which are both great fall/winter veggies.  It should be no surprise at this point of my infatuation with kale. So I shall skip forward to my utter love for the amazing sweet potato.

DSC_0172

I love roasting sweet potatoes, making them into sweet potato fries, throwing them into chili, or dumping them into soups and stews.  So I was über pumped when I came home from my family’s farm with a boat-load of home-grown sweet potatoes!

Sweet potatoes are planted in the summer and harvested in late October before the first frost.  The variety that my dad planted are amazingly sweet with red skin and bright orange flesh.  Sweet potatoes are naturally rich in antioxidants, and are great sources of both Vitamin A and Vitamin C.  They pack some powerful nutrients, dietary fiber, and are a great source of healthy carbs for athletes. So stock up on these in-season veggies. Store them in a cool, dark, well-ventilated place (not the fridge). They should keep for at least a month or two. Yay for food hoarding!

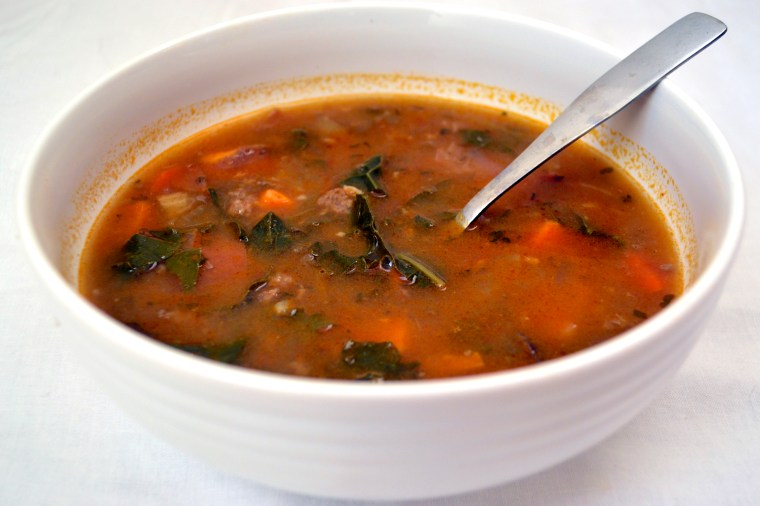
This is one of those soups that can be adapted from whatever you have on hand.  I used italian sausage, sweet potatoes, and kale.  If you don’t have sausage, try chicken…no sweet potatoes, try butternut squash or red skinned potatoes…no kale (weirdo), try spinach.  You can even add tomatoes or mushrooms.

The sausage that I had on hand was a spicy italian sausage from my CSA.  If you do not have access to local sausage and you are purchasing sausage from the store, read the ingredients on the package.  Some types of sausage contain preservatives, nitrates, and wheat-based fillers.  So just be aware of what you are buying. If you can not find a gluten-free or organic brand of sausage where you live/shop, then substitute shredded chicken (or a can of white beans for vegetarian version).

DSC_0174

Sausage, Kale, and Sweet Potato Soup (adapted from Bon Appetit)

Serves 6

Ingredients

  • 1 lb ground sausage (gluten-free and nitrate free)
  • 1 medium onion, chopped
  • 3 garlic cloves, minced
  • 2 large sweet potatoes, chopped into 1/4-inch pieces
  • 6 cups chicken broth
  • 1 bunch of kale, stems removed and leaves cut into 1-inch strips
  • red pepper flakes (optional)
  • salt and pepper (to taste)

Instructions

  1. Heat large heavy pot or dutch oven or medium heat. Add sausage and cook until brown, breaking into pieces (about 5 to 10 minutes).  Transfer cooked sausage to a bowl lined with paper towels to drain.
  2. Add onions and garlic to pot and cook in sausage drippings until onion is translucent, about 5 minutes. Stir often.
  3. Add potatoes and cook for about 10 to 15 minutes, stirring frequently, until they begin to soften.
  4. Add chicken broth. Bring to a boil. Reduce heat to medium-low, cover, and simmer for about 10 to 15 minutes (stirring occasionally), until potatoes are soft when stabbed with a fork. Using a potato masher, mash some of the potatoes in the pot. Add cooked sausage back into soup. Stir in kale (or spinach) and simmer for about 5 to 7 minutes, until greens are wilted. Season with salt and pepper. Remove from heat.

Grain-Free Chewy Ginger Chocolate Chip Cookies

I’m so excited. Christmas is getting closer. We went and picked out our tree a week ago. Even though it feels like Christmas in California (temps are in the 70s!!!), we still decorated the tree, drank bourbon-spiked egg nog, and watched Home Alone.

We pulled out all of our old and favorite childhood ornaments, placing them strategically on each limb.   We have many ornaments that have special meaning, but some are just funny.

Grain Free Ginger Chocolate Chip_04

For instance, we have a ceramic ornament that came from some craft show ages ago that has Santa’s face painted on what appears to be tree bark but instead looks like Santa is floating on poop. We lovingly refer to this ornament as “Terd Santa”. Terd Santa has a high priority placement on the tree. He is usually placed near the 1980 Avon classic Bear Bell (a mama bear whose legs are the swinging bell) and the Headless Paper-mache Angel.

Now that it looks like Christmas has vomited throughout my house, leaving poinsettia and pine cones everywhere….it was time to make it SMELL like it too! I cooked up a batch of ginger chocolate chip cookies to make the house smell of gingerbread and spice.  These are inspired by this amazing cookie that I made last year, which unfortunately contains gluten from the wheat flour. In order to make those cookies grain free, I used almond flour as the base.  If you don’t have almond flour on hand, I have also made these cookies using almond butter, making them slightly more dense and chewy but still scrumptious.

Ginger Chocolate Chip

Even if you are not gluten-free, I seriously recommend this grain free cookies for the following reasons:

(1) The nuts give them protein…GOOD.

(2) They ooze of chocolate…DOUBLE GOOD.

(3) The ginger gives a nice spicy kick in your mouth….YES.

(4) And they are a COOKIE! Hellooooo. Nuff said, peeps.

I made these cookies bite-sized and rolled each one in turbinado sugar. The crunch of the sugar in contrast to the gooey, chewy, chocolatey cookie is divine.  WARNING – these suckers are so easy to pop in your mouth like popcorn. They can be quite addictive.

SO HIDE THEM IF YOU WANT TO EAT ANY!!!!  Because as soon as you tell anyone else that you made them, they will disappear and you may not get any…booooh. At least that is what happens in my house!!!

Ginger Chocolate Chip

Grain-Free Chewy Ginger Chocolate Chip Cookies (Gluten Free, Vegan, Paleo Friendly)

Makes 2 dozen tiny, bite-sized cookies

Ingredients

  • 1½ cups almond flour*
  • 2 Tablespoons coconut oil, softened
  • 4 Tablespoons maple syrup or honey
  • 2 Tablespoons unsulphured blackstrap molasses
  • 3 teaspoons ground ginger
  • 1/8 teaspoon fine sea salt
  • 1/4 teaspoon baking soda
  • 1/4 cup dark chocolate chips or bar, chopped into tiny pieces
  • 1/3 cup turbinado sugar or coconut palm sugar (optional)

Instructions

  1. Preheat oven to 350F. Line a baking sheet with unbleached parchment paper or a Silpat mat. Place the large-grain turbinado sugar or coconut palm sugar in a small bowl and set aside.
  2. In a medium bowl, combine almond flour, coconut oil, maple syrup, ginger, salt, and baking soda. Mix until a thick batter is formed. Chill the batter in the refrigerator for at least 30 minutes which will make it easier to scoop and form cookies.
  3. I like these cookies tiny and barely bite-sized.  Scoop out the dough in exact, level tablespoons. Then tear those pieces of dough in two before rolling each 1/2 tablespoon of dough into a ball shape. From there, grab a small handful of the large-grained sugar that was set aside earlier and roll each ball between your palms to coat the outside of each dough ball.  Place dough a few inches apart on prepared baking sheets.  Use a wet fork to flatten each dough ball into your desired cookie thickness. 
  4. Bake for 7 to 10 minutes or until firm around the edges, but still soft in the center. Allow to cool on the pan for 5 to 10 minutes before transferring to a wire rack to cool completely before serving.
  5. Hide a few for your secret stash!

*NOTE – I use Honeyville almond flour. I have also made these cookies using 1 cup of almond butter instead of the 1.5 cups of almond flour. The cookies tasted great but were a little more dense.  I personally liked them both! So feel free to sub out for almond butter if you do not have access to almond flour.

Carrot, Walnut, Cranberry Bread with Almond Flour

I’m a morning person. At least, I thought I was a morning person until I met my husband.  He is the HAPPIEST morning person I have ever known. But here is the problem. His über happy morning disposition turns me into the most grump-a-licious person.  It’s weird.

Grey clouds swirl my head and lightning bolts shoot out of my red beady eyes as soon as he starts skipping around.  It’s like I have to balance out his extremely excited attitude by acting like someone took a poop in my Cheerios. If we both were happy at once, the house would implode! right?

Don’t get me wrong, I’m so glad that he isn’t crabby or grumpy…like me.  But, in the mornings, there are a couple of “rules” that I tend to follow. Rules that, well…my husband does not.  I consider these rules to be universal, but after marrying a man who is anything but rigid, pragmatic, or regimented…. I realize that my rules only apply to me….a very rigid, pragmatic, and regimented person. 

For example…

Alissa Morning Rules – The first thing that must occur is the brewing of a large pot of coffee. No speaking above a certain decibel in the morning.  I like to open the windows and see the fresh light stream through the house.

Kiley Antirules – Anything goes. Sing as loud as possible in as many octaves as possible. If you don’t know the words, make them up.  There are no songs off-limits.  Drum beats on hard surfaces (including your wife’s butt) are encouraged.  Turn TV on immediately, play music on phone, watch videos on iPad…..all at the same time.

I love and adore this man…but honestly, must he sing the Gummy Bears theme song at 6:30 am? Seriously. I didn’t even know they had a theme song. And maybe they don’t and he just was singing this ridiculously happy song. Must he sing the ENTIRE R Kelly “Trapped in the Closet” montage!?

But that is just it…he is happy.

So happy.

He hasn’t even drank coffee and he’s bouncing around like a pinball. And then I think…why is this man married to me? Why is he constantly happy to wake up next to the grouchiest person that THINKS she is a morning person but will break your finger in three places if you dare touch her before coffee and food are in her hands.

And that’s when I realize that I’m grateful for things that just don’t make sense sometimes. I’m grateful that this bouncy jukebox-singing man continues to wake up every morning and think that he hit the jack pot…with me. HA.  I know that if that jukebox ever went silent, my world would be a very boring and sad place. It would be like having banana bread every morning.

I mean, I like banana bread…just like I love silence in the mornings sometimes, but when you’ve had Carrot, Walnut, Cranberry Bread…whoa buddy…it’s a new ball game. Breakfast is exciting again. This breakfast bread is carrot cake reincarnated in a breakfast. So make a batch, freeze part of it for quick breakfasts, and you will find yourself singing your own morning show tunes. Just be sure to warn your family!

Carrot, Walnut, Cranberry Bread with Almond Flour (Grain Free, Gluten Free, Dairy Free, Refined Sugar Free, Paleo-Friendly)

(adapted from Anja’s Food 4 Thought)

Makes 2 loaves or 24 muffins 

Ingredients

  • 1 1/2 cup almond flour (I use Honeyville)
  • 2 teaspoons baking powder
  • 1/4 teaspoon salt
  • 2 teaspoon cinnamon
  • 3 eggs
  • 2 teaspoons vanilla extract
  • 4 tablespoons coconut oil
  • 4 bananas, mashed (1 cup)
  • 2 tablespoons honey or maple syrup
  • 4 medium carrots, shredded
  • 1/2 cup unsweetened coconut
  • 1/2 cup dried cranberries
  • 1/4 cup walnuts, chopped

Instructions

  1. Preheat oven to 350F. Spray muffin tins or loaf tins with nonstick spray.
  2. Mix dry ingredients (almond flour, baking powder, salt, and cinnamon) in a medium bowl. In a separate bowl, mix wet ingredients (eggs, vanilla, coconut oil, mashed bananas, and honey). Add wet ingredients to dry and mix until combined. Stir in carrots, coconut, cranberries, and walnuts.
  3. Pour batter into prepared loaf tins or muffin tins. Bake at 350F for 40 to 50 minutes if baking loaves. For muffins, bake at 350F for 25 to 35 minutes or until a cake tester comes out clean. Allow to cool for 5 to 10 minutes before removing from tins. Place muffins/loaves on cooling rack.  Muffins keep best in the refrigerator. I freeze a batch to reheat for quick breakfasts.

Roasted Pumpkin Seeds (Pepitas)

Tis’ the season of roasting pumpkins, butternut squash, acorn squash, delicata squash…. We all know what to do with the roasted flesh. Hello pumpkin pie and pumpkin bread.

But, don’t stop there! Roast those seeds. They are delicious as a snack, on a salad, or topping a delicious pumpkin or butternut squash soup!

These were a great addition on our holiday table this year. I used the seeds from the pie pumpkin that was the centerpiece for our Friendsgiving!

Toasted pumpkin seeds are a healthy snack too.  The flavors options are endless: Cajun, BBQ, cinnamon-spice, curry, or simply salt and pepper.

When you scoop out the seeds from the pumpkin or winter squash, wash off the pumpkin goop. Discard stringy fiber from seeds along with any seeds that are split or cracked then transfer to a strainer and rinse well. Drizzle with olive oil, seasoning, and salt. Roast in an oven until golden and BAM. Tasty tasty tasty.

I hope that everyone has a wonderful Thanksgiving.  We are lucky to have amazing friends and family to celebrate and eat delicious food with.  Please be safe this week in your travels! Merry Thanksgiving from Kansas City!

Roasted Pumpkin Seeds

Ingredients

  • Seeds from one medium-sized pumpkin or winter squash (Acorn, Butternut, Hubbard, Delicata) – about 1 cup
  • 2 tsp olive oil
  • 1/2 tsp sea salt
  • 1 to 2 tsp seasoning of choice (Cajun, BBQ, curry, cinnamon n sugar) (optional)

Instructions

  1. Preheat oven to 375. Spray a rimmed baking sheet with nonstick spray.
  2. In a medium-sized bowl, drizzle the olive oil over the pumpkin seeds. Add the seasoning of choice and salt. Toss well. Place seeds in a single layer across a baking sheet.
  3. Bake for 15 to 20 minutes or until seeds are golden. Sprinkle with a bit more seasoning when the seeds come out of the oven. Taste and season with more salt if needed. Makes about 1 cup.

Kale Salad with Cranberries, Pecans, and Roasted Apples

I’m drowning. Drowning in recipes and ideas and drooling over too many food photos. I can’t decide what to make for Thanksgiving. I want to make tooooo much.

How about sweet potatoes…..or sweet potato casserole, or sweet potato and chard gratin, or sweet potatoes with bourbon glaze. No…I’ll make a gluten free apple pie, or an apple crisp….or baked apples….or Ack…wait… look at these chocolate-caramel tartlettes.

OK…something green….. like green beans, green beans with miso and almonds, or roasted brussel sprouts, or….. *SNAP* And then my brain just…shuts….down. Stops.

And then I end up thinking…well, hell…I guess I’ll just make a salad.

But this just isn’t any salad, people. It’s a celebration. A Kale Party!  Ya…I know no one thinks of a party when you say “YAY KALE”. Except me. And well, maybe my friend Kathryn.

This kale party in a bowl salad is adapted from The Smitten Kitchen Cookbook. Another winning recipe from this amazing compilation from Deb.  She uses cherries where I used cranberries that I had on hand. I also added roasted apples and toasted pecans for autumnal festiveness. Dig in….

Kale Salad with Cranberries, Pecans, and Roasted Apples

Serves 6 to 8

Kale Salad Ingredients

  • 1 bunch of kale, washed and dried, stalks removed and leaves torn into bite-sized pieces
  • 1/4 cup dried cranberries (or cherries)
  • 1/4 cup raw pecans, chopped
  • 1 medium apple, cored and sliced thin

Honey Dijon Dressing Ingredients

  • 3 tablespoons olive oil
  • 1 1/2 tablespoons apple cider vinegar
  • 1 tablespoon smooth Dijon mustard
  • 1 1/2 teaspoons honey
  • salt and pepper to taste

Instructions

  1. Preheat oven to 350F.  Place apple slices on half of a roasting pan. On the other side of the pan, place the chopped pecans. Roast for 5 minutes. Remove from oven, and stir. Place back in oven for an additional 5 minutes, keeping an eye on the pecans to make sure that they don’t burn. Remove from oven and allow to cool to room temperature.
  2. Meanwhile, place torn kale leaves in a medium to large serving bowl. Sprinkle with a dash of salt and gently massage the kale until it begins to break down a bit.  Add the dried cranberries, toasted pecans, and roasted apples. Sprinkle with salt and pepper.
  3. For the honey dijon dressing,  add the olive oil, vinegar, mustard, and honey to a small mason jar with a lid. Shake the jar vigorously.  Drizzle the dressing evenly over the salad.  Toss everything together to coat everything in dressing.  Although you can eat the salad immediately, I let mine rest for at least 20 minutes, allowing the leaves to become even more tender.  This salad is great for make ahead events!

Recipe Review – Beer-Braised Short Ribs with Mashed Root Vegetables

Beer Braised Short Rips with Mashed Root VegetablesIs it just me or are there a crap ton of people born in November?  This past week we celebrated five birthdays! Five in one week! Included in these amazing days of birth are my middle sister (just turned 18…holy cow) and my husband.

I feel like I have my party pants permanently on. I’ve been a baking foo’! So many sweets!

Speaking of sweets n’ treats, last week I purchased Smitten Kitchen’s newly released cookbook! So beautiful! And there are pictures for every recipe. This is dangerous. So dangerous. I want to make everything in it. In one week, I’ve made four of the recipes. This is a record for me and a cookbook. Although I have an obsession with cookbooks, I rarely get around to actually cooking from them. Doh!

Recipe numero uno was her amazing S’mores Cake. Oh. My. God.

My youngest sister, Olivia (first picture below), and I made the S’mores Cake for my sister Jill’s birthday (second picture).  The cake is a spice cake that contains a cup of graham crackers pulsed to a flour. There is a rediculous chocolate ganache layer sandwiched between the two cake layers and it is topped with a homemade marshmallow meringue, which we broiled quickly in the oven. Although I am trying to stay away from gluten, I did have a smidge (or two). HOLY COW.   It’s a bit involved, but well worth it for a special occasion. My pictures were terrible since I had to take them at night, so I’ve only included a few.

The next recipe that I had to tackle from the cookbook was her Beer and Balsamic Braised Short Ribs.  Rediculous!  I made them for my husband’s surprise birthday dinner.  They were super easy and so flavorful. The meat falls off of bone.

For 10 people, I bought 16 short ribs and cooked them the night before the party in the oven for 2 1/2 hours.  Letting the ribs rest and cool overnight in the refrigerator makes it super easy to remove the top layer of fat since it hardens up (see picture below).  Plus these ribs are even better the second day, if that’s even possible. Right before everyone got to the house, I reheated them in the oven for 30 minutes. No fuss!

I also served them over mashed root vegetables: turnips, parsnips, and sweet potatoes. Great alternative to the carb laden mashed potatoes.

So A++++++++ to Deb Perelman of Smitten Kitchen. GO get this book. It’s well worth it and is laden with beautiful food porn!

Beer Braised Short Ribs with Mashed Rood Vegetables (adapted from the Smitten Kitchen Cookbook)

Serves 8 to 10

Ingredients for Beer-Braised Short Ribs:

  • 16 bone-in short ribs (6 to 8 pounds), at room temperature and trimmed of excess fat
  • Salt and pepper
  • 1 to 2 tablespoons of olive oil
  • 1 large red onion, chopped
  • 6 garlic cloves, smashed and peeled
  • 2 to 3 tablespoons tomato paste
  • 1/2 cup balsamic vinegar
  • 3 tablespoons of worcestrshire sauce (I used coconut aminos)
  • 2 bottles of dark beer (I used oatmeal stout)
  • 2 to 3 cups of beef stock

Ingredients for Mashed Root Vegetables:

  • 3 to 4 pounds of root vegetables (turnips, parsnips, sweet potatoes)
  • 1 tablespoon of butter
  • 1/4 cup coconut milk (or half and half)
  • 1 teaspoon garlic powder
  • salt and pepper

Instructions

  • Lay out the short ribs. Trim of excess fat. Pat dry. Season each side well with salt and pepper.
  • Preheat the oven to 325. In a large dutch oven, about 7 to 8 quarts in size, heat 1 tablespoon of olive oil. Brown the short ribs in batches, getting a good brown sear on each side.  This will take about 10 minutes per batch.  Transfer the browned ribs to a plate. Repeat with remaining ribs. 
  • Once all ribs are browned and resting on a plate, turn the heat down to medium-high and pour off all but 1 tablespoon of oil remaining in the dutch oven. Add the diced onions and cook until translucent. Add garlic and cook an additional 3 minutes. Add tomato paste and stir until thickened. Next, add vinegar, beer, and worcestershire sauce (if using). Scrape beef bits from the bottom.
  • Return the browned ribs to the pot. If they do not all fit laying flat, turn them vertically with bones sticking up. Add enough stock to just cover the ribs. Bring the liquid to a simmer over medium-high heat. Turn off the heat. Cover the pot with aluminum foil and then the lid. Aluminum foil keeps the liquid in the pot, keeping your meat moist. We love moist meat!
  • Bake in the preheated oven for 2 1/2 to 3 hours. Remove from the oven. The meat will be tender when pierced and the bones will look like they are falling away from the meat. Mmmmmmm. Let the ribs rest for 15 minutes. Skim as much of the fat from the surface as possible.
  • The ribs can be served immediately or allowed to cool and rest overnight. If you allow them to rest overnight, remove them the next day at least 1 hour before you are ready to serve them. Scrape off the top layer of fat. Reheat them for 30 to 45 minutes in a 325 oven.  Serve with sauce over mashed root veggies.

Mashed Root Vegetables

  1. In a large, heavy pot, place root vegetables with enough water to cover them.  Heat over medium-high heat, covered, until it comes to a rolling boil.  Once boiling, reduce to a simmer and cook for 25 to 30 minutes, or until the vegetables are tender. Drain.
  2. Add butter, coconut milk (or half and half, if using), and garlic powder to the pot. Mash vegetable mixture with a potato masher. Season with salt and pepper to taste.

Gluten Free Buffalo Turkey Meatballs

I have to admit that I am really not that big of a fan of chicken wings. Don’t get me wrong, I love the flavor. It’s mainly the work that goes into gnawing on a bone for just a measly morsel of meat.  But, I also get why most guys like them…they feel like authentic cavemen. This is probably the same reason why they dig ribs too.  And turkey legs.

So what better way to get the meat AND the buffalo flavor without the mess? Meatballs. Buffalo Meatballs. These mini meatballs are perfect if you have a gaggle of people coming over at different times, because you can keep them warm and saucy in a crock pot.  They are an easy finger food and a HUGE hit!

I recommend using Frank’s hot sauce. It’s the best buffalo sauce that I’ve found. You can make these meatballs with either ground chicken or ground turkey.  However, I should note that ground chicken is a bit harder to form into balls. I used ground turkey in this recipe and found them to be easier to mold and deeeeelicious. Adding a tad bit of coconut milk to the buffalo sauce adds creaminess.  Don’t worry, it doesn’t impart a coconut flavor at all. But you could easily sub melted butter for the coconut milk, if you are into that sort of thing.

Gluten Free Buffalo Turkey Meatballs 

Makes about 70 mini meatballs

Ingredients

  • 2 lbs ground turkey (or chicken)
  • 1 large egg
  • 1/2 cup dried parsley
  • 1 Tablespoon smoked paprika
  • 1 teaspoon salt
  • 3 Tablespoons + 1/2 cup Frank’s hot sauce
  • 1 teaspoon garlic powder
  • 1/2 cup almond meal*
  • 1/4 cup coconut milk (or melted butter)

*Note – If you do not have almond meal, you can either use 1/4 cup of oat flour or 1/2 cup of bread crumbs.  However, these alternatives are not gluten-free, unless you use gluten-free oats and/or gluten-free bread crumbs.

Instructions

  1. Preheat the oven to 450F. Spray two 9X13-inch baking dishes with nonstick spray. Set aside.
  2. Combine the ground turkey, egg, 3 tablespoons of hot sauce, parsley, paprika, salt, garlic powder, and almond meal in a large mixing bowl and mix by hand until thoroughly incorporated.
  3. Roll the mixture into 3/4-inch round balls. Place the meatballs in the prepared baking dish.  Line them up carefully, keeping them in even rows vertically and horizontally to form a grid. The meatballs should be touching one another.
  4. Roast at 450F for 15 to 20 minutes, or until the meatballs are firm and cooked through. A meat thermometer should read 165°F in the center of the meatball.
  5. Carefully transfer the cooked meatballs into a warmed crock pot.  Add the remaining Frank’s hot sauce (1/2 cup) and coconut milk (or melted butter) to the crock pot. Toss to coat the meatballs. The meatballs are ready when the sauce is warmed or allow to cook on low until your guests arrive!

German-Style Cinnamon Apple Walnut Pancake (Gluten Free)

It is official… I AM DONE!  I took my Professional Engineering (P.E.) exam yesterday and I feel GREAT.  I was so worried that after I finished that 8-hour monster exam, that I would feel drained and crappy and not want to be around anyone….but instead I walked out of that room like Mary Poppins and a bird singing on my shoulder. I was on a high…and still am. Who knows if I passed, but it feels good for it to be over.

I feel like I have new-found freedom. A new life. What should I do with ALL this time…. build a pantry? Finish painting the hallway that I started painting a year ago? Finish painting the back bedroom that I started a year ago?  Clean? no……

Instead, I shall make apple pancakes. And applesauce and apple pie and apple butter. And well, a lot of apple things, because I went apple picking last weekend.  Like nearly everyone that goes apple picking, we got quite zealous and brought home bushels and bushels and bushels of apples. I’ll be handing out loads of apple-themed goods for christmas. Act surprised! Heck…I might just hand you an apple. 🙂 Cheers.

Although I have a big crush on Mr Pumpkin, my true love is the humble Apple.  There are so many varieties.  A variety for all of my moods and emotions…tart or crisp or sweet or complicated. And who can resist that amazing aroma of baked cinnamon apples!? If you can resist it, your sick…weird…you need help.

So, with my loads of free time, I present an aroma therapy, gluten and grain free version of a german-style pancake that is made with coconut flour and loaded with cinnamon apples and walnuts.  It is made in one large oven proof skillet and would be perfect for crowds and the upcoming holidays.  The bottom of the “pancake” is layers of thinly sliced cinnamon spiced apples that bake in the oven while you prepare the batter. After the batter is whipped up, remove the baked apples from the oven, pour the prepared batter on top, sprinkle with nuts, place back into the oven, and let the holiday spirit and aroma fill your house. No fuss. Sit back. Sip that coffee. Then you can pull out a piping hot pancake that everyone gets to enjoy…..at the same time.

Oh…and don’t forget the real maple syrup, people. No Log Cabin! I mean it.  The pancake itself is not that sweet. It has natural sweetness from the apples, but it provides ample opportunity to manually sweeten your pancake slice with the goodness of fresh maple syrup and a dollop of coconut butter. Mmmm.

Note: This pancake is made with coconut flour. Coconut flour can not be substituted one for one with other flours. Because it does not contain gluten, it is dense and requires a poop ton of eggs to lighten and fluff up the recipe. Coconut flour can be found in most health food stores, online, and the health food section of most grocers.  It’s very healthy and packed with nutrients and fiber. It does not impart an overwhelming flavor of coconut to the pancake. It is the perfect balance of nuttiness. Don’t be scared….try something new!

German-Style Cinnamon Apple Walnut Pancake (adapted from the Foodie and The Family)

Serves 8

Ingredients

  • 2 medium apples, sliced thin with skins on (I used fresh picked Fuji)
  • 1 + 1/8 teaspoon ground cinnamon
  • 1/2 + 1/8 teaspoon ground nutmeg
  • 3 tablespoons coconut oil, melted and divided (or unsalted butter)
  • 4 tablespoons coconut palm sugar (or honey, maple syrup), divided
  • 6 eggs, beaten
  • 3/4 cup milk (or almond milk, coconut milk)
  • 2 teaspoons gluten-free vanilla
  • 1/4 cup coconut flour
  • 1/2 teaspoon baking soda
  • pinch of salt
  • 1/4 cup walnut pieces
  • 1/4 cup unsweetened shredded coconut (optional)

Instructions

  1. Preheat the oven to 375 F. Place 10-inch cast iron skillet in oven to preheat the skillet.
  2. Core apples, but keep skins on. Slice the apples thinly with a mandolin slicer at about 1/8-inch thick. To the apples, add coconut palm sugar (or honey or maple syrup), 1 teaspoon of cinnamon and 1/2 teaspoon of nutmeg. Toss to coat with sugar and spices.
  3. Remove the preheated skillet from oven. Add 1 tablespoon of coconut oil  or butter to the skillet and allow to melt. Toss sliced apples into the skillet and stir to coat the apples with melted coconut oil. Spread the apples evenly along the bottom of the skillet. Place the skillet with the apples back into the preheated oven to bake while you prepare the batter (about 10 minutes).
  4. In a large bowl, whisk eggs, milk, melted coconut oil (or butter), vanilla, and coconut sugar. In a separate medium bowl, add coconut flour, 1/8 teaspoon nutmeg, 1/8 teaspoon cinnamon, salt, and baking soda. Add dry ingredients to wet ingredients. Mix well to combine or until there are no lumps.
  5. Remove skillet with baked apples from oven. Stir apples and redistribute evenly along the bottom of the skillet. Pour batter mixture evenly over the prepared baked apples. Sprinkle with walnuts and unsweetened coconut.
  6. Place the skillet back into the oven. Bake for 25 to 30 minutes at 375 F, or until top is golden brown.
  7. Remove skillet from oven. Serve with fresh maple syrup and homemade coconut butter!

Beat Texas-Style Chili with Butternut Squash

As we get older in life, we begin to run out of “firsts”.

Early in life, there are so many firsts….first kiss, first love, first car, first road trip, first house, first job, first successful homemade meal for others. The first meal I made my husband when we met was horrible. I made him Chicken Helper but used ground beef and I think there was some freezer-burned shrimp thrown in for good measure. *Shudder*  The chick-beef-shrimp-arole was barf-worthy. I think the poor boy choked it down…with a smile. What a man.

Lucky for both of us, I have come a long way from the mystery meat boxed meal days.

Last weekend I made a chili…a chili that was a “first” for me. Now, I have a pretty kickass chili recipe that I normally make. But I wing it every time. I’ve been making it for years and we love it.   However, I saw a delicious brisket style chili in Bon Appetit and I wanted to give it a go.

So this chili was the first time that I have ever followed an actual recipe for chili. The first time I have ever made a chili WITHOUT beans! gasp.  The first time that I have added winter squash to chili. The first time that I cooked a chili in the oven..say whaaat??? AND the first time that I have made chili without ground beef (with exceptions of vegetarian chili and white chicken chili)!

*Drumroll* And ladies and gents, I gotta tell ya….that although I totally heart my old standby “throw some beans + tomatoes + ground beef + hoooooopla of chili powder” method of making chili…this chili is OUTSTANDING. Yes…caps are necessary. I will have a hard time making another type of chili now. It’s changed my life.

The original Bon Appetit recipe called for 5 pounds of beef brisket…yes FIVE.  I cut that down to accommodate the 2.5 lb arm roast that I had from my CSA (community supported agriculture) stash. I cut the thawed roast into 1/2-inch to 1-inch portions. Simmered low and slow in my dutch oven in a 350F oven for 3 to 4 hours. The roasted beef chunks just fell apart. Butternut squash is added during the last hour of cooking.  It adds a great chunkiness and heartiness to the dish.  And don’t forget the chili powder….like 1/4 cup of chili powder.  Recipes that only call for 1 tablespoon make me laugh…THAT AIN’T CHILI!  That’s northerners attempt at spicing up marinara sauce, I think.  Well, in my personal (and correct) opinion. No offense, northerners. Ya’ll make a lot of things right…but chili (and biscuits and gravy) ain’t it.

Last weekend, I made this chili on a cold and rainy day when OU beat the crap out of Texas. SO it was only fitting that we ate Beevo for dinner. Mmmm. So I call this the Beat Texas-Style Chili…and beat them we did.

Texas-Style Chili with Butternut Squash (adapted from Bon Appetit)

Serves 8

Ingredients

  • 2 slices of bacon, diced
  • 1 medium onion, chopped
  • 1 medium yellow or red sweet bell pepper, chopped
  • 2 to 3-pound beef roast, trimmed and cut into 1/2 to 1-inch pieces
  • 3 large cloves of garlic, minced
  • 1/4 cup chili powder
  • 1 tablespoon ground cumin
  • 1 tablespoon smoked paprika
  • 1/4 to 1/2 teaspoon chipotle chili powder (lower quantity for less spicy)
  • 1 teaspoon dried oregano
  • 1 1/2 teaspoons kosher salt
  • 2 cups of water
  • 1 15 oz can of fire roasted tomatoes with green chilis
  • 1 4 oz can of green chilis
  • 1 8 oz can of tomato sauce
  • 2 to 3 cups diced butternut squash
  • 1/2 diced cilantro

Instructions

  1. Preheat oven to 350°F. 
  2. Sprinkle diced beef all over with coarse salt and pepper. Set aside.
  3. Sauté bacon in heavy large ovenproof pot (dutch oven is perfect for this) over medium-high heat until the bacon begins to brown. Reduce heat to medium and add the onions. Cook until tender, about 5 minutes. Add diced beef and garlic to pot and stir to coat with bacon and onions. Allow to brown on outside.
  4. To pot, add water, chili powder, cumin, oregano, and 1 1/2 teaspoons coarse salt. Add tomatoes with juices, green chiles, and tomato sauce. Stir to coat evenly.Bring chili to simmer. Cover and place in oven. Cook for at least 2 hours. Remove from oven. Spoon off grease from top if any. Add squash and stir to coat. Add additional water if the chili is really thick (about 1/2 cup to 1 cup), keeping the meat covered. Place the pot back into the oven, uncovered. Roast uncovered until beef and squash are tender, about 45 minutes longer.
  5. Remove from oven when beef is tender. If it isn’t, put it back into the oven for a little longer. When the beef is tender, spoon off any fat or grease from the top of the chili. Season chili to taste with salt and pepper.  Stir in diced cilantro or serve it as a topping.

Slow Cooker Beef and Sweet Potato Stew

One of my favorite kitchen gadgets (besides my amazing food processor) is my slow cooker…a.k.a Madame Crockpot.  My mom bought Madame Crockpot for me when I left for college *cough* many moons ago. Madame has been my constant companion through many tough seasons. Madame Crockpot has saved me numerous times and has always provided a nutritious and hot meal when I came home from a long day of studying, or working, or camping, or skiing, or fishing, or running, or lounging around watching Last of the Mohicans on a rainy day.

If only she fit in my pocket! I would take her everywhere!!!!

Lately I have been studying and studying and studying every chance I get. So, as always, Madame Crockpot came to the rescue this past weekend and made me an amaaaazing beef stew.

The beauty of stew is that it is really hard to screw it up.  It’s quite a simple recipe….(1) brothy substance, (2) veggies, (3) herbs, (4) toss in meat if you want, and (5) cook it low and slow. So feel free to swap some things out for what you have on hand. I think mushrooms would be a fabulous addition or even butternut squash.

Slow Cooker Beef and Sweet Potato Stew (Gluten and Grain Free)

Serves 8

Ingredients

  • 1 to 2 pounds beef stew meat, diced into 1-inch cubes (include beef bones if you have them)
  • 1 medium onion, diced
  • 1 cup carrots (about 3 to 4 medium-sized), cut into 1-inch pieces
  • 2 medium sweet potatoes (I used 1 sweet and 1 white), leave skin on and dice into 1/2-inch cubes
  • 1 can of diced tomatoes (or 2 cups fresh)
  • 4 cups of organic beef broth
  • 1 tablespoon tomato paste
  • 1 teaspoon fresh rosemary, chopped
  • 1 teaspoon fresh thyme, chopped
  • 1 teaspoon smoked paprika
  • 1/2 cup frozen green peas
  • salt and fresh cracked pepper to taste

Instructions

  1. Add diced beef to slow cooker. Place vegetables in order as they appear above (onions through sweet potatoes).  Pour canned tomatoes with juice on top.  Mix beef broth, tomato paste, balsamic vinegar, and herbs together in a bowl. Pour on top of vegetables in crock pot.
  2. Put lid on crock pot and cook on low for 10 to 12 hours or on high for 4 to 6 hours. Add peas during last 15 minutes of cook time. Season with salt and pepper.