Healthy Triple Coconut Muffins (Gluten Free)

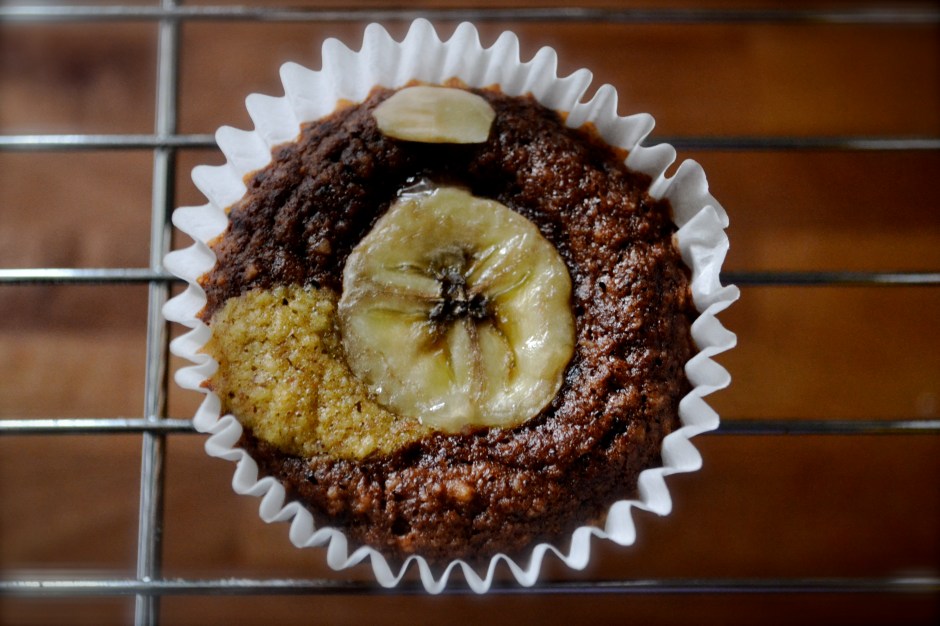
Last week, I saw amazing whole wheat banana coconut muffins on one of my favorite blogs, Cookie and Kate. Ever since then, I couldn’t stop thinking about trying to make a gluten-free version. And voila…I DID IT. I used coconut flour instead of whole wheat flour based on a gluten-free banana muffin recipe from Elana’s Pantry. These babies are SUPER moist too.

But first, let’s have a chat about fat. Good fat that is…not just cute baby sausage leg fat. I’m talking about good fats in the foods that we eat. The fat free craze that took over the nation created a fear of fats that is unjustified. The food industry began taking out real ingredients and injecting fillers and sugars to replace the fats.  Buying no fat items does not mean that  it is healthy, this is a bit of a myth….go for whole foods and you’ll be good and much more satisfied! Look on the ingredient list. If it says it is no or low fat, and there are more than five ingredients and you can’t pronounce most these ingredients….it’s not a real food.

These muffins have triple coconut in them…coconut oil, coconut flour, and shredded coconut. If you look at the nutritional facts of this muffin, there are approximately 130 calories, 7 g of fat, 2 g protein, and 3 g of fiber!  Let’s get real about coconut and the good fat that it provides.

Coconut Oil – contains saturated fat, but in the form of medium-chain triglycerides (or MCTs) which are easily digested, absorbed, and utilized in the body. This is because these molecules are smaller than those from long-chain triglycerides (or LCTs), which are the type of fat normally consumed from plant and animal sources. Basically, MCTs require less energy and fewer enzymes to break down for digestion, making them an excellent choice of fat for active people and athletes as MCTs digest immediately to produce energy and stimulate metabolism (instead of carb loading!). They are also ideal for those who suffer from digestive disorders and are often given in hospitals to provide nourishment for critically ill people who have trouble digesting fat. SO eat up! And it’s tasty too.  Coconut oil is also stable at high temperatures and is the best oil to be used for high heat cooking.

Coconut Flour – High in fiber, high in protein, and a great gluten-free substitute for flour. You can easily find coconut flour at your local grocer in the health foods section or Whole Foods, of course. Bob’s Red Mill is the brand that I use.  Even if you are not gluten free, you can add coconut flour to regular whole wheat muffins or baked goods to add extra protein and fiber into your recipes.

But seriously folks. Despite these being really healthy and good for you, I really think these are my favorite muffins ever….hands down better than any other muffin (including the fresh blueberry muffins from Cook’s Illustrated). I’ve made two batches in one week.

Triple Coconut Muffins

Note: If you have a good food processor, use it when you prepare these muffins….cuts down on tons of prep work. Otherwise you can do this by hand (just takes a little more elbow grease) or with a  stand mixer.

Makes 9 muffins, Serving Size: 1 muffin (135 calories, 17 g carbs, 7 g fat, 2 g protein, 3 g fiber)

Cook/Prep Time: 35 minutes

Ingredients

  • 2 medium bananas
  • 2 eggs
  • 2 tablespoons unsweetened applesauce
  • 1/2 teaspoon vanilla extract
  • 1/4 cup honey or agave nectar
  • 2 tablespoons extra virgin coconut oil, melted
  • 1/4 cup coconut flour
  • 1/2 teaspoon baking powder
  • 1/4 teaspoon sea salt or kosher salt
  • 1/4 cup shredded unsweetened coconut (plus more for sprinkling on top of muffins)

Instructions

  1. Preheat oven to 350F. Set a rack in the middle of the oven. Spray 9 muffins tins with nonstick spray or apply coconut oil inside the tins or line with muffin liners. Set aside.
  2. Add bananas, eggs, applesauce and vanilla to the bowl of the food processor and blend until well mixed and a liquid consistency (about 1 minute).
  3. Meanwhile, heat the coconut oil in a microwave safe bowl in the microwave for 30 second intervals until melted. Add the honey or agave nectar to the melted coconut oil. Mix until combined. With the mixer or food processor turned on and mixing, pour the coconut oil/honey mixture through the feed tube into the banana mixture. This helps keep the coconut oil from solidifying.
  4. Add coconut flour, baking powder, and salt to the mixer or food processor. Pulse or mix for about 1 minute until well combined and no lumps exist. Stir in 1/4 cup shredded coconut.
  5. Pour mixture into 9 greased tins, filling 3/4 full. Apply 1 teaspoon of shredded coconut on top of each muffin.
  6. Bake in middle of the oven in a preheated oven set at 350 for 23 to 28 minutes (takes me 26 minutes). Keep an eye on the coconut topping.  Allow to cool in the muffin tin for about 5 minutes. Then remove and cool on a wire rack (if you can keep from eating the whole pan).

Serving Size: 1 muffin (135 calories, 17 g carbs, 7 g fat, 2 g protein, 3 g fiber)

Healthy Banana and Chocolate Swirl Almond Flour Muffins (Gluten-Free)

Recently, my husband has gone not only gluten-free, but grain-free, dairy-free, and sugar-free. That’s a lot of ‘free’ in my house. But he has never felt better. The ‘diet’ (for lack of better terms) is called Paleo, referring to our paleolithic ancestors…also known as the Caveman Diet.  He eats anything his ancestors would have hunted or gathered, such as meat, vegetables, nuts, and fruit. It is based on the concept that our bodies have not evolved to digest the products that modern man and modern agriculture has developed (corn syrup, wheat, processed food, milk products, etc).

A good gluten-free substitute in baking is almond flour!  Even if you gluten and wheat lovers will dig this! Using almond flour instead of wheat flour will make your muffins lighter and give your muffins more protein, providing you sustained energy throughout the day. You can make your own almond flour by taking raw almonds and processing them in a food processor for a few minutes until a light and fluffy flour occurs. Be careful, if you process for too long, you will get almond butter…which is delicious, but will not help you when baking up these delicious muffins. I bought my almond flour in the bulk section of Whole Foods.

I slightly adapted these muffins from a recipe from Honest Fare, using honey instead of processed sugar.  They are AWESOME as a dessert, breakfast, or a snack. Love! They are light and fluffy too! I ate one this morning with a tablespoon of almond butter…mmmmmm.

When mixing up the batter, if you want to do the chocolate swirl, divide the batter into two bowls. Mix 2 teaspoons of unsweetened cocoa powder into one of the bowls. Layer the banana muffin mix and then dollop the chocolate muffin mix on top, alternating layers until the muffin mixtures are gone.

I topped my muffins with sliced bananas that caramelize when baked.

Healthy Banana and Chocolate Swirl Almond Flour Muffins (Gluten-Free, Dairy-Free, Sugar-Free, Grain-Free) adapted from Honest Fare

Makes: 12 muffins

Ingredients

  • 1 3/4 cup of almond flour (or about 9 oz of raw almonds processed into a flour)
  • 1/2 teaspoon baking powder
  • 1/2 teaspoon ground cinnamon
  • 1/8 teaspoon salt
  • 2 eggs
  • 3 tablespoons honey
  • 1 tablespoon of ground flax meal
  • 3 bananas (save half of one to use as slices on top of the muffins)
  • 2 heaping teaspoons unsweetened cocoa powder

Instructions

  1. Preheat oven to 300 F. Grease 12 muffin tins or place muffin liners. Set aside.
  2. Mix almond flour, baking powder, salt and cinnamon in a medium bowl. Set aside.
  3. In a food processor or mixer, mix eggs, honey, 2 1/2 bananas, and flax meal on medium-high for 5 minutes, or until mixture is pale and very fluffily.
  4. Pour banana batter over almond flour and mix until just combined.
  5. Separate 1 cup of batter into a separate bowl. Add cocoa to the separated batter.
  6. Place a large spoonful of banana batter into muffin liners. Top with a spoonful of cocoa-banana muffin batter. Pour the remaining original banana batter on top of the cocoa batter. Top the muffins with thinly sliced bananas and slivered almonds, if you want.
  7. Bake muffins for 30 to 35 minutes (or until tops are browned and a skewer comes out clean when placed in the center of the muffin).
  8. Remove from oven and place on wire rack to cool.

Tuna Salad

It has been a very busy week. I went back home to Oklahoma for five days to visit my family. It was a wonderful visit but has left me tired and unable to post this weeks recipe from the Food Matters Project, Cassoulet with Lots of  Veggies, chosen by Keely Marie. Don’t forget to check out the other food bloggers versions here.  I will return next monday with another great FMP recipe.

Instead I present you with an easy tuna salad recipe that I made for a quick lunch since I had nothing else in my cabinets except for a can of tuna and some random salad fixins in the fridge. This is fresh and a great lunch packed with protein. Don’t bother weighing yourself down with processed breads which will only leave you feeling tired in the afternoon.

Tuna Salad

Serves 2

Ingredients 

  • 1 can of dolphin-free, water-packed, low sodium tuna (6 oz)
  • 2 tablespoons of greek yogurt
  • 1/2 cup diced red bell peppers, divided
  • 1/4 cup diced celery
  • 1 green onion, white and green parts
  • 1 tablespoon lemon juice
  • fresh black pepper to taste
  • 4 cups of fresh spinach, rinsed and drained
  • diced veggies (carrot, tomato, cucumber, etc)
  • 2 teaspoons olive oil, divided
  • 1 tablespoon fresh parsley or cilantro, chopped
  • sunflower seeds

Instructions

  1. Mix tuna, greek yogurt, 1/4 cup bell pepper, celery, onion, lemon juice in a medium bowl. Add black pepper to taste.  Set aside or in the refridgerator until you are ready to assemble the salads.
  2. In two bowls, arrange the spinach, remaining 1/4 cup diced bell pepper, and other vegetables that you have on hand. Divide the tuna mixture and place half of it in each bowl on top of the spinach salad.
  3. Drizzle 1 teaspoon of olive oil on each salad. Sprinkle with fresh parsley or cilantro. Top with about 1 teaspoon of sunflower seeds on each salad.
  4. Chow down!

Fruit-on-Bottom Yogurt Cups

I’m a snacker. I love to snack throughout the day, eating one snack around 10am and another one around 3pm.  Snacking keeps my blood sugar in check and also keeps me from eating everything in sight once I get home.  One of my favorite snacks is yogurt!

Prepackaged yogurt cups have a lot of added sugar and preservatives. You can save money and have a tastier treat by making your own. I buy organic plain yogurt. Plain greek yogurt is also a great alternative which has over twice the protein as plain yogurt and is ultra creamy. Buying bulk plain yogurt is a lot cheaper and you can keep it on hand to use in other recipes (as an alternative to sour cream in dips, on tacos).

Fruit-on-Bottom Yogurt Cups

Ingredients

Organic plain yogurt (greek style, whole fat, or low fat)

Yogurt Option Add-ins:

  • unsweetened applesauce (add a dash of cinnamon for a kick)
  • 1/4 cup fruit (blueberry, strawberry, blackberry, peaches, whatever you have), frozen or fresh
  • 1 teaspoon no added sugar fruit preserves
  • dried fruit (cranberries, figs, apples, apricots)
  • vanilla extract
  • fresh sliced or chopped nuts (almonds, walnuts, pecans, etc)

Instructions

  1. If using frozen fruit, thaw in the microwave for 15 to 30 seconds. Add fruit, preserves, or applesauce  (or combination of these ingredients) to the bottom of a container.
  2. Add 1/2 cup to 1 cup of plain yogurt. Top with a sprinkle of nuts, vanilla extract, or dried cranberries.

Sloppy Joes

I love hugs. Nothing is better than a hug when you feel alone, or scared, or stressed. I wish I could bottle hugs…sounds goofy, but it would be a best seller.  You’d buy one, right?   

Like handshakes, hugging can also be done incorrectly. The back pat…what is that! Some people are born huggers….their arms swallow you and pull you in.  With a hug, they show you how much you mean to them. 

To me, a good Sloppy Joe is like an awesome bear hug. The canned variety…well that’s a back pat…bleh.  

This Sloppy Joe recipe is adapted from Ellie Krieger. It was one of the first things that my husband started cooking for me after we got married. It is sweetened with molasses, spiced with jalapenos, and veggie-chunked with bell peppers and beans. Yes Beans. This is definite cowboy food.

They are so harty that we usually eat these puppies open faced with a fork. 

Ya Ya Ya, I know. What fun is it to eat it with a fork, you say. Well take it from me, I can’t eat ANYTHING without it ending up in my lap, hair, and behind my knees (weird, I know). So I must resort to a fork to keep from ruining ALL of my clothes. Or I  should just wear a bib.

Ok. I’ll wear a bib even when I use a fork. Don’t judge!

 Sloppy Joes  (adapted from Ellie Krieger)

Notes: The ingredient list looks long, but don’t get overwhelmed. It is super easy and the ingredients are located in your cupboard or fridge.

Makes: 4 servings

Prep/Cook Time: 30 minutes

Ingredients

  • 1 pound ground beef
  • 1 onion, diced
  • 1 bell pepper (any color that you have…I prefer yellow or red), diced
  • 1 jalepeno, diced (deseed if you are making this for kids or non-cowboys)
  • 3 cloves of garlic, minced
  • 1 6 oz can of tomato paste
  • 2 cups of water
  • 1 tablespoon molasses
  • 1 tablespoon worcestershire sauce
  • 1 tablespoon dijon mustard (or 1 teaspoon of mustard powder)
  • 1 tablespoon red wine vinegar
  • 2 cups (or one 15 oz can) of black beans or kidney beans
  • 3/4 teaspoon salt (or to taste)
  • 1/4 teaspoon ground black pepper
  • 4 whole wheat hamburger buns or whole grain bread

Instructions

  1. Brown ground beef in skillet over medium heat until no longer pink. Drain any grease from pan.
  2. Add onions, pepper, and jalapeño and cook until onions are translucent. Add minced garlic and cook for an additional minute.
  3. Mix tomato paste, water, molasses, worcestershire sauce, dijon mustard, and red wine vinegar in a small bowl until combined. Add to the skillet with the ground beef mixture. Simmer over medium-low heat for 10 minutes.
  4. Add beans, salt, and pepper. Heat until beans are warmed through, about 5 minutes. Remove from heat.
  5. Serve over whole wheat hamburger buns.

Warm Hummus Dip with Sweet Potato Chips

Today, I am going to share some recipes that are big money savers and healthy.  You will learn to cook dried beans, prepare a dip from those beans, and make sweet potato chips (from scratch) to transport that bean dip to your mouth.  This is, of course, Food Matters Monday and the main recipe (warm hummus) is brought to you by the Food Matters Project.

Number 1COOK BEANS FROM SCRATCH. Seriously. Easy and cheap. Yes, canned beans are cheap anyways, but cooking your own is cheaper, tastier, and healthier (no added salt and BPA from cans). One pound of dried beans (about 2.5 cups) will make over 6 cups of cooked beans. One pound of dried beans costs the same as one can (less than 2 cups) of beans.  Rinse and pick through 1 pound of dried beans (any variety), removing rocks and bad beans. Soak the beans overnight (at least 8 hours). Drain and rins, refilling the crockpot with the soaked beans and water (no salt) until the water is about 1 inch over the beans.  Cook in your crockpot on low all day while you are at work (8 to 10 hours).  Now, you will have a crap ton of beans. Separate the beans in freezer safe ziplock bags, placing 2 cup portions in each bag. Freeze. Pull them out when you need them in a dish, soup, or dip.

Number 2MAKE YOUR OWN HUMMUS. Stop buying store bought dips. Now. After you have made your own huge pot of garbanzo beans following the directions above, throw three cups of those beans, some of the cooking liquid, two heaping tablespoons of tahini (sesame paste), two tablespoons of olive oil, salt to taste, and several tablespoons of lemon juice into a food processor and whirl until smooth. Done. Hummus can be served both warm or cold. Really. Try it warm. You’ll dig it.

Hummus can be spiced a meriad of ways: roasted garlic, basil, roasted red peppers, curry powder…. I chose to separate my hummus into two dishes, adding smoked paprika to one batch and siracha garlic chili paste to the other. Following Mark Bittman’s recommendations in “Hummus Served Hot”, I warmed the paprika hummus over the stove for a new spin. I loved the creaminess that it added.

Number 3MAKE YOUR OWN CHIPS. I chose to do some sweet potato chips, seasoned with cumin, smoked paprika, and sea salt. So so so so addictive and delicious. They were great alone or dipped in the hummus. It is best to have a mandoline slicer to slice your vegetable about 1/8 inch thick. Also, another tip, keep the chips in a single layer on the baking sheet to keep them from getting soggy. They will crisp up much better when they are not crowded (speaking from experience).

So, branch out and try to make these things from scratch. Best treat in the world. You deserve it.

Check out Naturally Ella for the featured FMP recipe of Hummus Served Hot. Also, don’t forget to stop by the FMP website to see the other delicious spins on this recipe. Have a great Monday!

Warm Hummus Dip with Sweet Potato Chips (adapted from Mark Bittman’s The Food Matters Cookbook)

Hummus Ingredients

  • 3 cups of garbanzo beans (chickpeas)
  • 1/4 cup of reserved cooking liquid from beans (or water)
  • 2 heaping tablespoons of tahini (sesame paste)
  • 2 tablespoons of olive oil
  • 3 tablespoons of lemon juice
  • 1/2 to 3/4 teaspoon of sea salt

Hummus Instructions:

  1. Combine all ingredients in food processor. Process until smooth. Add salt to taste.
  2. Optional mix ins: Saute garlic in olive oil and add garlic-flavored olive oil. Add 1/2 tablespoon smoked paprika.

Sweet Potato Chips Ingredients:

  • 2 sweet potatoes, peeled and sliced on a mandolin slicer 1/8 inch thick
  • 1 tablespoon olive oil
  • 1/4 teaspoon smoked paprika
  • 1/8 teaspoon cumin
  • 1/8 teaspoon cayenne (optional)
  • 1 teaspoon of salt

Sweet Potato Chips Instructions:

  1. Preheat oven to 400 F.
  2. Combine sliced sweet potatoes and remaining ingredients in a medium bowl. Toss until all are covered with seasonings and olive oil.
  3. Place sweet potato chips in a single layer on two nonstick baking sheets, lined with parchment paper or sprayed with nonstick spray.
  4. Place on middle and top racks. Cook for 25 minutes, rotating sheets half way through cooking process.
  5. Remove from oven and allow to cool for 5 minutes. Sprinkle with salt, if necessary.

Seared Bean Sprout Salad with Sesame-Orange Dressing

What is a bean sprout? It’s the sprout from a germinated mung bean. Bean sprouts are usually used in asian cooking and provide a bright crunchy texture to a stir fry dish. I originally intended on sprouting my own mung beans (which is really easy), but I didn’t have time. It takes 5 to 7 days of soaking the mung beans in water (changing every 12 hours). But you can easily find bean sprouts at your local grocer or asian market.

Today’s recipe is brought to you by the Food Matters Project, which is a group of foodie bloggers dedicated to cooking our way through Mark Bittman’s Food Matters Cookbook. The original recipe was chosen by Dominica of Food Wine Love and was supposed to be Seared Bean Sprouts with Beef and Sesame-Orange Sauce. 

Although this looked both easy and delicious, I was on my way to a dinner party last night and needed to bring a side dish. I decided to turn the recipe into a bright and colorful salad, adding some shredded carrots, diced cucumber, and chopped cilantro. It was really easy to throw together and was definitely unique.

Check the FMP website to see what the other foodies chose to do with this recipe!

Seared Bean Sprout Salad with Sesame-Orange Dressing

Makes: 8 servings (as a side dish)

Salad Ingredients

  • 1 Tablespoon sesame seeds
  • 1 Tablespoon canola oil or coconut oil
  • 1 lb bean sprouts, rinsed
  • 1/4 teaspoon salt
  • 1 bunch of scallions, green and white parts chopped
  • 2 carrots, shredded
  • 1 cucumber, diced
  • 1/4 cup cilantro, chopped

Dressing Ingredients

  • 2 oranges, juiced
  • zest of 1/2 orange
  • 1/2 Tablespoon fresh ginger, minced or grated
  • 2 Tablespoon soy sauce
  • 1 teaspoon sesame oil
  • 1 teaspoon tahini paste
  • 1 Tablespoon rice wine vinegar
  • 1 Tablespoon honey

Instructions:

  1. Add 1 tablespoon of sesame seeds to a DRY skillet. Cook on medium heat for 3 to 5 minutes, lightly toasting sesame seeds. Remove and set aside.
  2. Place 1 tablespoon of oil in skillet and heat over medium heat. When oil is hot (not smoking), toss in bean sprouts and salt. Stir fry for 3 to 5 minutes, or until lightly browned. Remove and place in colander. Run cold water over sprouts to stop them from cooking. You want them to still be crips.
  3. Add the sprouts, cucumber, shredded carrot, cilantro, and scallions to a medium serving bowl.
  4. Combine all dressing ingredients into a mason jar or lidded jar. Shake well. Pour over salad and stir.  Chill until you are ready to serve it. Toss before serving and sprinkle with toasted sesame seeds.

Huevos Rancheros with Black Beans

I loooooove breakfast. Lazy Sunday morning breakfast dates with my husband are the best thing on earth.  Our favorite breakfast joint back in Norman was a fabulous place called Turquoise Cafe. They were fresh, inventive, and used local ingredients. Brunch items included oatmeal brûlée, amazing huevos rancheros, and blue corn migas. I’d stab someone’s eye out with a spork for those migas or huevos. Ya, you heard me. Don’t stand in front of me and a good brunch, buddy.

But alas, Turquoise is no more (sniff sniff). It closed shortly after we moved due to some unfortunate circumstances. But, I still crave that food with a vengeance.

I have yet to find any breakfast joint in KC that comes close to Turquoise. We have searched near and far, and still nothing.

I set out to try to recreate the Huevos from that restaurant and I do believe that I have it down to a science, and, in my opinion, have perfected the recipe. Huevos Rancheros (Rachers Eggs) is a basic mexican breakfast that usually consists of fried eggs, tortillas, and cooked salsa.

I like to serve my huevos over black beans. This dish is SO freaking easy and quick. On a busy night, I often will whip this up for dinner. It seriously takes less than 10 minutes to put this meal together.

All you need is eggs, tortillas, cheese, black beans, and salsa. I think cilantro is a huge bonus but not a must. Luckily, my cilantro never gave up the ghost over our lackluster winter and I was able to run out there and nab some to sprinkle on the eggs.

Heat your oven to 350F and place tortillas with a sprinkle of cheese into the oven to melt the cheese. Use whatever cheese you have on hand: cheddar, pepper jack, goat cheese, or even parmesan….seriously.

I like to add a bit of ground cumin to black beans for a good earthy flavor, but it isn’t necessary if you do not have the spice. Add a bit of salsa to your black beans and heat in the microwave while the tortillas are warming in the oven. After the cheese is melted on the tortillas, put the tortillas on oven-proof serving plates and then place a bit of black beans down the middle of each tortilla. Lower the oven temp to 200 F and place the prepared plates in the oven to keep warm while making the eggs.

Fry or scramble some huevos (eggs) to top off the dish. I like my eggs over-medium with a great runny yolk. I recommend getting local, cage-free and farm fresh eggs, if possible. They taste and look so different than traditional store-bought eggs with amazing orange yolks instead of yellow. Mmmmm…love some good orange-yoked eggs for breakfast, lunch, and dinner.

Huevos Rancheros with Black Beans

Note: On the serving size, I usually eat one egg and one tortilla whereas my husband eats two eggs and two tortillas. So, adjust your portion size according to your crowd.

Serves 2 

Ingredients

  • 2 to 4 huevos (eggs)
  • 2 to 4 corn tortillas
  • 2 cups (1 15oz can) of black beans
  • 1/4 teaspoon ground cumin
  • 1/4 to 1/2 cup of cheese (whatever you have on hand)
  • 1/2 cup prepared salsa
  • Toppings – cilantro, green onions, extra cheese
  • salt and fresh cracked pepper

Instructions

  1. Preheat oven to 300 F. Place tortillas on a baking sheet. Spray tortillas on both sides with nonstick spray. Sprinkle a couple tablespoons of shredded cheese on each tortilla. Place in preheated oven. Once the cheese is melted (about 2 minutes), remove from oven. Reduce oven temp to 200F.
  2. Mix black beans, 1/4 cup salsa, cumin, and 1/8 teaspoon of salt in a medium microwavable bowl. Microwave (or heat on the stove in a saucepan) for about 2 minutes, or until warmed through. Stir.
  3. Place 1 to 2 cheese-topped tortillas on each serving plate. Place about 1/3 to 1/2 cup of warmed black beans down the middle of each melted cheese-topped tortilla. Set aside or place oven-proof plates in 200F oven to keep warm.
  4. Cook eggs over medium (or however you desire). Remove warmed plates from oven. Place one egg on top of black beans. Sprinkle with cilantro, green onions, and extra cheese. Serve with salsa.

Flourless Fudge Brownies with Butterscotch Chips (Gluten Free)

I recently realized that I have been taking something small for granted. My thumbs. Ya. Those puppies are really useful.

This past weekend, I cut myself pretty bad on the knuckle of my thumb on my left hand. My whole left hand is bandaged up with butterfly sutures and gauze. Little things like brushing my teeth, tying my running shoes, and drinking coffee have become quite challenging.

So the lesson of the story, don’t take the little things for granted.

Like black beans, for example. I know, I know, I know….weird comparison, but black beans can be used for more than savory dishes like tacos, side dishes, and salads. They are the magic and secret ingredient in my flourless brownies. Shhhhhhhh!

I swear you would NEVER know if I didn’t tell you.  I adapted this recipe from a Whole Foods recipe and swapped the chocolate chips for butterscotch chips. I also cut down the quantity of butter, adding applesauce instead to keep them moist. The consistency of these brownies is more fudge-like.

These sweet treats taste amazing and have protein and fiber. They are so good that you will want to make these to show that you do not take black beans for granted. It’s also a great dessert to serve if you have any friends that have a gluten intolerance. To make this truly gluten free, make sure you use gluten free vanilla extract and gluten free butterscotch chips. Chocolate chips can be swapped for the butterscotch chips.  But seriously folks, go grab that extra can of black beans in your pantry and whirl up a batch of these.

Flourless Fudge Brownies with Butterscotch Chips (Gluten Free) (adapted from Whole Foods Recipes)

Makes: 16 servings

Ingredients

  • 1 15oz can of black beans, rinsed and rained
  • 1/4 cup butter, melted
  • 1/4 cup applesauce
  • 1/4 cup unsweetened cocoa powder
  • 1/2 sugar (I used turbinado sugar)
  • 2 eggs
  • 1 1/2 teaspoons vanilla extract
  • 1/8 teaspoon salt
  • 1/2 cup butterscotch chips

Instructions

  1. Preheat oven to 350 F. Spray an 8X8 dish with nonstick spray and set aside.
  2. Combine black beans, butter, applesauce, cocoa powder, eggs, and salt in a food processor. Puree until smooth.
  3. Remove blade from food processor. Stir in butterscotch chips.
  4. Pour into prepared pan. Bake for 35 minutes or until middle is set. Remove from oven and allow to cool for 5 to 10 minutes.

Chocolate Banana Recovery Smoothie

There is something that you should know about me. I am very much a type-A personality. But I am working on it. Not that it is a bad thing…it just gets in the way of having fun sometimes. Once I decide on a goal, I’m like a rabid and starving dog…I latch onto it and DO NOT LET GO until I have done it. It’s like the old “hand shake” agreement that I have with my brain. It’s a sick sick sick disease that I have.

For example, a few years back I started running. I had never been a runner. When I think of runners, images of long legged and tall women and men come to my mind. Not me…short and squatty.  I’m short…very short. I lie when I say that I’m 5’3″ on my driver’s license. But I had a goal…I was going to start running. I had previously jogged here and there. I’d even ran a 5k several years before. But I had never kept with it. I was too busy, I thought. Too busy to take just 30 minutes out of my day.

So in an attempt to meet my goal and to shed some of the 10+ grad school pounds that I picked up, I began running. Beginning in January, I couldn’t run a mile. And then I ran two….and then, by April, I ran 6 miles in a relay.

Well, if I could go 6…I could go 13, right? Goal set. I ran a half marathon by June.

Then my head immediately says…”If you can do 13….you can do a full marathon”. Goal set.

My body choked, I got a hip fracture…but by October, I pushed through and finished a marathon, with a hip fracture. 26.2 miles. And yes, those last 0.2 miles are important. Did I mention I’m Type-A? And crazy. I mentioned I was crazy, right? And stupid. But I had a goal, right? Crazy.

Needless to say, I think I have learned my lesson…with running at least. I’m not advocating, at all, my quick way to marathoning. Really, you should be running for over a year before attempting one or even a half marathon at that. And then you probably won’t fracture your hip, like I did. stupid. I mentioned I was crazy, right?

Anyways, I do learn from my mistakes.

Who knows if I will ever run another marathon again, but I’ve been an avid runner now for over 3 years.  I’m addicted. I love the feeling of running in the spring. It’s my “me” time. I now know that you have to eat right to get to where you want to be. During that whole experience, I crashed and burned a lot, but I also learned that meals and snacks are the fuel for the next event.

I still do long runs on weekends, about 6 to 10 miles, depending on the weather. After a long run, bike ride, or even a hard workout (over 45 minutes), it is super important to get protein and carbs back into for body to refuel for the day and for your next run, ride, or workout. Low fat chocolate milk is perfect for this refueling. It has good carbs and plenty of protein (3 to 1 ratio). Usually, I buy the vacuum packed organic chocolate milk that is in simple individual servings. I can take them with me when I travel and they are a perfect single serving.

However, if I am at home, I make my own recovery drink which is a chocolate banana smoothie. I always keep sliced frozen bananas in the freezer because I always have those few bananas that are going bad at the end of the week. Slicing them up and storing them in the freezer is perfect to grab later for smoothies or to defrost and use in breads.

So here is the quick and simple smoothie. In a blender, throw some sliced frozen bananas with a cup of milk and a few teaspoons of dutch unprocessed cocoa powder (Mmmmm antioxidants!). Done. Blend. Drink.

Tastes like a milk shake.  Now that’s fun. I told you I was working on having fun. And even if you don’t do long runs, this is a great healthy start to your day or even as a dessert at night.

Chocolate Banana Recovery Smoothie

Makes: 1 serving

Ingredients

  • 1/2 to 1 cup sliced frozen bananas
  • 3/4 to 1 cup milk
  • 2 teaspoons dutch-processed cocoa

Instructions

  1. Place cocoa in a small bowl with 2 tablespoons of milk or water. Mix milk and cocoa powder to make a chocolate paste.
  2. Add frozen sliced bananas, milk, and chocolate paste to a blender or the cup of an immersion blender.
  3. Blend.
  4. Drink.
  5. Enjoy.