Jalapeño Bacon Jam

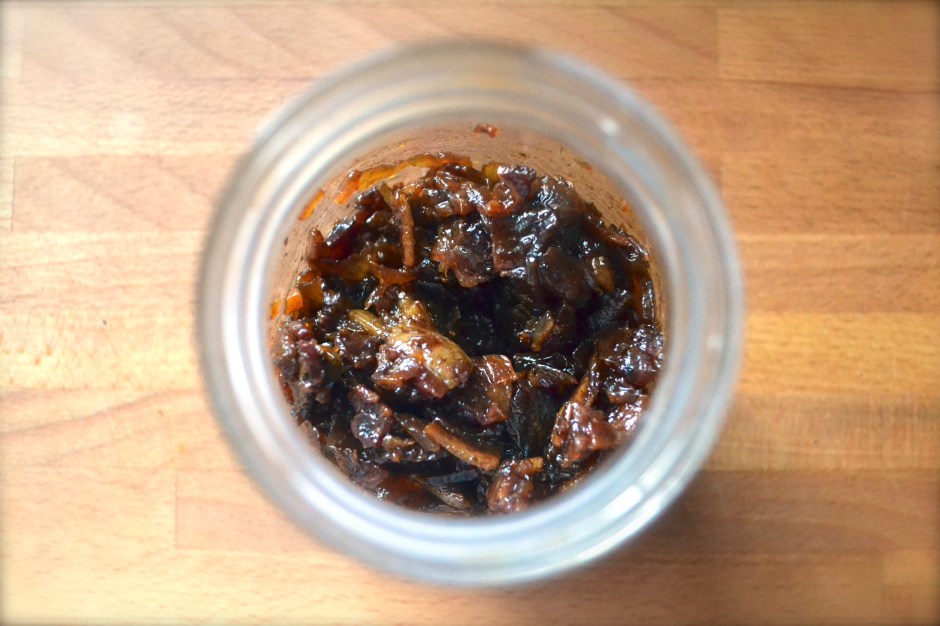
Heaven in a jar. Spicy + Smokey + Sweet + Salty.

I am going to give you a huge warning. Once you begin making this, your house will turn into a drool zone. People will come from all over. If you make it, they will come. Headlights will line up your street. People will pay admission to just be near you. It is the Field of Dreams of Jams. True story.

DSC_0015

DSC_0001

After researching and researching different versions of this amazing jam, there are several ways to make it. I really think you could stir nearly anything into it and get something magical. No matter what, it will be hard for you to not devour in one sitting or even while you are cooking it. Seriously.

Typically this jam consists of:

  • bacon (duh),
  • onions (I used red but yellow would work too),
  • vinegar (many recipes used cider vinegar but I opted for balsamic),
  • sugar (I used maple syrup + 1 tablespoon of molasses…several recipes use a combo of brown sugar + maple, you could definitely play around with the ratios here)
  • liquid (I used water, but Martha used strong brewed coffee)
  • Optional spices (I added a jalapeño, but I also think some chipotle powder or other spicy add-ins would be redonculous like this recipe)

So without further ado…I present to you, the heavenly and amazing Jalapeño Bacon Jam!  *Jazz Hands*

We had several people over and slathered it on burgers…erhmehgeeerd. SO GOOD. Somehow there was magically one tablespoon left. So I squirreled it away for my lunch the next day and topped a baked sweet potato with it. *swoooon*

DSC_0022

Notes on storage – This should keep in a jar with a tight fitting lid in the refrigerator for 3 weeks or the freezer for up to 6 months. But if this stuff is around longer than two days, I will be AMAZED at your self control. And don’t be surprised if it gets stolen…don’t look at me???

Jalapeño Bacon Jam (adapted from Martha Stewart and Homesick Texan)

Ingredients

  • 1 lb bacon (nitrate free if possible), cut into 1/2-inch pieces
  • 1 tablespoon reserved bacon grease
  • 2 red onions (about 2 1/2 cups), diced
  • 3 cloves garlic, minced
  • 2 jalapeños, deseeded and diced (about 1/4 cup)
  • 1 cup of water
  • 1/3 cup balsamic vinegar
  • 1/4 cup real maple syrup
  • 1 tablespoon unsulphured molasses
  • salt and cracked pepper

Instructions

  1. Cut the bacon slices into 1-inch strips. Over medium-high heat, cook the bacon in a dutch oven stirring frequently until the bacon is browned but not crispy. Use a slotted spoon to transfer the bacon to a paper-towel lined plate. Drain the bacon grease but reserve about 1 tablespoon.
  2. Add onions, jalapeño, and garlic to the dutch oven and cook over medium heat until the onions become translucent. This should take about 5 minutes.  Add bacon and remaining ingredients. Simmer on low for 1 to 2 hours, stirring occasionally. If jam gets too dry, add additional water 1/4 cup at a time. After it is good and thick, remove it from heat and allow to cool.
  3. If you want the jam to be a finer consistency, add it to a food processor and pulse a few times (not too much).  I personally liked mine a bit chunky. Transfer to a jar with a tight-fitting lid. Store in refrigerator for 3 weeks or in the freezer for 6 months. But if this stuff lasts longer than one or two days in your house, bravo to your self control!

Sweet Potato and Kale Stuffed Poblanos

My garden has a bumper crop of amazing lettuce, spinach, kale, and chard! It’s beautiful. But I am having a hard time trying to eat it all. Plus, we are leaving for PARIS in less than 24 hours and I need to figure out ways to harvest it before the summer heat and lack of watering kills it all.

I have made a few things recently that are perfect for freezing for quick weekday lunches.  Hope you enjoy! These were a big hit.

DSC_0018

DSC_0031

These Sweet Potato and Kale Stuffed Poblanos are spicy and very flavorful. Poblanos are easy to grow but also can be found in your local market. They are great for stuffing, given their large open cavity. I roast mine over an open flame on the oven before stuffing and baking them.  It’s quick and easy and gives a great smoky flavor.

DSC_0027

DSC_0028

Sweet Potato and Kale Stuffed Poblanos

Ingredients

  • 1 tablespoon olive oil
  • 1/2 medium onion
  • 2 to 3 medium garlic cloves
  • 1/2 jalapeño, deseeded and minced
  • 1 medium sweet potato, 1/2-inch cubes
  • 1/2 teaspoon smoked paprika
  • 1/2 teaspoon ground cumin
  • 1 bunch of kale (about 4 cups chopped), or spinach
  • salt and pepper
  • 4 poblano peppers
  • Toppings: cheese, cilantro, and salsa

Instructions

  1. Preheat oven to 350 F. Prepare a 9X13 glass pyrex with oil or nonstick spray. Set aside.
  2. To make the filling, heat olive oil in heavy skillet over medium heat. Sauté onion until translucent (about 5 to 7 minutes).
  3. Add garlic, jalapeño, sweet potato, paprika, and cumin. Cook, stirring frequently, until sweet potatoes begin to soften (about 10 minutes).
  4. Clean kale and remove stems. Don’t dry off. Chop into 1-inch pieces. Add to sweet potato mixture. Cook until kale is wilted (about 3 to 5 minutes). Remove from heat and set aside.
  5. Cut poblanos in half right through the stem. Remove seeds and rinse and dry thoroughly. To broil poblano peppers in an oven, place the halves cut side down on a roasting pan. Place on the highest rack in the oven and broil on high for a few minutes until the skins are blistered.  You can also do this using gas burners on your stove. Place the poblanos skin side down onto the gas flame using tongs to turn. Remove when skin is well blistered, about 1 or 2 minutes per side.
  6. Place poblanos skin side down into the prepared pyrex dish.  Spoon about 1/4 cup of the sweet potato-kale mixture into each poblano half.
  7. Bake for 30 minutes at 350F. Remove from oven. Serve with cheese (optional), avocados, cilantro, and salsa.

Roasted Salsa Verde (Tomatillo Sauce)

Winter is still trying to hold strong. But despite the lingering cold and the random flurries of snow that we had a few days ago, I am ready for margaritas, lime, tacos, and salsa verde!

DSC_0007

DSC_0013

Salsa verde is a simple tangy green sauce made from tomatillos. It is amazing drizzled on nearly anything. Growing up in Oklahoma, I was blessed with access to great mexican food.  It became my staple for preparing easy dinners.  Tacos, enchiladas, carne asada, tostadas…but then you add salsa verde and magic happens. Whoa!

DSC_0014

Just wanted to share this recipe with you! Now if you will excuse me…I have a margarita to attend to. Mmmm.

Roasted Salsa Verde (Tomatillo Sauce)

Ingredients

  • 1.5 lbs tomatillos
  • 1 medium onion, cut into eighths
  • 3 garlic cloves
  • 1 small jalapeño
  • 1/2 cup cilantro
  • 1/2 lime, juiced
  • 1/2 teaspoon salt
  • 1/2 to 1 cup of water (depending on desired consistency)

Instructions

  1. Preaheat oven to 400 F. 
  2. Remove husks from tomatillos. Place tomatillos, onion, jalapeño, and garlic on roasting pan. Roast for 15 to 20 minutes. Remove from oven and allow to cool slightly.
  3. Add all ingredients to bowl of food processor. Process until smooth. Serve with chips, on roasted chicken, or as a sauce for enchiladas.

Fiesta Time – Brunch Edition

Happy Quatro De Mayo!  This is the day to gather up all of your tasty recipes because tomorrow is Cinco de Mayo. Get started early with a brunch party!  I have collected and included a few of my favorite gluten-free mexican brunch recipes for a recipe roundup.

Make Ahead Mexican Breakfast Casserole

DSC_0192

Black Bean and Chard Breakfast Tacos

DSC_0175

Huevos Rancheros with Black Beans

DSC_0026

And for those egg haters, this Mexican Chicken and Lime Soup is a perfect.

DSC_0233

Or what about Carnitas??? seriously, this is always a winner plus you can cook it all day in the crock pot!

DSC_0231

And how can you not have a salsa bar???  The Rhubarb Salsa is amazing and the Basic Salsa is one of my favorites.

IMG_0075

IMG_0078

Cauliflower Pizza Crust (Grain Free, Gluten Free, Paleo)

Pizza, beer, and a movie is my idea of a perfect date night.  I’ve been hunting around for a good grain free pizza crust recipe.  Who knew cauliflower would come to the rescue!

DSC_0317

Cauliflower is like the working mother of five or even fifteen.  It can transform into so many different things…mash it, roast it, puree it, rice it, grill it. And now I’m adding one more thing to the list…crust it…that is, pizza crust, my friends. I was really amazed at how much this tasted like pizza.

DSC_0294DSC_0300DSC_0309

Get out your handy dandy food processor and rice that cauliflower. Combine the riced cauliflower with eggs, seasonings, and some almond flour.  Preheating a pizza stone and applying the cauliflower pizza “dough” onto the preheated stone helps produce a crisper crust. Prebake to get a golden crust. Then top with whatever toppings you choose.  I have included my easy homemade pizza sauce recipe as well.  Friday pizza night is back on!

DSC_0315

Cauliflower Pizza Crust (slightly adapted from Love and Lemons)

  • 1 cauliflower, diced in 1/2-inch pieces
  • 2 eggs
  • 1/2 teaspoon each of garlic powder, onion powder, salt
  • 1 teaspoon each of oregano and parsley
  • 3/4 cup almond flour

Homemade Pizza Sauce

  • 1 6 oz can of organic tomato paste
  • 1 cup of water
  • 1 tablespoon each of oregano, basil, and parsley
  • 1 teaspoon each of garlic powder and onion powder
  • 1/4 teaspoon ground black pepper
  • salt to taste

Instructions

  1. 1. Preheat oven to 450 degrees. Place a pizza stone in the oven and allow to preheat.
  2. Chop cauliflower into 1/2-inch pieces. Place cauliflower flourettes into the food processor and pulse for a “riced” consistency. Don’t go too far or you will puree it. Remove from food processor and place the riced cauliflower into a microwave save bowl. Microwave for 3 minutes.
  3. Add remaining ingredients and mix  to form into a wet ball. If it is too sticky to handle, add more almond flour. Gently knead it a few times to help it come together. Remember…this is cauliflower, NOT all purpose flour so it will not resemble typical pizza dough.
  4. Remove the preheated pizza stone from the oven or use a baking sheet. Place parchment paper on top of the stone or baking sheet. Press the cauliflower “dough” ball onto the pizza stone or baking sheet lined with parchment paper. Gently mold it into a 1/4-inch thick circle.
  5. Bake at 450 F for 20 to 25 minutes until golden brown.
  6. For the pizza sauce, combine all ingredients into a medium bowl. Top the baked pizza crust with the homemade pizza sauce.Then top with your favorite ingredients. We topped ours with cheese (not paleo, but I really wanted some melty cheese), pepperoni, jalapeño, and mushrooms.
  7. Bake for about 10 minutes.

DSC_0305

Poached Eggs on Broiled Portobello Mushrooms

DSC_0226

Let’s get fancy….but not toooooo fancy.

This recipe is adapted from Sophie Dahl’s cookbook “Voluptous Delights”, a beautiful cookbook that features sexy, delicious, and seasonal food! This cookbook makes easy food look sophisticated and sexy.

She uses Portobello mushroom caps in place of english muffins in a lighter version of an Eggs Benedict.  Portobello mushroom caps are huge and meaty and a great way to rock your breakfast world.  This breakfast makes you feel like you are at a top class brunch spot.

DSC_0248 DSC_0245

But what really takes the breakfast to the next level is the perfect poached egg!  Check out the tutorial here

This breakfast is fancy enough to serve to a group for brunch. It is also easy enough to make for just yourself on a lazy weekend when you would rather just sit around in wool socks drinking coffee, filling out the crossword puzzle, staring at the dust on your shelves that just does not go away by itself…uuugh…, wondering when your taxes will just do themselves, dreaming about cabins that you want to build when you win the lottery, watching reruns of HGTV and wishing that maybe someone will come “crash” your home, and helping yourself to another mimosa because hey you need your fruit serving for the day!

DSC_0251

Poached Eggs on Broiled Portobello Mushrooms (Gluten Free, Grain Free, Dairy Free, Paleo) (adapted from Sophie Dahl)

Serves 2

Ingredients

  • 2 Portobello mushroom caps, stems and gills removed
  • 2 eggs
  • 2 to 4 cups of fresh spinach, cleaned
  • olive oil
  • salt and pepper
  • 1/2 teaspoon fresh thyme

Instructions

  1. Preheat oven to 450 degrees F. Line a baking sheet with parchment paper. Place cleaned Portobello caps stem side up on the parchment paper. Drizzle with 1 teaspoon of olive oil each and sprinkle with salt and pepper. Bake for 10 to 15 minutes. 
  2. While Portobello caps are roasting, poach eggs as shown here or cook as desired.
  3. Add about 1 teaspoon of olive oil to small skillet placed over medium heat. Sauté spinach until slightly wilted, about 3 minutes. Remove skillet from heat.
  4. Remove mushroom caps from oven when done. Place one mushroom cap on each plate. Divide wilted spinach between the two mushroom caps. Top with the poached egg. Season with salt, pepper, and fresh thyme.

Blood Orange and Avocado Salad

I like simple things….

t-shirt and jeans…

a warm day in the middle of a cold spell…

a hug after a long day…

and winter citrus! 

Winter citrus is an anomaly to me: bright and flavorful fruits that are at their peak when everything else is dormant.  I can’t seem to get enough grapefruit, Meyer lemons, clementines, oranges, and especially blood oranges!  Have you had a blood orange? Eating them is like a secret escape to my own tropical island. Where’s my mai tai? Where’s my pool?  Where’s my hammock????

DSC_0186

The salad I made is adapted from Alice Water’s amazing avocado and grapefruit salad from her-must have cookbook The Art of Simple Food.  A girlfriend of mine had this cookbook and I poured over it every time I was at her house. And then I received a copy for my birthday!!!  The recipes are so simple and so flavorful.

DSC_0197

I swapped blood oranges in for the grapefruit and served it over a bed of mixed greens. Using blood oranges makes me feel like I just bedazzled my salad.  I whipped this up for a quick lunch and took it to work, eating with some leftover salmon. It totally made feel like I was on vacation in the tropics and not sitting inside an office cage in the middle of winter peering out a tiny jail-sized window. Womp womp.

Hrmmm….note to self…get a hammock for my office….and more winter citrus!

Blood Orange and Avocado Salad (adapted from The Art of Simple Food by Alice Waters)

Serves 4 as a side

Ingredients

  • 4 to 6 cups of mixed salad greens, washed and dried
  • 2 Blood oranges
  • 1 Avocado
  • 1/4 cup white wine vinegar
  • 1/4 cup extra-virgin olive oil
  • salt and pepper

Instructions

  1. Divide the salad greens evenly among four plates.
  2. With a sharp knife, peel the rind from the blood oranges down to the flesh. Slice in thin rounds. Divide the orange slices evenly among four plates.
  3. Cut the avocados in half and remove the pits. Sprinkle the inside lightly with salt. Inside the skin, slice the avocados in 1/4-inch slices. Carefully scoop from skin and divide the avocado slices evenly among the four plates.
  4. In a small lidded jar, add vinegar and olive oil with a pinch of salt and pepper. Shake well. Drizzle the vinaigrette lightly over each salad. Store leftover vinaigrette in the refrigerator for up to 3 days.

Roasted Brussels Sprouts with Cranberries and Pecans

So let me tell you a story about a notorious vegetable called Mr Brussel.

Mr Brussel was bulky and brawny. A bad boy in the vegetable kingdom. Not many people liked him. He kind of had multiple personalities or at least was pretty moody.  Some days he was bitter. Other days he was bland. But generally, most of the time he was smothered and tired and wilted and just overcooked. Bleh.

DSC_0167

Then one day Mr Brussel went to the Roasting Pan, a new pub.  He had heard stories of this place changing other veggies, but he thought that it was a myth.  Rumors stirred about Madame Cauli Flower and her infamous roasted makeover.

So Mr Brussel decided to give it a shot.

He went in. He stayed awhile. He lingered. He rested. He was massaged in some olive oil. He got braised and roasted.

Then when he got out of the Roasting Pan, something amazing happened. He was sweet and delicious and caramelized. He was a changed veggie. He was the Ryan Gosling of vegetables…well, maybe not THAT far…but close.

DSC_0172

The moral of the story, people?  Turn Mr Brussels from bleh to BAM by:

  • cutting those tiny cabbage-like veggies into quarter segments,
  • drizzling with olive oil,
  • sprinkling with salt and pepper, and
  • roasting in an oven!

That’s it. Oh the magic of the great Roasting Pan.

DSC_0179

For this recipe, I tossed my roasted brussels sprouts with cranberries, pecans, and a balsamic drizzle.  But don’t stop there. There are plenty of other ways to prepare these….maybe bacon? roasted garlic? parmesan? Harissa?  Yes!  Branch out. Give Mr Brussels another try. He won’t disappoint you.

Roasted Brussels Sprouts with Cranberries and Pecans (adapted from Whole Foods Market recipes)

Serves 6 as a side

Ingredients

  • 1 lb of fresh brussels sprouts, trimmed and quartered
  • 1 to 2 tablespoons of olive oil
  • 1/4 teaspoon salt and pepper each
  • 1/3 cup dried cranberries
  • 1/4 cup chopped pecans
  • 1 tablespoon balsamic vinegar

Instructions

  1. Preheat oven to 400 F.  Line a roasting pan with aluminum foil.  
  2. In a medium bowl, toss the brussels sprouts with olive oil, salt and pepper. Spoon the brussels sprouts in a single layer onto  the roasting pan.  Roast for 30 minutes. Stir the brussels sprouts. Add the pecans and cranberries onto the roasting pan. Add the pan back into the oven and cook for an additional 5 minutes. Stir well until brussels sprouts are well cooked.
  3. Remove from oven and toss with balsamic vinegar.

Grain-Free Hazelnut-Pecan Delights

First things first. I have some amazing news. I received my official notification in the mail that I passed my Professional Engineering exam!!!!  A grueling exam that I studied for nearly half a year for last year. It consumed me, but was worth it.  I now am a certified P.E., which has been a huge goal of mine. CHECK that off my bucket list.

DSC_0218

But now that I have checked that huuuuuge goal off of my list, I find myself at a bit of a loss. Where do I focus my energy next?  I’m a goal-oriented person and it only seems proper to set new goals. But aside from the small goals of “read more books” or “travel more”, I just can’t seem to figure out where to point my laser beams. So, if you have any ideas, I’m game.

At this point, I’m trying to tackle small things that include: (1) Organizing my “office” (junk room), or (2) Thinking about hanging pictures that have never been hung, or (3) Properly learning to do laundry because reading the labels seems more like reading hieroglyphics and I end up just throwing everything in at once and washing on cold. Evidently when clothes say gentle…they mean it. Booh.

DSC_0237

I also have been perfecting cookies….my butt thanks me and my skinny jeans do not. These Hazelnut-Pecan Delights are THE perfect cookie. They are just sweet enough, with a hint of salty, and are chewy and are….well….redonculous. Yes…redonculous, people.

They taste like my favorite Girl Scout cookie….oh that beloved Caramel Delight…and yes…they are soooo delightful.  The bonus with MY cookies is that they are gluten-free, dairy-free, and refined sugar-free. Plus they have hazelnuts and pecans, giving them added protein.

These are perfect to bring to your New Years Eve party, or football Bowl Game watch party, or for your last-hoorah-before-you-go-on-you-2013-fit-back-in-your-jeans party.

DSC_0244

Grain-Free Hazelnut-Pecan Delights

Makes 2 dozen tiny, bite-sized cookies

Ingredients

  • 1 cup hazelnuts
  • 1/2 cup pecans (or other raw nut such as almonds, walnuts)
  • 3 teaspoons ground ginger
  • 1/8 teaspoon fine sea salt
  • 1/4 teaspoon baking soda
  • 2 Tablespoons coconut oil, softened
  • 4 Tablespoons maple syrup or honey
  • 1 Tablespoon unsulphured blackstrap molasses
  • 1/4 cup dark chocolate chips, chopped into tiny pieces
  • 1/3 cup unsweetened shredded coconut

Instructions

  1. Preheat oven to 350F. Line a baking sheet with unbleached parchment paper or a Silpat mat.
  2. In a the bowl of your food processor, add nuts and process for 2 minutes, until finely ground.  Add ground ginger, salt, and baking soda and process until well mixed. Add coconut oil, honey, and molasses and process until a thick cookie dough ball forms. Add chocolate chips and shredded coconut to the food process or and pulse for 15 to 30 seconds to finely chop the chocolate, distributing throughout the cookie batter.
  3. Chill the batter in the refrigerator for at least 30 minutes, making it easier to scoop and form cookies.
  4. I like these cookies tiny and barely bite-sized.  Scoop out the dough in exact, level tablespoons. Then tear those pieces of dough in two before rolling each 1/2 tablespoon of dough into a ball shape.  Place dough a few inches apart on prepared baking sheets.  Use a wet fork to flatten each dough ball into your desired cookie thickness.
  5. Bake for 10 to 12 minutes or until firm around the edges (ovens vary so watch them), but still soft in the center. Allow to cool on the pan for 5 to 10 minutes before transferring to a wire rack to cool completely before serving.

Flourless Brownie Bites (Grain Free)

Merry Christmas!

I hope you all are having a wonderful and cozy day.  My husband I made the trek from KC down to Oklahoma to visit my family.  My brother had back surgery a week ago and has been recovering.  It was wonderful getting to spend time with all of us together.

DSC_0282

We cooked, we ate, we laughed, we made our gingerbread house, and we watched christmas movies on repeat while my bro was horizontal in bed recovering. He’s getting around better and was able to eat dinner with us and walk around with his walker.

DSC_0301

We had to leave a day early because Oklahoma freaks out over the mere mention of a slight chance of snow. So thinking Snowmaggeddon is on its way, we had to make a mad dash up north to Kiley’s family’s house in Tulsa last night to try to miss this “massive” snow storm. We woke up this morning to clear skies and no snow. Womp womp.  But at least we are safe and sound in Tulsa with Kiley’s family now with the warmth of coffee and a fire in the fireplace.  We hope you and your families are warm, cozy, and enjoying time together and slowing down this season.

DSC_0324

I’m whipping up a batch of flourless bite-sized brownies. I love the tiny size for snacking.  There is no flour, only cocoa powder, melted chocolate, honey, eggs, and butter or coconut oil! They are super easy and can be topped with anything you have on hand. Yes…even bacon.  I topped some with bacon (it was a hit), some with crystallized ginger, others with toasted walnuts, and some with salted caramel (my fave). The recipe is inspired by the flourless brownies in my new favorite cookbook, Practical Paleo. The recipe is found below.

DSC_0302

Also, if you are looking for some last minute quick gluten-free recipes to make for Christmas dinner, I’ve gathered up a few of my favorites….

Gluten-Free Breakfast:

DSC_0173

Mexican Breakfast Casserole (Grain Free and Dairy Free)

Crustless Quiche (Grain Free and Dairy Free)

Pumpkin-Apple Muffins (Grain Free and Dairy Free)

German-Style Apple Walnut Pancake (Grain Free and Dairy Free)

Gluten-Free Appetizers:

DSC_0309

Spinach-Cheese Balls (Vegetarian and Grain Free)

Buffalo Chicken Meatballs (Grain Free and Dairy Free)

Nutty Coconut Date Balls (Vegetarian, Grain Free, and Dairy Free)

Gluten-Free Side Dishes:

DSC_0273

Kale Salad with Cranberries, Pecans, and Apples (Gluten Free and Vegan)

Roasted Cauliflower 

Grilled Delicata Squash with Kale (Gluten Free and Vegetarian)

Gluten-Free Desserts:

Ginger Chocolate Chip

Chewy Ginger Chocolate Chip Cookies (Gluten Free, Grain Free, and Dairy Free)

Fudge Brownies (Gluten Free and Vegan)

DSC_0334

Flourless Brownie Bites (adapted from Practical Paleo)

Makes 30 brownie bites

Ingredients

  • 4 ounces dark chocolate (I use 85% cocoa from Trader Joes), melted and cooled
  • 1/2 cup coconut oil or butter, melted and cooled
  • 1/2 cup honey or maple syrup
  • 1/2 cup unsweetened cocoa powder, sifted
  • 1 teaspoon vanilla extract
  • 3 eggs, beaten
  • 1/4 teaspoon salt
  • 1/4 teaspoon baking soda
  • Toppings or mix-ins: bacon, walnuts, crystallized ginger, caramel, unsweetened coconut, flaked salt

Instructions

  1. Preheat oven to 350F. Grease mini muffin tin with butter, coconut oil, or nonstick spray. Set aside.
  2. To melt the dark chocolate bar, break into small pieces and place in a microwave-safe bowl. Microwave on high at 30 second intervals, stirring in between, until the chocolate is melted. It takes me 2 minutes.
  3. In a medium-sized bowl, combine the melted dark chocolate, melted coconut oil (or butter), maple syrup, vanilla, and eggs. Slowly sift the cocoa powder over the wet ingredients, whisking it evenly to ensure there are no lumps. Stir in salt and baking soda.
  4. Spoon the brownie batter into the mini muffin tins (about 1 1/2 tablespoons per muffin tin), filling about 3/4ths full. Top the batter with the topping of your choice (chopped bacon pieces, walnuts, ginger, coconut, caramel pieces, kosher salt). Bake for 20 to 25 minutes, or until a toothpick inserted into the center comes out clean.