Chocolate and Peanut Butter Macaroons (Grain Free)

Chocolate and Peanut Butter Macaroons / Big Eats Tiny Kitchen

Sorry for the long delay in between posts. Recently life has been tough at times but life also has been very good. When I am going through a roller coaster of emotions and dead lines and choices and what not, I consume chocolate and peanut butter. Doctors orders.

But when life is good…I also eat chocolate and peanut butter.

Chocolate and Peanut Butter Macaroons / Big Eats Tiny Kitchen

Chocolate and Peanut Butter Macaroons / Big Eats Tiny Kitchen

The combination sends warm fuzzies through my body. It’s a choco-pb hug for my soul. I get my best soul hugs from those crack-like addictive Reese’s PB eggs that spring forth from every corner around this time of year. I can stay away from Reese’s (nearly) the rest of the year, but throw them in an egg shape! Holy frijoles, I can’t stop. My eyes pop out of my head all googley and I froth at the mouth and I protect them like a squirrel, hiding my Reese’s eggs in weird and unassuming places.

These cookies are the wonderful love child of two of my favorite cookies: No bake cookies + macaroons. Whoa. Whoa.

Let this happen.

Make them egg shaped. They are better for you than those other choco-pb eggs and just as addictive.

Chocolate and Peanut Butter Macaroons / Big Eats Tiny Kitchen

It will make you love life even when there are a few major down moments.

Chocolate and Peanut Butter Macaroons (Grain Free and Diary Free)

Adapted from Against All Grain

Makes 2 dozen cookies

Ingredients

  • 2 1/2 cups unsweetened shredded coconut
  • 1/3 cup honey
  • 1/2 cup unsweetened cocoa powder
  • 2 tablespoons natural creamy unsweetened peanut butter*
  • 1 egg white
  • salt

Instructions

  1. Preheat oven to 325F. Place a piece of parchment paper onto a rimmed baking sheet. Set the baking sheet aside.
  2. In a large bowl, combine the coconut, honey, cacao powder, peanut butter, and a pinch of salt.
  3. Place egg white and another pinch of salt in a medium bowl. Using a whisk or electric beaters, beat the egg white for about 2 minutes until soft peaks form. Combine meringue with other ingredients in the large bowl.
  4. Using a melon baller, scoop out cookies and place them onto the parchment paper. Bake for 30 minutes. Remove from oven and allow to cool for at least 1 hour on a wire cooling wrack.

*Note – To make these Paleo friendly, use either almond butter or sunflower seed butter in place of the peanut butter. 

Creamy Roasted Parsnip, Cauliflower, and Fennel Soup (Gluten Free, Vegan, and Paleo-Friendly)

Roasted Parsnip, Cauliflower, and Fennel Soup / Big Eats Tiny Kitchen

I have a divided house when it comes to silky smooth soups that only contain vegetables and no cream. Pureed smooth, they show off the amazing flavor of just the vegetables without anything masking their natural deliciousness. I love them…a lot. They are creamy without being loaded with cream. They are smooth and comforting and light. I want them in my belly.

The other person in this house does not like them because, well…they are creamy without being loaded with cream and they are smooth and light and in his words, “like baby food”. He wants heartiness. He wants carbs. He wants meat. He wants cream. He wants butter. He wants bacon. Do I live with Paula Dean?

Roasted Parsnip, Cauliflower, and Fennel Soup / Big Eats Tiny Kitchen

Roasted Parsnip, Cauliflower, and Fennel Soup / Big Eats Tiny Kitchen

And I craaaave creamy soups that have NO cream but are just ALL vegetables. I love smooth and creamy tomato soup, or carrot soup, or butternut squash soup. And every time I make them, my poor hubs has to eat this nourishing amazing bowl of yumminess and smile and leave ALL the leftovers for me. GOOD. Best lunches EVER. He can have his can of tuna and weird packages of sardines for lunch. Meanwhile, I will enjoy my creamy roasted soups and everyone at work will smell them and say “whoa…what are you having?”. In a good way. At least, that’s how it plays out in my head.

I stumbled on this Parsnip and Apple soup the other day on the most beautiful blog called Golubka Kitchen and I instantly began drooling. I couldn’t get the soup out of my brain box. I adapted it to roast the parsnips and I swapped out the potatoes for cauliflower. I found fennel on sale at the store and so I through it in as well to round out the awesome white soup. I recommend saving some of the fennel fronds and some thyme for topping these delicious bowls of comfort. The soup is also yummy with a good drizzle of olive oil.

Roasted Parsnip, Cauliflower, and Fennel Soup / Big Eats Tiny Kitchen

Roasted Parsnip, Cauliflower, and Fennel Soup / Big Eats Tiny Kitchen

So despite knowing that I have a divided house on smooth and creamy dreamless soups, I MADE it. and I loooooved it. I recommend you do the same, because then you will have a few days worth of amazing lunches and they get stuck with canned tuna.

Creamy Roasted Parsnip, Cauliflower, and Fennel Soup (Vegan, Gluten Free, and Paleo-Friendly)

Adapted from Golubka Kitchen

Serves 4 as a side or 2 as a main dish

Ingredients

  • 1/2 lb parsnips, peeled and cut into 1/2-inch rounds
  • 1/2 large head of cauliflower, roughly chopped (about 2 cups)
  • 1/2 large fennel bulb, sliced into 1/2-inch wide slices
  • 2 medium apples, peeled, cored, and cut into eighths
  • 2 garlic cloves, peeled and smashed
  • 1 tablespoon olive oil (plus more for drizzling on finished soup bowls)
  • 1/2 teaspoon salt (plus more for seasoning)
  • 1/2 teaspoon ground cumin
  • 1 Tablespoon fresh thyme leaves (plus more for garnish)
  • 3 to 4 cups low sodium chicken broth
  • salt and pepper to taste
  • Toppings: thyme leaves, olive oil, yogurt, quinoa

Instructions

  1. Preheat oven to 400 F. Spray a roasting pan with nonstick spray or line with parchment paper.
  2. Place chopped parsnips, cauliflower florets, fennel slices, apple slices, and garlic cloves in a large mixing bowl. Drizzle with olive oil and salt. Toss to coat evenly and then spread evenly on baking sheet. Roast for 25 to 30 minutes, tossing at 15 minutes.
  3. Remove from oven. Place half of vegetables into a blender or food processor along with half of the chicken stock, cumin, and thyme. Blend well for 2 to 3 minutes until the mixture is smooth. Transfer the pureed mixture to a medium stock pot. Blend next batch of roasted vegetables and remaining chicken stock for 2 to 3 minutes. Transfer remaining soup puree to stock pot.
  4. Heat soup in stockpot over medium heat. Bring to a simmer. Add additional liquid if soup is too thick. Adjust seasonings as needed.
  5. Distribute evenly into bowls and top with a drizzle of olive oil and thyme leaves. I added some quinoa to mine for a more substantial dinner.

Lime Cilantro Brussels Sprout Slaw

Lime Cilantro Brussels Sprout Slaw / Big Eats Tiny Kitchen

We are all getting antsy around here. Am I right? I hate getting taunted with a few days of warm weather, then blasted with too many days of cold. It’s a terrible tease. Tulips are peaking out of the ground. Trees are beginning to bud. Patio weather one day and then fire-place/wool socks/snuggy weather the next. Ugh.

Does anyone else feel a little bipolar weather insanity coming on?  My body and cravings are in a constant state of flux… Sun!!!!! Give me fresh veggies! Give me fresh fruit! More spring greens!!!!

OOOOoooooh wait…clouds? Snow? Blaaaah. Carb me up it’s cold! Where’s the chili? Where’s the chowder? Salad, really???? Why is it not covered in cheese? Helloooo! I like my cupcake handles, thank you very much! Gotta keep some padding on this bod against the polar vortex!

Wait. But NO! Let’s think positive. Let’s all send out SPRING THOUGHTS. (Don’t roll your eyes! I’m trying to quit being so crabby….I said trying, people).

Lime Cilantro Brussels Sprout Slaw / Big Eats Tiny Kitchen

Lime Cilantro Brussels Sprout Slaw / Big Eats Tiny Kitchen

Wish for camping. Wish for tulips. Wish for gardening. Wish for the smell of grills. Wish for the sound of neighbors chatting with each other. Wish that your lawn will mow itself (get a goat). Wish that those cupcake handles will magically disappear once bathing suite season rears its ugly head (or maybe swimming t-shirts will come back in style).

Lime Cilantro Brussels Sprout Slaw / Big Eats Tiny Kitchen

As you send out your good vibes into the world, here is my positive food vibe. I used one of my fave winter veggies, brussels sprouts, to make a springy slaw! Lime and cilantro pump this puppy up another notch. Red cabbage makes this a total beauty to serve.  Oh ya, give me a badge! Healthy and Hawt!

Personally, I love this slaw on my fish tacos. Mmmmmm….recipe to come later. So put down the carbs and chili for just a few minutes and try to get a positive spring mind.

Maybe if we all think positive, spring will finally move in for good. But summer will stay asleep for a loooong time.

Lime Cilantro Brussels Sprout Slaw / Big Eats Tiny Kitchen

Lime Cilantro Brussels Sprout Slaw

Serves 4

Ingredients

  • 1/2 lb medium-sized brussels sprouts, ends trimmed
  • 1/2 head small red cabbage
  • 1/4 cup cilantro, chopped
  • 2 green onion, white and green parts sliced
  • juice of 1 large lime (about 2 to 3 tablespoons)
  • 1 to 2 tablespoons olive oil
  • 1/4 teaspoon salt

Instructions

  1. Remove any brown or spotted out leaves of the sprouts. The sprouts can be shredded several different methods: shredded in a food processor (using the slicing blade), sliced as thin as possible using a good knife, or using a mandolin slicer. Place in a large bowl.
  2. Shred half of a head of small red cabbage or slice as thin as possible. Add the shredded cabbage, cilantro, and green onions to the large bowl.
  3. In a small bowl, whisk lime juice, salt, and olive oil together. Pour dressing over shredded veggies. Toss and allow to sit at room temperature for at least 30 minutes, stirring occasionally to distribute the dressing. Eat up!

Grain Free Samoa Bars

Grain Free Samoa Bars

It’s Girl Scout cookie season. People are walking around with goofy grins, Do-Si-Do crumbs on their shirts, stupid Thin-Min-covered fingers, Tagalong-scented breath, and boxes of Samoas stuffed in their sock drawers so that no one else will get THEIR cookies. Or is this just me?

And who came up with those names anyways? Do-Si-Do? Tagalong? What is a Samoa even?

Grain Free Samoa Bars

But in reality I’m jealous. Seethingly jealous. I can’t have any of them. I just stare with dark, wide-eyed, frothing and foaming desire.

But this year, the ol’ Girl Scouts gave the gluten-free crowd a consolation prize and came out with a GF cookie. I was pumped, until I found out it was a shortbread. Womp womp. Really? Shortbread?  That all you got? No badge for you! Get back in the kitchen. TRY AGAIN.

Grain Free Samoa Bars

DSC_0384

Never fear. After being challenged by a friend that Grain Free Samoas would not be good, I woke up on Saturday morning with a mission. A cookie mission.

These cookies deserve a badge! A medal! An Oscar, even! They make you THINK they are the real deal, but alas…they have no wheat, no grains, no processed sugar. Ya…SUCK IT TRABECK!

Grain Free Samoa Bars

Instead of making single cookie-disks, I opted for bars. Because seriously, these puppies disappear so quickly into your mouth that cutting out little stupid tire shaped cookies is not worth it. Lets save time. Let’s make bars! The shortbread crust is perfect and crisp. I saved even more time by not dipping each bar in chocolate and instead spread the chocolate layer between the shortbread crust and the caramel coconut layer. The caramel coconut layer is a delicious concoction of honey and a smidge of molasses that has been cooked down to an amber-caramel-heavenly syrup.

These do take a bit of time to make each part. But the wait and work is WELL worth it. So make a batch, hide several (because they will go fast if you share them), turn on the Oscars, grab a yummy Samoa bar, and do your best Matthew McConaughey impersonation….”alright, alright, alright”.

Grain Free Samoa Bars

Grain Free Samoa Bars

Makes 16 small bars

Shortbread Crust Ingredients (inspired by Deliciously Organic)

  • 1 1/2 Cup almond flour (such as Honeyville)
  • 2 Tablespoons coconut flour
  • 2 Tablespoons arrowroot powder
  • 1/2 teaspoon unflavored gelatin
  • 1/2 teaspoon sea salt
  • 4 Tablespoons unsalted butter, at room temperature
  • 2 Tablespoons honey

Chocolate Layer

  • 1 Cup semisweet or dark chocolate, chopped

Coconut Caramel Topping (adapted from Against All Grains)

  • 1/2 Cup honey
  • 1 Tablespoon molasses
  • 2 Tablespoons unsalted butter
  • 1/2 Cup coconut milk or heavy cream
  • 1/2 teaspoon sea salt
  • 2 Cups unsweetened shredded coconut

Chocolate Drizzle

  • 1/2 Cup semisweet or dark chocolate

Instructions:

  1. Preheat oven to 350 F. Place parchment paper in the bottom of an 8-inch by 8-inch baking dish. Set aside.
  2. Combine crust ingredients in a medium bowl until just combined. The mixture will be crumbly. Press the crust evenly into the bottom of the prepared baking dish. Bake on the middle rack of the oven at 350 for 15 minutes or until light golden brown.
  3. Meanwhile, place the unsweetened coconut on a rimmed baking sheet in an even layer. Place on the top rack to toast. Toast the coconut for about 5 to 7 minutes, keeping an eye on it so that it doesn’t burn. Remove the toasted coconut from oven when golden brown and allow to cool on a wire rack.
  4. After the crust is finished baking, pull the crust from the oven. Turn the oven off. Sprinkle 1 cup of chopped chocolate onto the warm crust. Place back into the warm oven for 1 to 2 minutes. Remove from the oven and use a rubber spatula to spread the melted chocolate evenly over the shortbread crust. Set on a wire rack and allow to cool. Place in refrigerator after cooled.
  5. For the caramel sauce, place honey and molasses in a small saucepan over medium heat. Bring to a low bubbling boil for about 7 minutes, swirling frequently to caramelize evenly. Remove from heat and stir in butter, coconut milk, and salt until smooth and completely combined. Stir in toasted coconut.
  6. Remove cooled shortbread crust from the refrigerator. Spread the coconut caramel mixture on top of the chocolate covered crust.
  7. Microwave remaining chocolate in a microwave safe dish for about 2 to 3 minutes, in 30 second intervals, stirring in between intervals. Once the chocolate is completely melted, drizzle the chocolate (using a spoon or fork) over the Samoa bars. Cool bars completely in refrigerator for at least 1 hour.
  8. Use parchment paper to pull out the bars from the baking dish. Place on a cutting board and cut into 12 to 16 bars. Place bar in hand and shove into mouth. Mmmmm. 🙂

Creamy Polenta with Braised Kale and Poached Egg

Creamy Polenta with Crispy Kale and Poached Egg

Lately I have been cooking and posting a lot of my comfort food recipes. Hearty soul-warming french onion soup, curry (this one and this one), creamy tapioca, lemon pudding…mmmmm. These are foods that not only keep me cozy, but also nourish my tired and warn out mind and body.

They may not be the typical comfort food that most american’s have come to know and love. No mac n’ cheese. No cream o’ something soups dumped in a casserole. Sorry, no big fat cinnamon rolls are coming out of my oven (womp womp). No biscuits and gravy piled on my plate. Although, there are a few times that I miss some of those items, I feel better feeding myself and my family cozy winter comfort foods that are wholesome, full of nutrients to keep our immune systems up, and not laden with preservatives or packed with empty calories.

Lately I’ve been on a polenta kick.  Erhmergerd. It’s creamy. It’s sensational. It can be cheesy. It can be buttery. Hellooooo! And all it is is slow cooked stoneground cornmeal, water, and salt. You can add butter (yes) and cheese (OH YA) as options to kick it into winter overdrive.

Creamy Polenta with Crispy Kale and Poached Egg

You will need to spend a bit of time upfront cooking the polenta, like 40 minutes. But you can swirl it, let it bubble away, then put a lid on the dang pot while it boils away (stirring every 10 minutes) and then it’s done. The great thing about polenta is that any leftovers can be reheated with a little liquid to return to its creamy holiness OR it can be cut and baked into awesome polenta cutlets.

Polenta can be topped with a myriad of things: braised short ribs, sautéed mushrooms, or, my fave, a poached egg with braised kale. This dish is perfect for both brunch or dinner.  Bonus, make it for brunch one day, and leftovers can be reheated for dinner the next day. Win Win!

Notes: For a great tutorial on easy poached eggs, check this out.

Creamy Polenta with Crispy Kale and Poached Egg

Creamy Polenta with Crispy Kale and Poached Egg (gluten free)

Adapted from The Kitchn

Serves 4

Ingredients

  • 4 cups of water
  • 1 teaspoon salt
  • 1 cup coarse ground yellow cornmeal (or polenta, not quick cooking)
  • 2 tablespoons butter
  • 1/2 cup parmesan cheese
  • 1 tablespoon olive oil
  • 1 bunch of kale, inner ribs removed and discarded, coarsely chop leaves (wash and dry)
  • 2 teaspoons white wine vinegar
  • 4 poached eggs (I use this method)
  • salt and pepper

Instructions

  1. Place water in a heavy saucepan over medium-high heat and bring to a vigorous boil. Add salt and stir. While wishing the water gently, pour the cornmeal into the boiling water in a steady stream. Turn the heat down to low and continue to whisk the cornmeal/polenta until it has thickened.
  2. Cover the pot and continue to cook for 30 to 40 minutes, stirring vigorously every 10 minutes. Once it is finished, stir in butter and cheese. Place lid on pot and let sit for up to 10 to 15 minutes until ready to use.
  3. While cooking the polenta, place a separate sauté pan over medium heat. Add 1 tablespoon of olive oil. Add the kale and season with salt and pepper. Stir the kale lightly until it is slightly wilted. Stir in the vinegar, cover the pan, and turn the heat to high. Cook the kale over high heat until it is tender (about 5 minutes). Turn the heat off and set aside.
  4. Poach or fry eggs according to desired consistency. For a great poached egg, follow these directions.
  5. To serve, place 1/3 to 1/2 cup of creamy polenta in bottom of bowl, top with braised kale, and one poached egg. Season with salt and pepper to taste.

Lemony Coconut Tapioca Pudding

Lemony Tapioca Pudding / Big Eats Tiny Kitchen

I am in need of a vacation. It’s mid February and the skies are dismal and the temperatures are even more dismal.

So I have decided to create a vacation atmosphere in my home. Cozy, comfy, and relaxing. I curl up with a great record, a cozy blanket, and something creamy….like pudding. This tapioca pudding has the bright flavor of lemon. It reminds me of a random warm day in the 50s or 60s that comes along in the middle of winter and makes you want to run wild outside after having been locked inside from snow mounds and drifts of snow. Actually, at this point, I would go running around outside like a lunatic if it hit 40 degrees outside. I’ve got my bongos ready…I think it might hit 42 today. YES.

Lemony Tapioca Pudding / Big Eats Tiny Kitchen

So like I was saying. Lemons. Nothing is more refreshing and spring-like in flavor like lemons. This tapioca pudding has what every dismal winter day needs…a ray of sunshine and a warm breeze. But combine that with creamy tapioca pudding and you have comfort in a bowl.

Lemony Tapioca Pudding / Big Eats Tiny Kitchen

DSC_0295

I prefer to use small pearl tapioca, fresh honey, and a mixture of coconut milk and 2 percent milk. But for a completely dairy free version, by all means, use combination of other dairy free milks.

Lemony Coconut Tapioca Pudding

Adapted from Smitten Kitchen

Ingredients

  • 3 cups of coconut milk (or half coconut milk and half 2% milk)
  • 1/4 teaspoon kosher salt
  • 1/3 cup small pearl tapioca or granulated tapioca (I used this type)
  • 1 egg yolk, lightly beaten
  • 1/4 cup honey
  • 1/2 teaspoon gluten free vanilla extract
  • 1 tablespoon of lemon juice
  • zest from 1 lemon
  • toasted coconut (optional)

Instructions

  1. Combine coconut milk, salt, tapioca pearls, egg yolk, and honey in a medium saucepan. Place over medium heat and bring to a simmer while stirring frequently.  Turn heat down and allow to simmer softly for 20 minutes, stir frequently and make sure the bottom does not burn.  The tapioca will begin to thicken quickly at the end.
  2. Once the tapioca mixture is thick like gravy, remove from heat. Stir in the vanilla and lemon zest. Portion out 1/2 cup servings into separate pudding cups. Allow to cool in the refrigerator for a few hours or overnight. Serve alone or with extra lemon zest and/or toasted coconut on top.

Lemony Tapioca Pudding / Big Eats Tiny Kitchen

Grain Free Meyer Lemon Pudding Cake

Meyer Lemon Pudding Cakes (Paleo Friendly, Diary Free, Grain Free) - Big Eats Tiny Kitchen

I tend to have issues with making big decisions. I freeze when provided with too many choices. I try to logically narrow down the choices. I over think it. I marinate and choke over it.

I do this with nearly e.v.e.r.y.t.h.i.n.g. Cars. Houses. Jobs. Kids. Men. Shoes. Food. Does this come with a picture menu?

Apples at the store…. Pink lady? Gala? Fuji? Granny smith? wait..what do Rome apples taste like? or Empire? crap… or do I like Jonathon? no…wait… golden delicious are on sale… sold.

Meyer Lemon Pudding Cakes (Paleo Friendly, Diary Free, Grain Free) - Big Eats Tiny Kitchen

Sometimes I want cake. Other times I want something more creamy…pudding? Ugh… decisions. So here is where this cake is a winner on all fronts in my mind. It gives me the best of both worlds. This cake is the amazing love child between the most airy cake and the creamiest lemon curd-like pudding. I get pudding AND cake all in one bite. I get sweet AND tart all at once. I made these little Meyer lemon pudding cakes in two small 6-ounce ramekins and 1 larger gratin dish.

Meyer Lemon Pudding Cakes (Paleo Friendly, Diary Free, Grain Free) - Big Eats Tiny Kitchen

There is one tiny problem: trying to not devour the whole cake at once. They taste like sunshine bursting through a cold blustery day and warming you to the bone. Meyer lemons have a thinner rind, are slightly orangish in color, and are a bit sweeter than their bright yellow typical lemon counterparts. The first bite of these Meyer lemon pudding cakes was like capturing childhood in tiny ramekins. Cabin fever shmabin fever! These Meyer lemon pudding cakes will make you forget the dull skies that loom.

Meyer Lemon Pudding Cakes (Paleo Friendly, Diary Free, Grain Free) - Big Eats Tiny Kitchen

I loosely based my recipe on a Food and Wine recipe. To make this recipe grain free and dairy free (paleo friendly), I used coconut oil instead of butter, palm sugar instead of white sugar, almond milk instead of dairy milk, and a combination of almond flour/coconut flour in place of AP flour.  The cakes have a carmel-like color which I attribute to the dark coconut palm sugar.  Despite the caramel and faint yellow color of the pudding, these lil’ cuties are ridiculously good and will surely perk you up from any winter blues that you may be experiencing.  Cheers.

Meyer Lemon Pudding Cakes (Paleo Friendly, Diary Free, Grain Free) - Big Eats Tiny Kitchen

Grain Free Meyer Lemon Pudding Cake

Adapted from Food and Wine

Serves 6

Ingredients

  • 2 Tablespoons coconut oil (or grass fed butter), at room temperature
  • 2/3 cup coconut palm sugar
  • 3 large eggs, yolks separated from whites in separate bowls
  • 1 cup non-dairy milk (such as coconut milk or unsweetened almond milk)
  • 1/3 cup fresh Meyer lemon juice (from 2 lemons)
  • 1 Tablespoon fresh Meyer lemon zest (plus extra for serving)
  • 1/3 cup almond flour (such as Honeyville)
  • 1 Tablespoon coconut flour
  • 1/4 teaspoon salt
  • Optional Toppings: lemon zest, powdered sugar, coconut whip, or greek yogurt

Instructions

  1. Preheat the oven to 350ºF. Lightly butter six 6-ounce individual ramekins or a 9-inch pie dish. Set  the dishes inside a larger roasting pan and bring a kettle of water to a boil to create a bain-marie to evenly cook the pudding cakes.
  2. In another bowl, whisk the coconut oil (or butter) and palm sugar until creamed. Add one egg yolk at a time until combined. Gently whisk in the almond milk, lemon juice, and lemon zest until well combined. Stir in the almond flour and coconut flour and whisk until smooth.
  3. In the bowl of an electric mixer fitted with a whisk attachment, beat egg whites and salt until  stiff and soft peaks form. Gently fold in half of the beaten egg whites into the cake batter using a rubber spatula to lighten it. Carefully fold in the remaining egg whites. The batter should be light and fluffy at this point and will not resemble normal cake batter.
  4. Pour the cake batter into the prepared baking dishes. Since this cake will not rise, fill the dishes to the top if necessary.  Place the baking dishes into the larger roasting pan. Pour the boiling water from the kettle (step 1) into the roasting pan so that the water comes halfway up the outside of the ramekins or pie dish.  You can also fill the roasting pan with water while it is in the oven to keep from splashing water into the filled ramekins.
  5. Bake until the cake is puffed and golden, 50 to 60 minutes for a single pie dish, or 30 to 35 minutes for 6 small cakes. The top will become golden and the middle of the cake will barely jiggle when shaken. Pull out of the oven and allow to cool for 20 to 30 minutes on a wire rack. Serve the cake warm and fresh from the oven sprinkled with extra lemon zest.

Grain Free Cranberry Banana Bread Muffins

Cranberry Banana Muffins (Grain Free, Nut Free, Paleo Friendly) - Big Eats Tiny Kitchen

Christmas is approaching quickly and I am hosting! Pray for me. I’ve already caught a dishtowel on fire and burned my butcher block.  I will soon have a house filled with kids, love, hugs, ham, chocolate, pie, fudge, nuts, cheeselogs, stockings, egg nog, and so much more. Mmmmmm.

I’m trying to bake a few things ahead of time to prepare for the coming family. I whipped up this batch of muffins this week and have placed them in the freezer ready to be pulled out and rewarmed at a moments notice. Gotta love short cuts.

Cranberry Banana Muffins (Grain Free, Nut Free, Paleo Friendly) - Big Eats Tiny Kitchen

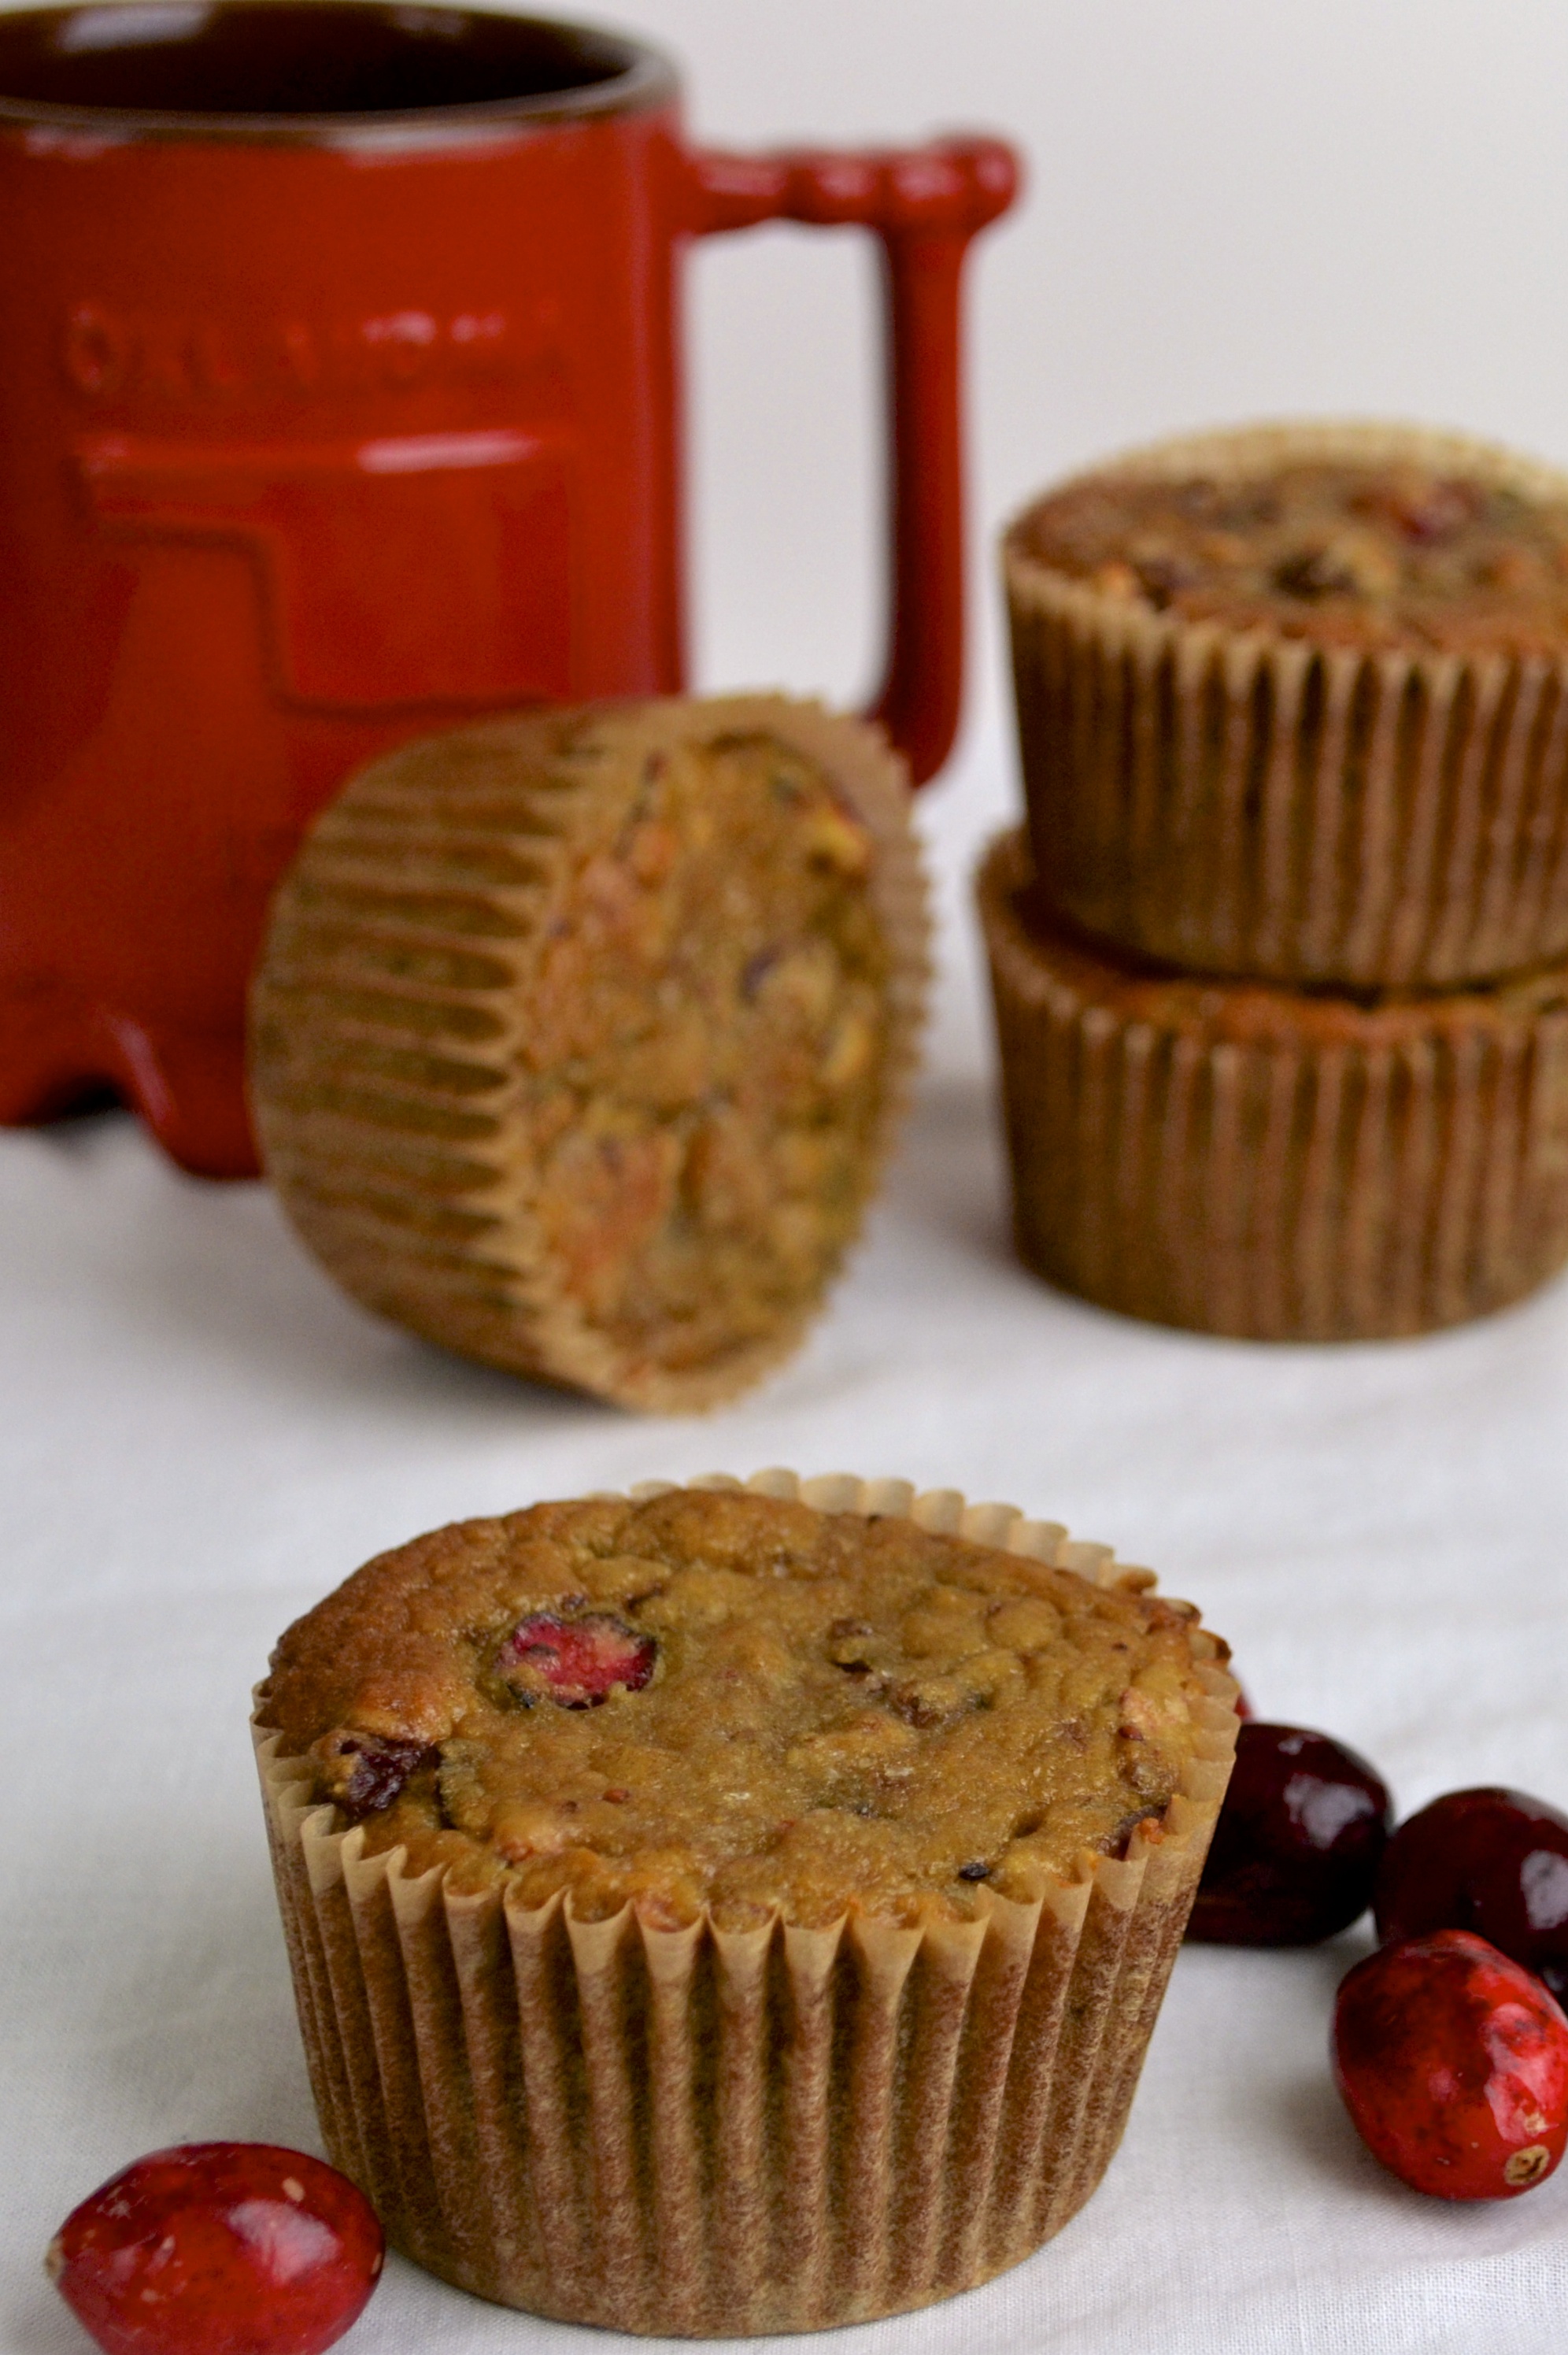
AAAAnd, you gotta love bursts of cranberries in these muffins. Well, everyone except my husband…dat’s weeeahd. But’s he’s weird anyways people. I mean, who puts their shoes in the freezer? Anyone? ya…him.

And who’s favorite christmas movie is Die Hard? Him! Well…and likely most dudes.

Ok ok ok…I love Die Hard too, but what about Jingle All the Way? Most people’s fave holiday movies are Home Alone and Christmas Story. But Sinbad and Arnold give the fabulous gift of I-haven’t-bought-anything-for-anyone-yet-so-I-will-buy-a-not-so-meaningful-but-expensive-Christmas-gift-on-Christmas-Eve-style Christmas spirit. Check it out. And don’t you dare go buy Christmas gifts ON Christmas Eve! Learn a lesson from Arnold, people. Or else you will end up driving around town, being robbed by washed up Santa’s, threatening a radio show host, and trying to steal presents from under other people’s trees. But then you end up dressed like a superhero at the end, so I guess it’s all worth it. But I digress….

Cranberry Banana Muffins (Grain Free, Nut Free, Paleo Friendly) - Big Eats Tiny Kitchen

If you haven’t gotten gifts at this point in the game, don’t do it. It’s a fart in the wind, friends. Make these muffins instead. Put them in a pretty box, tie some kitchen twine around them, and write a thoughtful note. When you present these to others, they’ll eat them and say “wow, that was so thoughtful and so delicious” in the voice of Ma Brady.

Now, isn’t this so much better than fighting the crowds and buying a crappy import mug with two year old hot cocoa mix and crouton-like marshmallows?

Cranberry Banana Muffins (Grain Free, Nut Free, Paleo Friendly) - Big Eats Tiny Kitchen

Back to these awesome muffins that you are making for “the ones that you love”, remember?!?

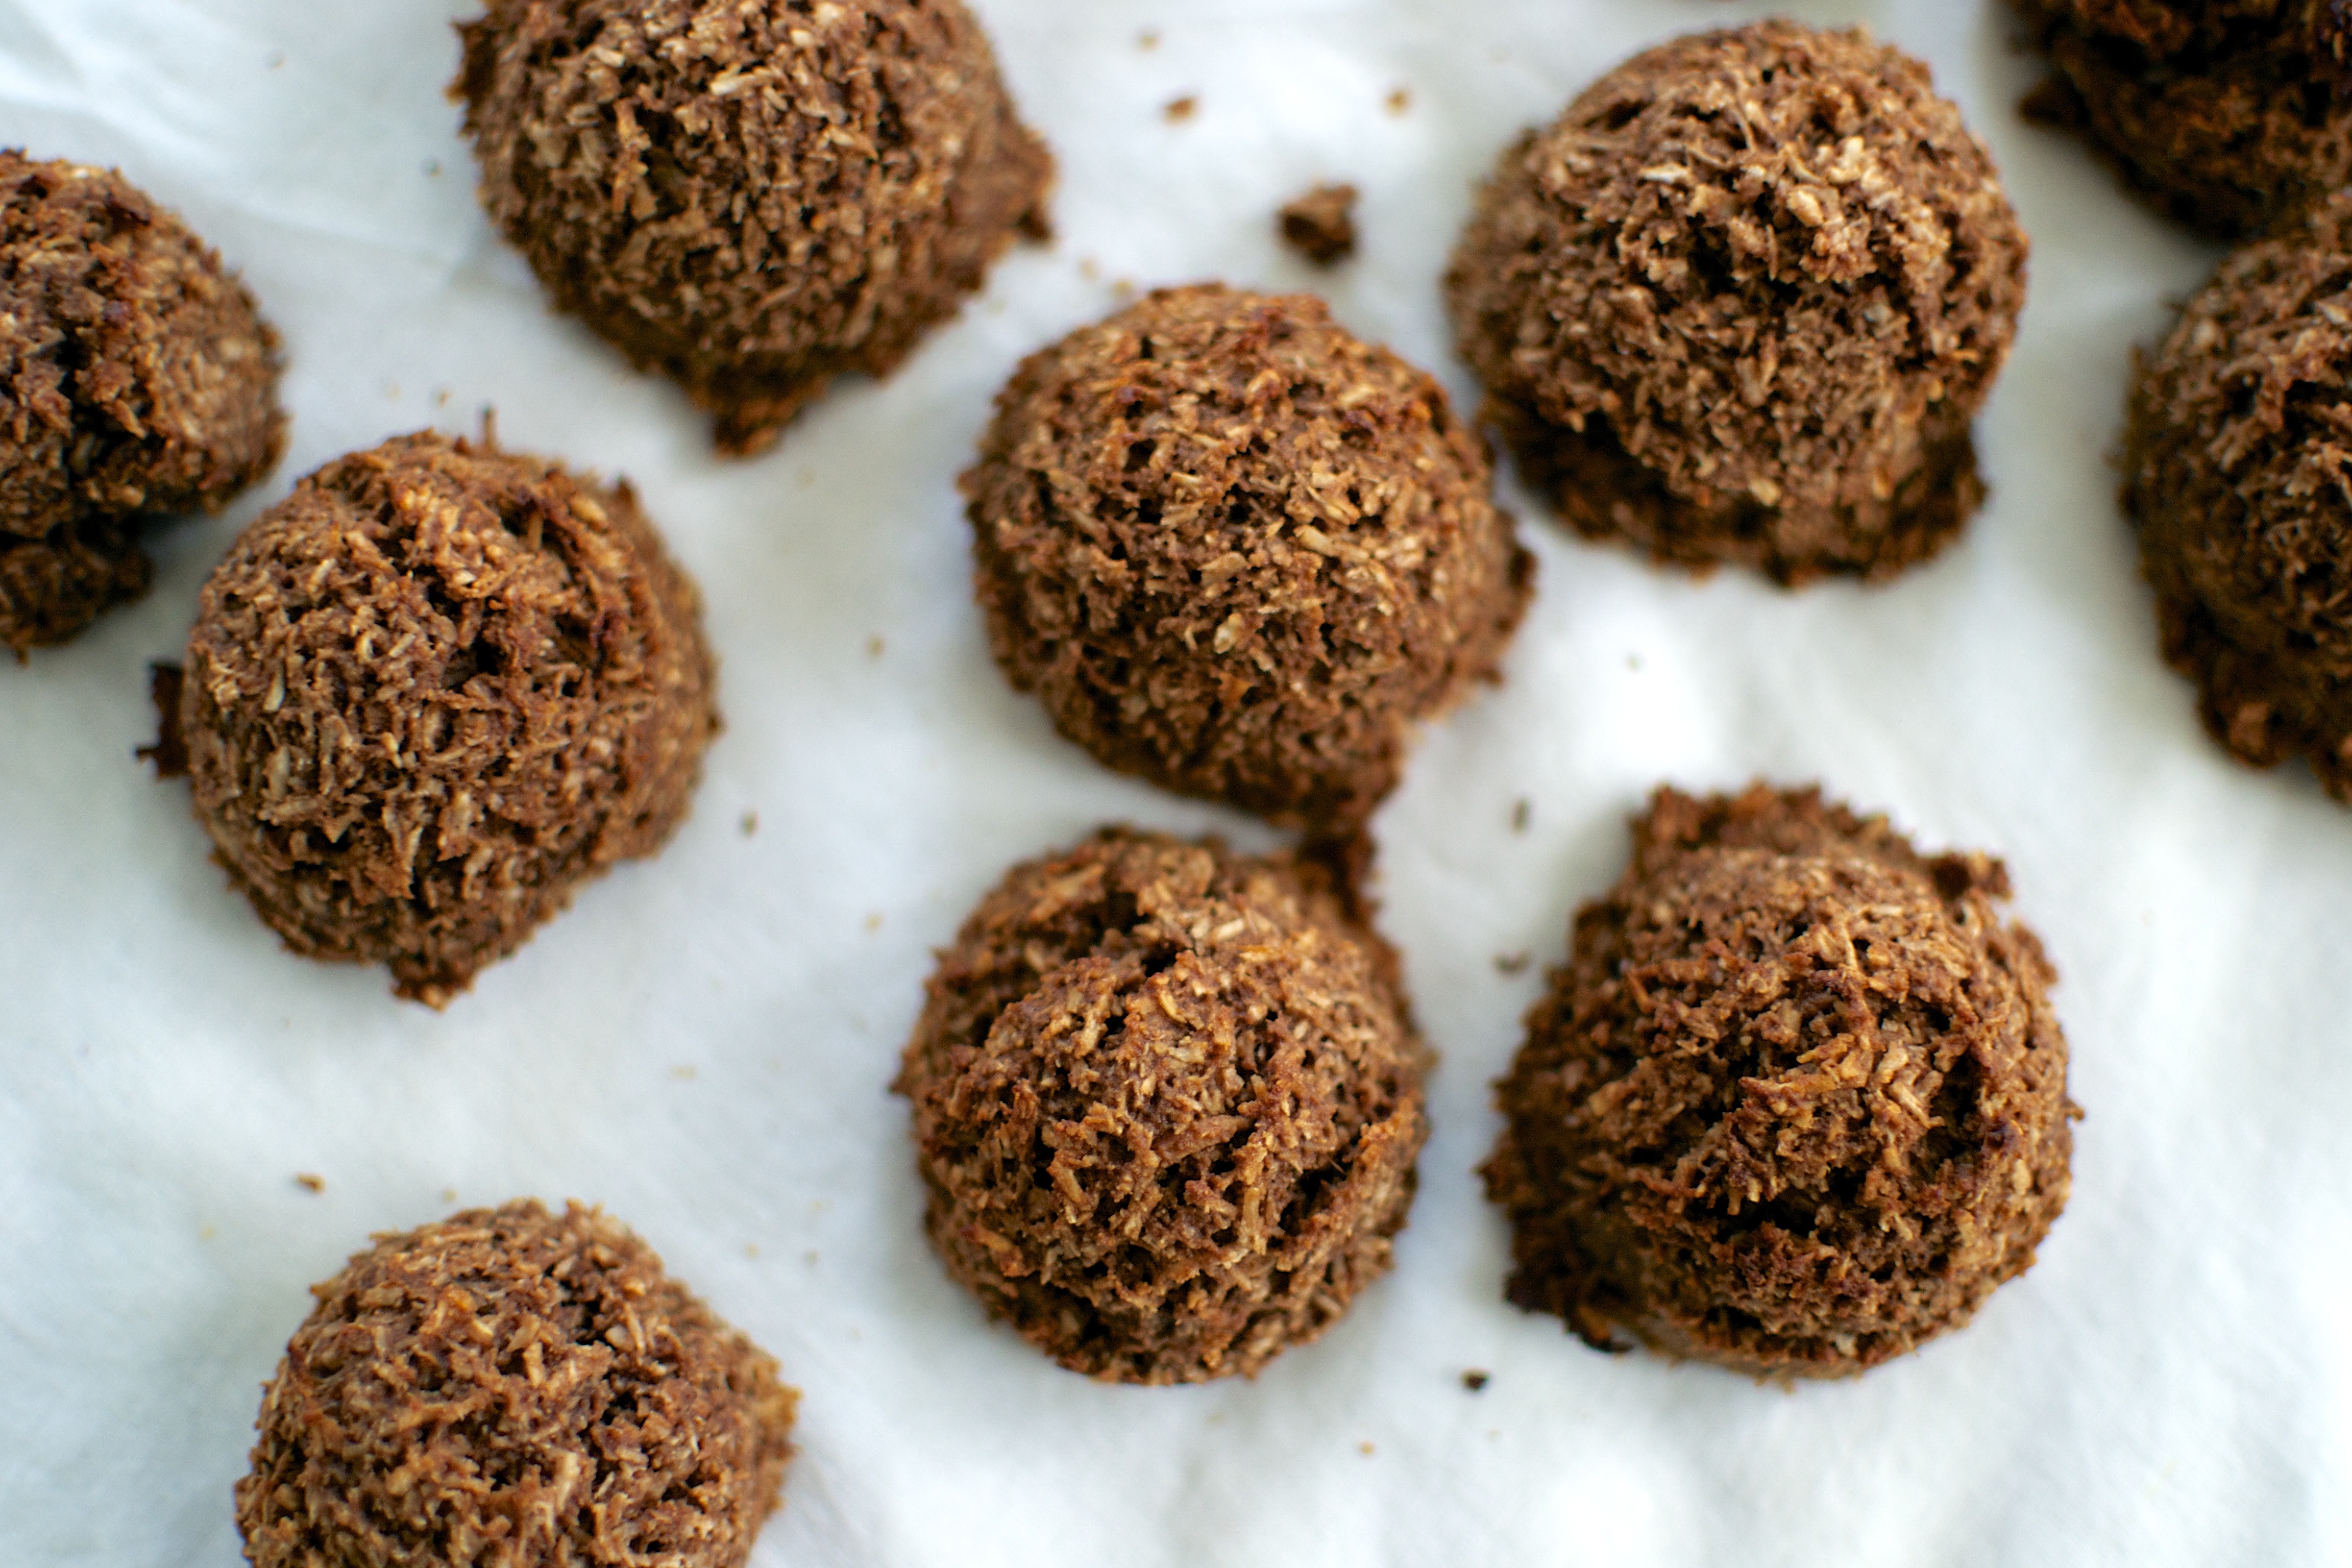
These muffins come together just using the food processor! It’s easy! No need to dirty multiple bowls. I adapted a recipe from Danielle Walker’s Against All Grains cookbook (best grain-free cookbook around, folks), swapping out the almond flour for tapioca flour for a nut free muffin version. I also added fresh cranberries for a fleck of holiday red and a punch of perfect tartness.

Oh Oh OH…AAAAND, even thought these muffins contain NO oil, they are uber moist. So there…you just made tasty AND healthy holiday treats for people and didn’t have to punch someone in the face at the store on Christmas Eve. You are a good person. Pat yourself on the back and enjoy a muffin. Because, of course you made a double batch so that you could keep some for yourself. We aren’t heathens around here. Sheesh.

I hope you have a happy Christmas and a merry New Year.  Muah!

Paris 2013

Paleo Cranberry Banana Bread Muffins

Adapted from Against All Grains

Ingredients

  • 2 ripe bananas
  • 4 eggs
  • 3 Tablespoons honey
  • 1 teaspoon vanilla extract
  • 1/2 cup sifted coconut flour
  • 1/4 cup tapioca flour
  • 1 teaspoon baking soda
  • 1/2 teaspoon kosher salt
  • 1/2 cup non-dairy milk (such as coconut milk or almond milk)
  • 1/2 teaspoon cider vinegar
  • 1 cup fresh cranberries

Instructions

  1. Preheat oven to 325 F. Line a 12-cup muffin tin with muffin liners and set aside.
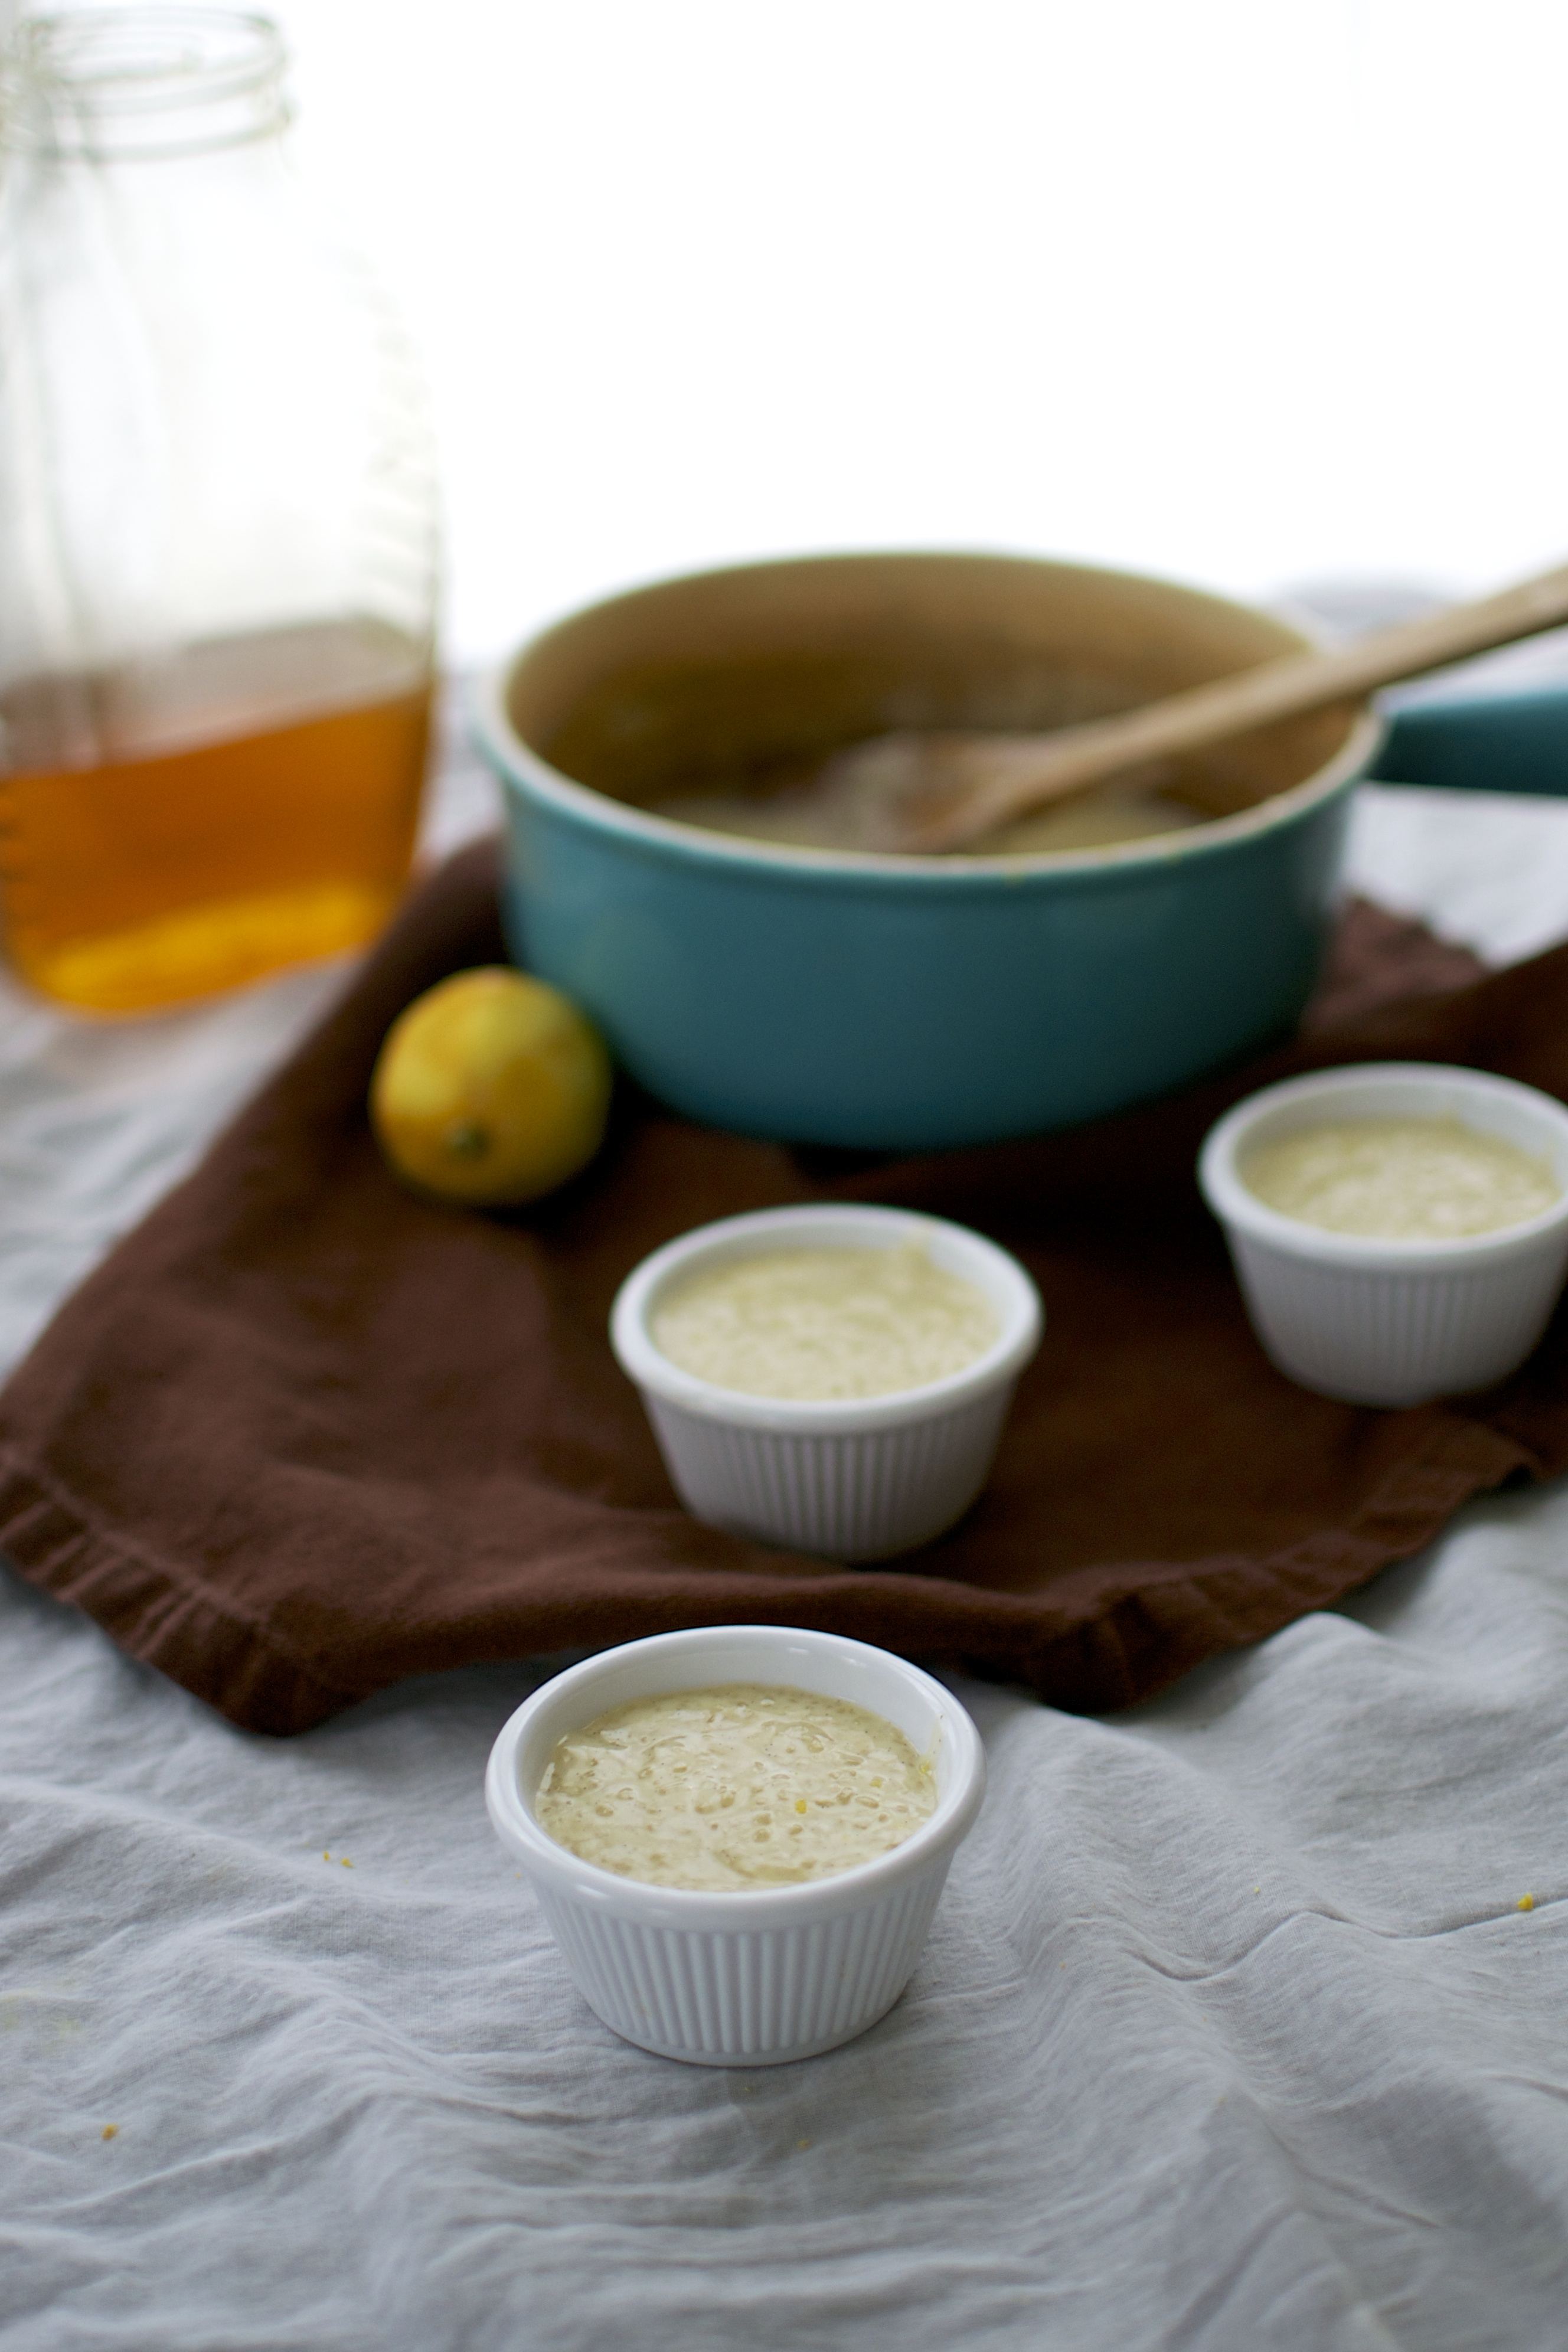
  2. Add the cider vinegar to the coconut milk and set aside for at least 5 minutes.
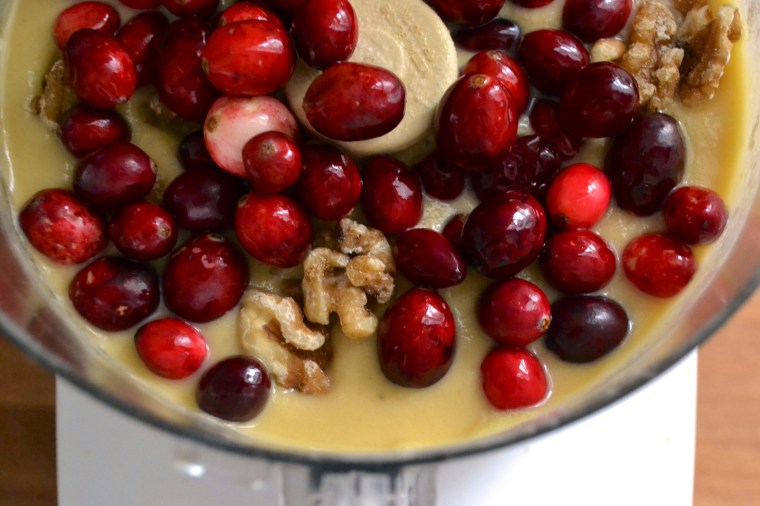
  3. In a food processor or blender, add bananas, eggs, honey and vanilla extract. Process for 1 to 2 minutes until eggs are frothy. Add coconut flour, tapioca flour, baking soda, and salt to the bowl of the food processor with the frothy egg mixture. Blend/process until well combined.  Add the vinegar/coconut milk mixture to the batter and process for an additional 30 seconds until well mixed.
  4. Add the washed fresh cranberries and whole walnuts. Pulse the mixture a few times (do not over process or the cranberries will be too chopped) to distribute the cranberries and walnuts throughout the batter.
  5. Spoon 1/4 cup of muffin batter into prepared muffin liners. This recipe makes 12 muffins.
  6. Place the muffin tin in the preheated oven. Bake the muffins at 325 F for 30 to 35 minutes or until the top of the muffins are light golden brown.
  7. Remove from oven and allow to cool for 5 minutes. Remove muffins from muffin tin and allow to cool further on a wire rack. If freezing, allow to cool completely before placing in a ziplock freeze bag or container. Microwave or reheat in oven to thaw. Serve warm or at room temperature. Store leftovers in refrigerator and/or freezer.

Classic Creamy Tomato Soup

Creamy Classic Tomato Soup - Big Eats Tiny Kitchen

Our tree is UP, snow is on the ground, my fire is LIT, wool socks are on my feeeeeet, and I’m eating tomato soup and grilled cheese. I do believe I am in a literal winter wonder land.

I made a HUGE batch of this creamy tomato soup yesterday when we had a OU vs OSU bedlam football watch party at our house. My Sooners about gave me a coronary, but managed to pull off a win in the last seconds. It was grueling. I was quite a fan of this soup and the grilled cheese bar that we did. Wish I had pics, but too busy screaming at the TV.

Creamy Classic Tomato Soup - Big Eats Tiny Kitchen

We had several types of cheese, lots o’ butter, and a few bread choices placed on the table for people to build their own grilled cheese dream. I decided to grill all of the sandwiches in the OVEN. It was brilliant (thanks Pinterest). That way we all had hot to trot grilled cheese sandwiches at the same time.

Creamy Classic Tomato Soup - Big Eats Tiny Kitchen

Here are the steps for a grilled cheese and tomato soup party:

1. Make your soup (recipe below). It can just simmer on the stove until you are ready to go. The soup takes a total of about 1 1/2 hours for prep, cook, and simmer. The recipe makes enough for 8 to 10 but can be cut in half for smaller crows. Of course the left overs are Ammmmmmmazing. So why would you cut in in half? exactly.

2. Next…let’s get our cheese on. Preheat the oven to 400 F. Place two cookie sheets in the oven. You will use one to place the sandwiches on and the second as a type of panini press.

3. Set out all of your grilled cheese sammy fixins: cheeses, butter, bread (I used gluten free for me), meat (bacon, ham, etc), veggies (caramelized onions, mushrooms, artichoke hearts, spinach) or go pure. Butter your bread, stack yo cheeeeeeze, and add what you want…or just cheesy peeazy cheese.

4. Place a piece of parchment paper on the table and write everyone’s name on it so that each person has a location to place their masterpiece cheesewich. Then pull out one of the cookie sheets from the oven, and place the parchment paper onto the cookie sheet. Be careful, it’s HOT. (I tell your this because I forgot. NO worries, I have no feeling in my hand anymore.) Place all of the sandwiches on their names on the parchment paper. Remove the second HOT cookie sheet and place it on top of the buttered sandwiches. Place these cookie sheets back into the hot oven.

5. Cook for about 10 minutes. Then pull out the sheet of sandwiches and check them. You may need to flip them and place them back into the oven for another 5 to 10 minutes or until the bread is nice and toasty on both sides.  Pull out the sandwiches and serve the hot and melty cheesywiches with your hot yummy tomato soup.

6. Enjoy that cozy feeling inside. You are welcome.

Creamy Classic Tomato Soup - Big Eats Tiny Kitchen

Classic Creamy Tomato Soup 

(Recipe adapted from Bon Appetit)

Serves 8 to 10

Ingredients

  • 3 Tablespoons unsalted grass-fred butter (or olive oil)
  • 2 medium onions, diced
  • 4 cloves of garlic, smashed and thinly sliced
  • 1 teaspoon dried thyme
  • 1 tablespoon dried basil
  • 1 teaspoon smoked paprika
  • 1 6-oz can of tomato paste
  • 3 28-oz cans of whole tomatoes (best quality)
  • 8 cups of water or broth
  • 1/4-cup to 1/2-cup half and half (or full fat coconut milk for dairy free)
  • salt and fresh cracked pepper to taste

Instructions

  1. In a large heavy dutch oven or pot placed over medium heat, melt the butter until bubbling. Add the onions and cook until completely soft and translucent (about 10 minutes).
  2. Add the thyme, basil, paprika, and garlic and cook an additional 1 to 2 minutes until fragrant.
  3. Increase the heat to medium-high and add the tomato paste. Stirring frequently, cook the tomato paste and onion mixture for 5 to 6 minutes or until the paste begins to caramelize in spots, but not burn.
  4. Add all of the tomatoes with their juices and 8 cups of water or broth to the pot. Increase the heat to high and bring to a simmer. Lower the heat to medium and maintain a gentle simmer for 45 minutes to 1 hour, until the soup has reduced slightly.
  5. Remove the soup from the heat and allow to cool slightly. The soup can be pureed in a blender, a food processor, or an immersion blender. If using a blender or food processor, be careful and work in batches. Also be sure to vent the hot mixture. After the soup has been pureed, return it to the pot and keep the soup warm over low heat.
  6. Stir in desired amount of half and half. Simmer an additional 10 minutes. Season the soup with salt and pepper to taste. Sprinkle additional thyme on top for serving or some extra half and half.

Roasted Butternut Squash and Apple Soup

Roasted Butternut Squash and Apple Soup - Big Eats Tiny Kitchen

This week is a time to give thanks and to be with those that mean the most to us. It is my favorite holiday. No pretenses. No gifts that weren’t good enough. No wrong sizes.

Just family, friends, food, and laughter.

My grandmother had seven children. However, I can’t imagine birthing 1 child, much less SEVEN, but my wonder-woman of a grandmother did it.  My father was the fifth. And getting together with all of my aunts and uncles is a tradition that I look forward to every year.  When I was a kid, I loved the large gatherings because I was an only child until I was 11. I had always wanted a sister or a brother. A gaggle of over 30 people enjoying each others company (sometimes), telling stories, and eating together was like heaven to me. Sure there was sometimes drama, but as a kid that all didn’t matter to me. Family mattered.

Roasted Butternut Squash and Apple Soup - Big Eats Tiny Kitchen

Roasted Butternut Squash and Apple Soup - Big Eats Tiny Kitchen

Needless to say our family gathering for Thanksgiving is large and fun. The house is warm, but the company is warmer.

On Wednesday night, my aunt hosts “Soup Night”. It’s an easy night with hot soups cooking on the stove as guests trickle in for the big event.  Although Thursday is the day to showcase the TURKEY, Wednesday night is the big Paaaaarhtaaaahy.

The beer flows freely.

The wine glasses are poured large.

The stories get loud, the laughter gets even louder, and the guitars strum.

All the while, the soup stays hot.

Roasted Butternut Squash and Apple Soup - Big Eats Tiny Kitchen

We ladle another bowl. We pour another drink. We toast to those that have passed. We tell stories of previous Thanksgivings.  We argue about the pronunciation of words and mathematical concepts and whether the seed of an avocado really keeps guacamole from turning brown or not.

All the while the soup continues to stay hot.

That is why soup is the perfect party food. You can mingle and be a great host/hostess and not worry about the food getting cold or over cooked or not being ready at the right time. Everyone can serve themselves and you get to serve yourself another tasty beverage!

This Roasted Butternut Squash and Apple soup is particularly “soup”er easy.  Roast all the vegetables at once, blend the veggies with broth using an immersion blender or food processor.  Aaaaand…wait for it…. Your done. Basically. Just keep it heated. Ok. NOW you are done. There.

Breath. Do some stretches.

Now GO HUG SOMEONE! And get them a drink too! Sheeesh.

I hope you and your loved ones have a wonderful, safe, and memorable turkey day.

Cheers to you and yours.

Roasted Butternut Squash and Apple Soup - Big Eats Tiny Kitchen

Roasted Butternut Squash and Apple Soup

(Gluten Free, Dairy Free, Paleo Friendly)

Ingredients

  • 1 3 to 4 pound butternut squash, peeled, deseeded, and diced into 1/2-inch cubes
  • 1 small red onion, cut into chunks
  • 1 tablespoon olive oil
  • 1/2 teaspoon kosher salt
  • 4 cloves of garlic (in the skin)
  • 2 sweet apples, cored and diced
  • 4 cloves of garlic (in the skin)
  • 4 to 6 cups of low sodium vegetable broth (or chicken broth)
  • 1/2 teaspoon ground cumin
  • 1/2 teaspoon ground coriander
  • 1/4 teaspoon ground ginger
  • 1/4 teaspoon ground cinnamon
  • salt and pepper to taste

Instructions

  1. Preheat oven to 400 F. Prepare two shallow roasting pans by spraying with nonstick spray or lining with parchment paper.
  2. In a large bowl, toss the cubed butternut squash and onion with the olive oil and salt. Place in a single layer on a roasting pan. Place in the oven and roast for 40 to 45 minutes, stirring every once and awhile until the squash are cooked through.
  3. With 20 minutes left on the butternut squash, place the apples on a roasting pan with the garlic cloves and into the oven on a separate oven rack.
  4. Remove cooked vegetables from the oven. Remove the skins from the garlic and discard. Place the vegetables and spices into a dutch oven or large pot with 5 cups of vegetable or chicken broth. Using a blender, a food processor, or an immersion blender, puree the soup in several batches, adding more liquid (broth or water) if necessary. Return the soup to the pot and heat over medium heat until simmering. Season with salt and pepper to taste.