Paleo Zucchini Brownies

I like surprises. Do you like surprises? Good. I have one for you.  Be ready to have your mind space blown.

Zucchini brownies.

DSC_0235

We are gettin’ craaaaazy today. Adding veggies to brownies. Ya, you heard me. I know stuffing a brownie with healthy zucchini might not be your idea of a great surprise, but I promise this brownie won’t disappoint you.

These are cakey-style brownies. So for you fudgey-style brownie lovers (like me) these are not those, buuuuut they are incredibly delicious. Plus, they are stuffed with wholesome nutritious zucchini, almond butter, maple syrup, and raw cacao powder! Ya, these are likely the healthiest brownies out there. They are really close to zucchini bread but with a double chocolate edge that comes from the cacao powder and diced dark chocolate bites. Mmmmmm. Can I get an AMEN?!?

DSC_0226

DSC_0239

If you don’t have almond butter, any nut butter would work. For the nonPaleo peeps and those not allergic to peanuts, these would be delish with peanut butter swapped in for the almond butter. But if your nut butter is not all natural (or has salt and added sweetener), be sure to eliminate the salt and reduce the sweetener in the below recipe to account for it.

Don’t worry. I won’t tell anyone that you ate these for breakfast.

DSC_0238

Paleo Zucchini Brownies (adapted from Fast Paleo)

Ingredients

  • 1 cup creamy unsalted and unsweetened almond butter (or any nut butter)
  • 1 egg
  • 1/3 cup honey or maple syrup
  • 1 teaspoon vanilla
  • 1 teaspoon baking soda
  • 1/8 teaspoon kosher salt
  • 2 Tablespoons cacao or cocoa powder
  • 1 1/2 cups shredded zucchini
  • 1/4 cup chopped dark chocolate or chocolate chips

Instructions

  1. Preheat oven to 350 F. Grease an 8 X 8 baking dish and set aside.
  2. Shred 1 to 2 zucchini with either a grater or a shredder attachment on a food processor. Set aside.
  3. In a medium bowl, combine almond butter, egg, maple syrup, and vanilla. Mix well. Stir in baking soda, salt, and cacao powder. After well mixed, stir in shredded zucchini and chopped dark chocolate.
  4. Pour into prepared 8X8 baking dish. Bake for 20 to 25 minutes in preheated 350 F oven. The brownies are done with the center is set. Remove from oven and allow to cool for 5 to 10 minutes.

Strawberry and Cucumber Ribbon Salad

DSC_0243

My husband pulled the trigger this week. Four years of waffling on my end.  But he just woke up one morning this week and decided it was time. He jumped in and started pulling up the 85 layers of laminate and tile and fiber board that covered our kitchen floors. Good thing he stopped just before hitting the asbestos tile. What a man!

He sent me pictures of the destruction while I was at work. Needless to say I was shocked. And then kind of excited. But then it hit me…

“Wait… You JUST did this???? Are you kidding??? No stove? No fridge? No floor?  Is that asbestos? Are you dying? Is that a respirator? Are you drinking water???? Don’t eat the floor! Don’t die on me.”

DSC_0240

I guess this means I’m GETTING A FLOOR!

What do you eat when you don’t have a kitchen and your garden is going gangbusters with cucumbers? Cucumber salad!

Let’s get fancy….cucumber ribbon salad! Oooooh gurrrrl!  Ya, I did it. I used a vegetable peeler for something besides collecting dust in my kitchen utensil crap drawer. Boom!

DSC_0249

DSC_0252

I also threw some fresh strawberries, basil, mint, and feta into the mix. Personally, I think the fresh herbs and feta really bring this dish together. I also drizzled a little bit of good balsamic vinegar on top. This has been my go to lunch of choice this week. Summer in a bowl!

DSC_0250

This also is a perfect picnic salad! Because I’m basically picnicking every meal until our kitchen floor installation is complete.

DSC_0260

Strawberry and Cucumber Ribbon Salad

Makes 4 side salads or 2 large salads

Ingredients

  • 2 medium cucumbers
  • 1/2 cup sliced strawberries
  • 2 to 3 Tablespoons crumbled feta
  • 2 to 3 Tablespoons fresh mint and/or basil, slivered
  • 1 to 2 Tablespoons balsamic vinegar

Instructions

  1. Using a vegetable peeler or or mandolin slicer, cut the cucumber lengthwise into long thin ribbons. Stop before you get to the seeds.
  2. Place cucumber ribbons in a bowl with sliced strawberries, crumbled feta, basil, and mint. Drizzle with good balsamic vinegar when ready to serve.

Almond Flour Blueberry Peach Muffins

DSC_0223

I don’t know what evokes more tasty, comforting memories: peach cobbler or blueberry muffins.  Both make me giddy. Both make me drool. Both make me scramble to the kitchen and wait impatiently for them to get out of the oven and promptly take too quick of a bite which then results in me burning the crap out of my mouth.

Every. Dang. Time.

And do I learn, people?

No.

DSC_0202

DSC_0191

A friend of mine went blueberry picking and graciously parted with a few of her fresh, sweet, awesome blueberries.  I also had some fresh Missouri peaches at the house. Oh YaH!

Are you guys thinking what I’m thinking? YAH! Let’s burn the crap out of our mouths with hot sexy blueberry peach muffins!!!!! YAH.  Wait….that’s not what you were thinking? Seriously? Well it should be. Cuz that’s what we are going to DO! Tell your mouth to get ready.

DSC_0205

DSC_0219

What do we want? BLUEBERRY PEACH MUFFINS. When do we want them? NOW!

Fresh blueberries + fresh peach + lemon zest = dreamy

DSC_0194

While these muffins were cooking, I sat and waited and watched through the oven door as they rose. I smelled the ridiculous spell-binding, blueberry-peach aroma as  it wafted through my house. My stomach growled. I couldn’t take it! I nearly pulled them out of the oven too early because I WANTED THEM NOW! I was drooling.

But once they were finished, I pulled them out…I let them cool (for 2 seconds) and then I took a bite and felt those bursts of blueberries, the zip of lemon zest, the fresh juicy peaches…. And then it hit me.  OOOOOOW…crap…burnt again…but…Mmmmmmm. The burned roof of my mouth and seared finger tips forget the pain easily when tempted and provided with such awesomeness.

DSC_0213

Almond Flour Blueberry Peach Muffins (Grain Free, Gluten Free, Paleo-Friendly, Dairy Free)

Ingredients

  • 2 1/2 C almond flour (I use Honeyville blanched almond flour)
  • 3/4 teaspoon baking soda
  • 1/4 teaspoon kosher salt
  • zest of 1 lemon (organic preferably)
  • 3 eggs
  • 1/4 C maple syrup or honey
  • 2 Tablespoons grass-fed butter or coconut oil (melted)
  • 1/2 C unsweetened applesauce
  • 1 ripe peach, diced (ok to leave skin on)
  • 1/2 to 1 C blueberries (fresh or frozen)

Instruction

  1. Preheat oven to 350 F. Place 12 muffin liners in a 12 regular-sized muffin tin. Set aside. (I ran out of muffin liners half way through so I just sprayed coconut oil inside the muffin cups that were not lined.)
  2. In a medium bowl, combine almond flour, baking soda, salt, and zest. In a separate bowl, combine together wet ingredients, which include eggs (slightly beaten), maple syrup or honey, melted butter or coconut oil (allow to slightly cool before adding to eggs or you will scramble those suckers), and applesauce. Add dry to wet and stir until combined. Stir in peaches and blueberries carefully!
  3. Spoon about 1/4 cup of batter into each lined muffin tin. Bake for 15 to 20 minutes at 350F. Muffins will be set in the center and lightly browned on edges. Remove from oven and allow to cool in muffin tin for 5 minutes. Then move to cooling rack (if you can stand it) and allow to cool the rest of they way…about 30 minutes…or if you are me, 30 seconds.

Notes:

* The base recipe for these delicious muffins is adapted from an awesome blog called Power Hungry.

Paleo Banana Ice Cream Cake

It’s already the middle of July and this weekend was the first time that I put a bathing suit on.  Honestly, between you and me…this doesn’t have to happen again.

DSC_0242

Why do bathing suits have to be so UNFLATTERING! Ugh.

I should just wear a T-shirt or a trash bag.

But Oh well….I guess I didn’t get too upset, because after swimming all day, all I wanted was ICE CREAM.  So I promptly made this amazing dairy free and grain free banana ice cream cake to go along with ribs that we smoked.  Maybe this is why my bathing suit is unflattering?  Ice cream cake + ribs?

Naaaaah.

DSC_0252

DSC_0219

DSC_0222

This cake is amazing. Creamy. Dreamy. Guiltless. It is made with cashews, bananas, dates, hemp seeds, raw cacao powder! Ya…shhhh….it’s good for you.

So I will just serve myself up another slice of cake…banana ice cream cake, that is. And I will eat it in my ugly, weird fitting, old bathing suit. And be happy.

Very happy.

DSC_0255

Paleo Banana Ice Cream Cake (adapted from This Rawsome Vegan Life)

Crust Ingredients

  • 1/2 C raw pecans
  • 1/4 C hemp seeds
  • 2 Tbsp cacao powder
  • 1/4 tsp salt
  • 1 C pitted dates

Caramel Ingredients

  • 1 C pitted dates, soaked in hot water for 10 minutes
  • 1/4 C water
  • 1/8 tsp salt

Chocolate Ingredients

  • 1/4 C cacao powder
  • 1/4 C water
  • 2 Tbsp coconut oil
  • 2 Tbsp honey or maple syrup or agave nectar

Filling Ingredients

  • 2 C frozen bananas (3 to 4)
  • 2 C raw cashews, soaked for 3 to 4 hours (or overnight)
  • 1/2 C water or nondairy milk
  • 1/3 C maple syrup or honey
  • 1/3 C coconut oil
  • 1/8 tsp salt
  • 1 tsp vanilla

Instructions

  1. Crust – In a food processor, place nuts, hemp seeds, raw cacao powder (or cocoa powder), and salt.  Pulse until the ingredients combine to make a flour like consistency. Add dates and process for a few minutes until it forms into a paste.  The mixture should hold together when you pinch a small amount between your fingers.  In a springform pan, place wax paper or syran wrap on the bottom. Press crust evenly into the bottom of the springform pan only slightly coming up the sides. Set in the freezer while preparing the filling.
  2. Caramel Sauce – Clean out food processor. Place soaked dates and 1/4 cup of water in the bowl of the food processor. Process for several minutes until a caramel-like substance is formed.  Add additional liquid as necessary. Add salt. Spoon into a separate bowl. Clean food processor bowl for next step.
  3. Banana Ice Cream Filling – Microwave the coconut oil in a small Pyrex dish for 30 seconds until mostly melted. Place all of the filling ingredients (except the caramel sauce) into the bowl of the food processor and blend on high-speed for several minutes until very smooth.
  4. Chocolate Sauce – In a separate bowl, combine cacao powder and 1 tablespoon of warm water. Stir carefully until a fudgey mixture is formed. Add warm water 1 tablespoon at a time until a drizzleable (is this a word???) fudge sauce is formed.  Stir in melted coconut oil at a tablespoon at a time. Keep mixture warm or it will harden. Pop in microwave if necessary.
  5. Assembly – Remove the crust from the freezer. Pour about two-thirds of the cashew mixture onto the crust and smooth evenly with a rubber spatula. Swirl in half of caramel mixture and alternate with 1/3 of chocolate mixture using a butter knife. Top with remaining filling. And swirl in remaining caramel sauce and another 1/3 of chocolate sauce. Drizzle any remaining chocolate sauce on top. Place in freezer for about 2 hours or until solid.
  6. Serving – To serve, remove from freezer about 30 minutes before serving.  Heat a smooth and sharp knife under hot water and cut the pie into 8 slices. Serve with any additional chocolate sauce. Store any remaining pie in the freezer.

Steak with Grilled Zucchini and Herb Salad

So I am incredibly proud right now. I have to admit something to you.  I painted my kitchen!

Wait wait wait…Before I gloat, it should be known that I am the worlds worst at picking out paint colors. I have a near panic attack in the paint aisle with ALL OF THOSE STUPID COLORS. Names like “pony tail”, “mushroom mist”, “crisp dawn”, “twilight foxtail”….what?  Who comes up with these names for Pete’s sake!

DSC_0173

I swear I am partially color blind (is that a thing?). Or maybe I’m just terrible with colors. My wardrobe proves it. And I can’t decide on things. I have had paint swatches on a wall for months and months before. I have left painter’s tape in the hallway for nearly a year because I couldn’t pick a stupid paint color! Ugh. And when I do pick one, finally, I hate it. It either resembles a cardboard box, or a hospital, or baby blue boys room, or a 1980s doctor’s office. Seriously…I suck at this.  Well until yesterday!

I stand before you…well, I type before you today as a new woman! A woman who PICKED THE PERFECT GRAY PAINT! ya…GRAY. That is a bitch of a color, can I say. It’s either a purple gray, or a blue-gray, or a brown gray….blah! I just want gray.  And I did it…first try. Well…ok, with the help of my hubby. But honestly, we went in the paint store in the morning and looked at the colors.  We pointed at a color. Paint dude mixed it up. We went home and we completely repainted the kitchen cabinets in a day! A day! I have a new kitchen now…white walls instead of blue. Gray lower cabinets and the cutest farm hutch that I repainted in a bright turquoise. Totally urban farmhouse. I just have to redo the floors. Once it is all put back together I will post picks! High five to me and my man.

DSC_0178

But in the mean time, here is a simple farm salad that is easy peasy to throw together (even when your kitchen is in shambles from remod stuff). Fresh greens from the garden mixed with those fresh herbs that are so bountiful right now.  Top it with grilled steak and a fresh vinaigrette. Dinner in under 20 minutes. That includes the time to go pick your fresh veggies, if you are so lucky to have a garden. And even if you don’t have a back yard, you can easily grow these herbs and a salad mix in containers.  Try it!

DSC_0188

Steak with Grilled Zucchini and Herb Salad  (adapted from Bon Appetit)

Ingredients

  • 1/4 cup white wine vinegar
  • 1/3 cup olive oil plus 1 tablespoon
  • 1 teaspoon dijon mustard
  • salt and pepper
  • 1 medium zucchini, cut into 1/4-inch rounds
  • 1 lb hanger or skirt steak
  • 4 cups of arugula or fresh salad mix
  • 2 cups (packed) assorted fresh herb leaves (such as basil, mint, chives, parsley, cilantro)
  • salt, pepper, and smoked paprika or Piment D’Espelette to taste

Instructions

  1. Combine white wine vinegar and dijon mustard in a small bowl. Whisk in 1/3 cup olive oil until well combined. Season vinaigrette with salt and pepper. Set aside.
  2. Prepare grill for medium-high heat. Brush zucchini with remaining 1 tablespoon of olive oil. Season with salt and pepper. Grill, turning often, until tender and charred in spots, 5 minutes on each side (watch carefully to not burn). Set aside and allow to cool.
  3. Next season steak with salt and fresh cracked pepper on both sides. Grill 5–7 minutes per side for hanger steak (medium-rare) or, for skirt steak (which is thinner), about only 2 minutes per side. Let rest for about 5 minutes.  Then thinly slice against the grain.
  4. Toss arugula (or fresh salad mix), herbs, grilled zucchini, steak, and reserved vinaigrette in a medium bowl. Season with smoked paprika (or if you are lucky enough to have piment d’espelette), salt and fresh cracked pepper.

6 Days in Paris

Last week we were gallivanting around Paris. Rough life I know. But honestly this trip has been a long long long time coming. I can’t wait to go back to that amazing city. It was gorgeous and a much needed break. I loved the little specialty shops. The cafes were picturesque and romantic. You can feel the history, the significance, and the difference in the pace of life, despite almost 2.5 million people living there.

DSC_0131

1004414_10151667329162241_1934101584_n

We rented an apartment through AirBnB that was located in the 10th arrondissement by Canal St-Martin. It’s an awesome area. It was just a 2 minute walk to the metro station, and by some of the best bakeries, eateries, butcher shops, and fromageries (cheese shop).  We ate well, tasted amazing olive oil, ate creme brulee, swam in fabulous gelato, walked every day, drank espresso every morning from cafe seats facing the street, and smelled fresh baked bread…EVERYWHERE.

DSC_0164 DSC_0167 DSC_0042

SO let’s talk real quick about bakeries and about being gluten free in Paris, of all places. If there was a time to fall off the wagon…this is the place to do it. My husband embraced the pan au chocolat (chocolate croissants) for breakfast every morning. I instead ate my measly bowl of oatmeal. It was a good trade for me to not have to deal with stomach pain all day.  But such torture! People walking around and biking around eating loaves and loaves of amaaaazing bread. Here in the states, I don’t feel too deprived, but there! Man…it was tough.

One day I did break down and ate a few slices of baguette, dipping it dreamily into my creamy baked eggs. SWOOON. But boy did I pay for it later. We had to end the night early as my stomach went into a tailspin. After that, I happily enjoyed my oatmeal and passed on the chewy bread.

DSC_0099

But it really wasn’t hard to be gluten free…even in the land o’ bread. Hell, who could feel slighted when you can have amazing gelato or creme brûlée! If you happen to be traveling to Paris, I definitely recommend finding Pozzetto‘s gelato shop and getting the pistache (pistachio). You won’t be disappointed.

994811_10151667329397241_1607347676_n 998908_10151667327822241_1197366970_n

DSC_0029 DSC_0006

I did manage to find a fabulous gluten free bakery shop near our apartment called Helmut Newcake. It was fabulous! My husband and I shared a lemon meringue tart and a salted butter caramel profiterole. Dear lord those were ridiculous! Good thing we walked nearly 40 miles in just 6 days. Otherwise I don’t think I would have fit in an airplane seat to come back home. Hrmmm…maybe getting stuck in Paris wouldn’t have been such a bad thing.

Jalapeño Bacon Jam

Heaven in a jar. Spicy + Smokey + Sweet + Salty.

I am going to give you a huge warning. Once you begin making this, your house will turn into a drool zone. People will come from all over. If you make it, they will come. Headlights will line up your street. People will pay admission to just be near you. It is the Field of Dreams of Jams. True story.

DSC_0015

DSC_0001

After researching and researching different versions of this amazing jam, there are several ways to make it. I really think you could stir nearly anything into it and get something magical. No matter what, it will be hard for you to not devour in one sitting or even while you are cooking it. Seriously.

Typically this jam consists of:

  • bacon (duh),
  • onions (I used red but yellow would work too),
  • vinegar (many recipes used cider vinegar but I opted for balsamic),
  • sugar (I used maple syrup + 1 tablespoon of molasses…several recipes use a combo of brown sugar + maple, you could definitely play around with the ratios here)
  • liquid (I used water, but Martha used strong brewed coffee)
  • Optional spices (I added a jalapeño, but I also think some chipotle powder or other spicy add-ins would be redonculous like this recipe)

So without further ado…I present to you, the heavenly and amazing Jalapeño Bacon Jam!  *Jazz Hands*

We had several people over and slathered it on burgers…erhmehgeeerd. SO GOOD. Somehow there was magically one tablespoon left. So I squirreled it away for my lunch the next day and topped a baked sweet potato with it. *swoooon*

DSC_0022

Notes on storage – This should keep in a jar with a tight fitting lid in the refrigerator for 3 weeks or the freezer for up to 6 months. But if this stuff is around longer than two days, I will be AMAZED at your self control. And don’t be surprised if it gets stolen…don’t look at me???

Jalapeño Bacon Jam (adapted from Martha Stewart and Homesick Texan)

Ingredients

  • 1 lb bacon (nitrate free if possible), cut into 1/2-inch pieces
  • 1 tablespoon reserved bacon grease
  • 2 red onions (about 2 1/2 cups), diced
  • 3 cloves garlic, minced
  • 2 jalapeños, deseeded and diced (about 1/4 cup)
  • 1 cup of water
  • 1/3 cup balsamic vinegar
  • 1/4 cup real maple syrup
  • 1 tablespoon unsulphured molasses
  • salt and cracked pepper

Instructions

  1. Cut the bacon slices into 1-inch strips. Over medium-high heat, cook the bacon in a dutch oven stirring frequently until the bacon is browned but not crispy. Use a slotted spoon to transfer the bacon to a paper-towel lined plate. Drain the bacon grease but reserve about 1 tablespoon.
  2. Add onions, jalapeño, and garlic to the dutch oven and cook over medium heat until the onions become translucent. This should take about 5 minutes.  Add bacon and remaining ingredients. Simmer on low for 1 to 2 hours, stirring occasionally. If jam gets too dry, add additional water 1/4 cup at a time. After it is good and thick, remove it from heat and allow to cool.
  3. If you want the jam to be a finer consistency, add it to a food processor and pulse a few times (not too much).  I personally liked mine a bit chunky. Transfer to a jar with a tight-fitting lid. Store in refrigerator for 3 weeks or in the freezer for 6 months. But if this stuff lasts longer than one or two days in your house, bravo to your self control!

Sweet Potato and Kale Stuffed Poblanos

My garden has a bumper crop of amazing lettuce, spinach, kale, and chard! It’s beautiful. But I am having a hard time trying to eat it all. Plus, we are leaving for PARIS in less than 24 hours and I need to figure out ways to harvest it before the summer heat and lack of watering kills it all.

I have made a few things recently that are perfect for freezing for quick weekday lunches.  Hope you enjoy! These were a big hit.

DSC_0018

DSC_0031

These Sweet Potato and Kale Stuffed Poblanos are spicy and very flavorful. Poblanos are easy to grow but also can be found in your local market. They are great for stuffing, given their large open cavity. I roast mine over an open flame on the oven before stuffing and baking them.  It’s quick and easy and gives a great smoky flavor.

DSC_0027

DSC_0028

Sweet Potato and Kale Stuffed Poblanos

Ingredients

  • 1 tablespoon olive oil
  • 1/2 medium onion
  • 2 to 3 medium garlic cloves
  • 1/2 jalapeño, deseeded and minced
  • 1 medium sweet potato, 1/2-inch cubes
  • 1/2 teaspoon smoked paprika
  • 1/2 teaspoon ground cumin
  • 1 bunch of kale (about 4 cups chopped), or spinach
  • salt and pepper
  • 4 poblano peppers
  • Toppings: cheese, cilantro, and salsa

Instructions

  1. Preheat oven to 350 F. Prepare a 9X13 glass pyrex with oil or nonstick spray. Set aside.
  2. To make the filling, heat olive oil in heavy skillet over medium heat. Sauté onion until translucent (about 5 to 7 minutes).
  3. Add garlic, jalapeño, sweet potato, paprika, and cumin. Cook, stirring frequently, until sweet potatoes begin to soften (about 10 minutes).
  4. Clean kale and remove stems. Don’t dry off. Chop into 1-inch pieces. Add to sweet potato mixture. Cook until kale is wilted (about 3 to 5 minutes). Remove from heat and set aside.
  5. Cut poblanos in half right through the stem. Remove seeds and rinse and dry thoroughly. To broil poblano peppers in an oven, place the halves cut side down on a roasting pan. Place on the highest rack in the oven and broil on high for a few minutes until the skins are blistered.  You can also do this using gas burners on your stove. Place the poblanos skin side down onto the gas flame using tongs to turn. Remove when skin is well blistered, about 1 or 2 minutes per side.
  6. Place poblanos skin side down into the prepared pyrex dish.  Spoon about 1/4 cup of the sweet potato-kale mixture into each poblano half.
  7. Bake for 30 minutes at 350F. Remove from oven. Serve with cheese (optional), avocados, cilantro, and salsa.

Paleo Chocolate Banana Ice Cream Sandwich

I grew up in the smack dab middle of Oklahoma. And Oklahoma summers are HOT. And Windy. And LONG. We often experienced over a month or two straight of days exceeding 100 degrees!  The only cure for those days is a body of water, air conditioning, and ICE CREAM.  Or just ice. Lots of ice ice baby.

DSC_0040

DSC_0029

Unfortunately I did not grow up around any body of water nor a creek (pronounced crick). Instead of lakes or ‘cricks’ or rivers….I grew up running in and out of a water sprinkler attached to our water hose in our front yard. I would jump over and over and over the stream as it sprayed into my face.  The only thing that would make me stop the water dance was when the homemade ice cream machine would finally stop churning. I would inhale fresh ice cream with it dripping all over my face as the sprinkler water quickly evaporated from my hair and swimsuit. By the time I had devoured my ice cream, I was bone dry and ready for another round of the great water sprinkler dance.

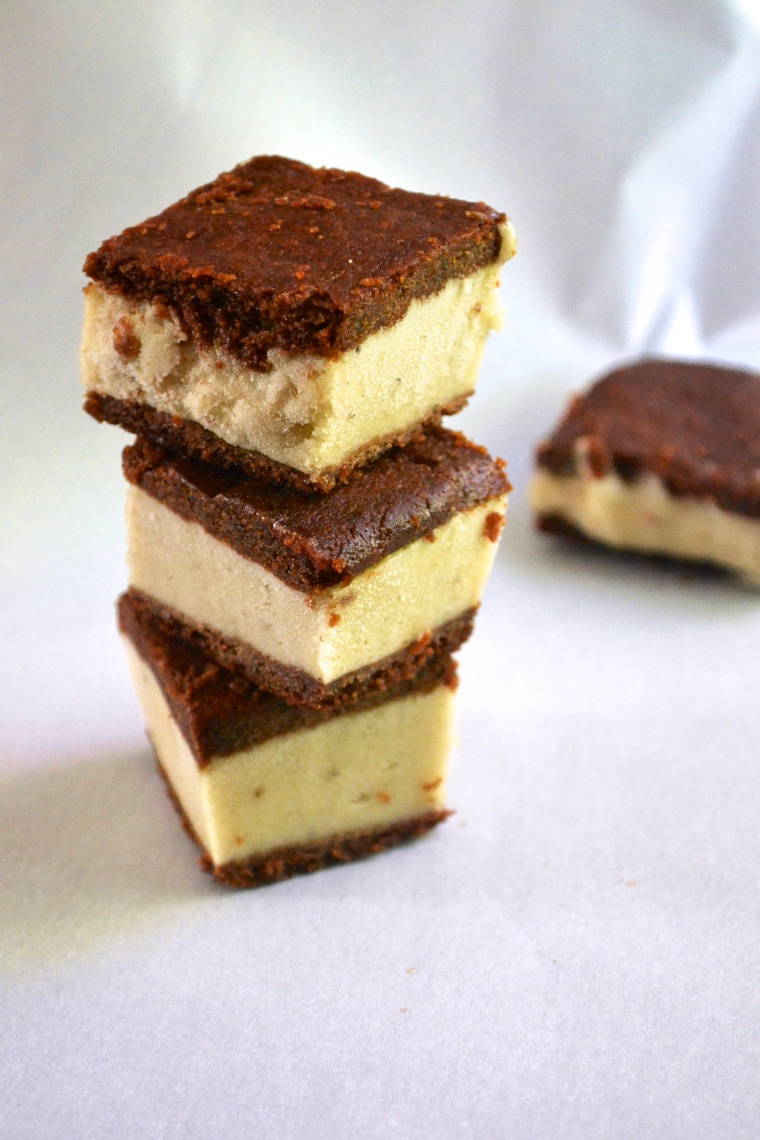
Even though I’m older (much), my priorities of summer remain the same. But sometimes, waiting for fresh churned ice cream is not possible…also, my butt loves to hoard it. Stupid butt. So in order to deny my butt the pleasure of hoarding all of the ice cream AND to cut down on time to prepare homemade ice cream, I came up with a BRILLIANT ice cream sandwich that is gluten free, grain free, dairy free, paleo-friendly.  Bonus…they taste like the classic ice cream sandwich (or even better in my opinion).

DSC_0004

DSC_0006

My criteria for this recipe were: (1) simple to make; (2) gluten free and dairy free; and (3) the cookies couldn’t be rock hard. There is nothing worse in my opinion than biting into an ice cream sandwich and having all of the ice cream squeeeeeze out the sides and into my lap and floor and face and shoes and toes and other odd crevices. UGH. Or is that just me?

DSC_0013

I’m serious…these puppies are amazing. I woke up in the middle of the night with this idea. I would patent the crap out of these if I could. I’m THAT excited about it. Pretty sad, huh? My little sister was in town for the weekend and once I proclaimed my amazing recipe idea to her, she immediately replied “LET’S DO IT”. Such conviction! I love it.

DSC_0010

DSC_0011

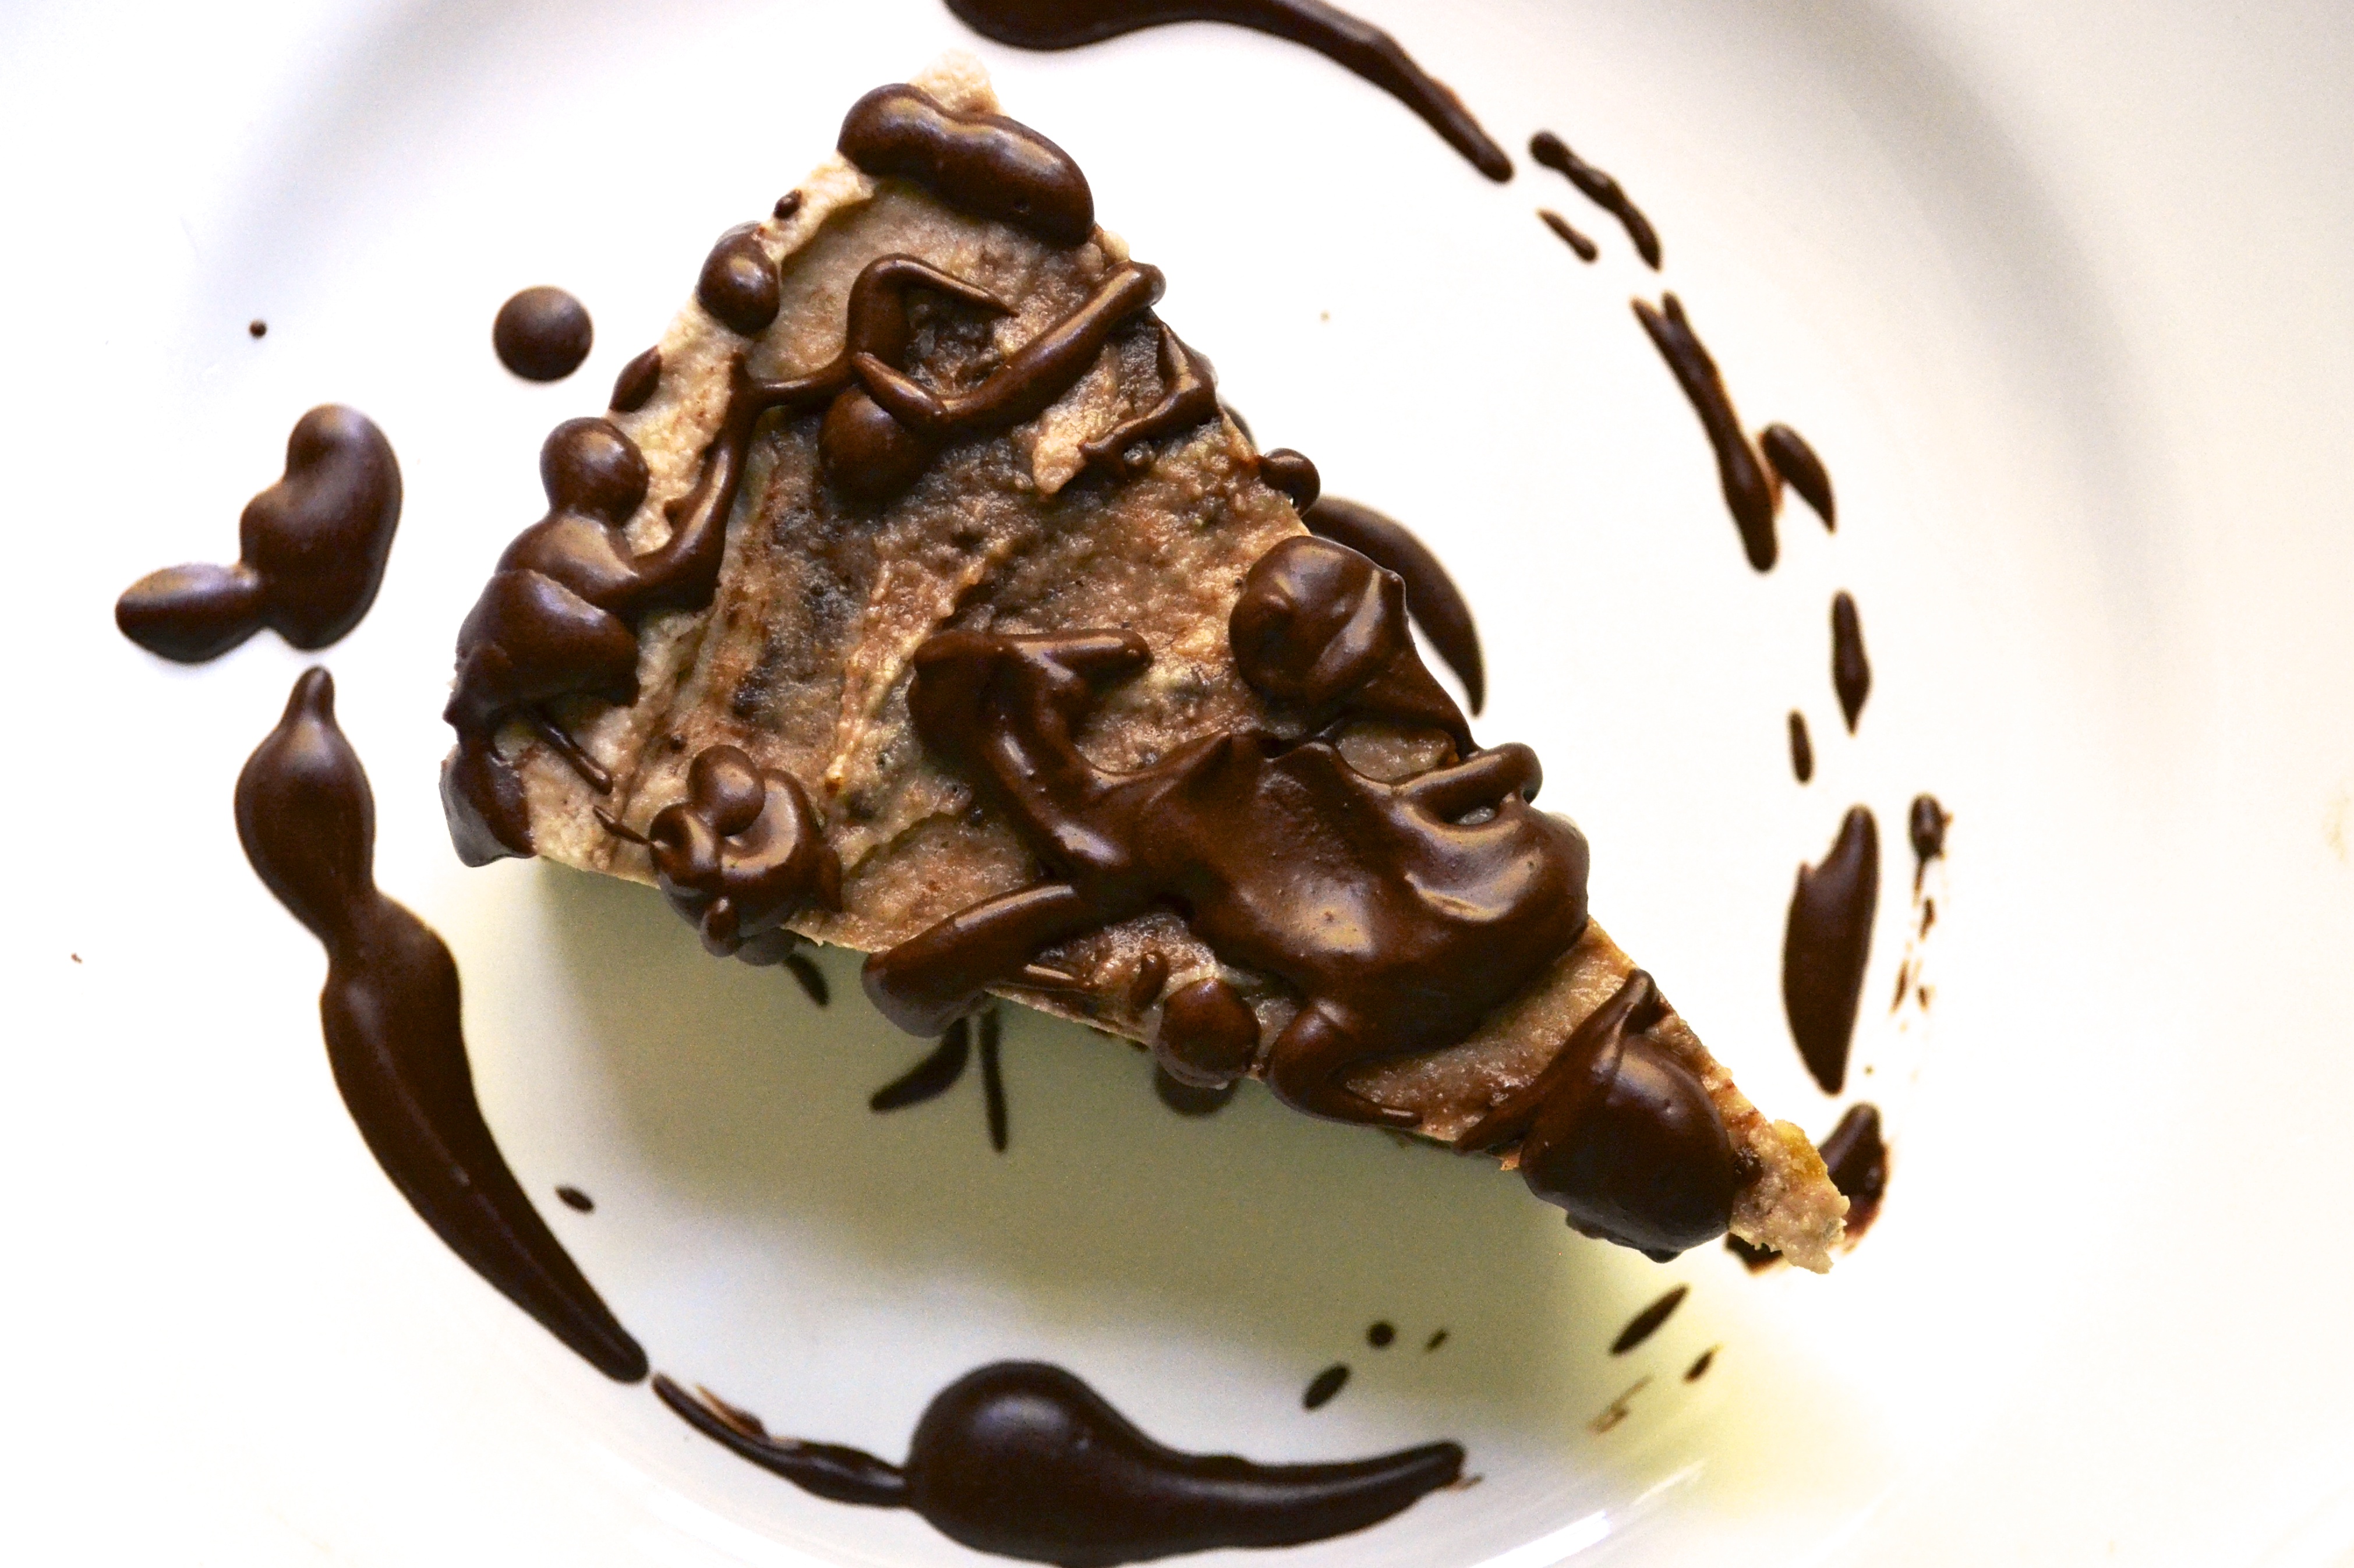
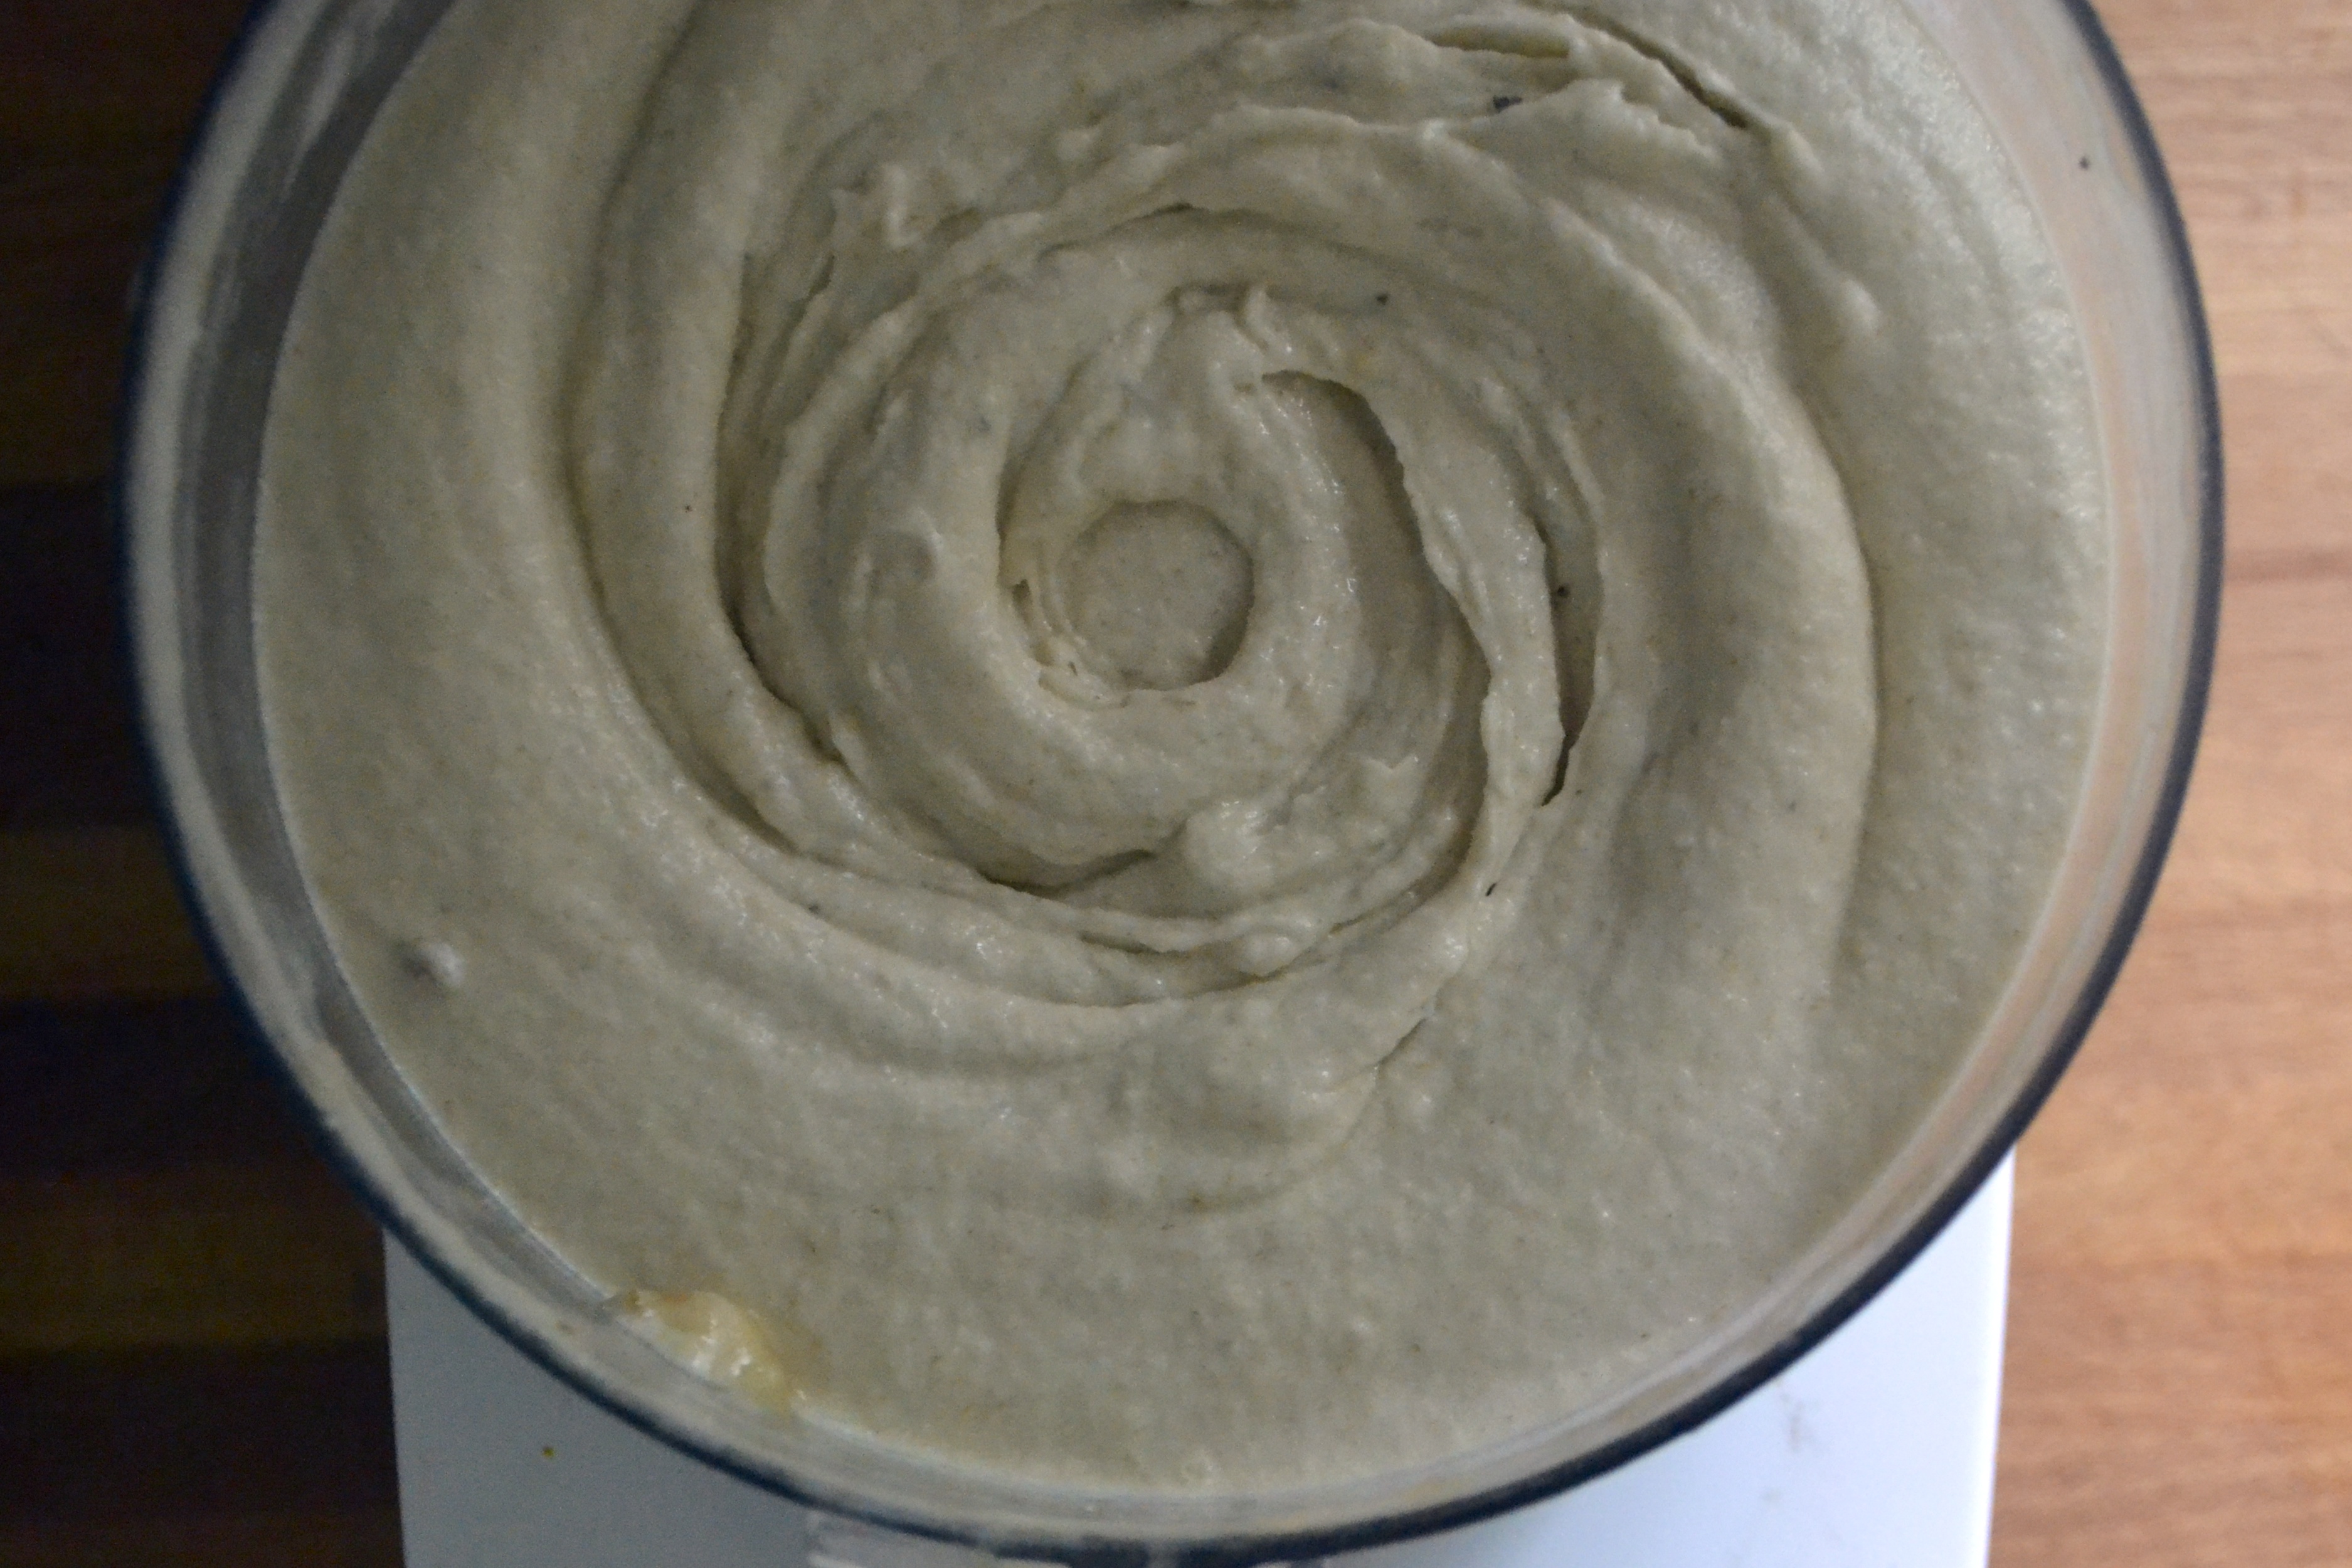
The “ice cream” is just 5 to 6 frozen bananas that have been pureed into an amazing banana sorbet. Simple. One ingredient. Then the banana ice cream is sandwiched between two simple chocolate-nut butter cookie-cakey layers. I have made the cookie layer using peanut butter and almond butter.

DSC_0016

DSC_0017

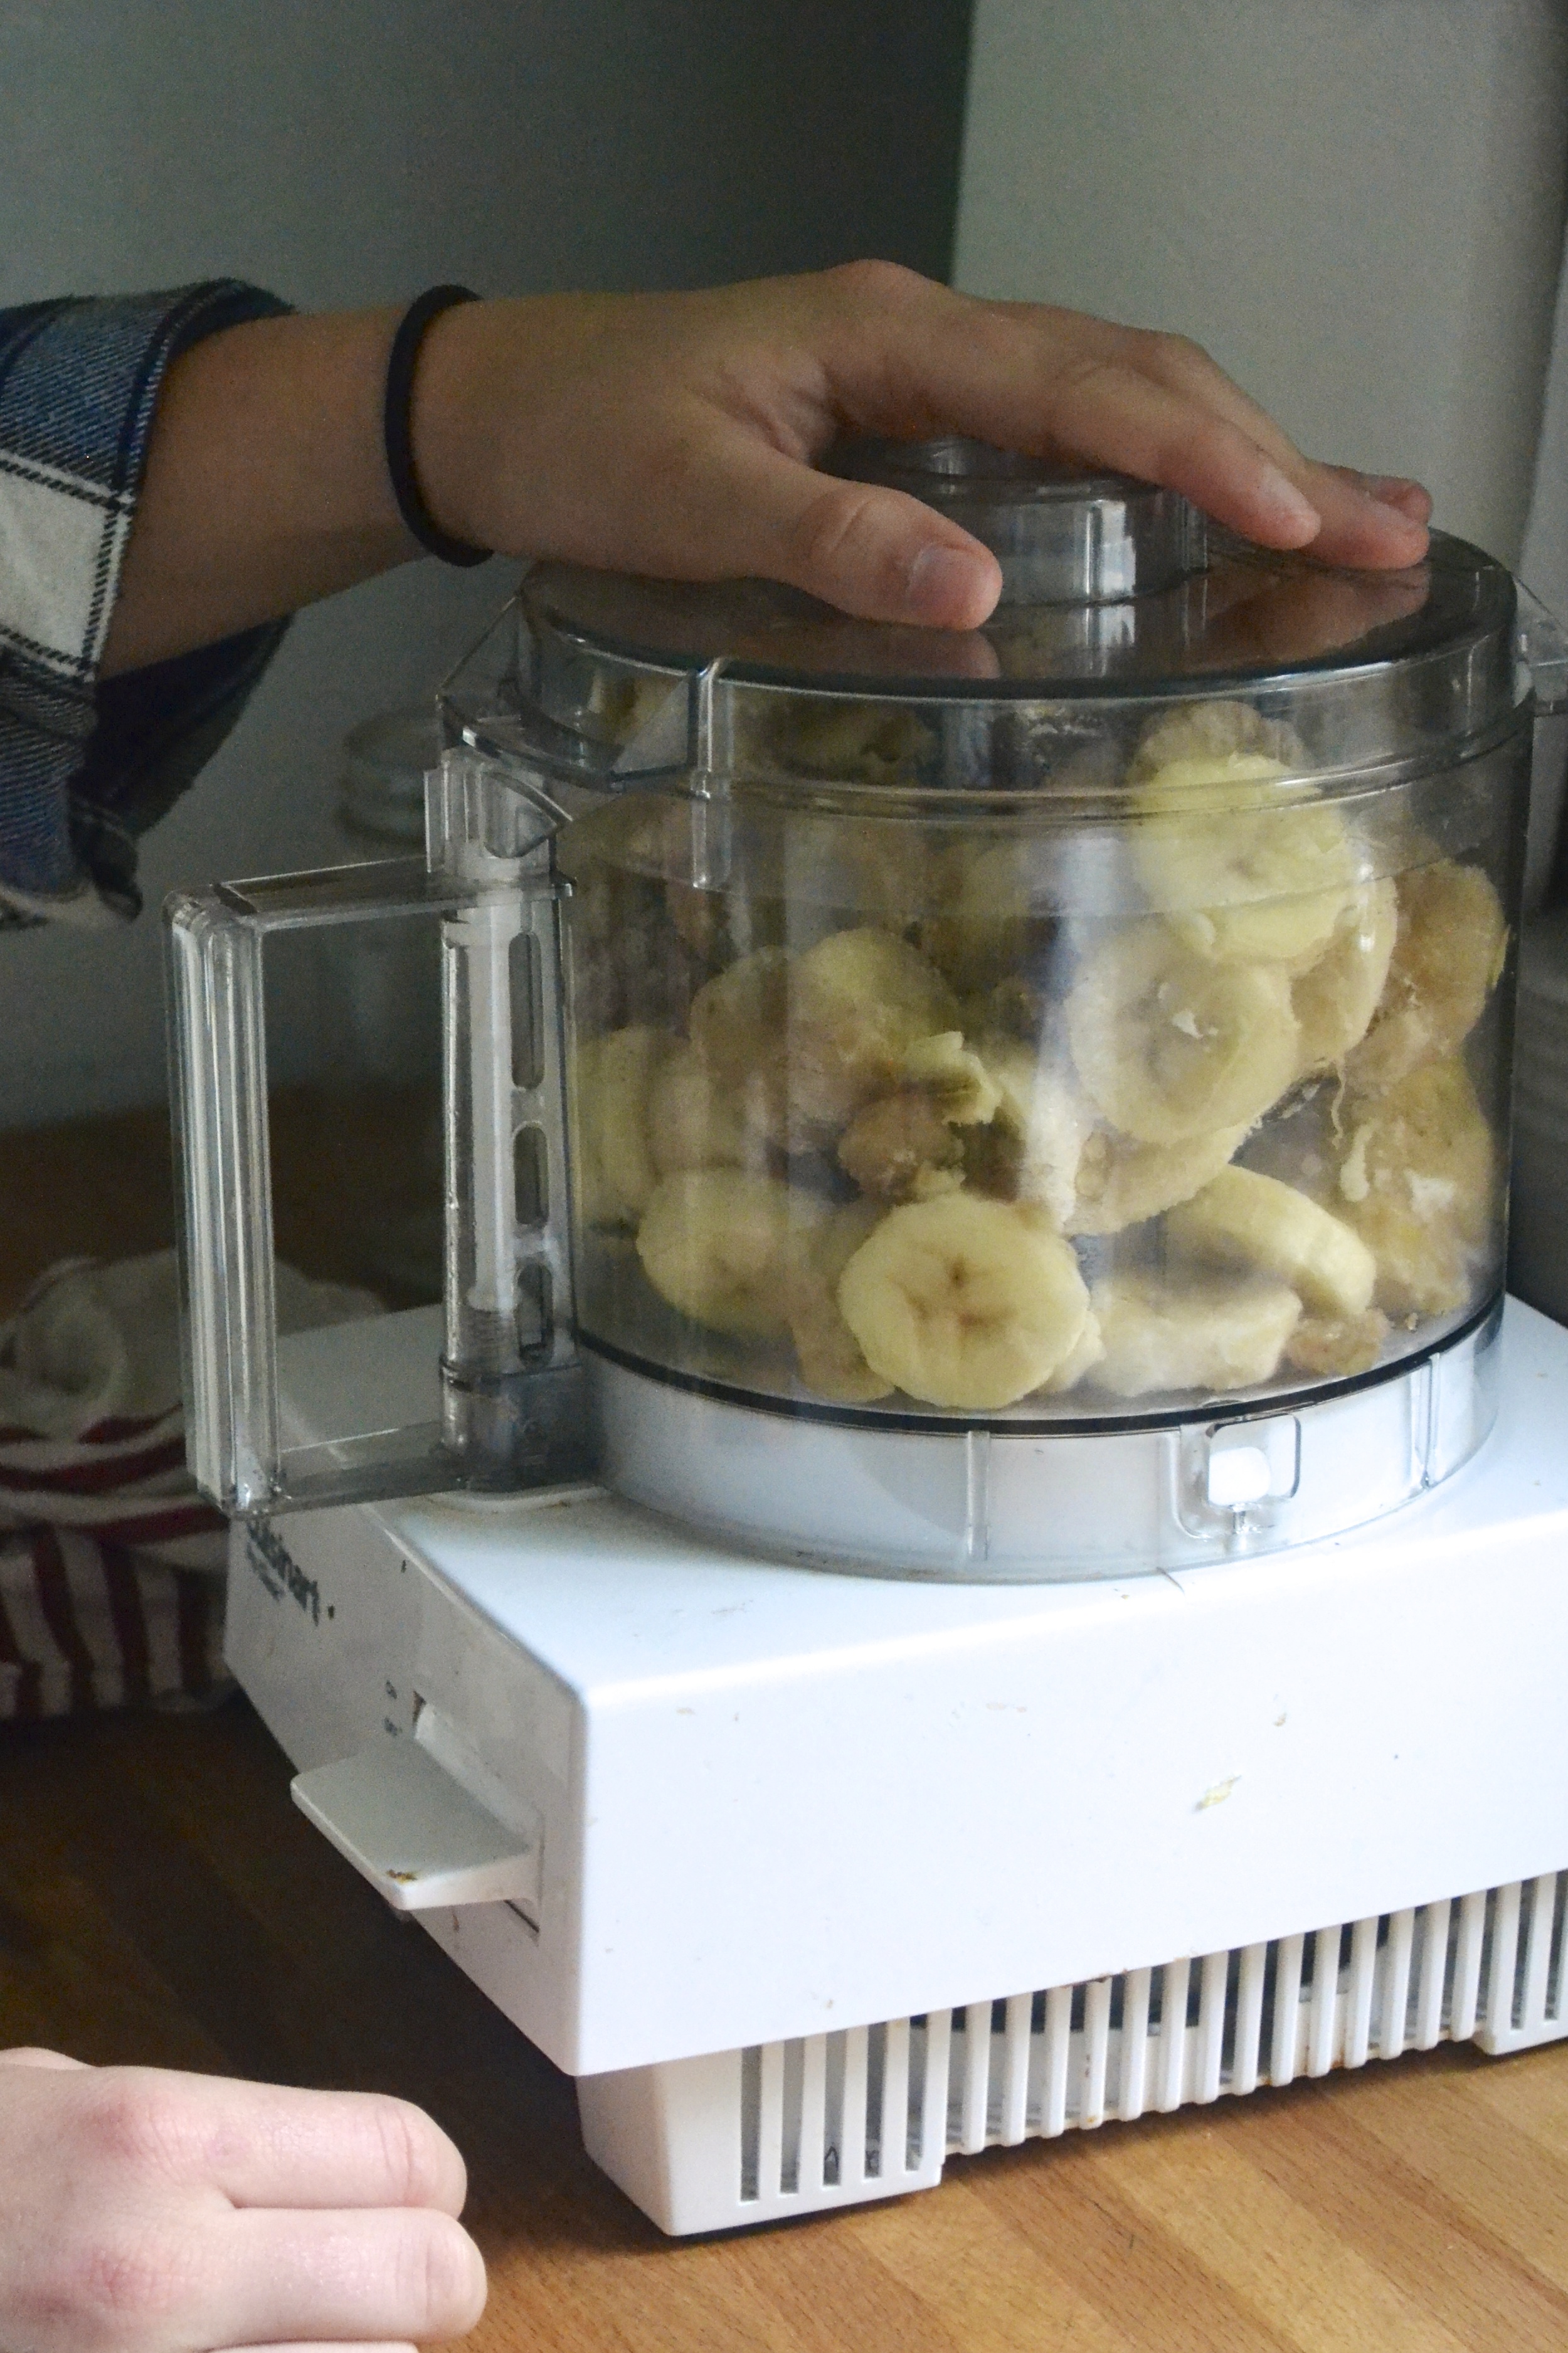
So first things first, go peel and chop up a crap-ton of bananas and throw them into the freezer. I always have a huge gallon bag of frozen bananas ready to go. Anytime one is nearing the “great for banana bread stage” I just chop it up and add it to the ziplock freezer bag. Insta- banana ice cream whenever I want!

DSC_0034

Paleo Chocolate Banana Ice Cream Sandwich 

Ingredients

  • 1 cup of creamy nut butter (almond butter or peanut butter)
  • 1/3 cup honey
  • 1 egg
  • 1/2 teaspoon baking soda
  • 1/4 teaspoon salt
  • 1 teaspoon vanilla
  • 2 tablespoons cocoa powder
  • 5 to 6 sliced frozen bananas

Instructions

  1. Preheat oven to 325 F. Line a rimmed baking sheet with parchment paper. Set aside.
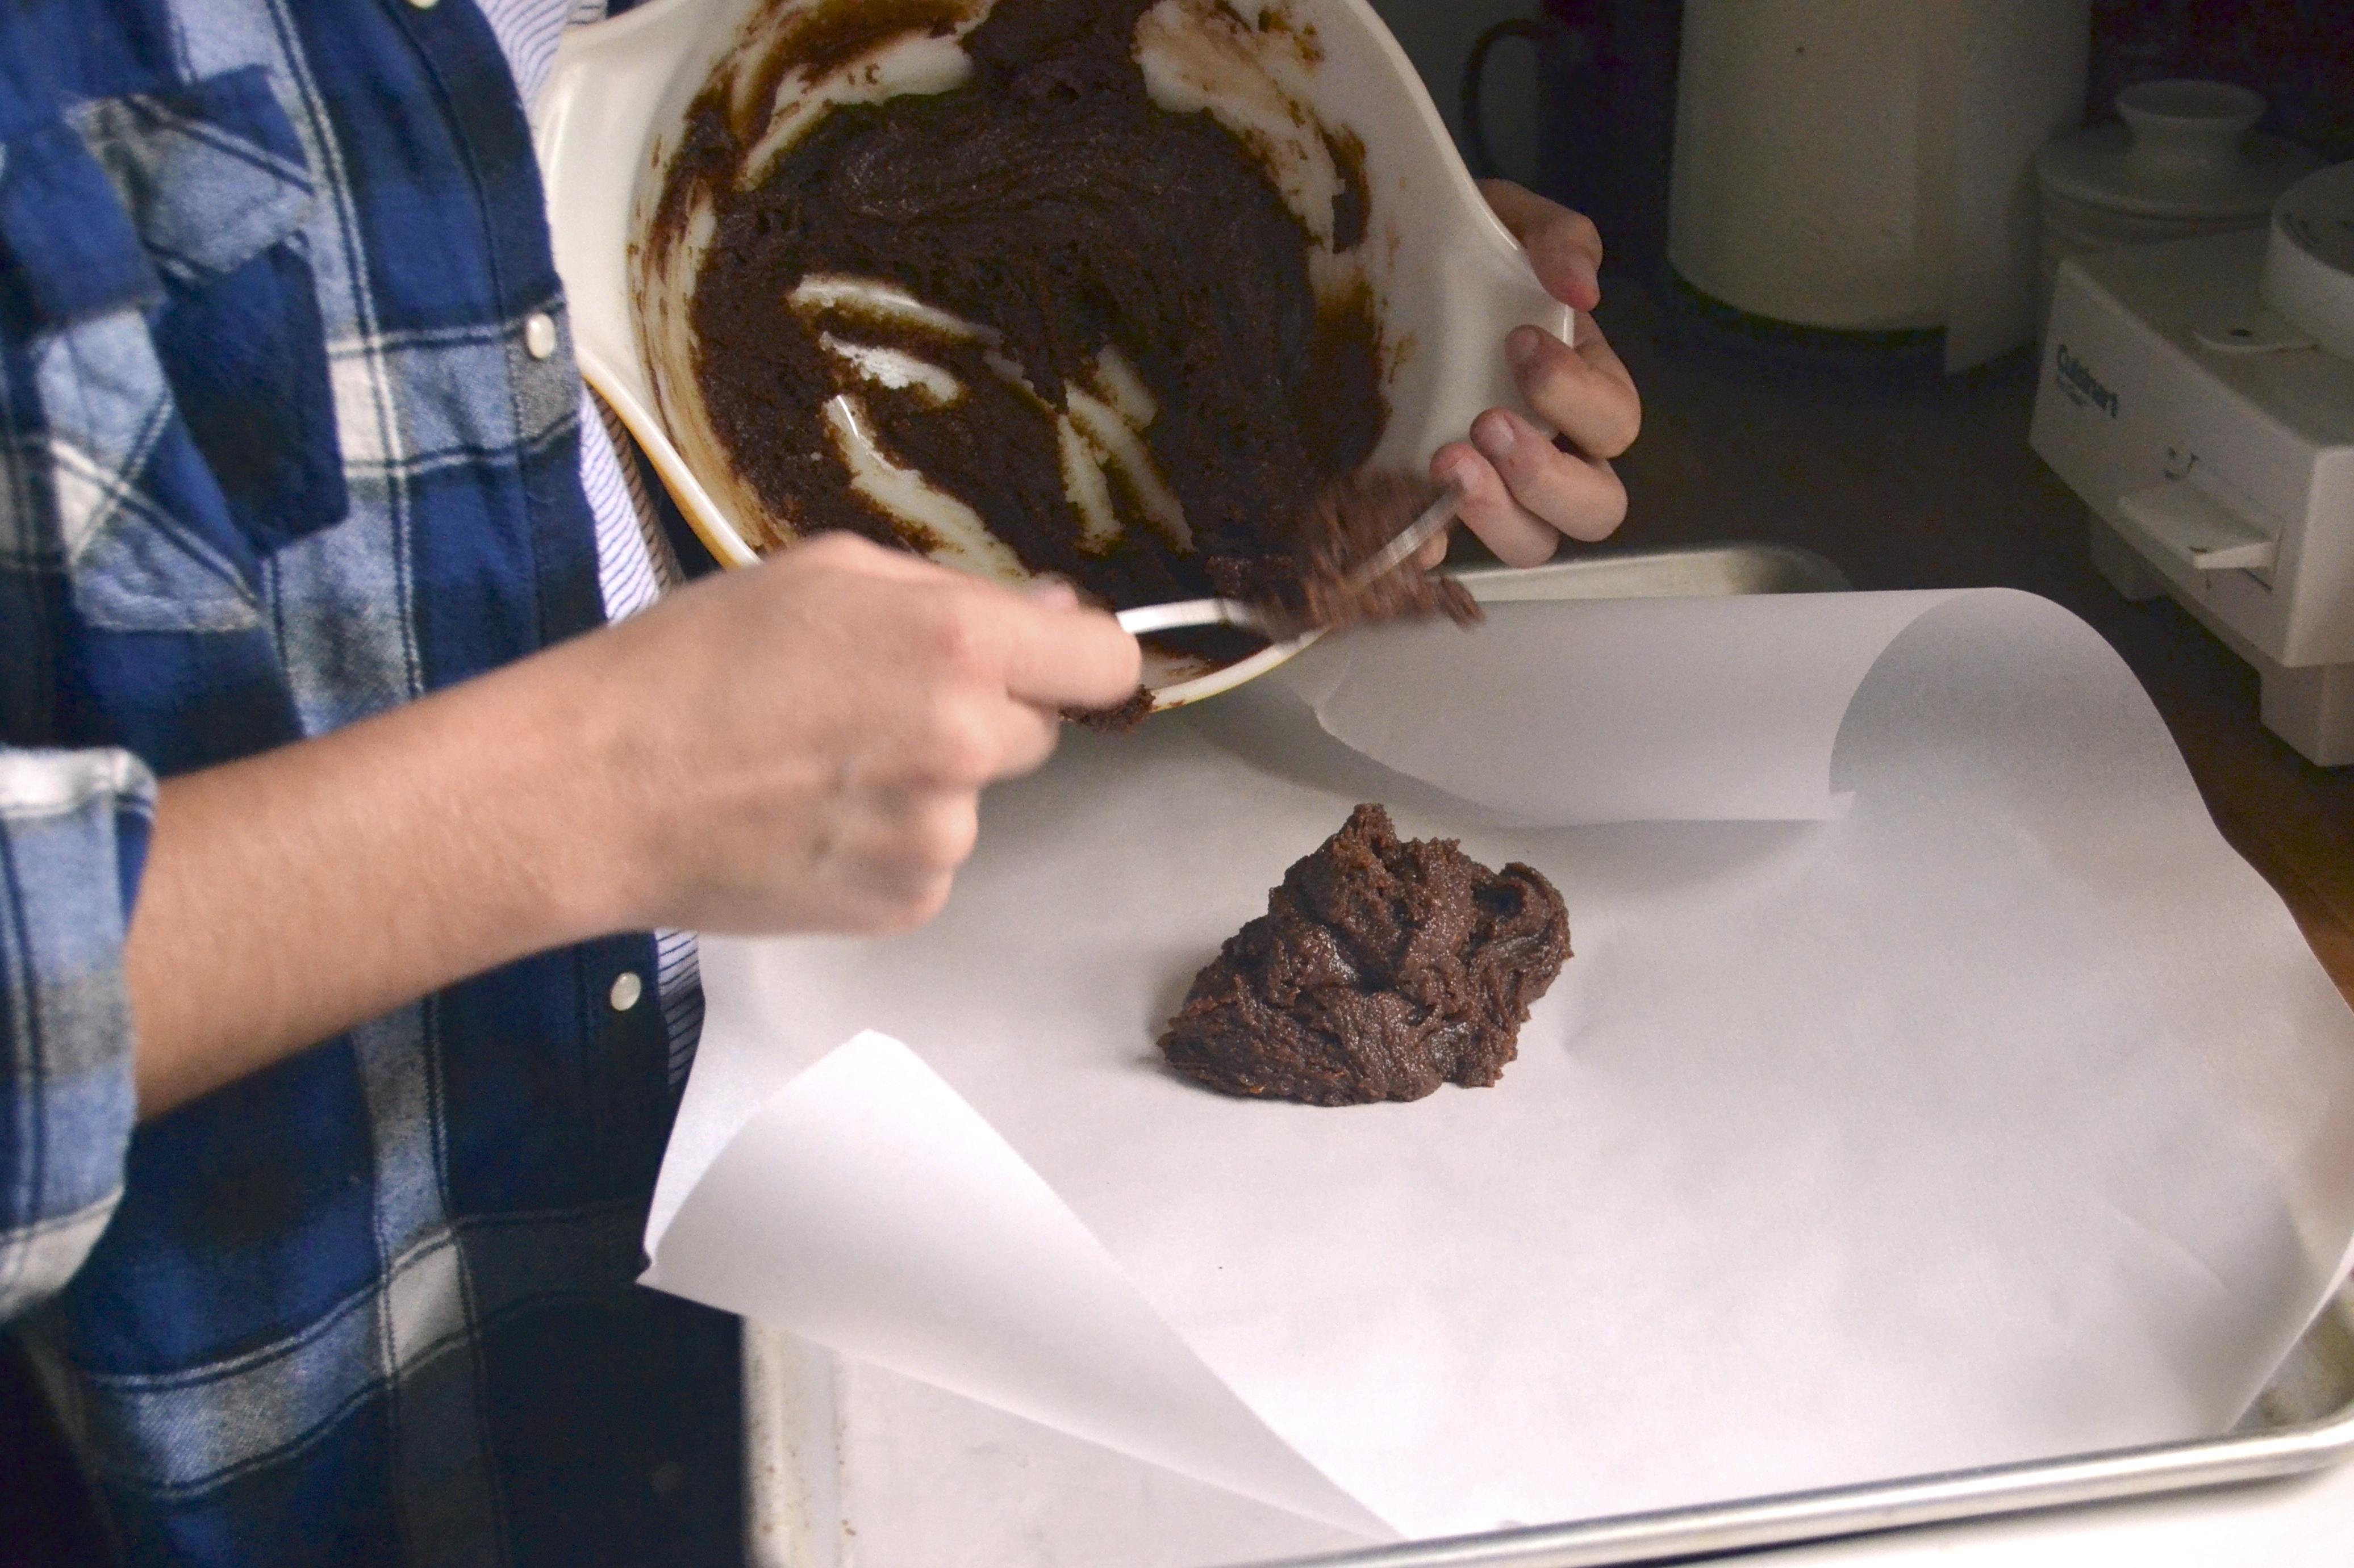
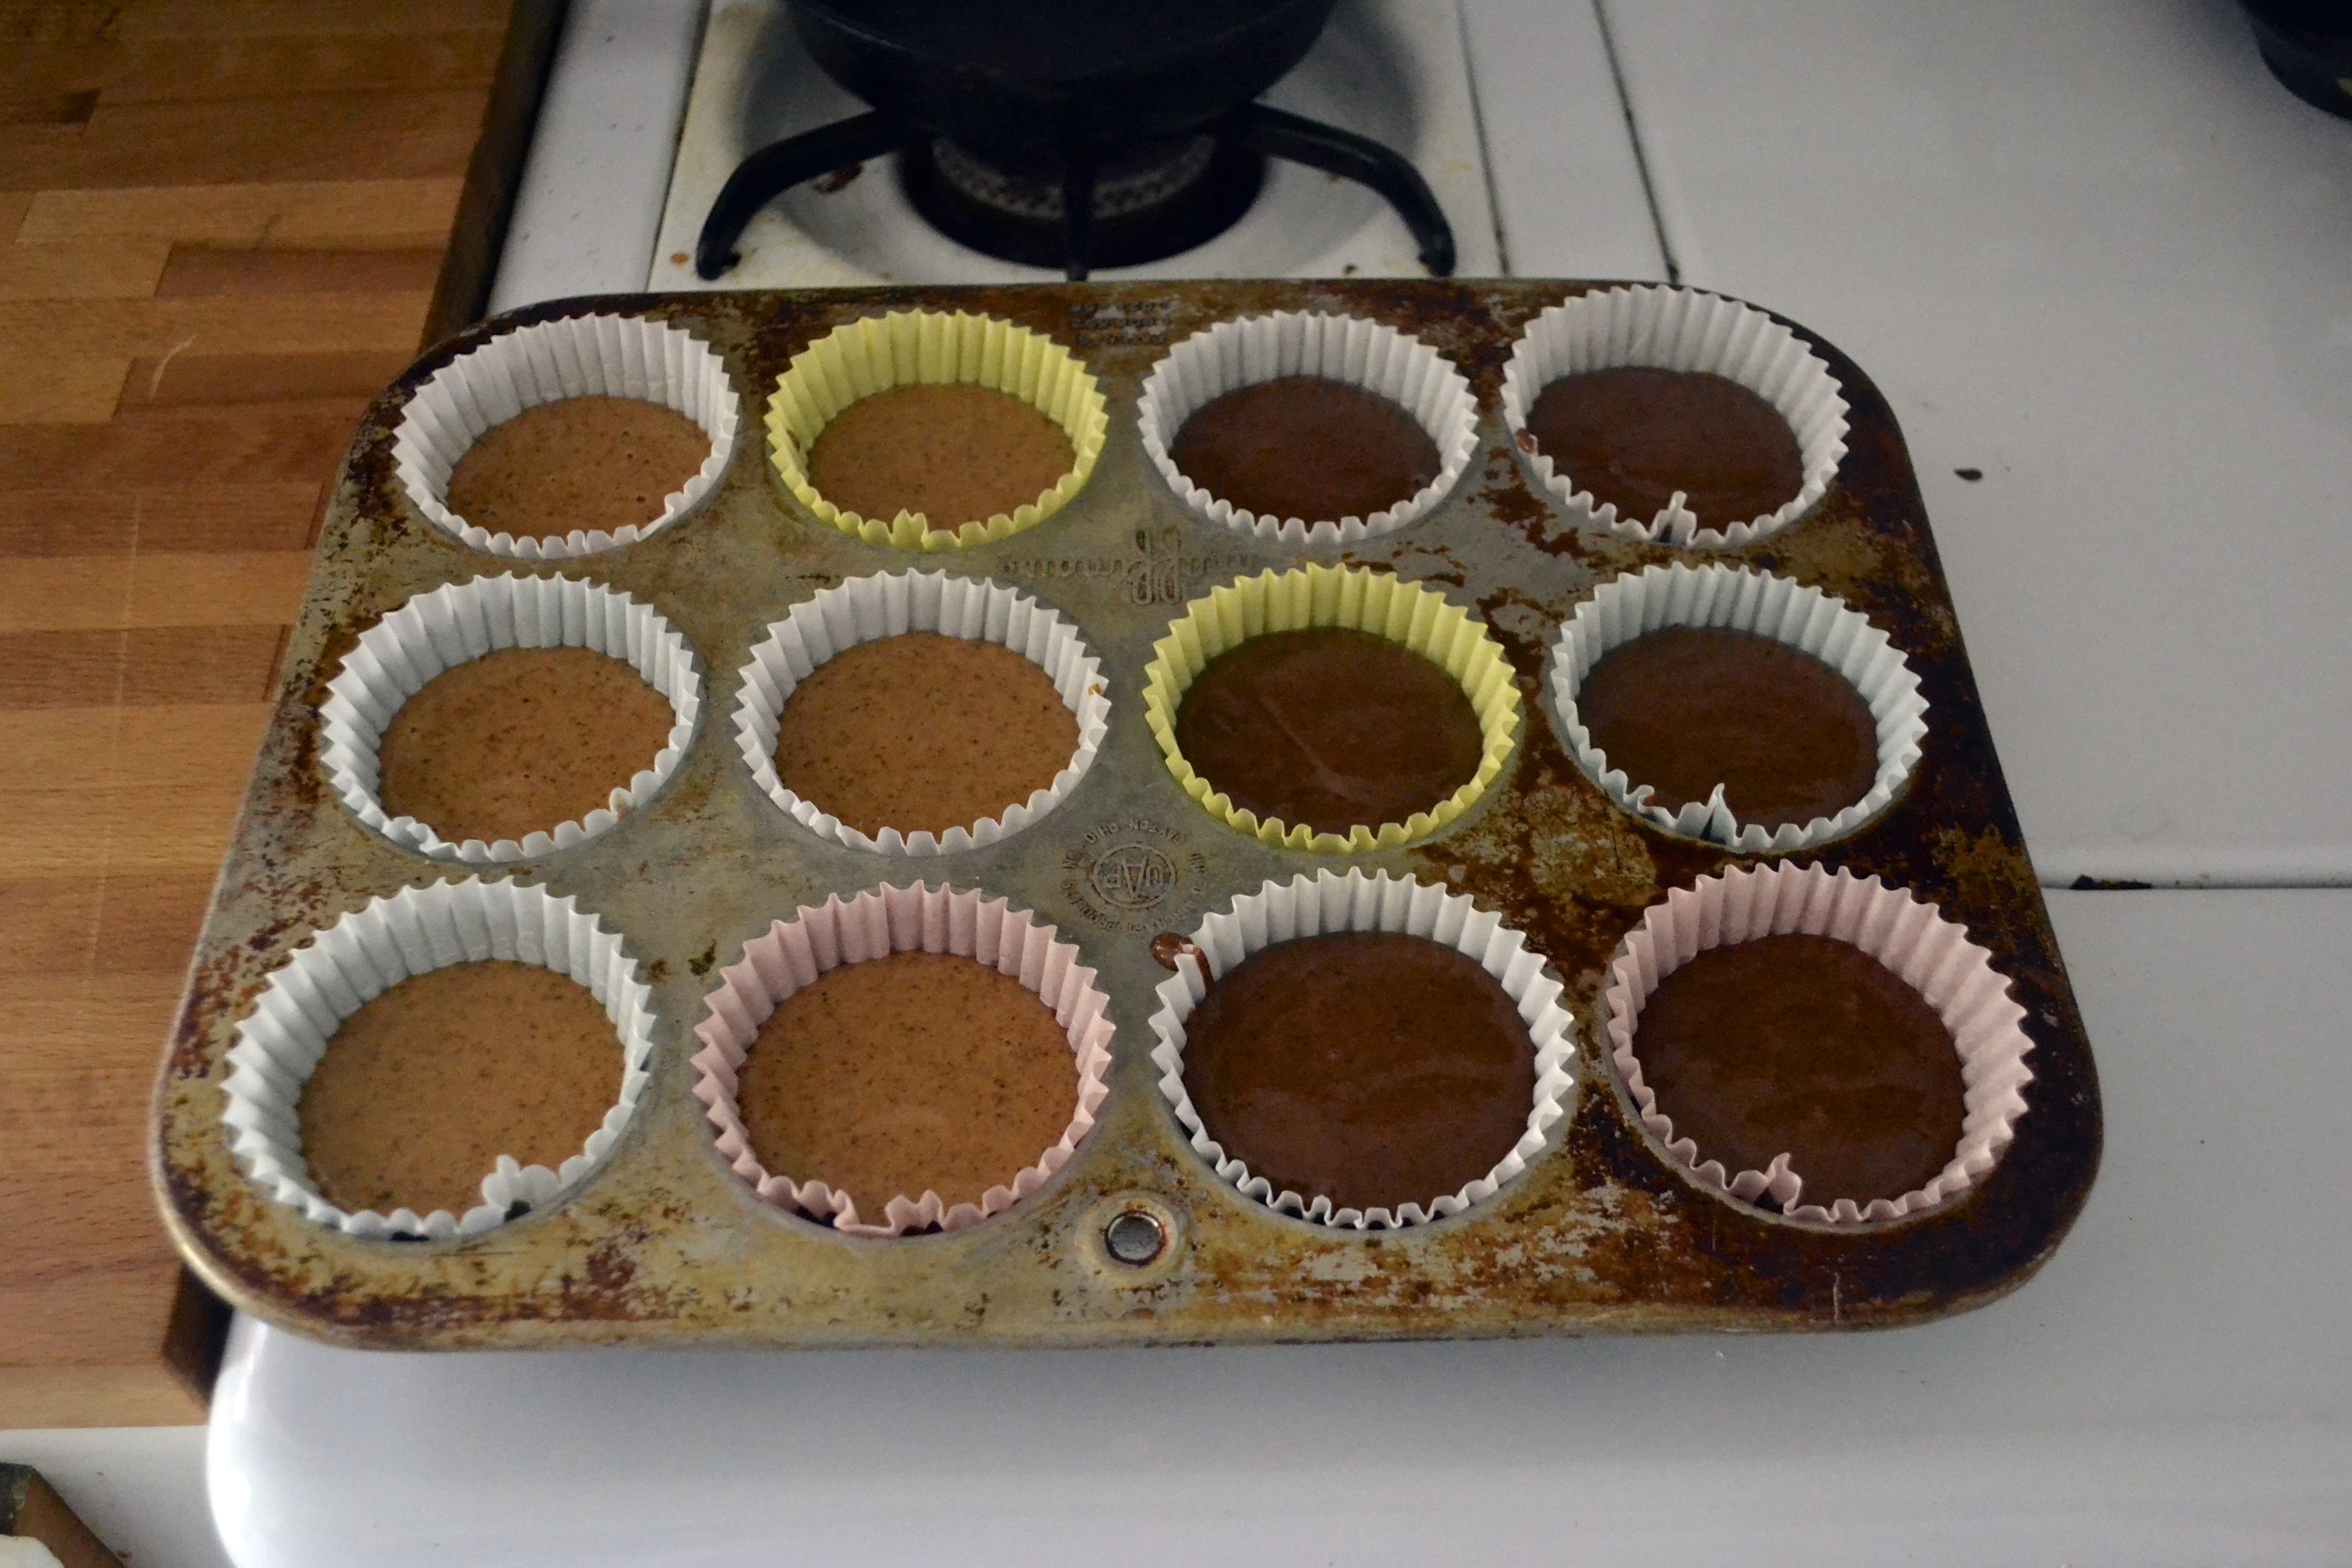
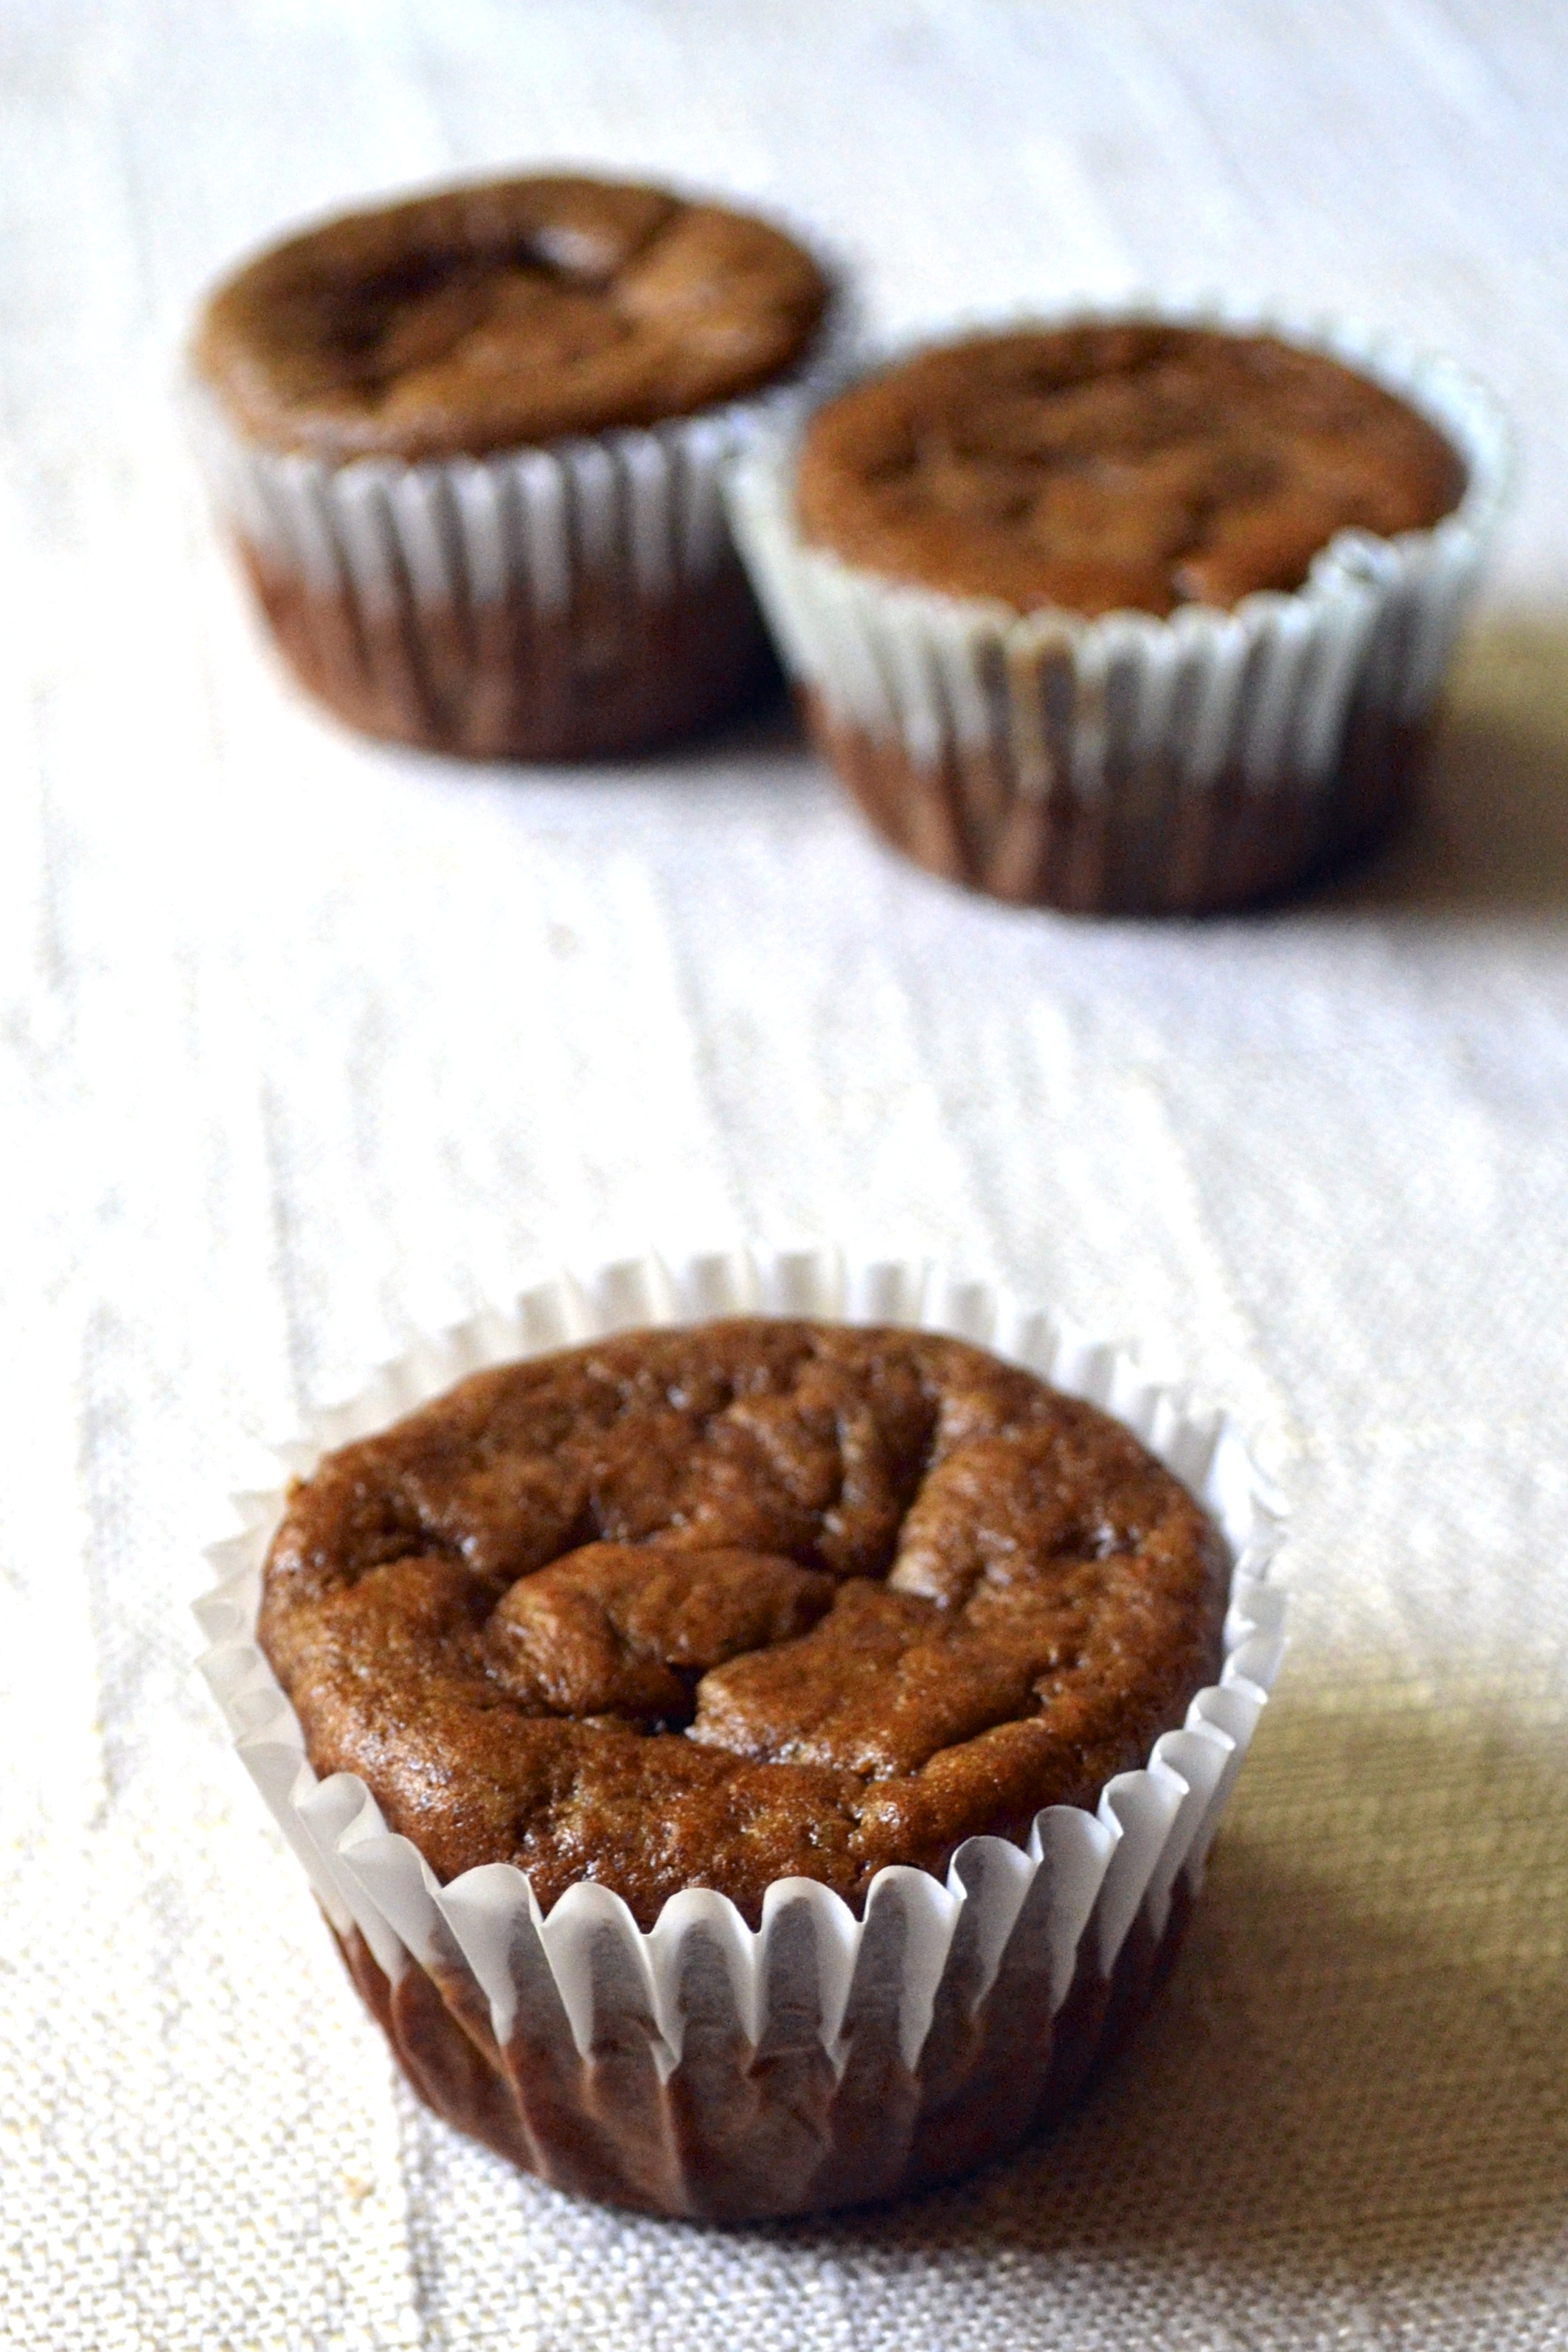
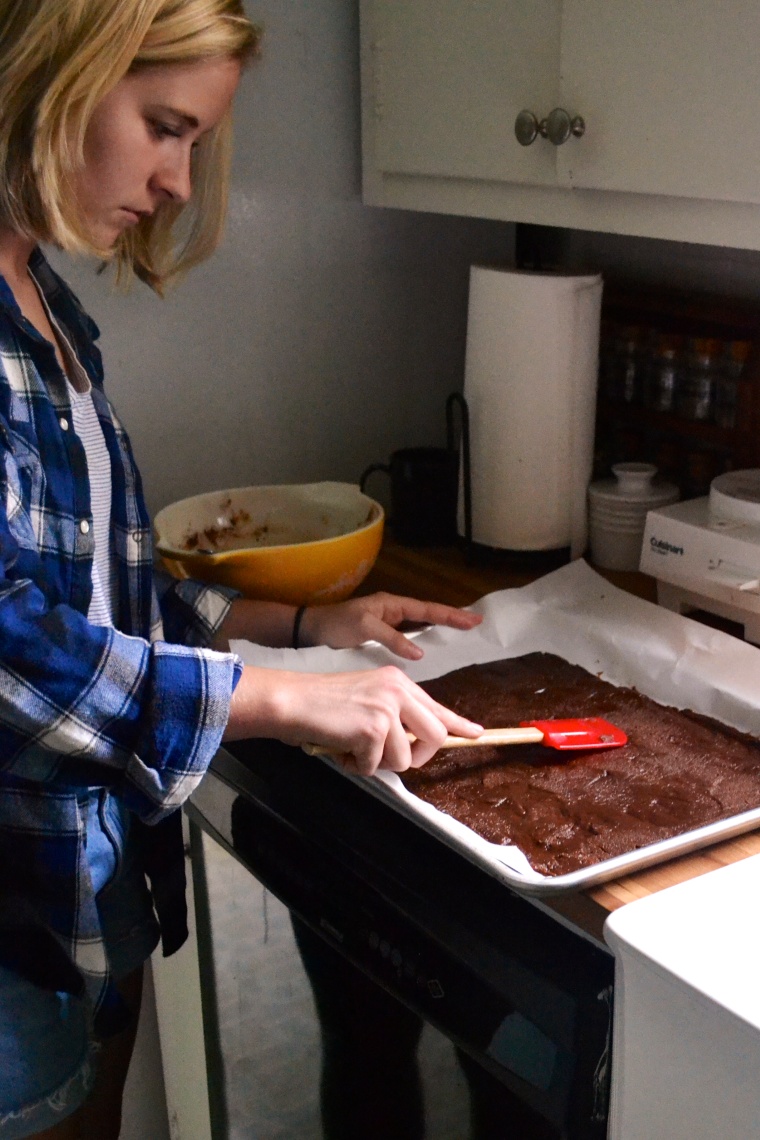
  2. In a medium bowl, mix together the almond butter, honey, and egg until combined. Stir in the baking soda, salt, vanilla, and cocoa powder until well mixed. Spread cookie mixture with a spatula onto prepared pan evenly to 1/4-inch thick.  The batter will be thick like dough. Keep pressing it until it evenly covers the bottom of the pan. Bake for 12 to 15 minutes (times vary between ovens) or until edges appear done and a toothpick inserted in the middle comes out clean. Remove from oven and allow to cool completely. I placed the cookie sheet into the freezer while I made the banana ice cream.
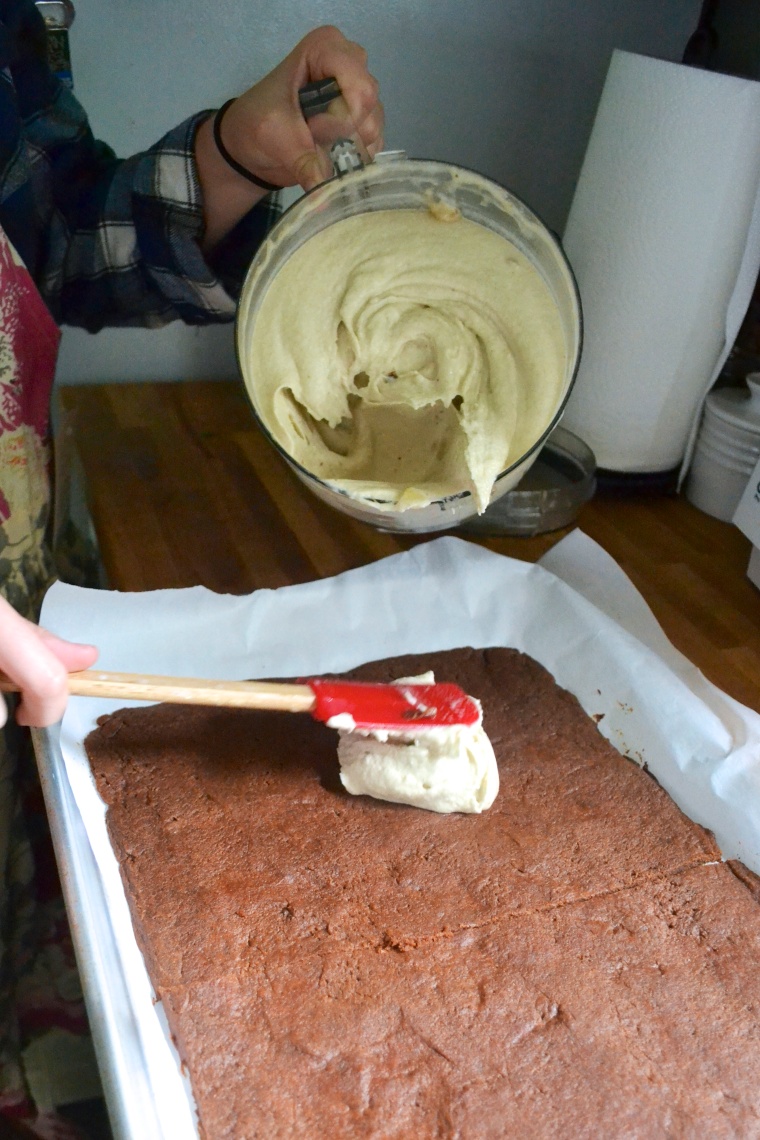
  3. Once cookie is cooled, make the banana ice cream. For the banana ice cream, place the sliced bananas into the bowl of a good food processor or into a blender. Blend on high or process for a few minutes. Bananas will turn into a creamy sorbet.
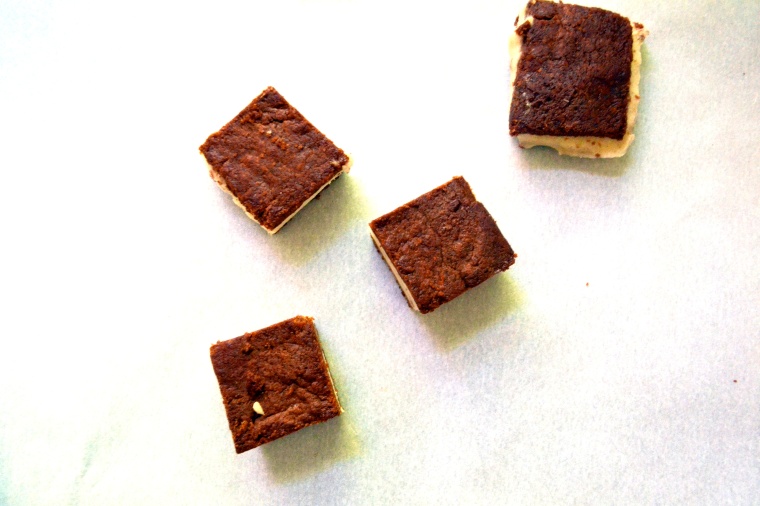
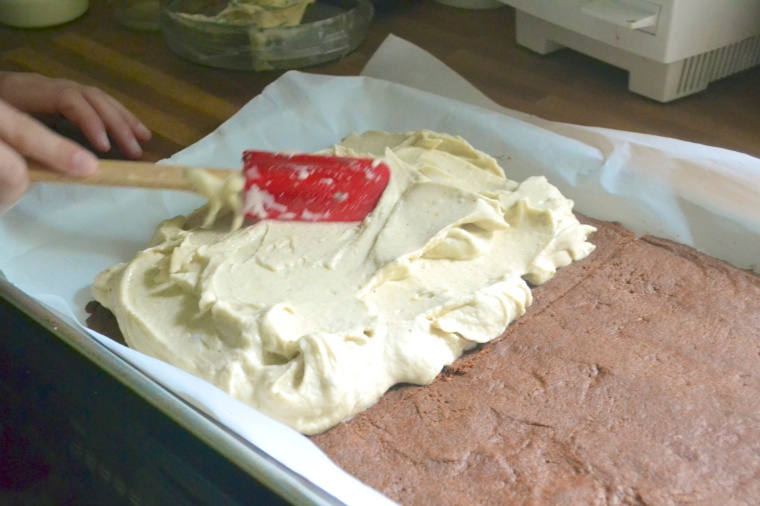
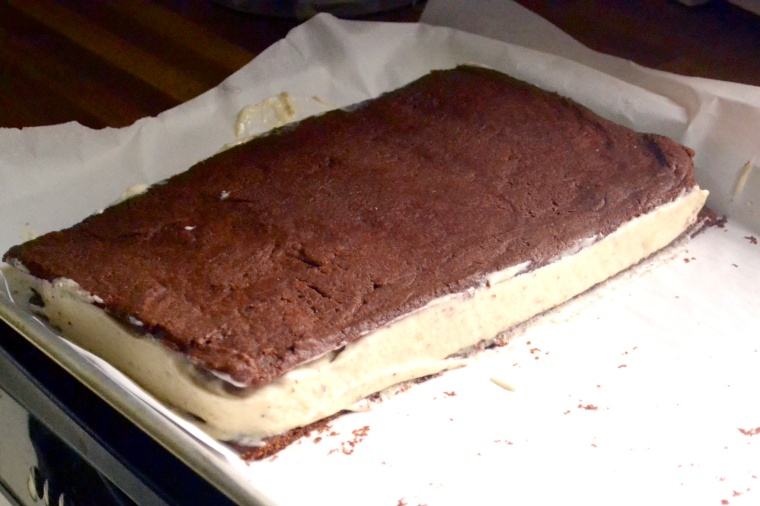
  4. Using a serrated knife, cut the cookie in half crosswise. Use a spatula and spoon out the banana ice cream and place onto one side of the cookie. Spread evenly. Then carefully lift and place the other side of the cookie (flat side up) on top of the ice cream-covered side. Smooth sides and wrap tightly in plastic wrap and freeze for at least 2 hours.
  5. When ready to serve, unwrap the ice cream sandwich. Using a serrated knife, cut into 12 rectangles. Freeze leftovers wrapped in plastic wrap.

Almond Butter Banana Muffins

I am a bit of a hoarder.  I’m definitely a food hoarder, but also a hoarder of things. My husband thinks it is junk.  Which it isn’t! But seriously, I keep things in boxes that I have never looked at for the past four years that we have lived here.  I find myself holding on to things because… “don’t you dare get rid of it because I am saving that chair just in case some day I want to paint it red and have a tea party”. Yes…that really came out of my mouth.

DSC_0001

He recently decided to have a garage sale…or an “Alissa’s Things Sale” as I refer to it. He doesn’t hold on to anything. When we got married, he moved into my house with a single box. I had a U-Haul trailer that could have fit a plane. So needless to say, purging is a hard thing for me. I remember every gift someone gave to me. I can’t seem to part with it even if that person totally does not remember giving it to me. They probably just picked it up randomly and thought “crap, it’s her birthday…uhm…ya, here’s a chicken tea pot…she eats chicken…she drinks tea…CHICKEN TEA POT!”.  And here I am 15 years later with the ugliest tea pot and refusing to get rid of it. Until one day I wake up and the love of my life is selling all of my precious belongings (crap) and other people are walking away with my chicken tea pot!  *sob*

DSC_0003

DSC_0015

It was a similar feeling for me when I made the switch a year ago to give up gluten. Making the switch to being gluten free can be tough sometimes. It’s hard to not feel like an outsider when everyone is laughing and enjoying cake and big plates of lasagna. Family gatherings and cookouts and office parties offer a plethora of pasta salads and cupcakes and brownies and bread and crackers.  I would end up being the person in the corner snacking on carrots and a bag of nuts that I had stashed away in my purse like a squirrel.  BECAUSE I AM A HOARDER.

One day I decided to PURGE! I threw away everything that contained wheat or even traces of wheat.  It felt awesome.  I began researching and arming myself with easy recipes to bring to gatherings. So now I always offer to bring something that I know that I can eat and that will blow the socks off of others that have no idea how great gluten free food can be.

DSC_0010

This recipe uses nut butter in place of flour! No flour, no oil, no butter.  Basically it is just almond butter and bananas and honey and eggs. Those purged cabinets probably have these simple ingredients in them.  These muffins are rediculously good and rediculously easy!  I have made them with almond butter and also with peanut butter. Both are fabulous.  You can also add cocoa powder to the batter for chocolate cupcakes!

Almond Butter Banana Muffins

Ingredients

  • 1 cup almond butter* (see note below)
  • 2 ripe bananas, mashed (about 1 cup)
  • 2 eggs, lightly beaten
  • 1 teaspoon baking soda
  • 1 teaspoon vanilla
  • 1/2 teaspoon sea salt
  • 1/4 cup honey
  • 1/2 teaspoon cinnamon (optional)
  • 2 tablespoons cocoa powder (optional)

Instructions

  1. Preheat oven to 350 F. Prepare a 12 cup muffin tin with muffin liners. Set aside.
  2. In a medium bowl, combine the banana, eggs, and almond butter until well mixed. Add the remaining ingredients except the cocoa powder. With half of the batter, fill 6 muffin liners 3/4 full. I use a 1/4 cup to measure for each. With the remaining muffin batter, add the cocoa powder. Fill the remaining 6 muffin cups to 3/4 full with the chocolate batter.
  3. Bake for 15 minutes at 350F. Muffins will be firm a slightly golden, but fluffy. Allow to cool for 10 minutes then remove from the muffin pan to a wire rack.

*Notes

  1. I have also made these with peanut butter and they were great. I assume other nut butters would work too. If you have a nut allergy, sunbutter (sunflower seed butter) would be a good substitute.
  2. I recommend all natural and unsweetened nut butters. However, if you aren’t using all natural nut butters (that is, if they have added sweeteners) then lower the overall amount of added honey in the recipe.
  3. These are also delicious as cupcakes!