Paleo Banana Ice Cream Cake

It’s already the middle of July and this weekend was the first time that I put a bathing suit on.  Honestly, between you and me…this doesn’t have to happen again.

DSC_0242

Why do bathing suits have to be so UNFLATTERING! Ugh.

I should just wear a T-shirt or a trash bag.

But Oh well….I guess I didn’t get too upset, because after swimming all day, all I wanted was ICE CREAM.  So I promptly made this amazing dairy free and grain free banana ice cream cake to go along with ribs that we smoked.  Maybe this is why my bathing suit is unflattering?  Ice cream cake + ribs?

Naaaaah.

DSC_0252

DSC_0219

DSC_0222

This cake is amazing. Creamy. Dreamy. Guiltless. It is made with cashews, bananas, dates, hemp seeds, raw cacao powder! Ya…shhhh….it’s good for you.

So I will just serve myself up another slice of cake…banana ice cream cake, that is. And I will eat it in my ugly, weird fitting, old bathing suit. And be happy.

Very happy.

DSC_0255

Paleo Banana Ice Cream Cake (adapted from This Rawsome Vegan Life)

Crust Ingredients

  • 1/2 C raw pecans
  • 1/4 C hemp seeds
  • 2 Tbsp cacao powder
  • 1/4 tsp salt
  • 1 C pitted dates

Caramel Ingredients

  • 1 C pitted dates, soaked in hot water for 10 minutes
  • 1/4 C water
  • 1/8 tsp salt

Chocolate Ingredients

  • 1/4 C cacao powder
  • 1/4 C water
  • 2 Tbsp coconut oil
  • 2 Tbsp honey or maple syrup or agave nectar

Filling Ingredients

  • 2 C frozen bananas (3 to 4)
  • 2 C raw cashews, soaked for 3 to 4 hours (or overnight)
  • 1/2 C water or nondairy milk
  • 1/3 C maple syrup or honey
  • 1/3 C coconut oil
  • 1/8 tsp salt
  • 1 tsp vanilla

Instructions

  1. Crust – In a food processor, place nuts, hemp seeds, raw cacao powder (or cocoa powder), and salt.  Pulse until the ingredients combine to make a flour like consistency. Add dates and process for a few minutes until it forms into a paste.  The mixture should hold together when you pinch a small amount between your fingers.  In a springform pan, place wax paper or syran wrap on the bottom. Press crust evenly into the bottom of the springform pan only slightly coming up the sides. Set in the freezer while preparing the filling.
  2. Caramel Sauce – Clean out food processor. Place soaked dates and 1/4 cup of water in the bowl of the food processor. Process for several minutes until a caramel-like substance is formed.  Add additional liquid as necessary. Add salt. Spoon into a separate bowl. Clean food processor bowl for next step.
  3. Banana Ice Cream Filling – Microwave the coconut oil in a small Pyrex dish for 30 seconds until mostly melted. Place all of the filling ingredients (except the caramel sauce) into the bowl of the food processor and blend on high-speed for several minutes until very smooth.
  4. Chocolate Sauce – In a separate bowl, combine cacao powder and 1 tablespoon of warm water. Stir carefully until a fudgey mixture is formed. Add warm water 1 tablespoon at a time until a drizzleable (is this a word???) fudge sauce is formed.  Stir in melted coconut oil at a tablespoon at a time. Keep mixture warm or it will harden. Pop in microwave if necessary.
  5. Assembly – Remove the crust from the freezer. Pour about two-thirds of the cashew mixture onto the crust and smooth evenly with a rubber spatula. Swirl in half of caramel mixture and alternate with 1/3 of chocolate mixture using a butter knife. Top with remaining filling. And swirl in remaining caramel sauce and another 1/3 of chocolate sauce. Drizzle any remaining chocolate sauce on top. Place in freezer for about 2 hours or until solid.
  6. Serving – To serve, remove from freezer about 30 minutes before serving.  Heat a smooth and sharp knife under hot water and cut the pie into 8 slices. Serve with any additional chocolate sauce. Store any remaining pie in the freezer.

Blackberry Cashew Cheesecake (Vegan, Dairy Free, Gluten Free, Paleo)

DSC_0041

I like surprises.  Well…good surprises. This week has been full of some unpleasant surprises but it has also been filled with amazing surprises like…friends dropping by to say hey for no reason but just to visit, a letter from an amazing friend telling me how they cherished our friendship, random hugs, dinner ready when I get home from work, coffee ready when I get up (what a blessing), random dance parties downtown…

DSC_0001

DSC_0015

I also like having intimate gatherings at our place and surprising people with a healthy dessert.  When it comes to a dessert that surprises most folks because it is both gluten-free and dairy free, this cashew cheesecake takes the “cake”. I have made multiple versions including strawberry-vanilla, chocolate-banana, and now blackberry.

This blackberry cashew cheesecake was the BEST so far.  I made the cashew cheesecake filling using my high-powered Cuisinart Pro Plus food processor.  If you have a Vitamix or Blendtec, use it. I’m jealous. But seriously, a great food processor will do the trick but it just may take a bit more time.

DSC_0008

DSC_0017

Instead of mixing whole blackberries into the filling, I made a blackberry sauce and strained out those pesky seeds that looooove to stick around in your teeth while you are trying to be sexy and suave but no one tells you that you have a massive black seed the size of a minivan lodged in your front teeth.  So, I just amped up your sex appeal and created a seedless sauce to mix into the blackberry cheesecake layer. You are welcome!

DSC_0021

The blackberry sauce is easy and takes only an extra 10 minutes. I used 2 cups of blackberries that I froze last summer.  You could also use a bag of frozen blackberries (completely thawed and use organic if possible) or fresh blackberries when they are in season. Boil the blackberries and juices in a saucepan until it begins to thicken (about 5 minutes).  Add a tablespoon of arrowroot powder mixed with water to make a slurry. Arrowroot powder is a grain-free starch alternative to cornstarch. If you aren’t worried about grains, then you could swap cornstarch for the arrowroot powder. Adding the starch will make the sauce even thicker.  Strain the cooked blackberries through a strainer and reserve about 1/3 to 1/2 cup of the sauce. This sauce is amazing in yogurt, on pancakes, waffles, my face.

DSC_0027

DSC_0037

So go surprise your face and someone you love or maybe even just tolerate and make this cheesecake. I promise you won’t be disappointed. Plus, it is gorgeous!

Blackberry Cashew Cheesecake (Paleo, Gluten Free, Grain Free, Dairy Free)  (adapted from My New Roots, serves 8)

Note – You will need a very powerful food processor or blender (such as a Vitamix). I have a Cuisinart Pro Plus food processor that works like a champ and a half. 

Crust Ingredients

  • 1/2 cup raw pecans
  • 1/2 cup pitted dates
  • 1/4 teaspoon sea salt

Filling Ingredients

  • 1 1/2 cups raw cashews (soaked at least 4 hours)
  • 1/3 cup coconut oil (melted)
  • 1/3 cup maple syrup (or honey for non vegan)
  • juice of 2 lemons (about 1/4 cup)
  • 1 teaspoon vanilla extract
  • 1 to 2 cups fresh or frozen blackberries (thawed if frozen and retain the juices)
  • 1 tablespoon arrowroot powder + 2 tablespoons of water

Instructions

  1. Crust – In a food processor, place nuts, salt, and pitted dates and pulse until the ingredients combine into a paste.  The mixture should hold together when you pinch a small amount between your fingers.  Place Saran wrap in a 7″ pie pan (spring form pans work best but aren’t necessary) or 8×8″ square baking dish. Spoon crust mixture into pan and press evenly and firmly, making sure that the edges are well packed. Wash and rinse the food processor.
  2. Blackberry Sauce – Place the blackberries and thawed blackberry juices in a heavy saucepan and heat over medium heat. Stir frequently, and bring to a low boil.  In a small bowl, mix the arrowroot powder with 2 tablespoons of cold water until it forms a slurry. Slowly stir the arrowroot slurry into the blackberries. Simmer for about 5 to 10 minutes until the homemade blackberry sauce thickens to coat the back of a metal spoon. Remove from heat. To get separate the seeds from the blackberries, set a strainer over a heat-proof bowl. Pour the blackberry sauce into the strainer and mash with the back of a spoon to get all of the juices from the blackberries. You should get about 1/2 cup of sauce. Reserve the sauce for later use in the filling. You can keep the blackberry mash for either a topping or another use (stirred into oatmeal? in yogurt?).
  3. Cashew Cheesecake Filling – Microwave the coconut oil in a small Pyrex dish for 30 seconds until mostly melted. Whisk in maple syrup to combine. Place all of the filling ingredients (except the blackberries) into the bowl of the processor and blend on high-speed for several minutes until very smooth.
  4. Assembly – remove the crust from the freezer. Pour about two-thirds of the cashew mixture onto the crust and smooth evenly with a rubber spatula. To the remaining third of the cashew filling mixture, add the blackberry sauce (about 1/3 cup). Blend on high until smooth. Pour this mixture onto the first layer of filling. I drizzled an additional 1/4 cup of sauce on the top of the blackberry layer and made a swirl pattern with a butter knife. Place in freezer for about 2 hours or until solid.
  5. Serving – To serve, remove from freezer about 30 minutes before serving.  Heat a smooth and sharp knife under hot water and cut the pie into 8 slices. Serve with any additional blackberry sauce. Store any remaining pie in the freezer.

Fiesta Time – Brunch Edition

Happy Quatro De Mayo!  This is the day to gather up all of your tasty recipes because tomorrow is Cinco de Mayo. Get started early with a brunch party!  I have collected and included a few of my favorite gluten-free mexican brunch recipes for a recipe roundup.

Make Ahead Mexican Breakfast Casserole

DSC_0192

Black Bean and Chard Breakfast Tacos

DSC_0175

Huevos Rancheros with Black Beans

DSC_0026

And for those egg haters, this Mexican Chicken and Lime Soup is a perfect.

DSC_0233

Or what about Carnitas??? seriously, this is always a winner plus you can cook it all day in the crock pot!

DSC_0231

And how can you not have a salsa bar???  The Rhubarb Salsa is amazing and the Basic Salsa is one of my favorites.

IMG_0075

IMG_0078

Grain Free Lemon Tart

Are you ready?  Like REEEEEALLY ready? Because this isn’t your standard lemon tart. It is a TART tart.  A creamy tart with pucker power but tempered with sweet agave nectar. It is the princess of tarts that will make you dream of fresh flowers, warm picnics, and lemon trees even when it is still stupid cold outside.

DSC_0407

I have been slightly obsessed with lemon tarts lately.  I made piss poor lemon bars last weekend and was out for vengeance.  I didn’t like the filling and was dead set on making a creamier version that could be placed into a tart crust.  So the hunt began for a lemon tart recipe that satisfied my obsession.  I studied several recipes and finally settled on an amalgamation of Julia Child’s Tarte Au Citron, Cookie and Kate’s Honey-Sweetened Citrus Curd, and Dave Lebovitz’s Lime Meringue Tart.

In the end, the curd recipe was adapted from Kathryn’s recipe.  I swapped agave nectar for the honey because I didn’t have honey on hand.  Kathryn’s curd was a bit sweeter than this lemon curd, which could be due to the sweetener swap. If you prefer a sweeter lemon curd, you might stick with honey which will provide that pronounced honey flavor or you could increase the quantity from 1/3 cup to 1/2 cup.  But I liked using the neutral-flavored agave nectar which allowed the tartness of the lemons to be the leading lady of the lemon curd. I also love tart things over sweet. Give me Sour Patch Kids any day of the week over Smarties. EEW.

DSC_0421

DSC_0431

When making the curd, be careful when using the direct heat method to thicken the curd. Use nonreactive saucepan and either a wooden spoon or metal wire whisk. Plastic will make your curd curdle like curdly curdy curd. Hehe.  Just keep your heat on low and STIR constantly with a wire whisk. It’ll be fine.  However, if you get a little bit of cooked egg or lemon pulp in the curd, you can always strain the curd before placing it into the tart crust.  This lemon curd can also be made in advance and refrigerated for several weeks. It’s SO dreamy stirred into greek yogurt.

The almond flour-based tart crust pairs incredibly well with the lemon curd filling.  This grain free tart crust is amazing and can be used as a basic crust for a multitude of fillings.  I adapted the recipe from the Gluten-Free Almond Flour Cookbook by Elana Amsterdam.  I used Dave Lebovitz’s method for making a basic french tart crust where he places butter, oil, water, sugar, and salt in a bowl and melts it in a hot oven before adding the flour. The butter begins to brown, giving it a wonderful complex and nutty flavor. So simple!

DSC_0422

I also should note that this is a prebaked tart crust. Because almond flour tends to burn easily, keep the heat slightly lower when prebaking and allow the shell to slightly brown.  After filling it with the prepared lemon curd, bake the filled tart until the filling has set (about 10 minutes).  If the edges of the tart begin to brown too quickly, place aluminum foil around the crust edge to protect it from burning.

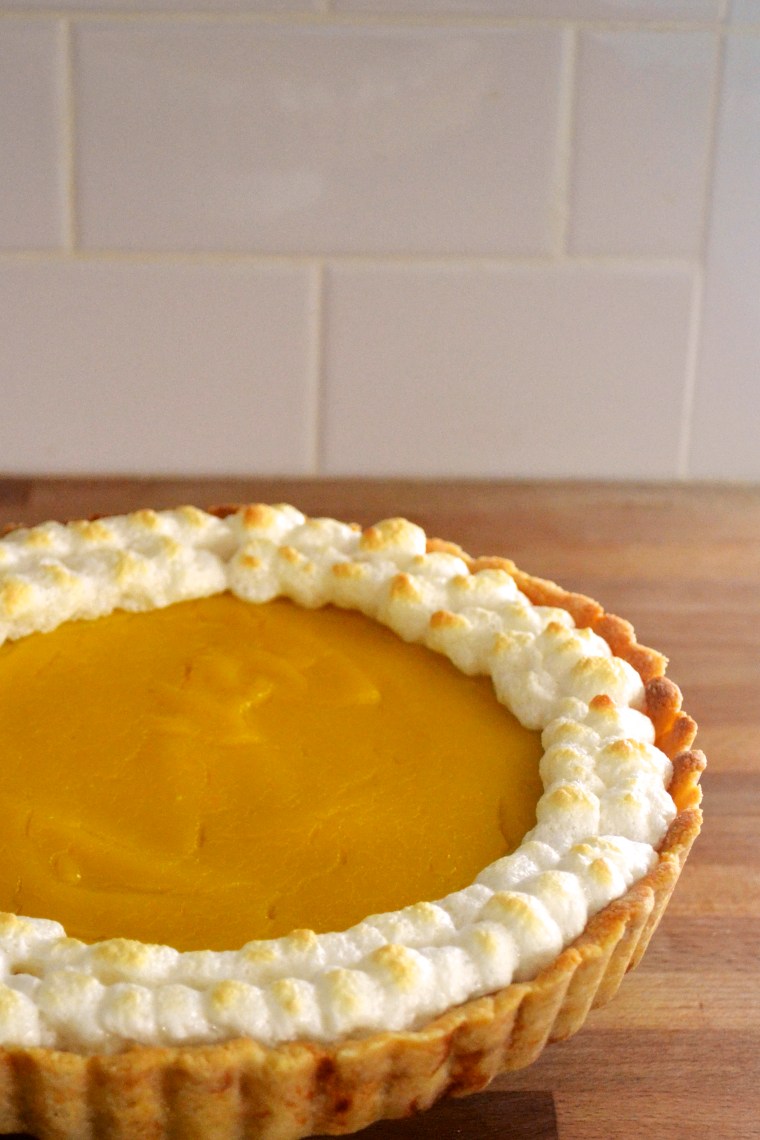
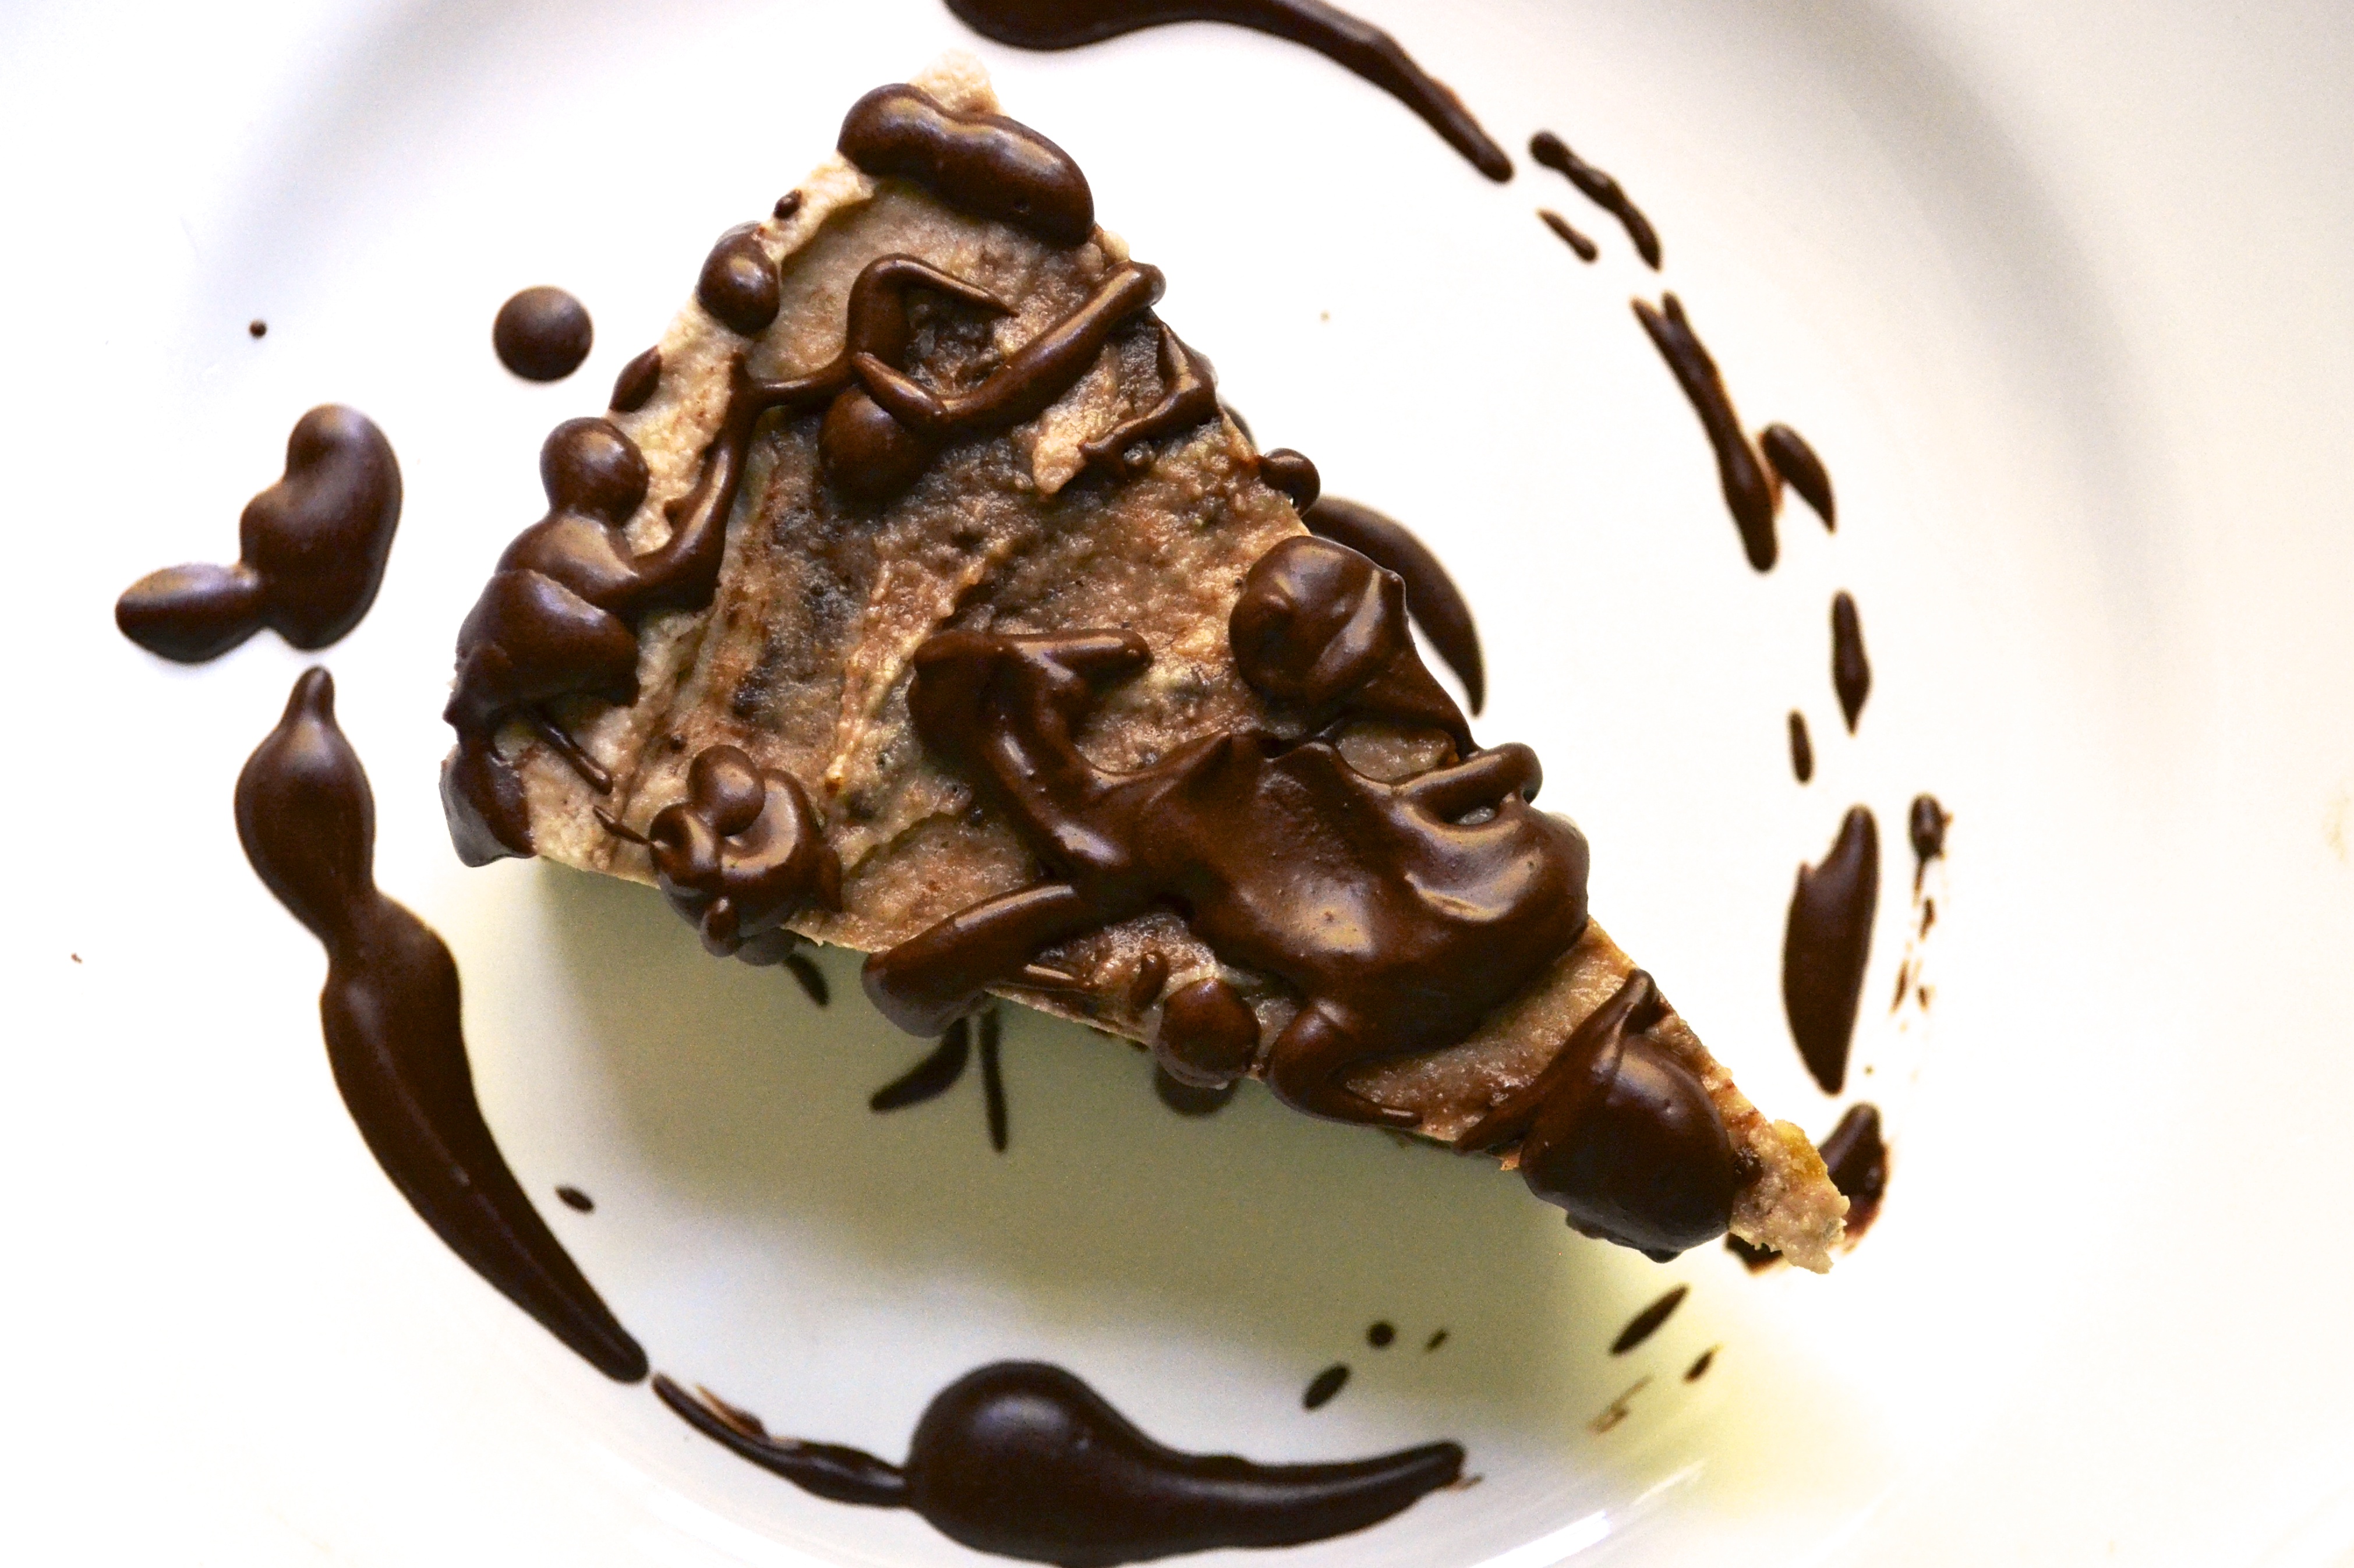
You can top the lemon tart with meringue (like me) or fresh seasonal fruit. Once my blueberry and raspberry bushes begin to fruit, you can bet your butt that I will be topping these tarts with a gaggle of berries. But in the mean time, I piped a small amount of meringue around the edge of the tart using 2 reserved egg whites. I made a metric poop-ton (actual measurement) of meringue and was sad to see it go to waste.  I nearly made a second and third tart JUST to give that beautiful meringue a home.

DSC_0437

Grain Free Lemon Tart (adapted from recipes from Cookie and Kate and Dave Lebovitz)

Serves 8

Tart Crust Ingredients

  • 3 Tablespoons unsalted grass-fed butter, cut into pieces
  • 1 Tablespoon coconut oil
  • 1 Tablespoon water
  • 2 Tablespoons agave nectar or honey
  • 1/2 teaspoon sea salt
  • 1 1/2 cups almond flour
  • 1/4 teaspoon baking soda
  • 1/2 teaspoon vanilla extract

Lemon Curd Filling Ingredients

  • 4 tablespoons unsalted butter, cut into small pieces
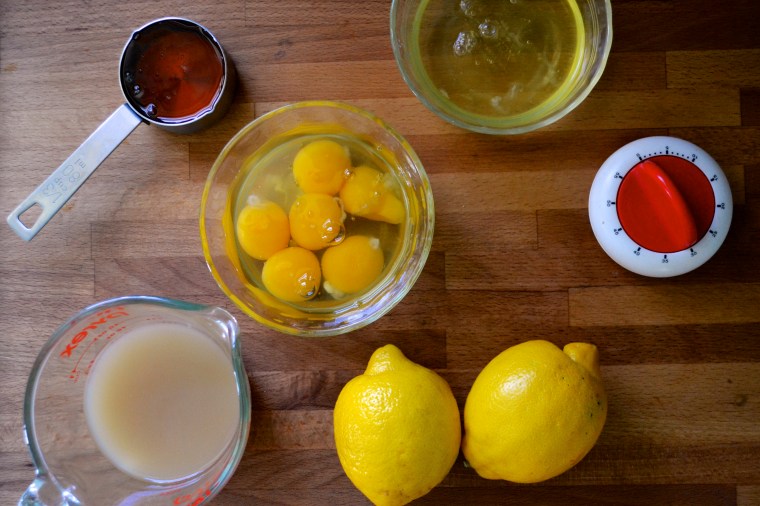
  • 3 large eggs
  • 3 egg yolks (reserve whites for meringue)
  • 1/3 cup agave nectar (or honey)
  • 2/3 cup fresh lemon juice (about 3 to 4 large lemons)
  • 1 Tablespoon lemon zest
  • pinch of salt

Meringue Ingredients

  • 2 reserved egg whites 
  • pinch of salt
  • 3 Tablespoons agave nectar or honey

Tart Crust Instructions:

  1. Preheat oven to 350F. 
  2. Place butter, coconut oil, water, agave nectar, and salt in a Pyrex bowl.
  3. Place bowl in preheated oven for 10 to 15 minutes.  Allow the butter and coconut oil to begin bubbling. The butter will begin to brown on the edges (a.k.a. browned butter).
  4. Remove the Pyrex bowl from the oven.  Be careful because the bowl will be hot.  Add almond flour, vanilla extract, and baking soda and stir quickly until a ball forms.
  5. Transfer dough ball to a 9-inch tart mold with a removable bottom. Use your fingers to spread dough into the base and up the edges of the tart pan. Prick the bottom all over with the tines of a fork.
  6. Partially bake for 7 to 10 minutes at 350 F.  You don’t want to fully bake or it will get too brown when later baking the filled tart.
  7. Remove the partially baked tart shell from the oven. Set aside and allow to fully cool before filling.

Lemon Curd Instructions:

  1. In a saucepan over low heat, heat butter, lemon juice, zest, and salt until butter is melted, but not boiling.
  2. In a medium bowl, whisk eggs, egg yolks, and agave nectar for 1 to 2 minutes until combined and slightly frothy.
  3. Temper the egg mixture by adding a bit of the heated butter-lemon juice mixture to the eggs and whisking constantly.  This will warm the egg mixture without cooking your eggs.  After the eggs are slightly warmed and tempered, add them slowly to the warm butter-lemon juice mixture, whisking constantly.
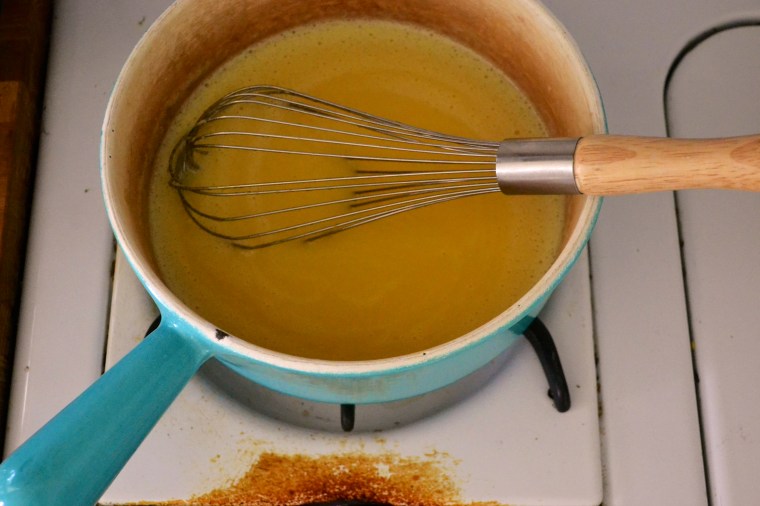
  4. Increase the heat and cook over medium-low heat, whisking constantly until the lemon curd mixture begins to thickens with a consistency of jelly. DO NOT LET IT BOIL!!! It is done the whisk is lifted from the curd and the mixture holds its shape when it falls back into the saucepan from the whisk (see picture below).
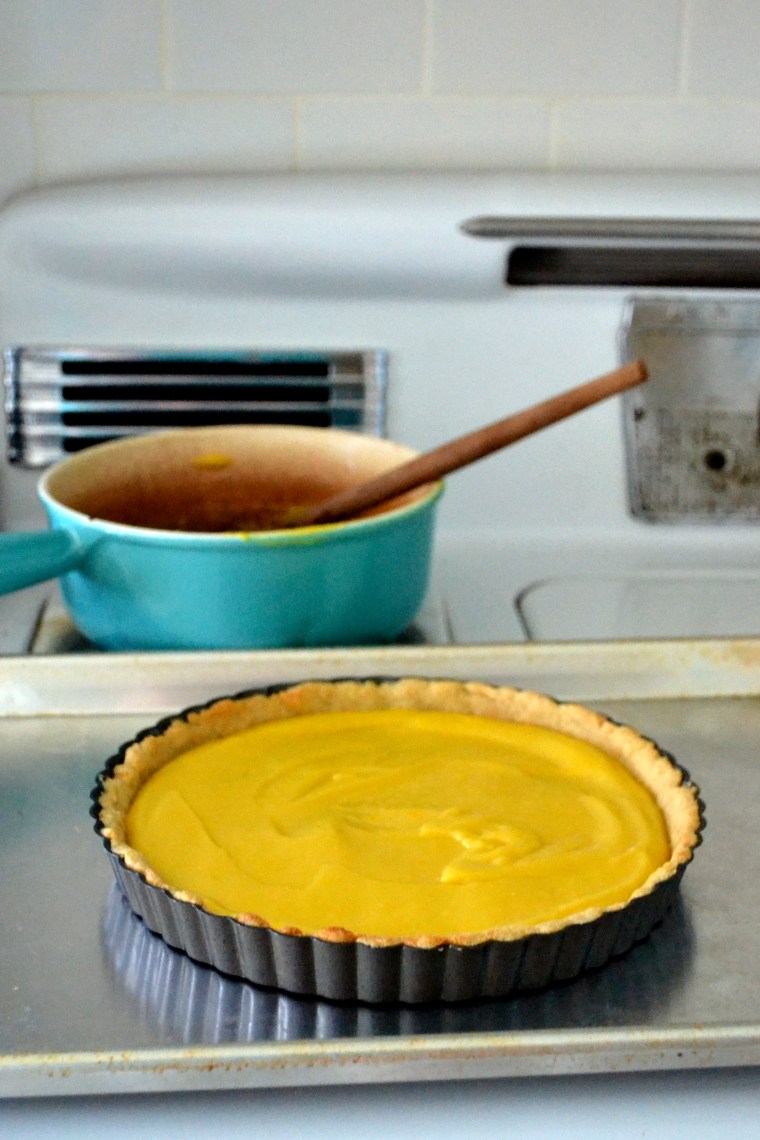
  5. Remove the curd from heat. Place the prebaked tart shell onto a rimmed baking tray.  (Be careful with the tart shell and the removable bottom!!! I have ruined a few tart crusts by accidentally pushing through the mold.) Scrape the filling into the prebaked tart shell.
  6. Bake at 350 F for 10 minutes. Remove from the oven.  You can either top with marshmallowy meringue (recipe below) or fresh seasonal fruit. Allow to cool completely before slicing.

DSC_0412

DSC_0416

Marshmallowy Meringue (makes 3 cups):

  1. Heat 3 tablespoons of agave nectar in a microwave safe dish for 30 seconds (watch out because this might boil over).
  2. Add 2 egg whites and a pinch of salt to the bowl of a mixer. Turn on high and whip with whisk attachment until soft peaks form. Gradually drizzle in the heated agave nectar and a few drops of vanilla. The meringue will become shiny and slightly stiff.
  3. Scrape the meringue either into a pastry bag fitted with a fancy tip or (like me) scoop it into a Ziploc bag and cut the end off of the corner. Pipe the meringue in a ring around the tart. Or you can also spread the meringue with a spatula around the tart. (You will have meringue left over which either can be used for a second tart or stored in a mason jar in the refrigerator for 24 hours).
  4. Turn on the broiler in the oven. Place the tart under the broiler, watching VERY carefully because it will brown quickly! After the top begins to brown and darken, remove the tart from the oven and cool completely before slicing.

Dijon Ham Steaks with Apples

Snow snow snow snow!!!! Winter is not giving up in Kansas City with predictions of 10 to 15 inches of snow and zero visibility. Plus, we are not just getting metric boat loads of snow, but….(cue deep booming echoing voice) THUNDER SNOW.  It sounds more like an X Men character or superhero name or maybe they should add this as the next movie in the Mad Max movie serious….Return of Thunder Snow….anyone? come on!

Ham steak

DSC_0176

It’s really strange to see the light snow falling and hear booming thunder outside.  They have canceled and closed everything around here including schools, work, gyms, ceremonies. The grocery stores have been like war zones the last few days with people stocking up for Snowmeggedon.  So now there is nothing left to do but hunker down, cook up a hearty breakfast, put a fire in the fireplace, add a roast in the oven to cook low and slow, and cuddle with my favorite boys…Guinness and Kiley.

DSC_0183

Even if you aren’t getting (booming voice) THUNDER SNOOOOOW…. you can still make a heart-warming breakfast that deserves being stranded in a snowy mountain cabin with a warm fire in the fireplace.  My local Community Supported Agriculture (CSA) meat supplier provides us with 12 to 16 oz bone-in ham steaks.  We like to brown these in a cast iron skillet for breakfast.  In the summer, I like to cook these steaks on the grill.  When cooking indoors in a skillet, I cut the ham steak into four equal portions to cook evenly and quicker.  A simple Dijon sauce and butter-sauted apples pair well with the ham. This is even good as a quick dinner.

DSC_0184

Dijon Ham Steaks with Apples (Adapted from Gourmet, 1999)

Serves 4

Ingredients

  • 12 to 16 oz uncooked ham steak (1/4-inch thick), trimmed of fat and cut into 4 portions
  • 1 Tablespoon whole grain mustard
  • 1 Tablespoon Dijon mustard
  • 2 Tablespoons butter
  • 2 small apples (or 1 large), cored and sliced in 1/4-inch slices

Instructions

  1. Preheat oven to 250°F.
  2. In a small bowl, mix whole grain mustard and Dijon mustard. Spread mustard mixture on top of ham steak.
  3. Heat 1 tablespoon butter in a skillet over moderately high heat. Add ham steaks to skillet and sauté until browned (about 5 to 6 minutes). If your ham steak is thicker than 1/4-inch, cook a little longer. Transfer browned ham to a heat-proof dish, loosely covered with foil, and place in preheated oven to keep warm while apples cook.
  4. Add remaining tablespoon butter to skillet and sauté apple slices, turning once, until golden and tender, about 4 minutes total. Remove ham from oven. Top each piece of ham with apple slices. Serve with fried eggs for a fabulous fancy country breakfast.

Mushroom, Spinach, and Sausage Crustless Quiche (Gluten Free and Dairy Free)

Want to have brunch with me this morning?

Please? I’ve made a delicious Quiche.  It’s crustless, but I promise you won’t miss the crust.

Go on…pull up a chair…keep your pjs on…I made an extra pot of coffee.  I even have a fire in the fireplace. It’s cozy. No need to put pants on. You are my guest!

DSC_0261

DSC_0267

It’s biting cold outside, but in the kitchen it smells of coffee, bacon, and love. Quiche love.  Warm and creamy and hearty and filling Quiche that is baking just for you.  No no no…it was no trouble at all. Whipped it up quick and threw it in the oven. Here…need more coffee? Let’s talk.

DSC_0258

I’m sorry that things have been so tough lately.  Life is crazy and terrible sometimes. But just for this morning, let’s not think of those things. Let’s dream. Let’s remember the great times and the blessings that we have. Let’s remember our small victories.

Need some more coffee? Cream? Sugar?

I missed you.  I’m so glad that you came over.

Need another slice of bacon? Seriously…I made extra. Next time I’ll make us a mimosa.

We should do this more often.

DSC_0263

Mushroom, Spinach, and Sausage Crustless Quiche (Gluten Free and Dairy Free)

Serves 4 to 6

Ingredients

  • 1/2 teaspoon salt
  • 1/4 teaspoon fresh black pepper
  • 8 eggs
  • 1/3 cup coconut milk (low fat or full fat)
  • 2 Tablespoon butter, bacon grease, or olive oil
  • 10 oz baby bella mushrooms, sliced
  • 1/2 teaspoon dried thyme
  • 1 spicy italian chicken sausage, diced
  • 1 package of fresh spinach (or kale) (3 to 4 cups)

Instructions

  1. Preheat oven to 375 F. Butter a 9-inch pie pan or cake pan and set aside.
  2. In a medium bowl, whisk eggs, salt, pepper, and coconut milk. Set aside.
  3. In a heavy skillet, heat butter over medium heat. Add mushrooms and thyme in a single layer and sauté until browned. Don’t crowd them. Toss in sausage and brown (about 2 minutes) stirring often. Add spinach on top of cooked mushrooms and sausage. Stir and cook until spinach is slightly wilted, about 1 to 2 minutes. Remove skillet from heat. Add a pinch of salt and pepper to taste.
  4. Spoon and spread the mushroom, sausage, and spinach evenly into the prepared pie pan. Top this with the egg mixture.
  5. Bake for 35 to 40 minutes, or until slightly golden brown on edges, puffed, and set in the middle. Serve warm or at room temperature.  Leftovers are great reheated for breakfast or lunch.

Mexican Chicken and Lime Soup

I came down with a horrendous cold last week. My head felt like it was in a vice grip.  Thinking about going on a walk made me too tired.  So all I did was lay on the couch, become a Pinterest addict, and watch guilty pleasures including Downton Abbey, Wes Anderson movies, Lady and the Tramp, and, of course, Varsity Blues.

DSC_0224

The two things I wanted to eat were tapioca pudding (a childhood comfort food) and chicken soup…warm brothy chicken soup.  I didn’t get the tapioca (boooh) but I did get chicken soup. I found this Mexican Lime Soup on Pinterest. This amazing brothy and spicy soup hit the spot. 

Note – Be sure to use fresh limes to obtain the 1/4 cup of lime juice. Oh and serve with a fresh avocado. Game changer! I can also see this easily being compiled into a slow cooker and cooked all day.  DSC_0227

Mexican Chicken and Lime Soup (Gluten Free, Grain Free, Dairy Free, Paleo-Friendly, Whole30 Compliant) (slightly adapted from Williams Sonoma)

Serves 4 to 6

Ingredients

  • 4 limes juiced to yield 1/4 cup lime juice, extra slices for serving
  • 1 tablespoon olive oil
  • 1 yellow onion, diced
  • 4 to 6 cloves of garlic, minced
  • 1 red bell pepper, diced
  • 1 jalapeño, seeded and diced
  • 3 cups low sodium organic chicken broth (homemade is best)
  • 3 cups water
  • 1 lb boneless chicken breasts and/or thighs
  • 1 teaspoon dried mexican oregano
  • 1/3 cup diced cilantro
  • salt and pepper to taste

Instructions

  1. In a large heavy pot or dutch oven, heat olive oil over medium heat. Add onion and saute until translucent, about 5 minutes.  Add garlic, red bell pepper, and jalapeño and cook for an additional 2 to 3 minutes, stirring frequently.  
  2. Add broth, water, oregano, and lime juice and bring to a full boil. Add chicken. Bring back to a boil, lower heat to medium-low and cover. Cook for 10 to 15 minutes, or until chicken is cooked through and no longer pink.
  3. Remove cooked chicken from pot with tongs and place on a cutting board. Shred into pieces with two forks. Add the shredded chicken back to pot. Turn off heat and add fresh chopped cilantro. Serve soup with diced avocado, fresh cilantro, and sliced limes.

Paleo Cranberry and Apple Cobbler

My heart is heavy on this last day of December and this last day of 2012. I’m staying in my pajamas and watching the snow fall. The snow falls so peaceful outside my window, yet I know that sometimes there is no peace and life is just not fair.  

DSC_0234

My thoughts go out to everyone who has lost someone this year. My thoughts go out to those that are lost. My thoughts go out to those that are enduring hardships that are unfathomable. 

There are so many cruel and unfair things that occur and I always ask “why?”…but sometimes there is no reason. It’s just the way it is.  I only hope that there is something better that hopefully will come out of tragedy.

DSC_0239

DSC_0253

So I make this cobbler for my friends that are struggling right now, my friends that are enduring an unfathomable loss, my friends that are lost in life.  I make this cobbler to hopefully bring comfort into their hearts and to warm their souls.

Paleo Cranberry and Apple Cobbler (Grain Free, Gluten Free, and Diary Free) (adapted from Beeckman 1802 Heirloom Cookbook)

Filling:

  • 12 oz bag of fresh cranberries
  • 3 medium apples, cored and diced
  • 1/4 cup crystallized ginger, diced
  • 1 cup water
  • 1/3 cup honey
  • 2 tablespoons arrowroot powder

Topping:

  • 1 cup almond flour
  • 1/4 cup chopped walnuts
  • 1 teaspoon ground cinnamon
  • 1/8 teaspoon sea salt
  • 1/4 cup coconut oil, melted

Instructions:

  1. Preheat oven to 350F.  Grease a 9X9-inch baking dish with butter, coconut oil or nonstick spray.  Set aside.
  2. In a medium saucepan, combine cranberries, apples, crystallized ginger, water, and honey. Heat over medium heat until the mixture begins to boil and the cranberries pop. Cook for 5 to 10 minutes.  Remove from heat and stir in arrowroot powder. Pour the hot cranberry mixture into the baking dish and set aside.
  3. In a separate medium bowl, combine all of the topping ingredients. Mix well.  Spoon the topping mixture evenly over the filling.
  4. Bake at 350F for 30 to 40 minutes. The cobbler will begin to bubble and the topping should lightly brown.  Remove from oven and allow to cool for a few minutes.  Best when served with vanilla coconut ice cream!

Kale Salad with Cranberries, Pecans, and Roasted Apples

I’m drowning. Drowning in recipes and ideas and drooling over too many food photos. I can’t decide what to make for Thanksgiving. I want to make tooooo much.

How about sweet potatoes…..or sweet potato casserole, or sweet potato and chard gratin, or sweet potatoes with bourbon glaze. No…I’ll make a gluten free apple pie, or an apple crisp….or baked apples….or Ack…wait… look at these chocolate-caramel tartlettes.

OK…something green….. like green beans, green beans with miso and almonds, or roasted brussel sprouts, or….. *SNAP* And then my brain just…shuts….down. Stops.

And then I end up thinking…well, hell…I guess I’ll just make a salad.

But this just isn’t any salad, people. It’s a celebration. A Kale Party!  Ya…I know no one thinks of a party when you say “YAY KALE”. Except me. And well, maybe my friend Kathryn.

This kale party in a bowl salad is adapted from The Smitten Kitchen Cookbook. Another winning recipe from this amazing compilation from Deb.  She uses cherries where I used cranberries that I had on hand. I also added roasted apples and toasted pecans for autumnal festiveness. Dig in….

Kale Salad with Cranberries, Pecans, and Roasted Apples

Serves 6 to 8

Kale Salad Ingredients

  • 1 bunch of kale, washed and dried, stalks removed and leaves torn into bite-sized pieces
  • 1/4 cup dried cranberries (or cherries)
  • 1/4 cup raw pecans, chopped
  • 1 medium apple, cored and sliced thin

Honey Dijon Dressing Ingredients

  • 3 tablespoons olive oil
  • 1 1/2 tablespoons apple cider vinegar
  • 1 tablespoon smooth Dijon mustard
  • 1 1/2 teaspoons honey
  • salt and pepper to taste

Instructions

  1. Preheat oven to 350F.  Place apple slices on half of a roasting pan. On the other side of the pan, place the chopped pecans. Roast for 5 minutes. Remove from oven, and stir. Place back in oven for an additional 5 minutes, keeping an eye on the pecans to make sure that they don’t burn. Remove from oven and allow to cool to room temperature.
  2. Meanwhile, place torn kale leaves in a medium to large serving bowl. Sprinkle with a dash of salt and gently massage the kale until it begins to break down a bit.  Add the dried cranberries, toasted pecans, and roasted apples. Sprinkle with salt and pepper.
  3. For the honey dijon dressing,  add the olive oil, vinegar, mustard, and honey to a small mason jar with a lid. Shake the jar vigorously.  Drizzle the dressing evenly over the salad.  Toss everything together to coat everything in dressing.  Although you can eat the salad immediately, I let mine rest for at least 20 minutes, allowing the leaves to become even more tender.  This salad is great for make ahead events!

Seared Bean Sprout Salad with Sesame-Orange Dressing

What is a bean sprout? It’s the sprout from a germinated mung bean. Bean sprouts are usually used in asian cooking and provide a bright crunchy texture to a stir fry dish. I originally intended on sprouting my own mung beans (which is really easy), but I didn’t have time. It takes 5 to 7 days of soaking the mung beans in water (changing every 12 hours). But you can easily find bean sprouts at your local grocer or asian market.

Today’s recipe is brought to you by the Food Matters Project, which is a group of foodie bloggers dedicated to cooking our way through Mark Bittman’s Food Matters Cookbook. The original recipe was chosen by Dominica of Food Wine Love and was supposed to be Seared Bean Sprouts with Beef and Sesame-Orange Sauce. 

Although this looked both easy and delicious, I was on my way to a dinner party last night and needed to bring a side dish. I decided to turn the recipe into a bright and colorful salad, adding some shredded carrots, diced cucumber, and chopped cilantro. It was really easy to throw together and was definitely unique.

Check the FMP website to see what the other foodies chose to do with this recipe!

Seared Bean Sprout Salad with Sesame-Orange Dressing

Makes: 8 servings (as a side dish)

Salad Ingredients

  • 1 Tablespoon sesame seeds
  • 1 Tablespoon canola oil or coconut oil
  • 1 lb bean sprouts, rinsed
  • 1/4 teaspoon salt
  • 1 bunch of scallions, green and white parts chopped
  • 2 carrots, shredded
  • 1 cucumber, diced
  • 1/4 cup cilantro, chopped

Dressing Ingredients

  • 2 oranges, juiced
  • zest of 1/2 orange
  • 1/2 Tablespoon fresh ginger, minced or grated
  • 2 Tablespoon soy sauce
  • 1 teaspoon sesame oil
  • 1 teaspoon tahini paste
  • 1 Tablespoon rice wine vinegar
  • 1 Tablespoon honey

Instructions:

  1. Add 1 tablespoon of sesame seeds to a DRY skillet. Cook on medium heat for 3 to 5 minutes, lightly toasting sesame seeds. Remove and set aside.
  2. Place 1 tablespoon of oil in skillet and heat over medium heat. When oil is hot (not smoking), toss in bean sprouts and salt. Stir fry for 3 to 5 minutes, or until lightly browned. Remove and place in colander. Run cold water over sprouts to stop them from cooking. You want them to still be crips.
  3. Add the sprouts, cucumber, shredded carrot, cilantro, and scallions to a medium serving bowl.
  4. Combine all dressing ingredients into a mason jar or lidded jar. Shake well. Pour over salad and stir.  Chill until you are ready to serve it. Toss before serving and sprinkle with toasted sesame seeds.