Rosemary Almond Flour Tart Crust

I’m on a mission to take life slower. Sometimes things move so quickly that I get caught up in trying to get everything done perfectly and on time and I miss the important things that are going on around me. I forget to breathe. I forget the basics. I focus on the wrong things.

This weekend I decided to slow down, to be present, to breathe.

DSC_0219

DSC_0221

Hang my clothes out on the line.

Read a book.

Spend meaningful time with dear friends.

Eat butter pecan ice cream and remember my father.

Remember the basics.

Hold my husband’s hand.

Eat simply. And simply eat.

DSC_0222

DSC_0226

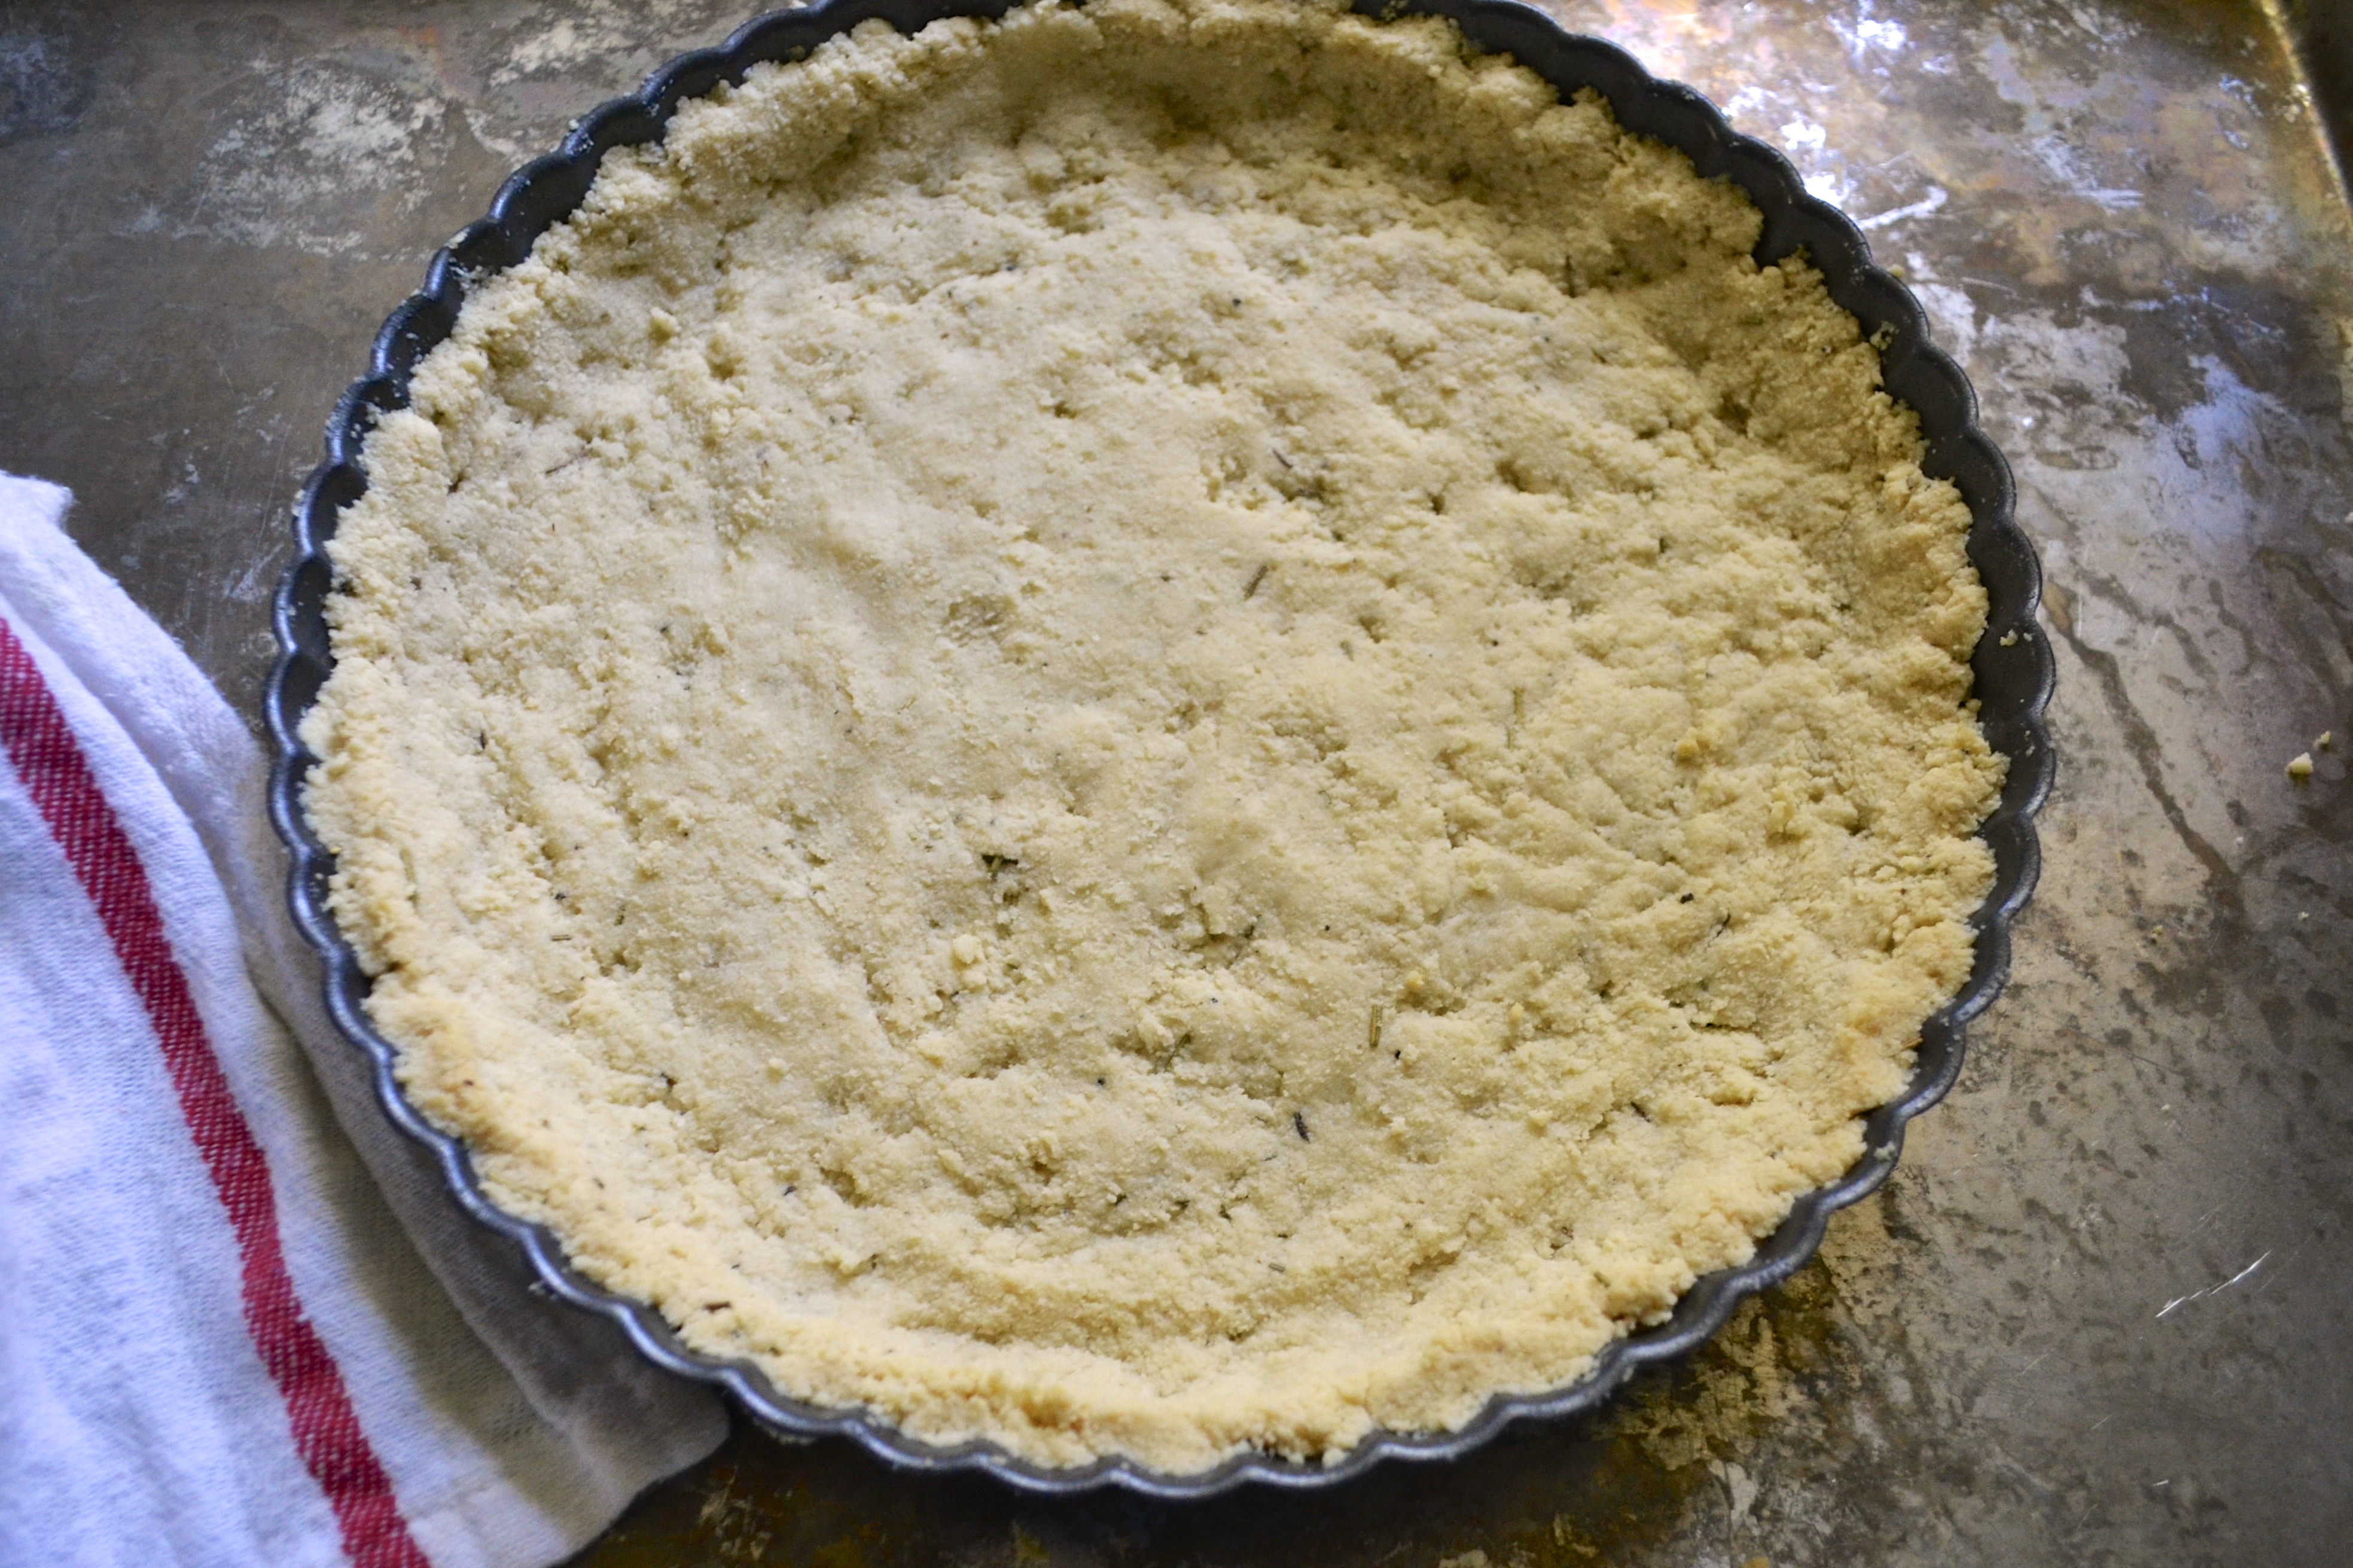
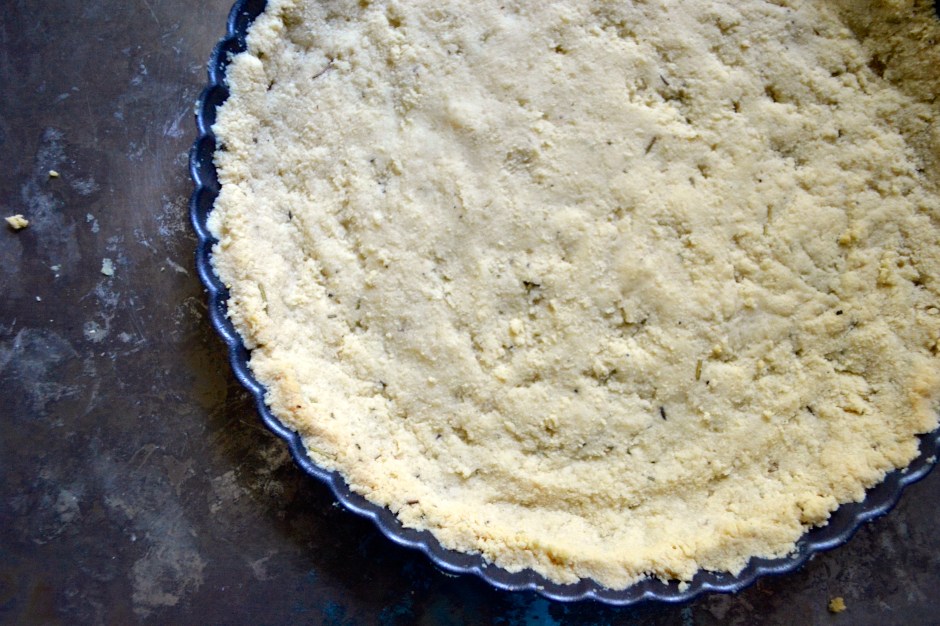
Bake something wholesome…. like a savory tart, which is where this basic tart crust came into my life this weekend. Everyone should have a basic pie crust and tart crust recipe up their sleeves. And bonus for the gluten and grain free gang, almond flour makes a wonderful flaky and light crust.

DSC_0205

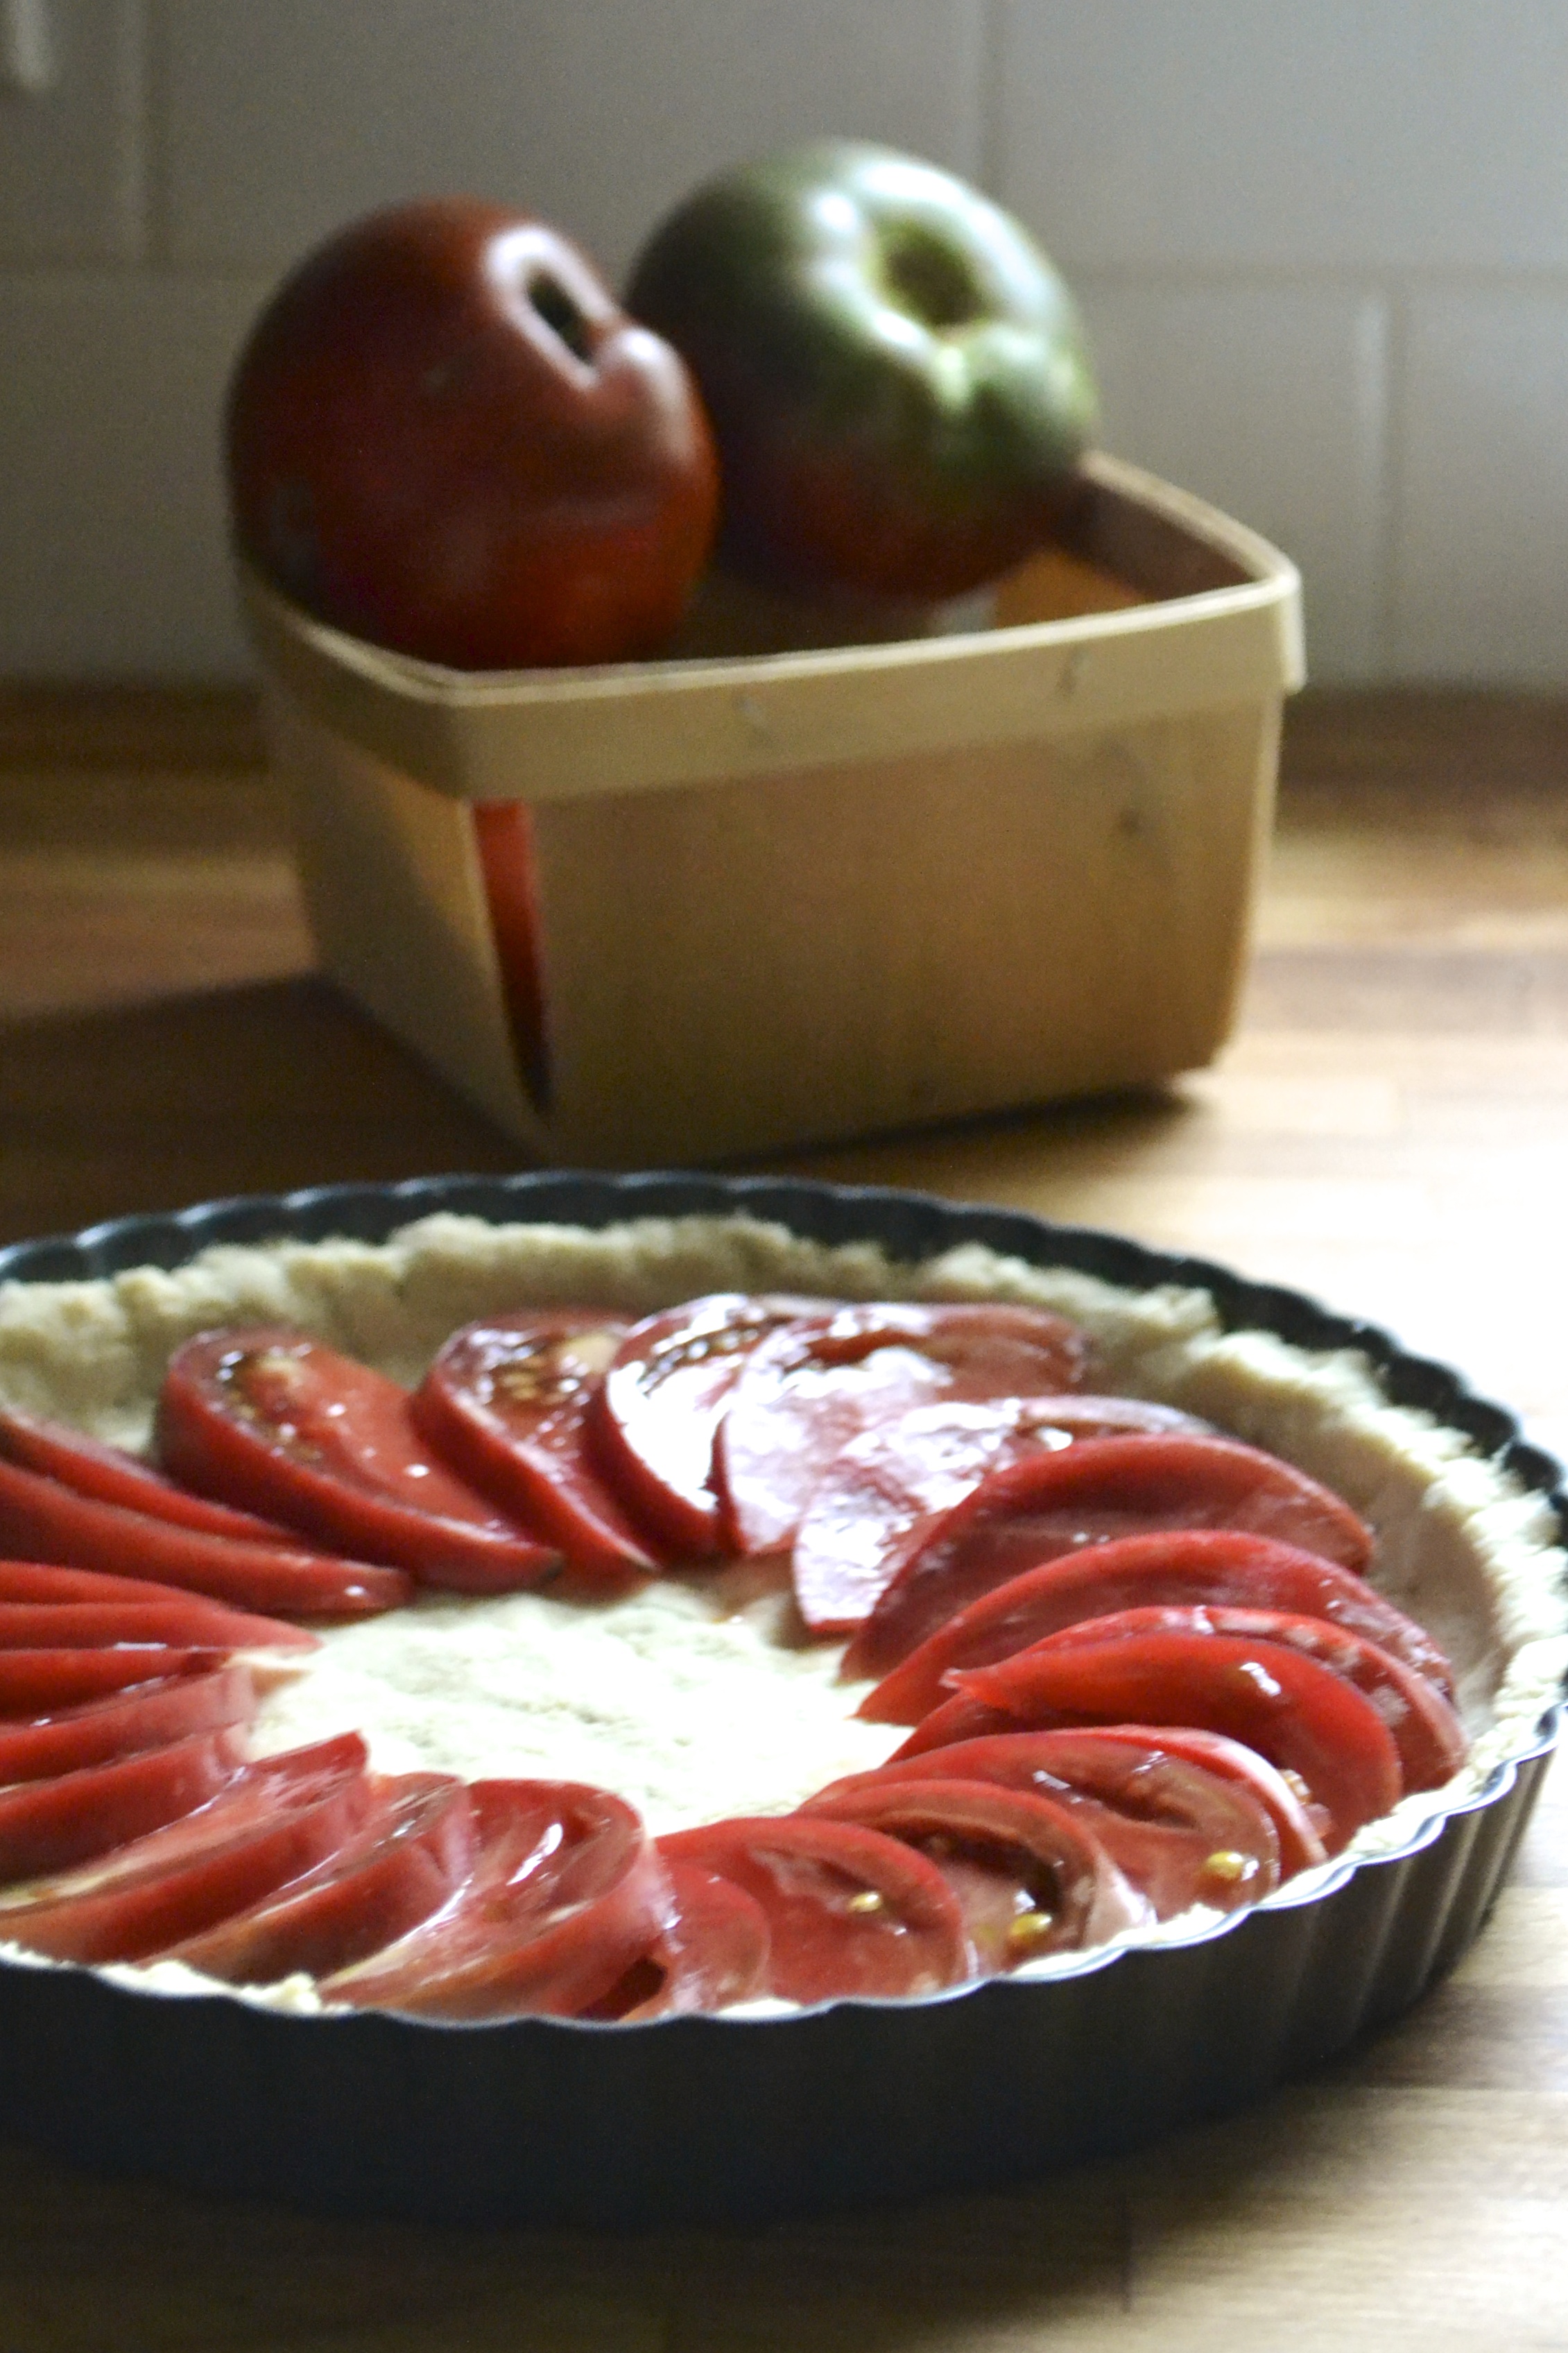
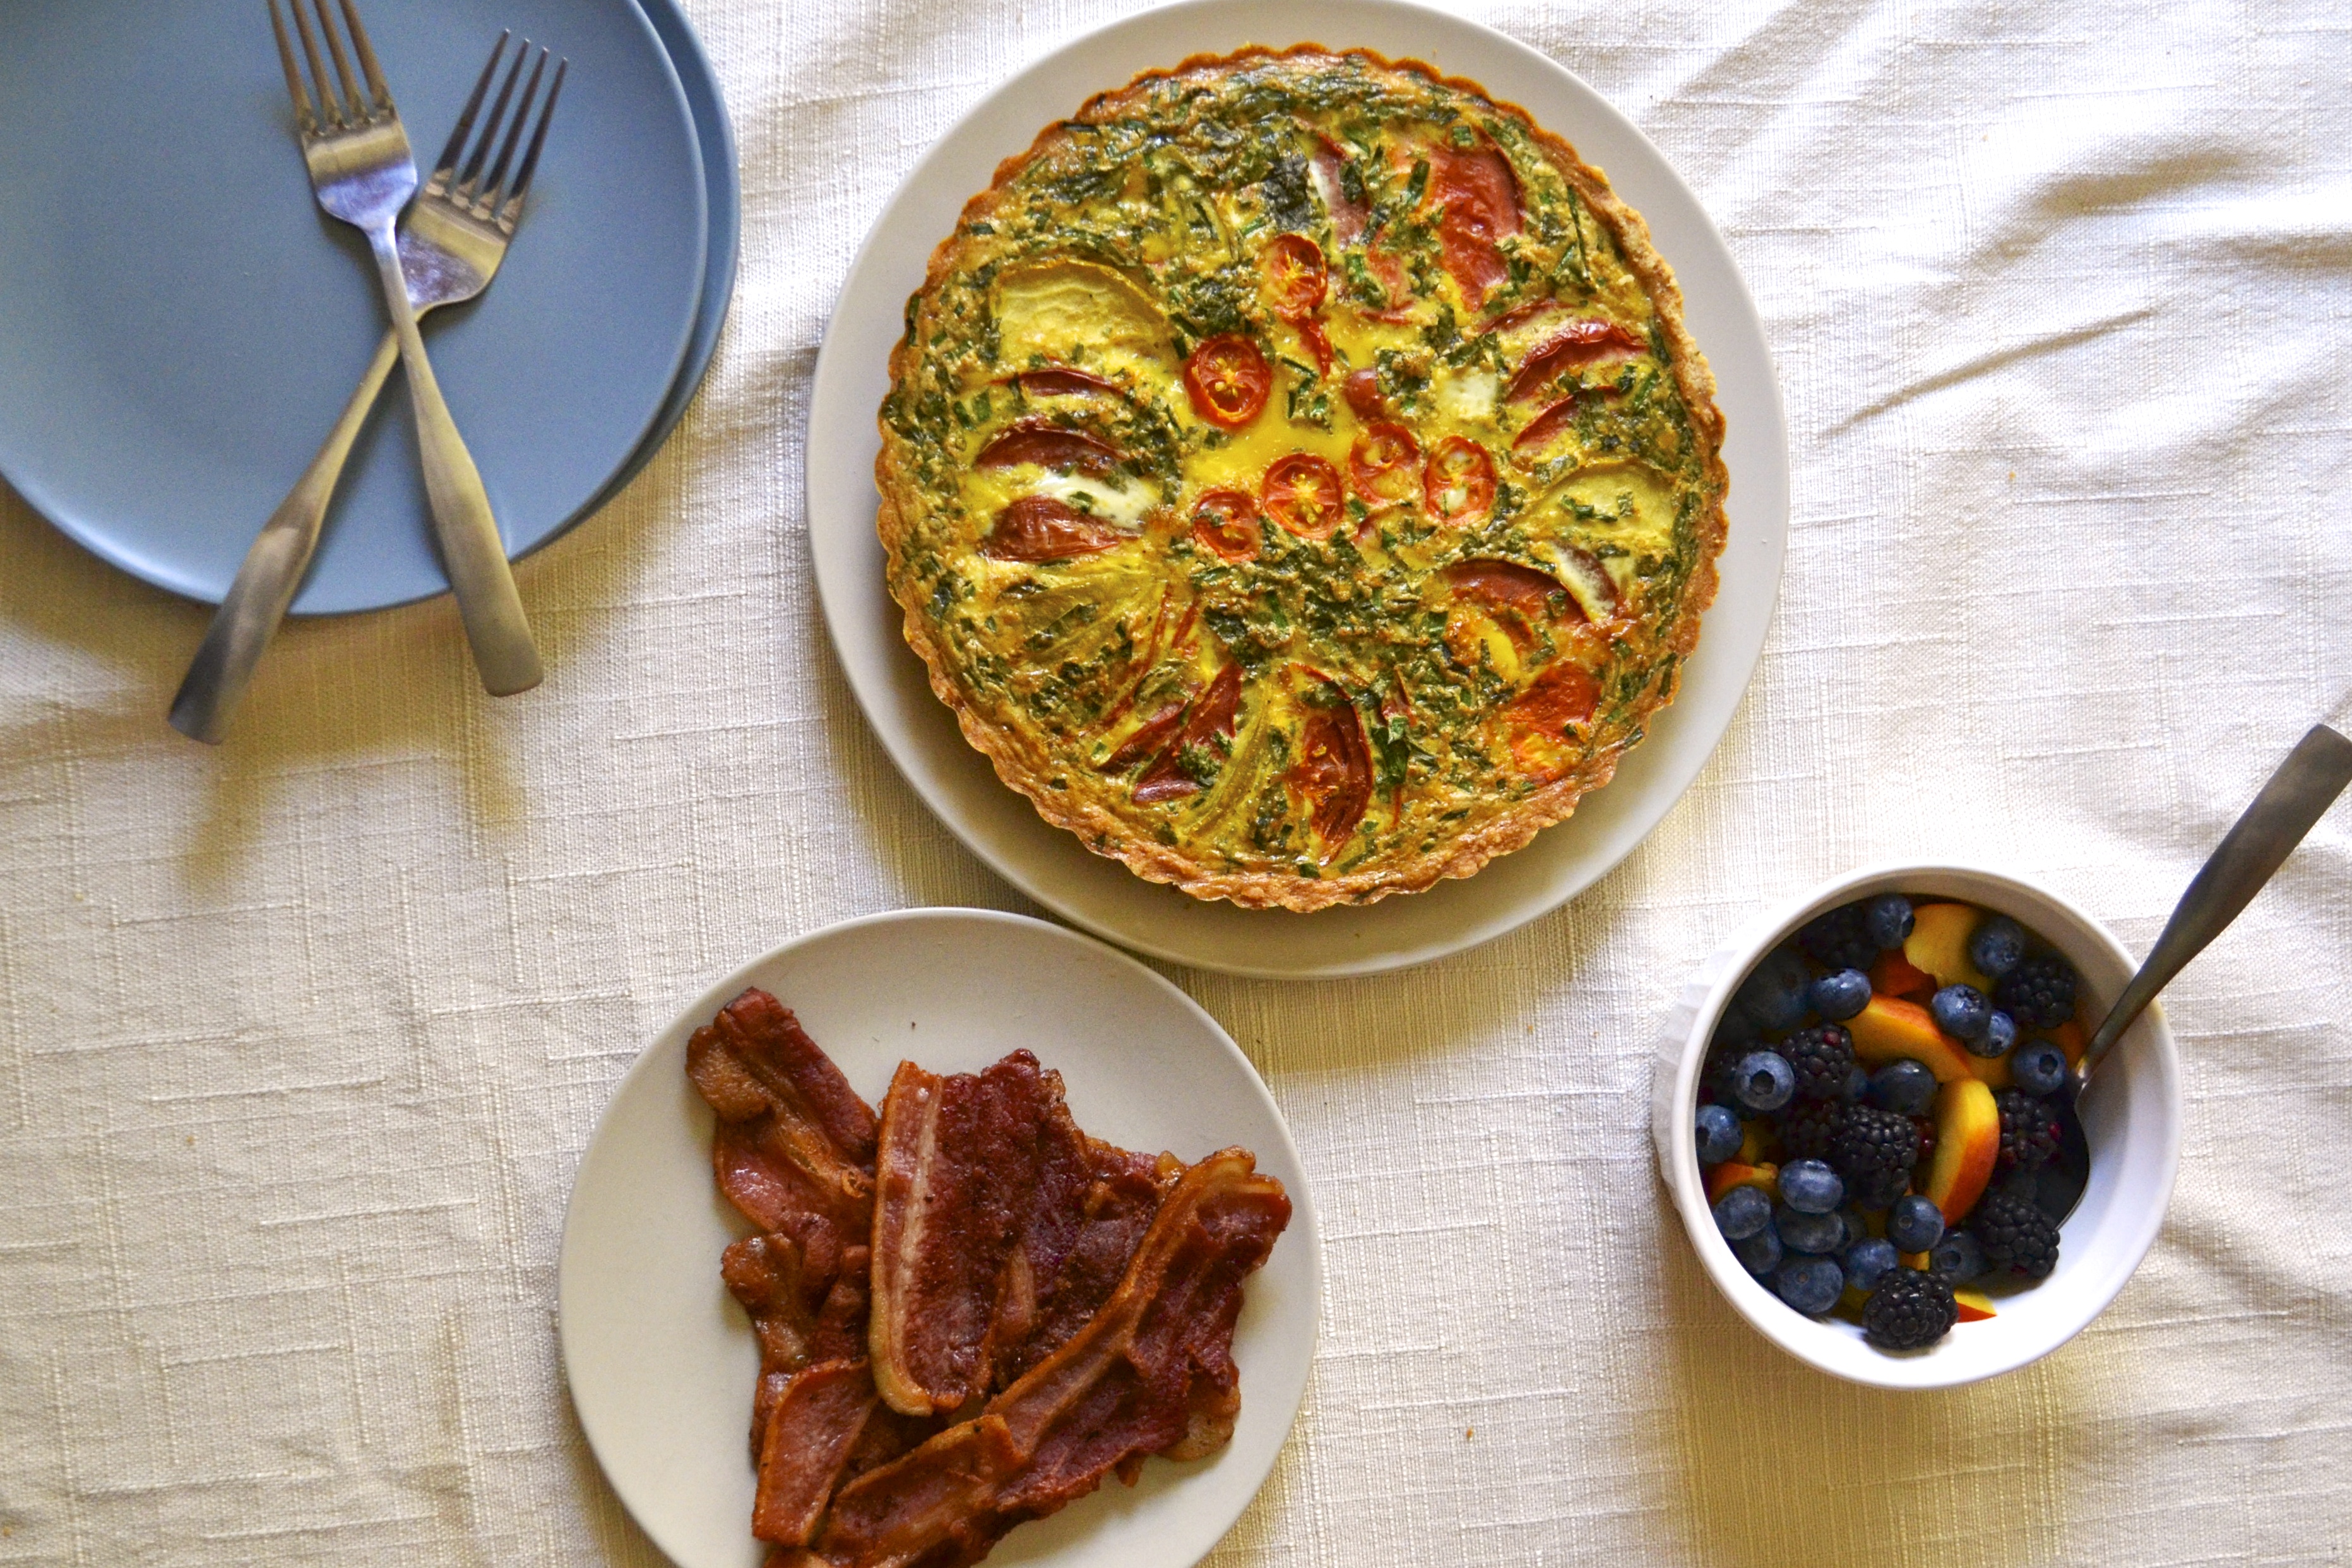
This basic tart crust is based on a fabulous recipe from the Gluten-Free Almond Flour Cookbook by Elana Amsterdam. (Which is a great book for those who are breaking into the world of almond flour baking.) This basic tart crust recipes is easily adaptable to go to the savory side or the sweet side. Currently my fave way to serve this tart crust is by adding fresh herbs from the garden and filling it with eggs and heirloom tomatoes. Simple. Done. And leftovers will be breakfast for the upcoming week! Man, I’m liking this simple life.

For other savory fillings, you could use this crust for a quiche crust or as an open pot pie crust! However, if going sweet, eliminate the black pepper and rosemary and add a tablespoon of honey. This would be simply great filled with lemon curd. Mmmm.

DSC_0232

Rosemary Almond Flour Tart Crust (Adapted from Gluten-Free Almond Flour Cookbook)

Makes 1 9-inch tart crust

Ingredients

  • 1 1/2 cups almond flour (I use Honeyville)
  • 1/4 teaspoon salt
  • 2 teaspoons fresh chopped rosemary
  • 1/8 teaspoon ground black pepper (optional)
  • 1/3 cup coconut oil (or butter), softened
  • 1 to 2 Tablespoons cold water

Instructions

  1. Preheat oven to 350 F. Lightly butter or oil a 9-inch tart pan and set aside.
  2. Place the dry ingredients into a medium bowl and combine with a wire whisk.   Add softened coconut oil and mix with a spoon until combined. Add in the ice water, starting with just 1 tablespoon. Combine with your hands until the mixture begins to hold together. If the dough is not holding together, add a second tablespoon of cold water. Press into a ball. If making ahead, you can cover the ball of dough in plastic wrap at this stage and place in the fridge for a few hours until you are ready to bake it.
  3. Place the dough ball into the prepared tart pan. Starting from the center of the dough, press into the tart pan evenly working your way out to the sides. Press the dough up the sides evenly. Pierce the bottom of the crust with a fork a few times.
  4. If making a tart crust that will be cooked after it is filled, then you will want to partially bake the crust. However, if you are filling the tart with something that will not bake after it is filled, then you will need to fully bake this crust.  Place the tart crust in a preheated 350 F oven and either partially bake for 15 minutes or fully bake for 30 minutes or until the tart is lightly golden brown.
  5. Remove from oven and allow to cool on a wire rack for 5 to 10 minutes before filling.

Almond Butter Banana Muffins

I am a bit of a hoarder.  I’m definitely a food hoarder, but also a hoarder of things. My husband thinks it is junk.  Which it isn’t! But seriously, I keep things in boxes that I have never looked at for the past four years that we have lived here.  I find myself holding on to things because… “don’t you dare get rid of it because I am saving that chair just in case some day I want to paint it red and have a tea party”. Yes…that really came out of my mouth.

DSC_0001

He recently decided to have a garage sale…or an “Alissa’s Things Sale” as I refer to it. He doesn’t hold on to anything. When we got married, he moved into my house with a single box. I had a U-Haul trailer that could have fit a plane. So needless to say, purging is a hard thing for me. I remember every gift someone gave to me. I can’t seem to part with it even if that person totally does not remember giving it to me. They probably just picked it up randomly and thought “crap, it’s her birthday…uhm…ya, here’s a chicken tea pot…she eats chicken…she drinks tea…CHICKEN TEA POT!”.  And here I am 15 years later with the ugliest tea pot and refusing to get rid of it. Until one day I wake up and the love of my life is selling all of my precious belongings (crap) and other people are walking away with my chicken tea pot!  *sob*

DSC_0003

DSC_0015

It was a similar feeling for me when I made the switch a year ago to give up gluten. Making the switch to being gluten free can be tough sometimes. It’s hard to not feel like an outsider when everyone is laughing and enjoying cake and big plates of lasagna. Family gatherings and cookouts and office parties offer a plethora of pasta salads and cupcakes and brownies and bread and crackers.  I would end up being the person in the corner snacking on carrots and a bag of nuts that I had stashed away in my purse like a squirrel.  BECAUSE I AM A HOARDER.

One day I decided to PURGE! I threw away everything that contained wheat or even traces of wheat.  It felt awesome.  I began researching and arming myself with easy recipes to bring to gatherings. So now I always offer to bring something that I know that I can eat and that will blow the socks off of others that have no idea how great gluten free food can be.

DSC_0010

This recipe uses nut butter in place of flour! No flour, no oil, no butter.  Basically it is just almond butter and bananas and honey and eggs. Those purged cabinets probably have these simple ingredients in them.  These muffins are rediculously good and rediculously easy!  I have made them with almond butter and also with peanut butter. Both are fabulous.  You can also add cocoa powder to the batter for chocolate cupcakes!

Almond Butter Banana Muffins

Ingredients

  • 1 cup almond butter* (see note below)
  • 2 ripe bananas, mashed (about 1 cup)
  • 2 eggs, lightly beaten
  • 1 teaspoon baking soda
  • 1 teaspoon vanilla
  • 1/2 teaspoon sea salt
  • 1/4 cup honey
  • 1/2 teaspoon cinnamon (optional)
  • 2 tablespoons cocoa powder (optional)

Instructions

  1. Preheat oven to 350 F. Prepare a 12 cup muffin tin with muffin liners. Set aside.
  2. In a medium bowl, combine the banana, eggs, and almond butter until well mixed. Add the remaining ingredients except the cocoa powder. With half of the batter, fill 6 muffin liners 3/4 full. I use a 1/4 cup to measure for each. With the remaining muffin batter, add the cocoa powder. Fill the remaining 6 muffin cups to 3/4 full with the chocolate batter.
  3. Bake for 15 minutes at 350F. Muffins will be firm a slightly golden, but fluffy. Allow to cool for 10 minutes then remove from the muffin pan to a wire rack.

*Notes

  1. I have also made these with peanut butter and they were great. I assume other nut butters would work too. If you have a nut allergy, sunbutter (sunflower seed butter) would be a good substitute.
  2. I recommend all natural and unsweetened nut butters. However, if you aren’t using all natural nut butters (that is, if they have added sweeteners) then lower the overall amount of added honey in the recipe.
  3. These are also delicious as cupcakes!

Mushroom, Spinach, and Sausage Crustless Quiche (Gluten Free and Dairy Free)

Want to have brunch with me this morning?

Please? I’ve made a delicious Quiche.  It’s crustless, but I promise you won’t miss the crust.

Go on…pull up a chair…keep your pjs on…I made an extra pot of coffee.  I even have a fire in the fireplace. It’s cozy. No need to put pants on. You are my guest!

DSC_0261

DSC_0267

It’s biting cold outside, but in the kitchen it smells of coffee, bacon, and love. Quiche love.  Warm and creamy and hearty and filling Quiche that is baking just for you.  No no no…it was no trouble at all. Whipped it up quick and threw it in the oven. Here…need more coffee? Let’s talk.

DSC_0258

I’m sorry that things have been so tough lately.  Life is crazy and terrible sometimes. But just for this morning, let’s not think of those things. Let’s dream. Let’s remember the great times and the blessings that we have. Let’s remember our small victories.

Need some more coffee? Cream? Sugar?

I missed you.  I’m so glad that you came over.

Need another slice of bacon? Seriously…I made extra. Next time I’ll make us a mimosa.

We should do this more often.

DSC_0263

Mushroom, Spinach, and Sausage Crustless Quiche (Gluten Free and Dairy Free)

Serves 4 to 6

Ingredients

  • 1/2 teaspoon salt
  • 1/4 teaspoon fresh black pepper
  • 8 eggs
  • 1/3 cup coconut milk (low fat or full fat)
  • 2 Tablespoon butter, bacon grease, or olive oil
  • 10 oz baby bella mushrooms, sliced
  • 1/2 teaspoon dried thyme
  • 1 spicy italian chicken sausage, diced
  • 1 package of fresh spinach (or kale) (3 to 4 cups)

Instructions

  1. Preheat oven to 375 F. Butter a 9-inch pie pan or cake pan and set aside.
  2. In a medium bowl, whisk eggs, salt, pepper, and coconut milk. Set aside.
  3. In a heavy skillet, heat butter over medium heat. Add mushrooms and thyme in a single layer and sauté until browned. Don’t crowd them. Toss in sausage and brown (about 2 minutes) stirring often. Add spinach on top of cooked mushrooms and sausage. Stir and cook until spinach is slightly wilted, about 1 to 2 minutes. Remove skillet from heat. Add a pinch of salt and pepper to taste.
  4. Spoon and spread the mushroom, sausage, and spinach evenly into the prepared pie pan. Top this with the egg mixture.
  5. Bake for 35 to 40 minutes, or until slightly golden brown on edges, puffed, and set in the middle. Serve warm or at room temperature.  Leftovers are great reheated for breakfast or lunch.

Paleo Cranberry and Apple Cobbler

My heart is heavy on this last day of December and this last day of 2012. I’m staying in my pajamas and watching the snow fall. The snow falls so peaceful outside my window, yet I know that sometimes there is no peace and life is just not fair.  

DSC_0234

My thoughts go out to everyone who has lost someone this year. My thoughts go out to those that are lost. My thoughts go out to those that are enduring hardships that are unfathomable. 

There are so many cruel and unfair things that occur and I always ask “why?”…but sometimes there is no reason. It’s just the way it is.  I only hope that there is something better that hopefully will come out of tragedy.

DSC_0239

DSC_0253

So I make this cobbler for my friends that are struggling right now, my friends that are enduring an unfathomable loss, my friends that are lost in life.  I make this cobbler to hopefully bring comfort into their hearts and to warm their souls.

Paleo Cranberry and Apple Cobbler (Grain Free, Gluten Free, and Diary Free) (adapted from Beeckman 1802 Heirloom Cookbook)

Filling:

  • 12 oz bag of fresh cranberries
  • 3 medium apples, cored and diced
  • 1/4 cup crystallized ginger, diced
  • 1 cup water
  • 1/3 cup honey
  • 2 tablespoons arrowroot powder

Topping:

  • 1 cup almond flour
  • 1/4 cup chopped walnuts
  • 1 teaspoon ground cinnamon
  • 1/8 teaspoon sea salt
  • 1/4 cup coconut oil, melted

Instructions:

  1. Preheat oven to 350F.  Grease a 9X9-inch baking dish with butter, coconut oil or nonstick spray.  Set aside.
  2. In a medium saucepan, combine cranberries, apples, crystallized ginger, water, and honey. Heat over medium heat until the mixture begins to boil and the cranberries pop. Cook for 5 to 10 minutes.  Remove from heat and stir in arrowroot powder. Pour the hot cranberry mixture into the baking dish and set aside.
  3. In a separate medium bowl, combine all of the topping ingredients. Mix well.  Spoon the topping mixture evenly over the filling.
  4. Bake at 350F for 30 to 40 minutes. The cobbler will begin to bubble and the topping should lightly brown.  Remove from oven and allow to cool for a few minutes.  Best when served with vanilla coconut ice cream!

Grain-Free Hazelnut-Pecan Delights

First things first. I have some amazing news. I received my official notification in the mail that I passed my Professional Engineering exam!!!!  A grueling exam that I studied for nearly half a year for last year. It consumed me, but was worth it.  I now am a certified P.E., which has been a huge goal of mine. CHECK that off my bucket list.

DSC_0218

But now that I have checked that huuuuuge goal off of my list, I find myself at a bit of a loss. Where do I focus my energy next?  I’m a goal-oriented person and it only seems proper to set new goals. But aside from the small goals of “read more books” or “travel more”, I just can’t seem to figure out where to point my laser beams. So, if you have any ideas, I’m game.

At this point, I’m trying to tackle small things that include: (1) Organizing my “office” (junk room), or (2) Thinking about hanging pictures that have never been hung, or (3) Properly learning to do laundry because reading the labels seems more like reading hieroglyphics and I end up just throwing everything in at once and washing on cold. Evidently when clothes say gentle…they mean it. Booh.

DSC_0237

I also have been perfecting cookies….my butt thanks me and my skinny jeans do not. These Hazelnut-Pecan Delights are THE perfect cookie. They are just sweet enough, with a hint of salty, and are chewy and are….well….redonculous. Yes…redonculous, people.

They taste like my favorite Girl Scout cookie….oh that beloved Caramel Delight…and yes…they are soooo delightful.  The bonus with MY cookies is that they are gluten-free, dairy-free, and refined sugar-free. Plus they have hazelnuts and pecans, giving them added protein.

These are perfect to bring to your New Years Eve party, or football Bowl Game watch party, or for your last-hoorah-before-you-go-on-you-2013-fit-back-in-your-jeans party.

DSC_0244

Grain-Free Hazelnut-Pecan Delights

Makes 2 dozen tiny, bite-sized cookies

Ingredients

  • 1 cup hazelnuts
  • 1/2 cup pecans (or other raw nut such as almonds, walnuts)
  • 3 teaspoons ground ginger
  • 1/8 teaspoon fine sea salt
  • 1/4 teaspoon baking soda
  • 2 Tablespoons coconut oil, softened
  • 4 Tablespoons maple syrup or honey
  • 1 Tablespoon unsulphured blackstrap molasses
  • 1/4 cup dark chocolate chips, chopped into tiny pieces
  • 1/3 cup unsweetened shredded coconut

Instructions

  1. Preheat oven to 350F. Line a baking sheet with unbleached parchment paper or a Silpat mat.
  2. In a the bowl of your food processor, add nuts and process for 2 minutes, until finely ground.  Add ground ginger, salt, and baking soda and process until well mixed. Add coconut oil, honey, and molasses and process until a thick cookie dough ball forms. Add chocolate chips and shredded coconut to the food process or and pulse for 15 to 30 seconds to finely chop the chocolate, distributing throughout the cookie batter.
  3. Chill the batter in the refrigerator for at least 30 minutes, making it easier to scoop and form cookies.
  4. I like these cookies tiny and barely bite-sized.  Scoop out the dough in exact, level tablespoons. Then tear those pieces of dough in two before rolling each 1/2 tablespoon of dough into a ball shape.  Place dough a few inches apart on prepared baking sheets.  Use a wet fork to flatten each dough ball into your desired cookie thickness.
  5. Bake for 10 to 12 minutes or until firm around the edges (ovens vary so watch them), but still soft in the center. Allow to cool on the pan for 5 to 10 minutes before transferring to a wire rack to cool completely before serving.

Flourless Brownie Bites (Grain Free)

Merry Christmas!

I hope you all are having a wonderful and cozy day.  My husband I made the trek from KC down to Oklahoma to visit my family.  My brother had back surgery a week ago and has been recovering.  It was wonderful getting to spend time with all of us together.

DSC_0282

We cooked, we ate, we laughed, we made our gingerbread house, and we watched christmas movies on repeat while my bro was horizontal in bed recovering. He’s getting around better and was able to eat dinner with us and walk around with his walker.

DSC_0301

We had to leave a day early because Oklahoma freaks out over the mere mention of a slight chance of snow. So thinking Snowmaggeddon is on its way, we had to make a mad dash up north to Kiley’s family’s house in Tulsa last night to try to miss this “massive” snow storm. We woke up this morning to clear skies and no snow. Womp womp.  But at least we are safe and sound in Tulsa with Kiley’s family now with the warmth of coffee and a fire in the fireplace.  We hope you and your families are warm, cozy, and enjoying time together and slowing down this season.

DSC_0324

I’m whipping up a batch of flourless bite-sized brownies. I love the tiny size for snacking.  There is no flour, only cocoa powder, melted chocolate, honey, eggs, and butter or coconut oil! They are super easy and can be topped with anything you have on hand. Yes…even bacon.  I topped some with bacon (it was a hit), some with crystallized ginger, others with toasted walnuts, and some with salted caramel (my fave). The recipe is inspired by the flourless brownies in my new favorite cookbook, Practical Paleo. The recipe is found below.

DSC_0302

Also, if you are looking for some last minute quick gluten-free recipes to make for Christmas dinner, I’ve gathered up a few of my favorites….

Gluten-Free Breakfast:

DSC_0173

Mexican Breakfast Casserole (Grain Free and Dairy Free)

Crustless Quiche (Grain Free and Dairy Free)

Pumpkin-Apple Muffins (Grain Free and Dairy Free)

German-Style Apple Walnut Pancake (Grain Free and Dairy Free)

Gluten-Free Appetizers:

DSC_0309

Spinach-Cheese Balls (Vegetarian and Grain Free)

Buffalo Chicken Meatballs (Grain Free and Dairy Free)

Nutty Coconut Date Balls (Vegetarian, Grain Free, and Dairy Free)

Gluten-Free Side Dishes:

DSC_0273

Kale Salad with Cranberries, Pecans, and Apples (Gluten Free and Vegan)

Roasted Cauliflower 

Grilled Delicata Squash with Kale (Gluten Free and Vegetarian)

Gluten-Free Desserts:

Ginger Chocolate Chip

Chewy Ginger Chocolate Chip Cookies (Gluten Free, Grain Free, and Dairy Free)

Fudge Brownies (Gluten Free and Vegan)

DSC_0334

Flourless Brownie Bites (adapted from Practical Paleo)

Makes 30 brownie bites

Ingredients

  • 4 ounces dark chocolate (I use 85% cocoa from Trader Joes), melted and cooled
  • 1/2 cup coconut oil or butter, melted and cooled
  • 1/2 cup honey or maple syrup
  • 1/2 cup unsweetened cocoa powder, sifted
  • 1 teaspoon vanilla extract
  • 3 eggs, beaten
  • 1/4 teaspoon salt
  • 1/4 teaspoon baking soda
  • Toppings or mix-ins: bacon, walnuts, crystallized ginger, caramel, unsweetened coconut, flaked salt

Instructions

  1. Preheat oven to 350F. Grease mini muffin tin with butter, coconut oil, or nonstick spray. Set aside.
  2. To melt the dark chocolate bar, break into small pieces and place in a microwave-safe bowl. Microwave on high at 30 second intervals, stirring in between, until the chocolate is melted. It takes me 2 minutes.
  3. In a medium-sized bowl, combine the melted dark chocolate, melted coconut oil (or butter), maple syrup, vanilla, and eggs. Slowly sift the cocoa powder over the wet ingredients, whisking it evenly to ensure there are no lumps. Stir in salt and baking soda.
  4. Spoon the brownie batter into the mini muffin tins (about 1 1/2 tablespoons per muffin tin), filling about 3/4ths full. Top the batter with the topping of your choice (chopped bacon pieces, walnuts, ginger, coconut, caramel pieces, kosher salt). Bake for 20 to 25 minutes, or until a toothpick inserted into the center comes out clean.

Grain-Free Chewy Ginger Chocolate Chip Cookies

I’m so excited. Christmas is getting closer. We went and picked out our tree a week ago. Even though it feels like Christmas in California (temps are in the 70s!!!), we still decorated the tree, drank bourbon-spiked egg nog, and watched Home Alone.

We pulled out all of our old and favorite childhood ornaments, placing them strategically on each limb.   We have many ornaments that have special meaning, but some are just funny.

Grain Free Ginger Chocolate Chip_04

For instance, we have a ceramic ornament that came from some craft show ages ago that has Santa’s face painted on what appears to be tree bark but instead looks like Santa is floating on poop. We lovingly refer to this ornament as “Terd Santa”. Terd Santa has a high priority placement on the tree. He is usually placed near the 1980 Avon classic Bear Bell (a mama bear whose legs are the swinging bell) and the Headless Paper-mache Angel.

Now that it looks like Christmas has vomited throughout my house, leaving poinsettia and pine cones everywhere….it was time to make it SMELL like it too! I cooked up a batch of ginger chocolate chip cookies to make the house smell of gingerbread and spice.  These are inspired by this amazing cookie that I made last year, which unfortunately contains gluten from the wheat flour. In order to make those cookies grain free, I used almond flour as the base.  If you don’t have almond flour on hand, I have also made these cookies using almond butter, making them slightly more dense and chewy but still scrumptious.

Ginger Chocolate Chip

Even if you are not gluten-free, I seriously recommend this grain free cookies for the following reasons:

(1) The nuts give them protein…GOOD.

(2) They ooze of chocolate…DOUBLE GOOD.

(3) The ginger gives a nice spicy kick in your mouth….YES.

(4) And they are a COOKIE! Hellooooo. Nuff said, peeps.

I made these cookies bite-sized and rolled each one in turbinado sugar. The crunch of the sugar in contrast to the gooey, chewy, chocolatey cookie is divine.  WARNING – these suckers are so easy to pop in your mouth like popcorn. They can be quite addictive.

SO HIDE THEM IF YOU WANT TO EAT ANY!!!!  Because as soon as you tell anyone else that you made them, they will disappear and you may not get any…booooh. At least that is what happens in my house!!!

Ginger Chocolate Chip

Grain-Free Chewy Ginger Chocolate Chip Cookies (Gluten Free, Vegan, Paleo Friendly)

Makes 2 dozen tiny, bite-sized cookies

Ingredients

  • 1½ cups almond flour*
  • 2 Tablespoons coconut oil, softened
  • 4 Tablespoons maple syrup or honey
  • 2 Tablespoons unsulphured blackstrap molasses
  • 3 teaspoons ground ginger
  • 1/8 teaspoon fine sea salt
  • 1/4 teaspoon baking soda
  • 1/4 cup dark chocolate chips or bar, chopped into tiny pieces
  • 1/3 cup turbinado sugar or coconut palm sugar (optional)

Instructions

  1. Preheat oven to 350F. Line a baking sheet with unbleached parchment paper or a Silpat mat. Place the large-grain turbinado sugar or coconut palm sugar in a small bowl and set aside.
  2. In a medium bowl, combine almond flour, coconut oil, maple syrup, ginger, salt, and baking soda. Mix until a thick batter is formed. Chill the batter in the refrigerator for at least 30 minutes which will make it easier to scoop and form cookies.
  3. I like these cookies tiny and barely bite-sized.  Scoop out the dough in exact, level tablespoons. Then tear those pieces of dough in two before rolling each 1/2 tablespoon of dough into a ball shape. From there, grab a small handful of the large-grained sugar that was set aside earlier and roll each ball between your palms to coat the outside of each dough ball.  Place dough a few inches apart on prepared baking sheets.  Use a wet fork to flatten each dough ball into your desired cookie thickness. 
  4. Bake for 7 to 10 minutes or until firm around the edges, but still soft in the center. Allow to cool on the pan for 5 to 10 minutes before transferring to a wire rack to cool completely before serving.
  5. Hide a few for your secret stash!

*NOTE – I use Honeyville almond flour. I have also made these cookies using 1 cup of almond butter instead of the 1.5 cups of almond flour. The cookies tasted great but were a little more dense.  I personally liked them both! So feel free to sub out for almond butter if you do not have access to almond flour.

Carrot, Walnut, Cranberry Bread with Almond Flour

I’m a morning person. At least, I thought I was a morning person until I met my husband.  He is the HAPPIEST morning person I have ever known. But here is the problem. His über happy morning disposition turns me into the most grump-a-licious person.  It’s weird.

Grey clouds swirl my head and lightning bolts shoot out of my red beady eyes as soon as he starts skipping around.  It’s like I have to balance out his extremely excited attitude by acting like someone took a poop in my Cheerios. If we both were happy at once, the house would implode! right?

Don’t get me wrong, I’m so glad that he isn’t crabby or grumpy…like me.  But, in the mornings, there are a couple of “rules” that I tend to follow. Rules that, well…my husband does not.  I consider these rules to be universal, but after marrying a man who is anything but rigid, pragmatic, or regimented…. I realize that my rules only apply to me….a very rigid, pragmatic, and regimented person. 

For example…

Alissa Morning Rules – The first thing that must occur is the brewing of a large pot of coffee. No speaking above a certain decibel in the morning.  I like to open the windows and see the fresh light stream through the house.

Kiley Antirules – Anything goes. Sing as loud as possible in as many octaves as possible. If you don’t know the words, make them up.  There are no songs off-limits.  Drum beats on hard surfaces (including your wife’s butt) are encouraged.  Turn TV on immediately, play music on phone, watch videos on iPad…..all at the same time.

I love and adore this man…but honestly, must he sing the Gummy Bears theme song at 6:30 am? Seriously. I didn’t even know they had a theme song. And maybe they don’t and he just was singing this ridiculously happy song. Must he sing the ENTIRE R Kelly “Trapped in the Closet” montage!?

But that is just it…he is happy.

So happy.

He hasn’t even drank coffee and he’s bouncing around like a pinball. And then I think…why is this man married to me? Why is he constantly happy to wake up next to the grouchiest person that THINKS she is a morning person but will break your finger in three places if you dare touch her before coffee and food are in her hands.

And that’s when I realize that I’m grateful for things that just don’t make sense sometimes. I’m grateful that this bouncy jukebox-singing man continues to wake up every morning and think that he hit the jack pot…with me. HA.  I know that if that jukebox ever went silent, my world would be a very boring and sad place. It would be like having banana bread every morning.

I mean, I like banana bread…just like I love silence in the mornings sometimes, but when you’ve had Carrot, Walnut, Cranberry Bread…whoa buddy…it’s a new ball game. Breakfast is exciting again. This breakfast bread is carrot cake reincarnated in a breakfast. So make a batch, freeze part of it for quick breakfasts, and you will find yourself singing your own morning show tunes. Just be sure to warn your family!

Carrot, Walnut, Cranberry Bread with Almond Flour (Grain Free, Gluten Free, Dairy Free, Refined Sugar Free, Paleo-Friendly)

(adapted from Anja’s Food 4 Thought)

Makes 2 loaves or 24 muffins 

Ingredients

  • 1 1/2 cup almond flour (I use Honeyville)
  • 2 teaspoons baking powder
  • 1/4 teaspoon salt
  • 2 teaspoon cinnamon
  • 3 eggs
  • 2 teaspoons vanilla extract
  • 4 tablespoons coconut oil
  • 4 bananas, mashed (1 cup)
  • 2 tablespoons honey or maple syrup
  • 4 medium carrots, shredded
  • 1/2 cup unsweetened coconut
  • 1/2 cup dried cranberries
  • 1/4 cup walnuts, chopped

Instructions

  1. Preheat oven to 350F. Spray muffin tins or loaf tins with nonstick spray.
  2. Mix dry ingredients (almond flour, baking powder, salt, and cinnamon) in a medium bowl. In a separate bowl, mix wet ingredients (eggs, vanilla, coconut oil, mashed bananas, and honey). Add wet ingredients to dry and mix until combined. Stir in carrots, coconut, cranberries, and walnuts.
  3. Pour batter into prepared loaf tins or muffin tins. Bake at 350F for 40 to 50 minutes if baking loaves. For muffins, bake at 350F for 25 to 35 minutes or until a cake tester comes out clean. Allow to cool for 5 to 10 minutes before removing from tins. Place muffins/loaves on cooling rack.  Muffins keep best in the refrigerator. I freeze a batch to reheat for quick breakfasts.

Roasted Pumpkin Seeds (Pepitas)

Tis’ the season of roasting pumpkins, butternut squash, acorn squash, delicata squash…. We all know what to do with the roasted flesh. Hello pumpkin pie and pumpkin bread.

But, don’t stop there! Roast those seeds. They are delicious as a snack, on a salad, or topping a delicious pumpkin or butternut squash soup!

These were a great addition on our holiday table this year. I used the seeds from the pie pumpkin that was the centerpiece for our Friendsgiving!

Toasted pumpkin seeds are a healthy snack too.  The flavors options are endless: Cajun, BBQ, cinnamon-spice, curry, or simply salt and pepper.

When you scoop out the seeds from the pumpkin or winter squash, wash off the pumpkin goop. Discard stringy fiber from seeds along with any seeds that are split or cracked then transfer to a strainer and rinse well. Drizzle with olive oil, seasoning, and salt. Roast in an oven until golden and BAM. Tasty tasty tasty.

I hope that everyone has a wonderful Thanksgiving.  We are lucky to have amazing friends and family to celebrate and eat delicious food with.  Please be safe this week in your travels! Merry Thanksgiving from Kansas City!

Roasted Pumpkin Seeds

Ingredients

  • Seeds from one medium-sized pumpkin or winter squash (Acorn, Butternut, Hubbard, Delicata) – about 1 cup
  • 2 tsp olive oil
  • 1/2 tsp sea salt
  • 1 to 2 tsp seasoning of choice (Cajun, BBQ, curry, cinnamon n sugar) (optional)

Instructions

  1. Preheat oven to 375. Spray a rimmed baking sheet with nonstick spray.
  2. In a medium-sized bowl, drizzle the olive oil over the pumpkin seeds. Add the seasoning of choice and salt. Toss well. Place seeds in a single layer across a baking sheet.
  3. Bake for 15 to 20 minutes or until seeds are golden. Sprinkle with a bit more seasoning when the seeds come out of the oven. Taste and season with more salt if needed. Makes about 1 cup.

German-Style Cinnamon Apple Walnut Pancake (Gluten Free)

It is official… I AM DONE!  I took my Professional Engineering (P.E.) exam yesterday and I feel GREAT.  I was so worried that after I finished that 8-hour monster exam, that I would feel drained and crappy and not want to be around anyone….but instead I walked out of that room like Mary Poppins and a bird singing on my shoulder. I was on a high…and still am. Who knows if I passed, but it feels good for it to be over.

I feel like I have new-found freedom. A new life. What should I do with ALL this time…. build a pantry? Finish painting the hallway that I started painting a year ago? Finish painting the back bedroom that I started a year ago?  Clean? no……

Instead, I shall make apple pancakes. And applesauce and apple pie and apple butter. And well, a lot of apple things, because I went apple picking last weekend.  Like nearly everyone that goes apple picking, we got quite zealous and brought home bushels and bushels and bushels of apples. I’ll be handing out loads of apple-themed goods for christmas. Act surprised! Heck…I might just hand you an apple. 🙂 Cheers.

Although I have a big crush on Mr Pumpkin, my true love is the humble Apple.  There are so many varieties.  A variety for all of my moods and emotions…tart or crisp or sweet or complicated. And who can resist that amazing aroma of baked cinnamon apples!? If you can resist it, your sick…weird…you need help.

So, with my loads of free time, I present an aroma therapy, gluten and grain free version of a german-style pancake that is made with coconut flour and loaded with cinnamon apples and walnuts.  It is made in one large oven proof skillet and would be perfect for crowds and the upcoming holidays.  The bottom of the “pancake” is layers of thinly sliced cinnamon spiced apples that bake in the oven while you prepare the batter. After the batter is whipped up, remove the baked apples from the oven, pour the prepared batter on top, sprinkle with nuts, place back into the oven, and let the holiday spirit and aroma fill your house. No fuss. Sit back. Sip that coffee. Then you can pull out a piping hot pancake that everyone gets to enjoy…..at the same time.

Oh…and don’t forget the real maple syrup, people. No Log Cabin! I mean it.  The pancake itself is not that sweet. It has natural sweetness from the apples, but it provides ample opportunity to manually sweeten your pancake slice with the goodness of fresh maple syrup and a dollop of coconut butter. Mmmm.

Note: This pancake is made with coconut flour. Coconut flour can not be substituted one for one with other flours. Because it does not contain gluten, it is dense and requires a poop ton of eggs to lighten and fluff up the recipe. Coconut flour can be found in most health food stores, online, and the health food section of most grocers.  It’s very healthy and packed with nutrients and fiber. It does not impart an overwhelming flavor of coconut to the pancake. It is the perfect balance of nuttiness. Don’t be scared….try something new!

German-Style Cinnamon Apple Walnut Pancake (adapted from the Foodie and The Family)

Serves 8

Ingredients

  • 2 medium apples, sliced thin with skins on (I used fresh picked Fuji)
  • 1 + 1/8 teaspoon ground cinnamon
  • 1/2 + 1/8 teaspoon ground nutmeg
  • 3 tablespoons coconut oil, melted and divided (or unsalted butter)
  • 4 tablespoons coconut palm sugar (or honey, maple syrup), divided
  • 6 eggs, beaten
  • 3/4 cup milk (or almond milk, coconut milk)
  • 2 teaspoons gluten-free vanilla
  • 1/4 cup coconut flour
  • 1/2 teaspoon baking soda
  • pinch of salt
  • 1/4 cup walnut pieces
  • 1/4 cup unsweetened shredded coconut (optional)

Instructions

  1. Preheat the oven to 375 F. Place 10-inch cast iron skillet in oven to preheat the skillet.
  2. Core apples, but keep skins on. Slice the apples thinly with a mandolin slicer at about 1/8-inch thick. To the apples, add coconut palm sugar (or honey or maple syrup), 1 teaspoon of cinnamon and 1/2 teaspoon of nutmeg. Toss to coat with sugar and spices.
  3. Remove the preheated skillet from oven. Add 1 tablespoon of coconut oil  or butter to the skillet and allow to melt. Toss sliced apples into the skillet and stir to coat the apples with melted coconut oil. Spread the apples evenly along the bottom of the skillet. Place the skillet with the apples back into the preheated oven to bake while you prepare the batter (about 10 minutes).
  4. In a large bowl, whisk eggs, milk, melted coconut oil (or butter), vanilla, and coconut sugar. In a separate medium bowl, add coconut flour, 1/8 teaspoon nutmeg, 1/8 teaspoon cinnamon, salt, and baking soda. Add dry ingredients to wet ingredients. Mix well to combine or until there are no lumps.
  5. Remove skillet with baked apples from oven. Stir apples and redistribute evenly along the bottom of the skillet. Pour batter mixture evenly over the prepared baked apples. Sprinkle with walnuts and unsweetened coconut.
  6. Place the skillet back into the oven. Bake for 25 to 30 minutes at 375 F, or until top is golden brown.
  7. Remove skillet from oven. Serve with fresh maple syrup and homemade coconut butter!