Heirloom Tomato Quiche with Rosemary Almond Flour Crust

DSC_0209

People! We have a lot to celebrate around here. The weather in Kansas City has been ridiculously amazing. Highs in the 70s…in AUGUST! I’m in heaven. My windows are wide open! I’m sitting on my back patio. I’m wearing long sleeves in the mornings! Could it get any better? Oh yes it can…

DSC_0195

We got our Google Fiber hooked up this week! My internet is Speeeeeeeedy McSpeederson!

AND my family sent me some fresh honey from the farm!!!!! YUM!

AND my husband started back as a teacher! High five hard working teachers!

AND my middle sister went off to college! High five college students!

AND I went and saw my first NFL game…GO CHIEFS (even though you lost…:( )

AND the Royals are dominating… wild card spot here we come!

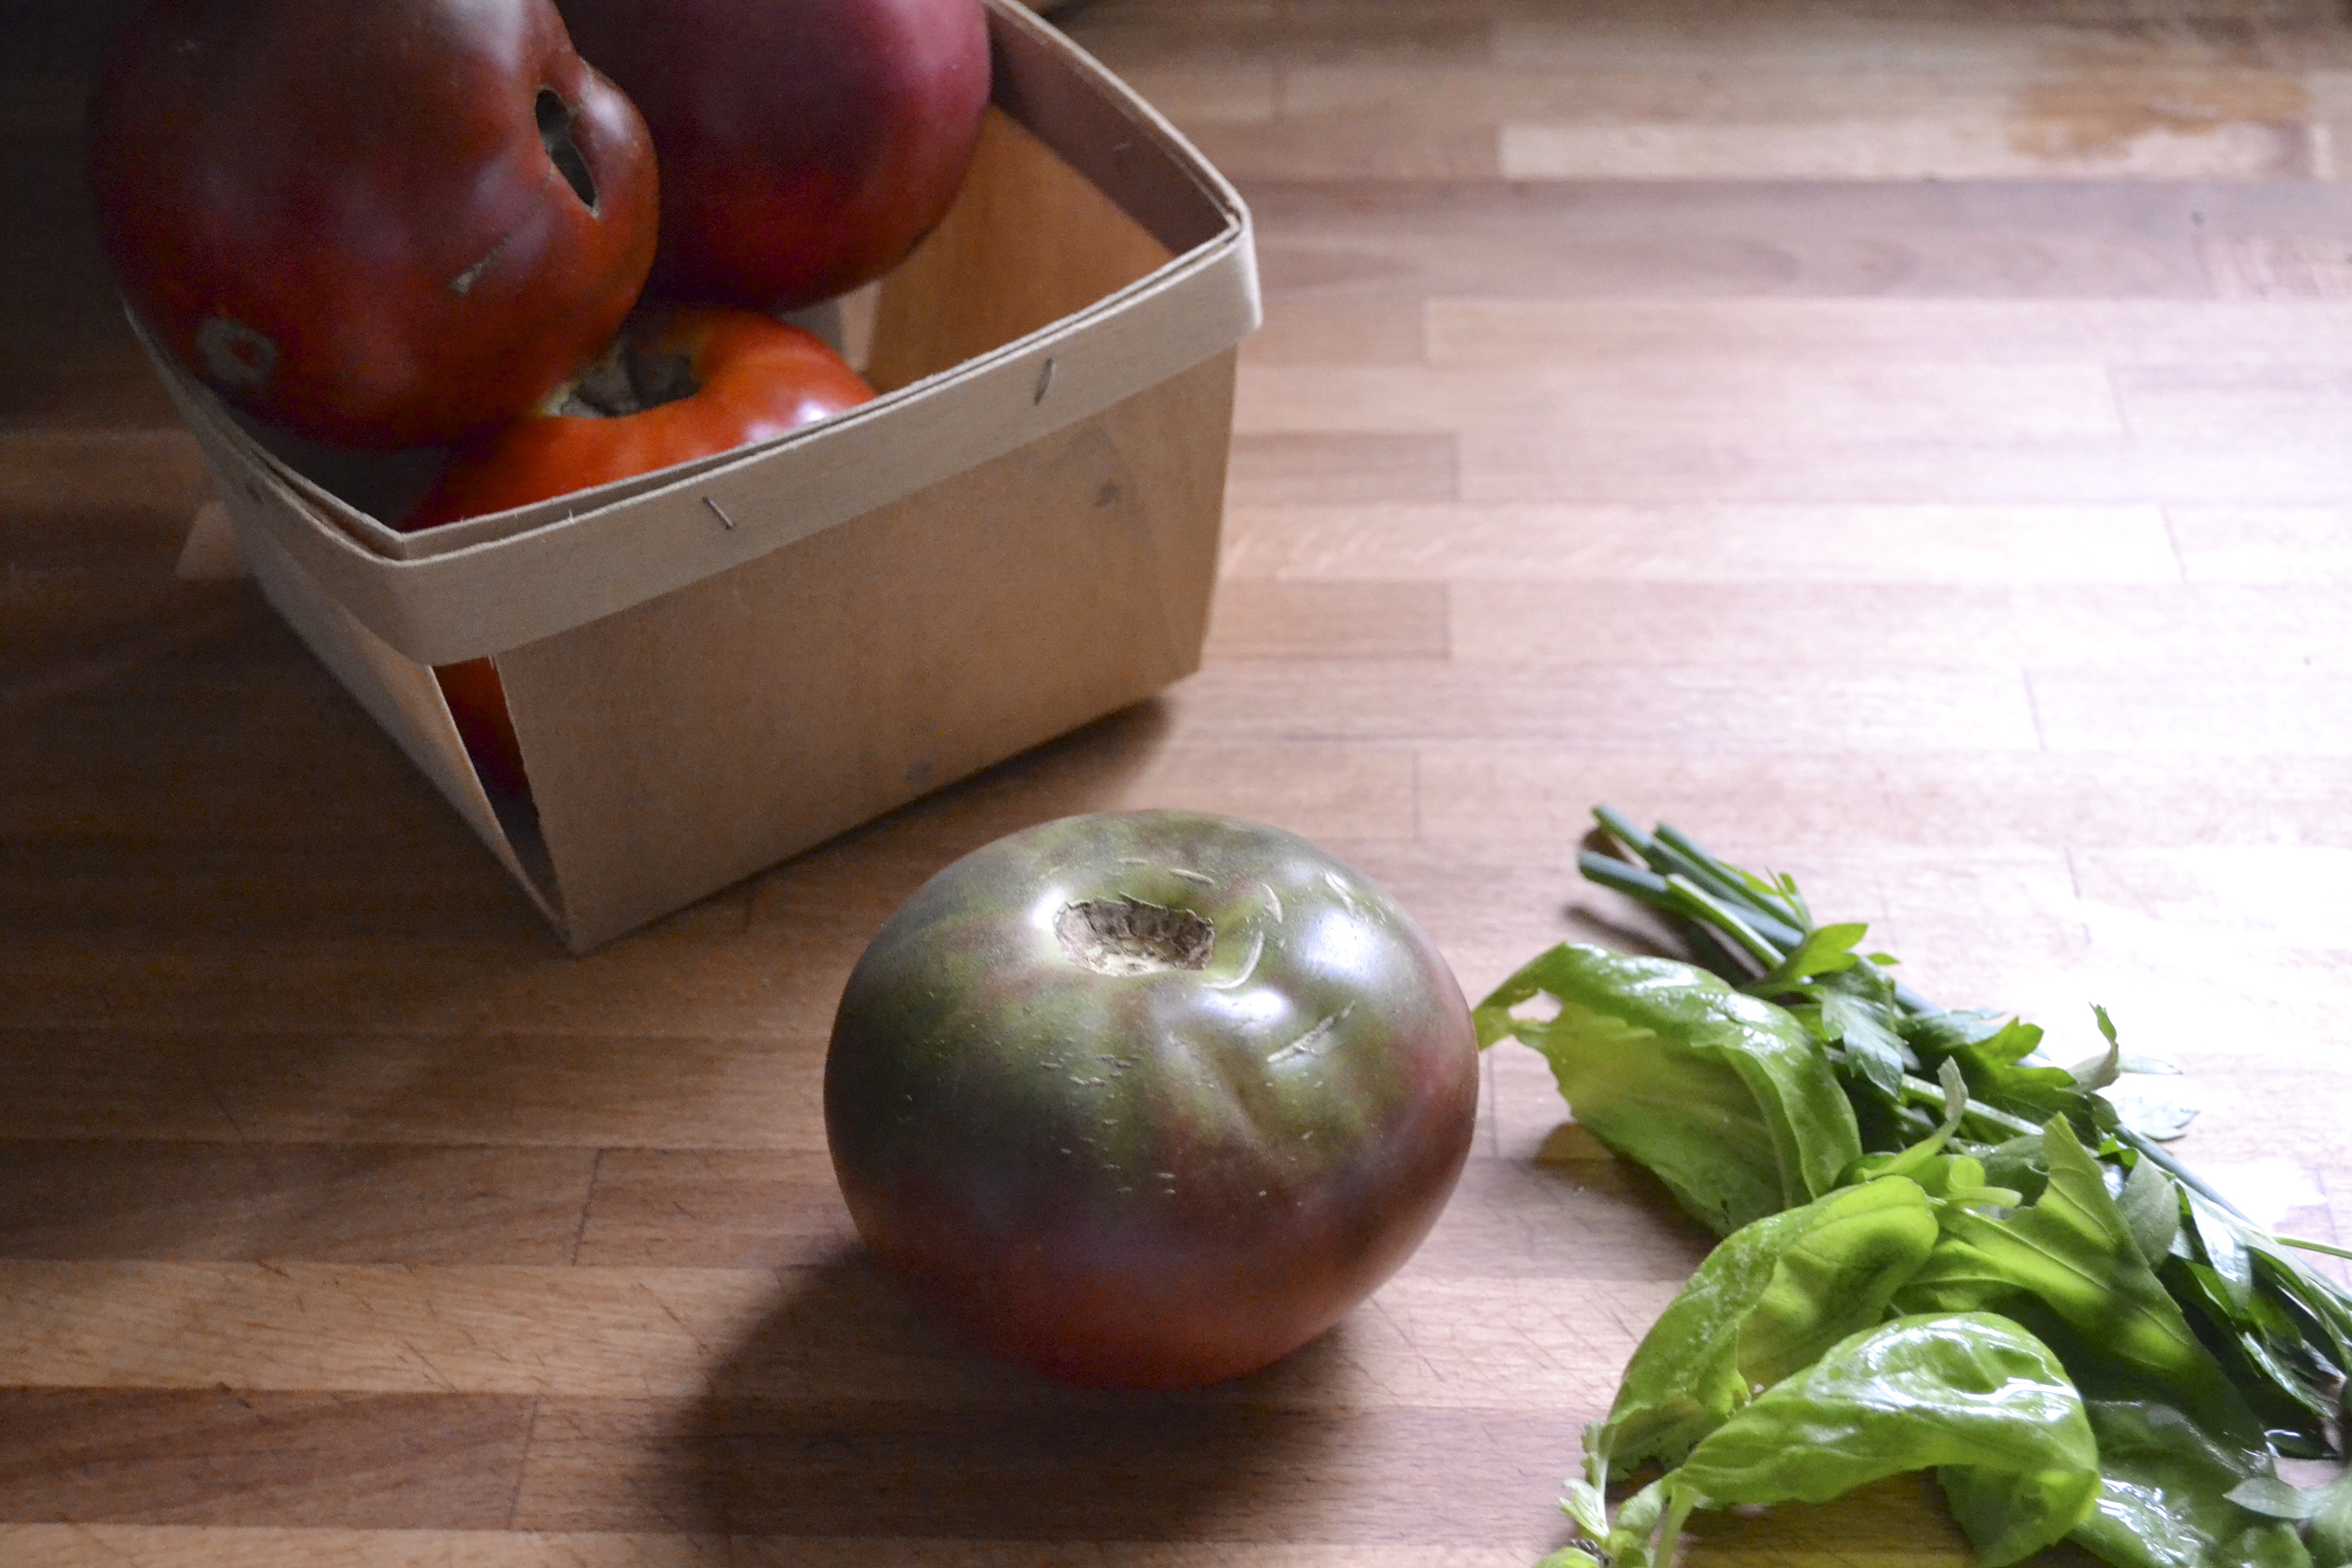
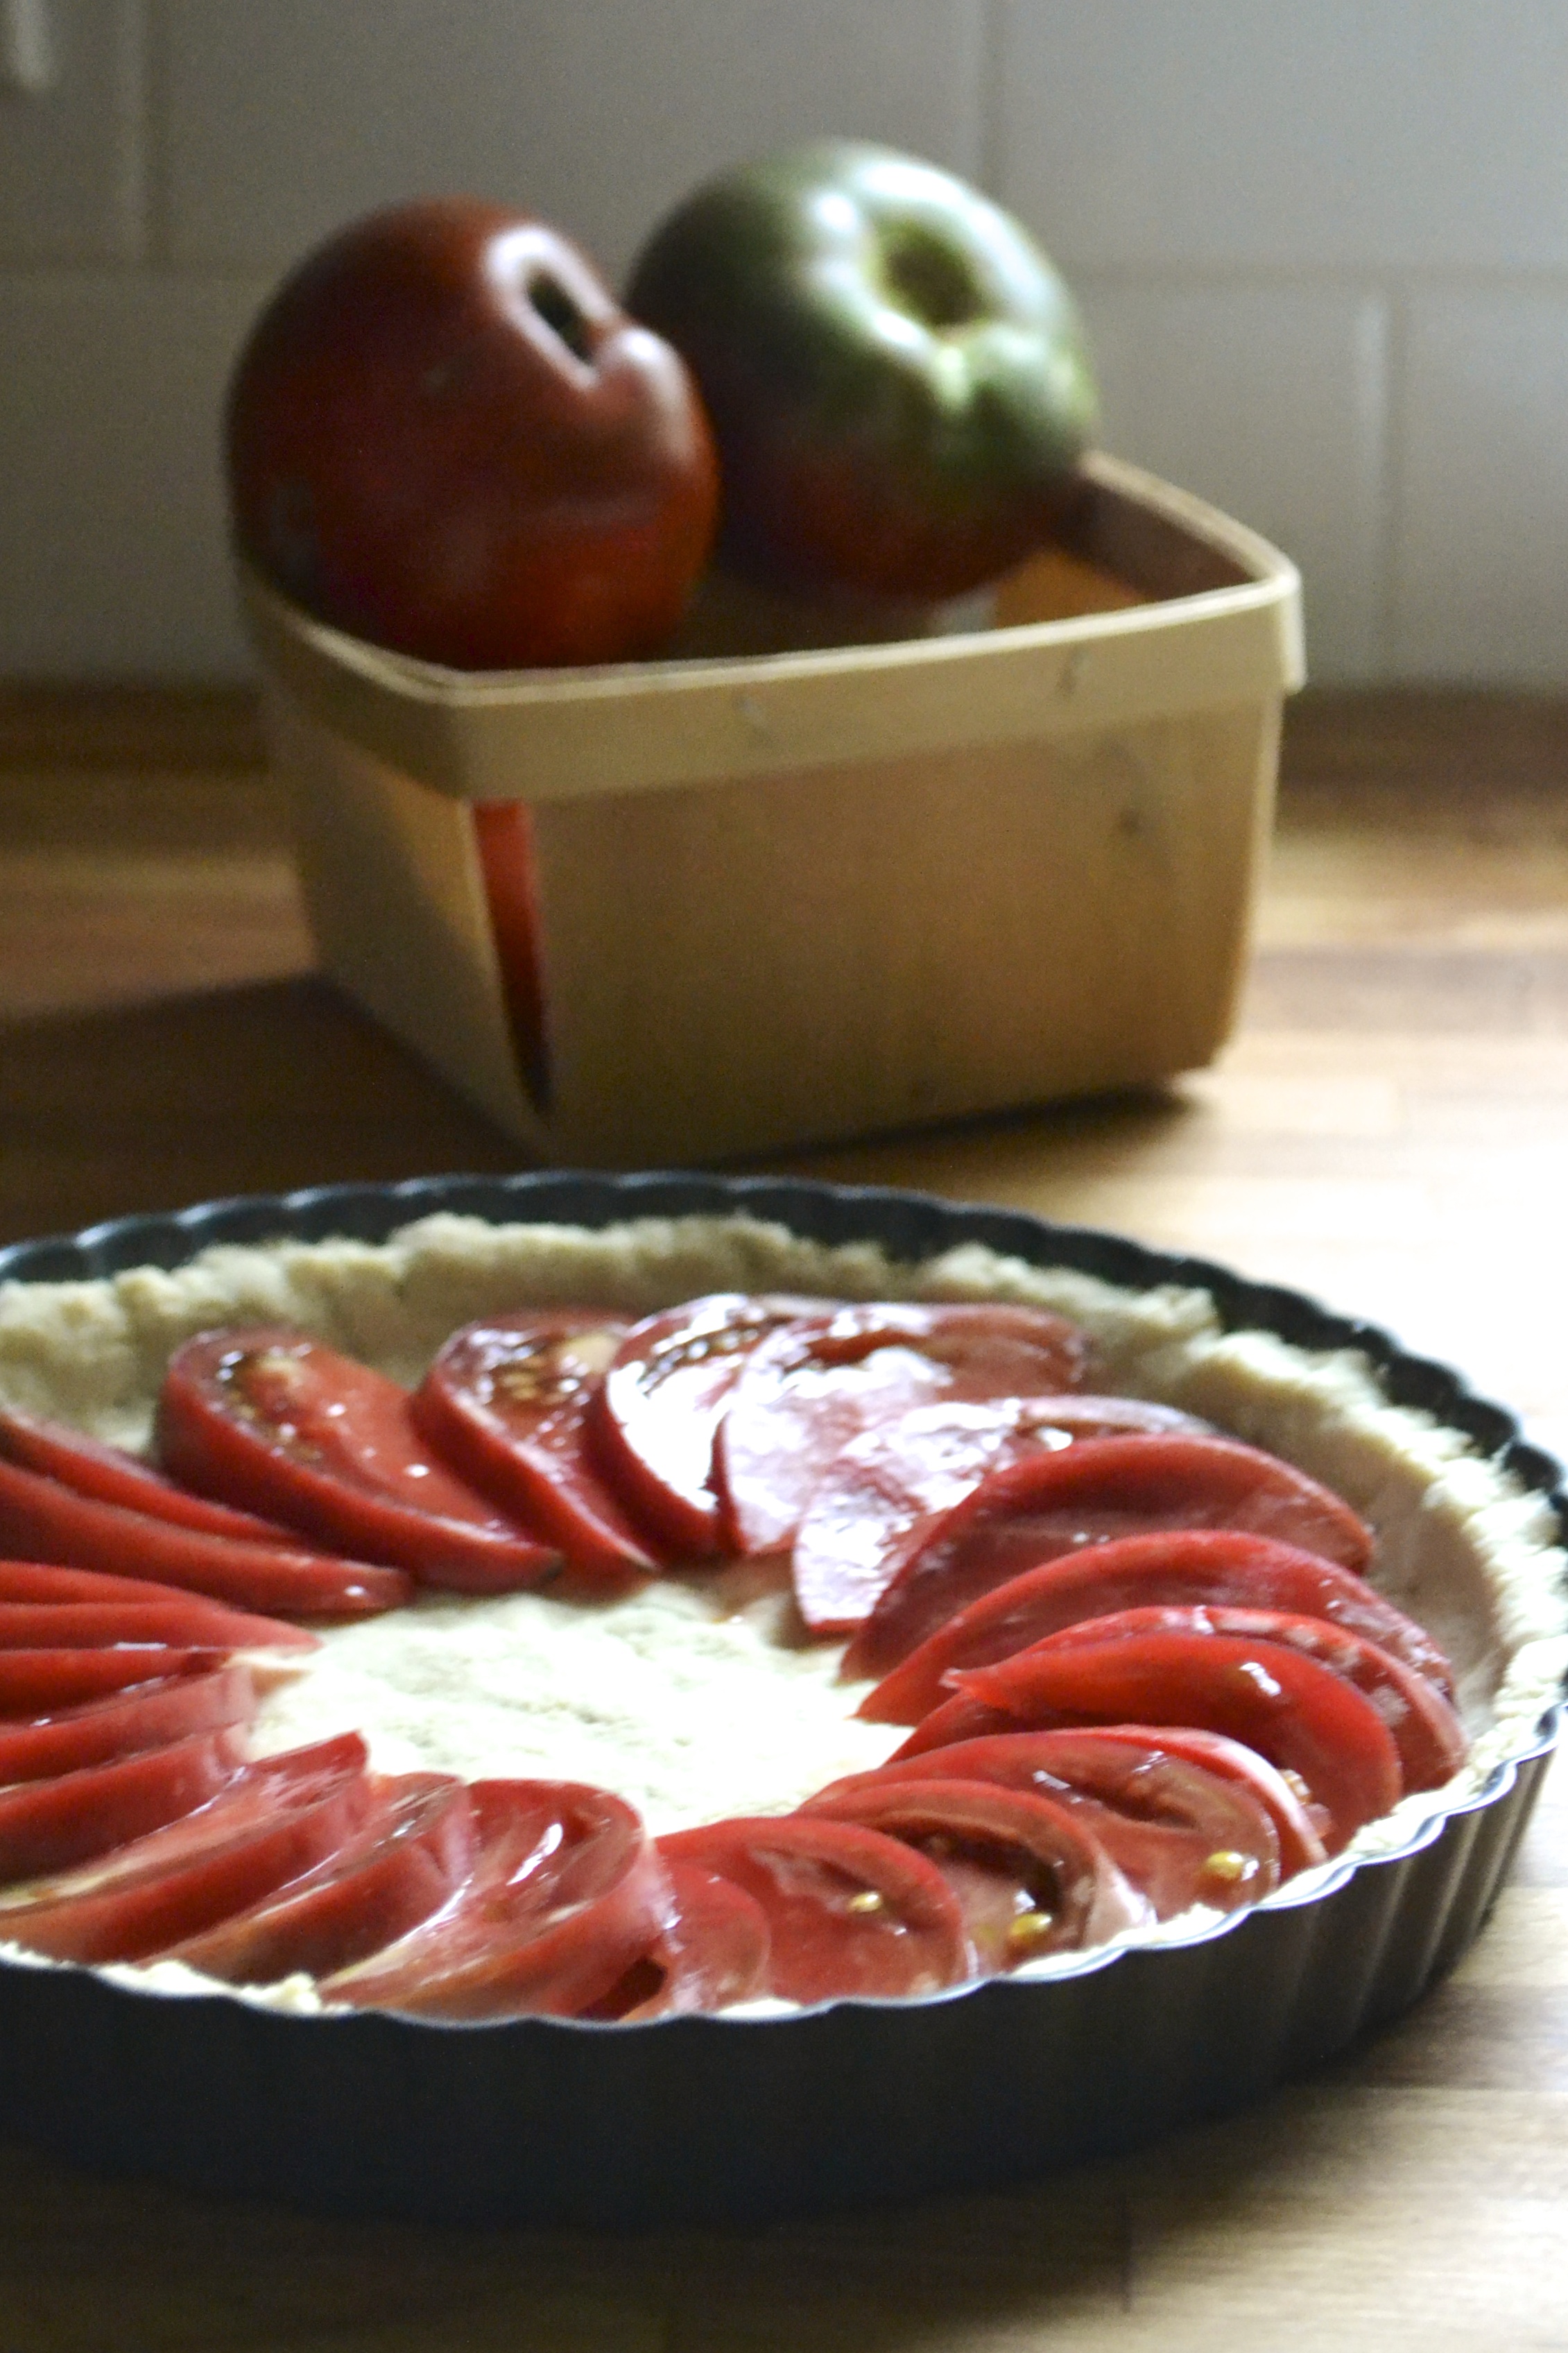
AND my tomatoes are FINALLY turning red…after sitting green for eveeeeer…

AND one of my best friends is having her baby!!!!! Right. Now.

Well…*looks at watch* maybe in a few hours. *checks phone*

DSC_0197

DSC_0200

I’m anxiously waiting for this beautiful baby girl. She is 13 days past her due date. COME ON lil’ lady!!!! So, I’m cleaning my house, scrubbing my floors….*checks phone*

Mowing my lawn, pulling weeds…. *checks phone*

Pulling more weeds….*checks phone*

Tweezing my eyebrows…. *checks phone*

DSC_0202

You get the picture. The arrival of this beautiful baby girl is more exciting than the onset of my amazing juicy heirloom tomatoes. Ya…Mirabel, you are that special and your KC family can NOT wait to meet you.

*check phone* Still no word.

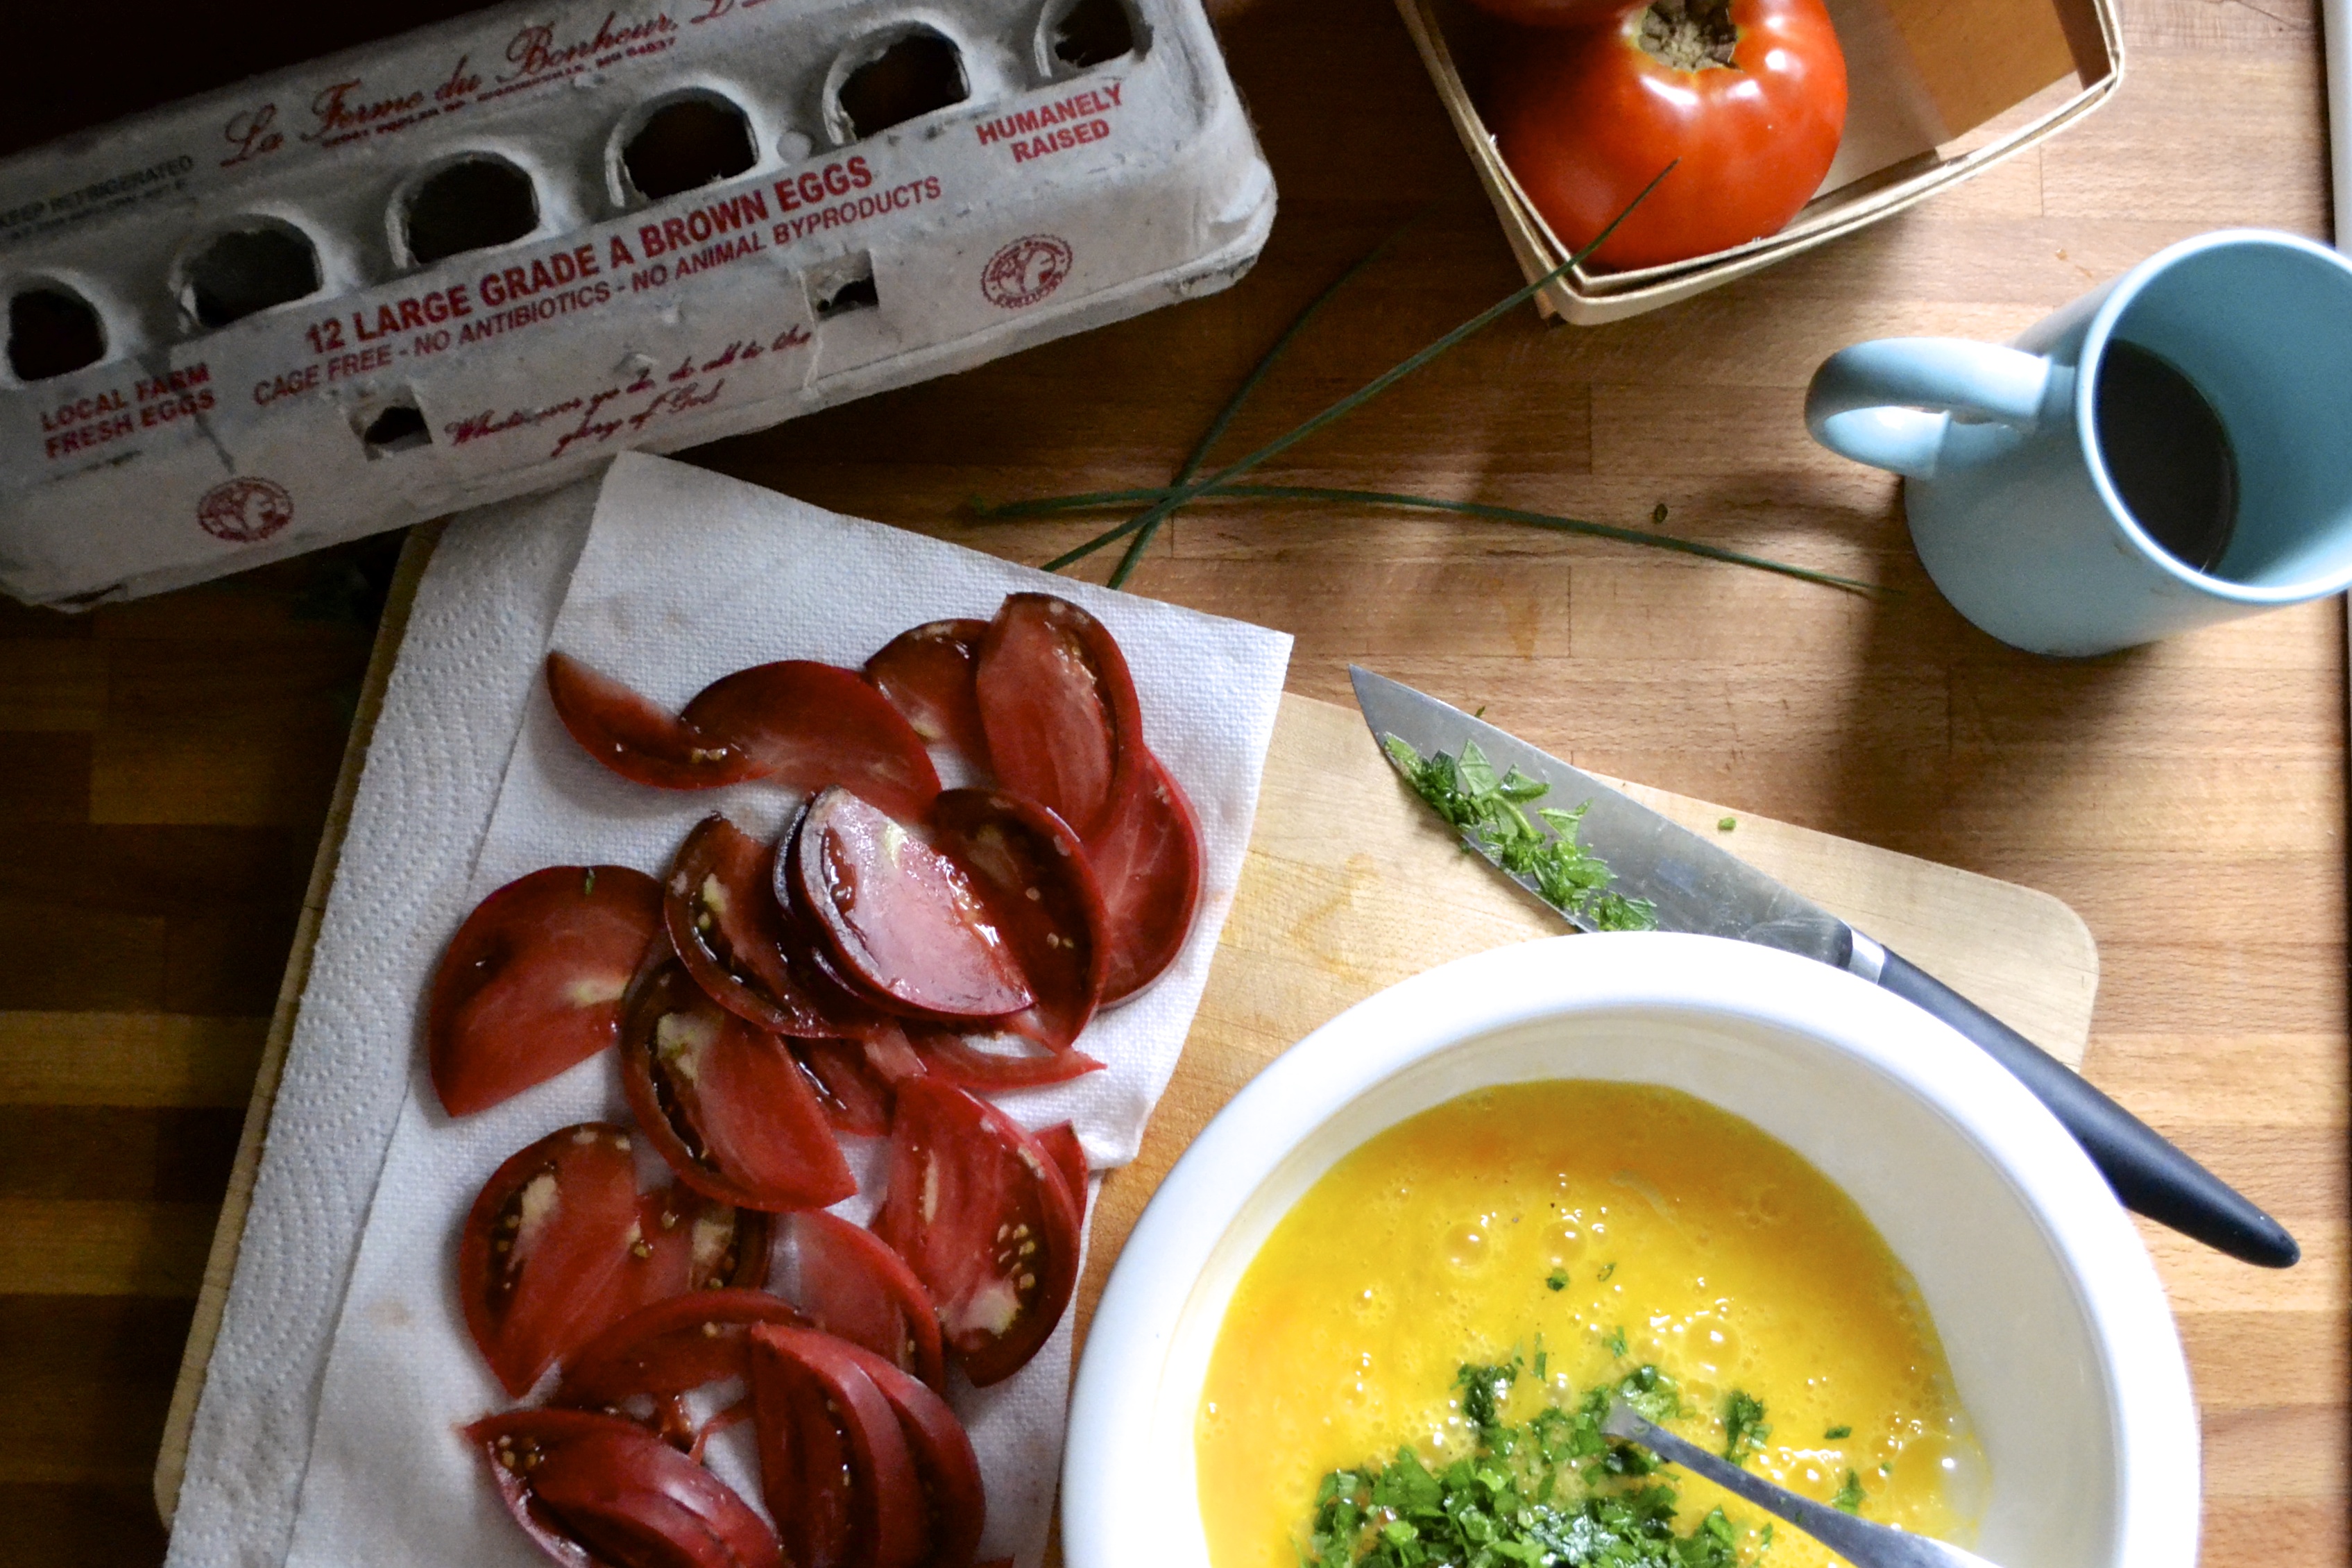
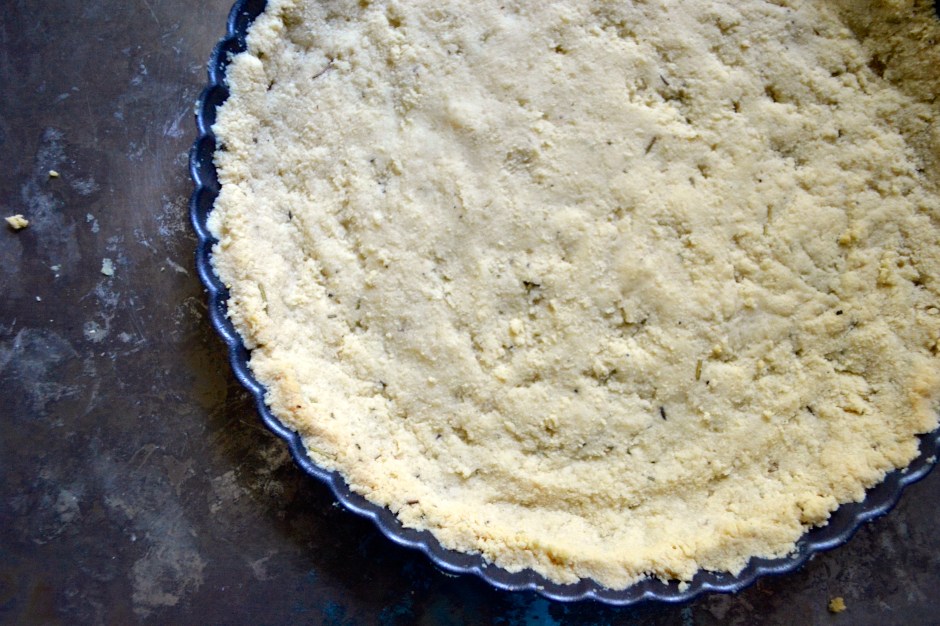
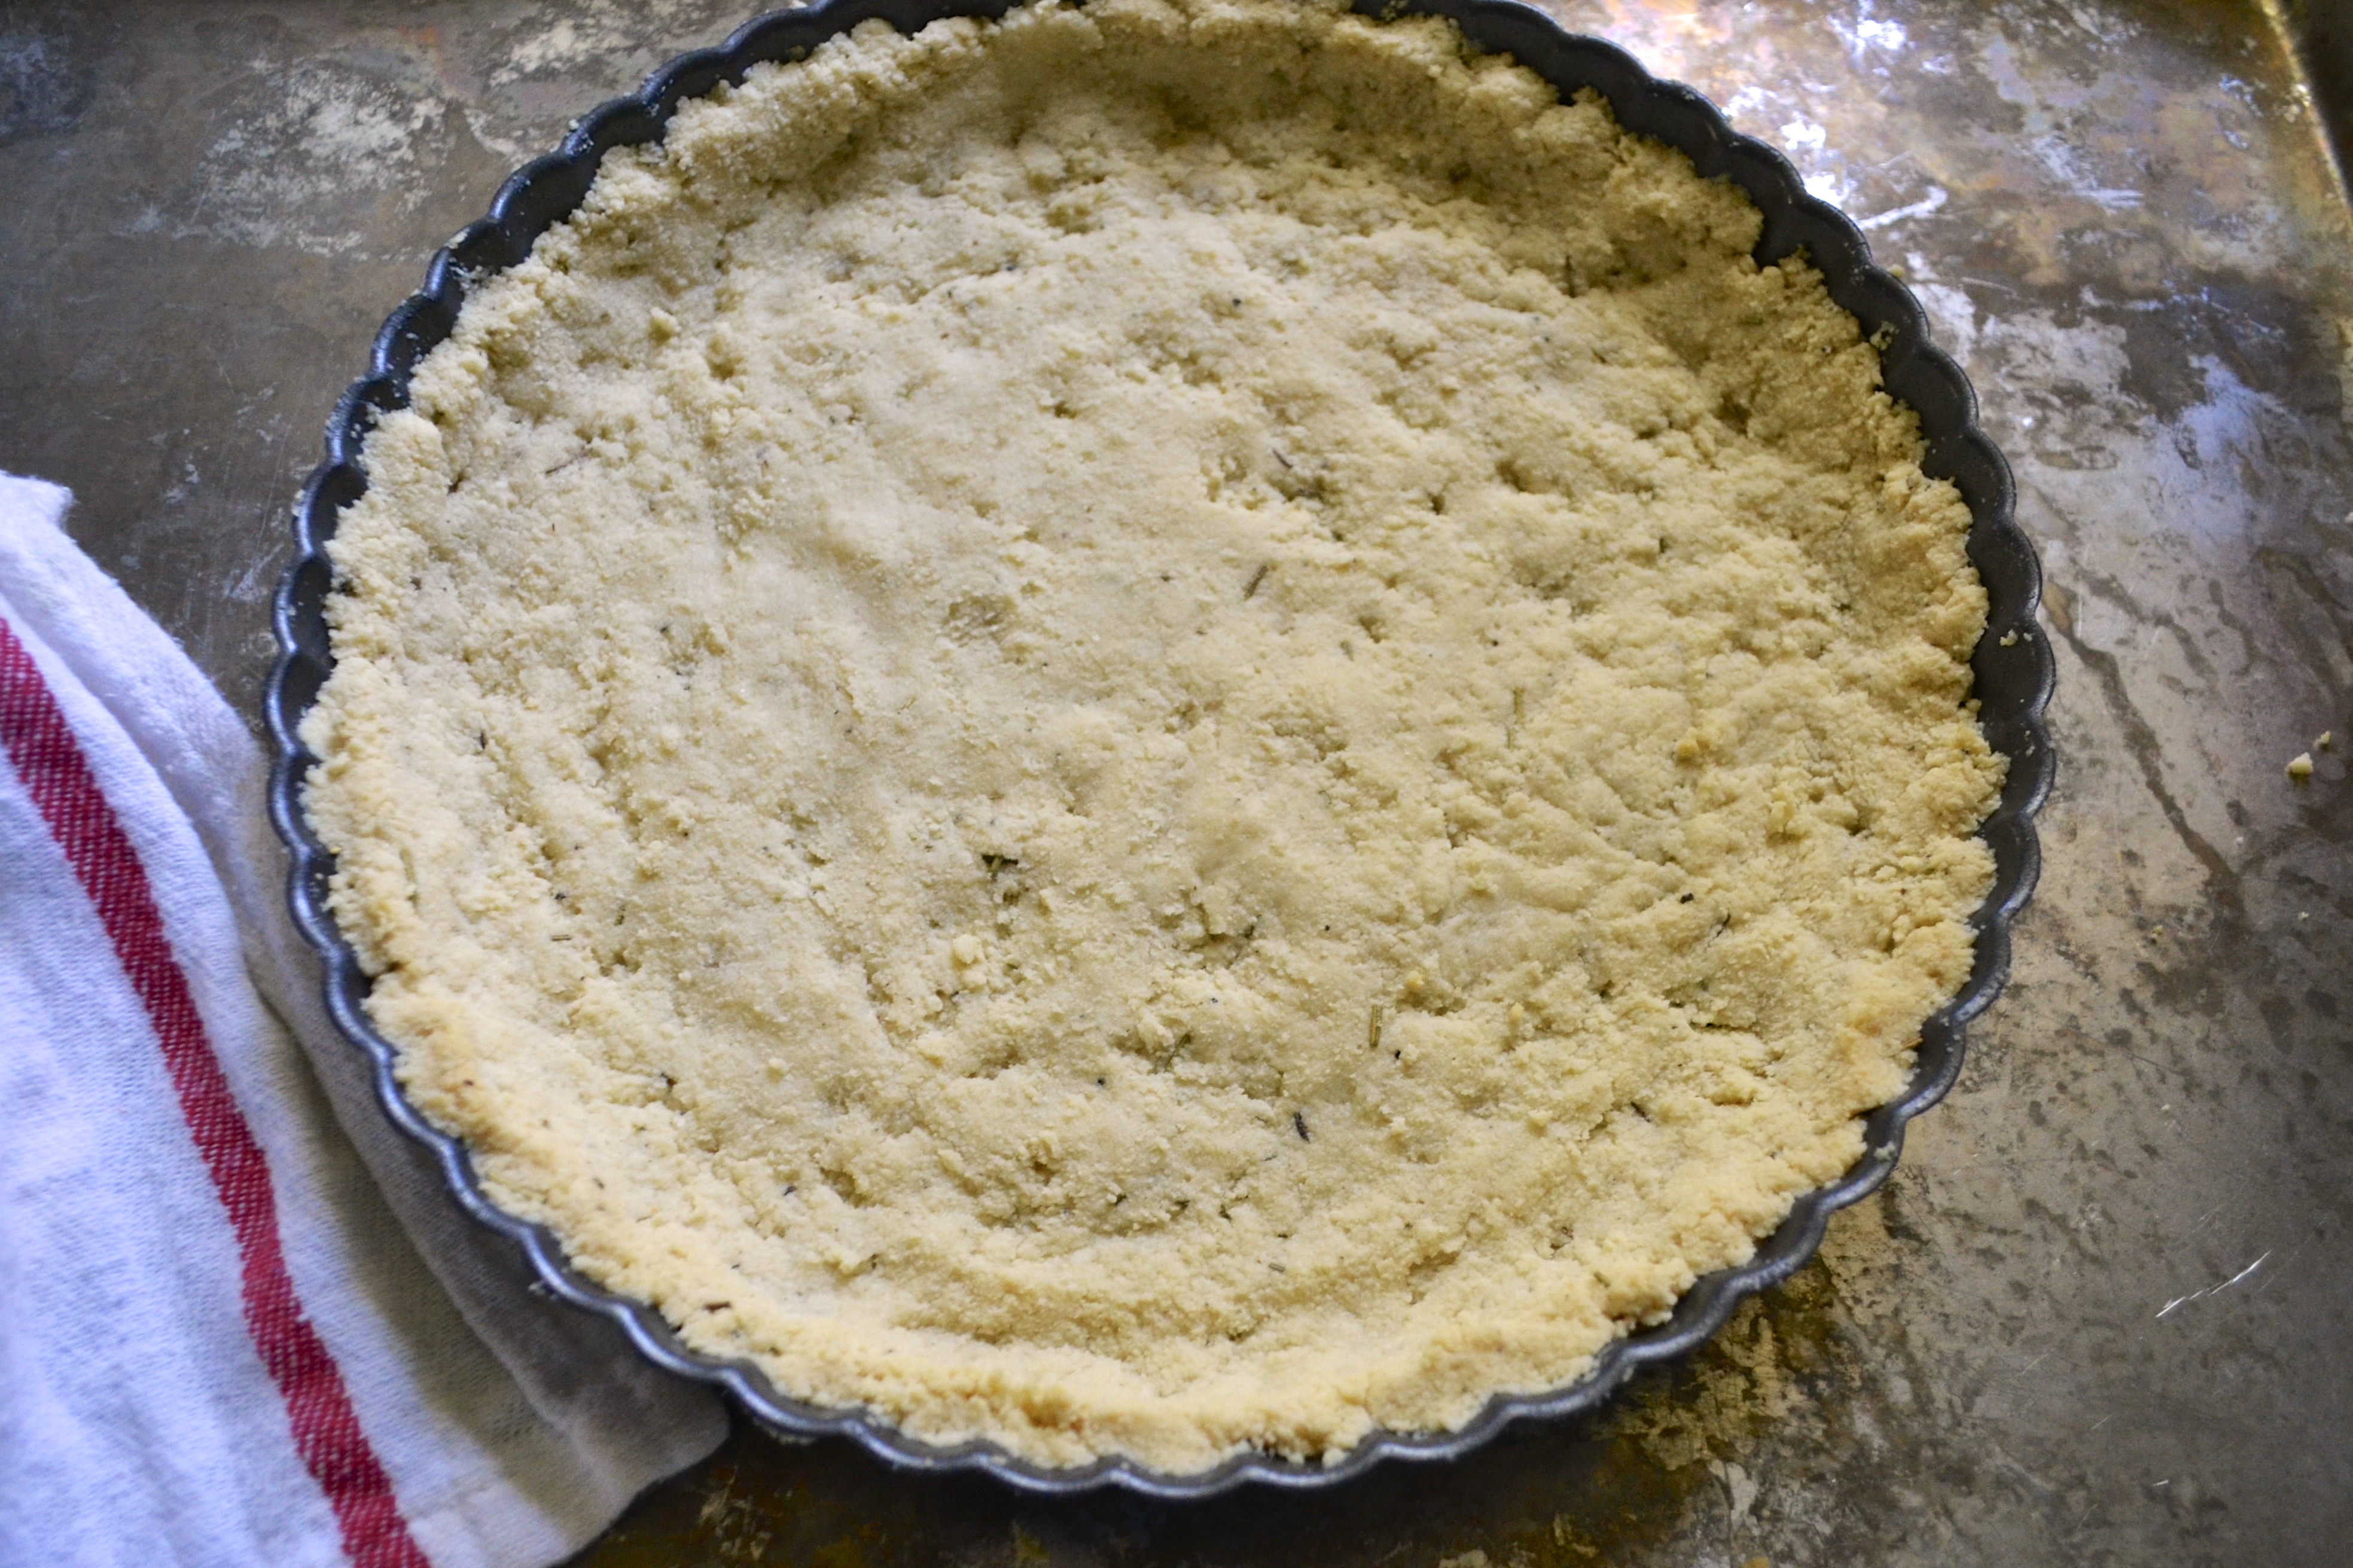
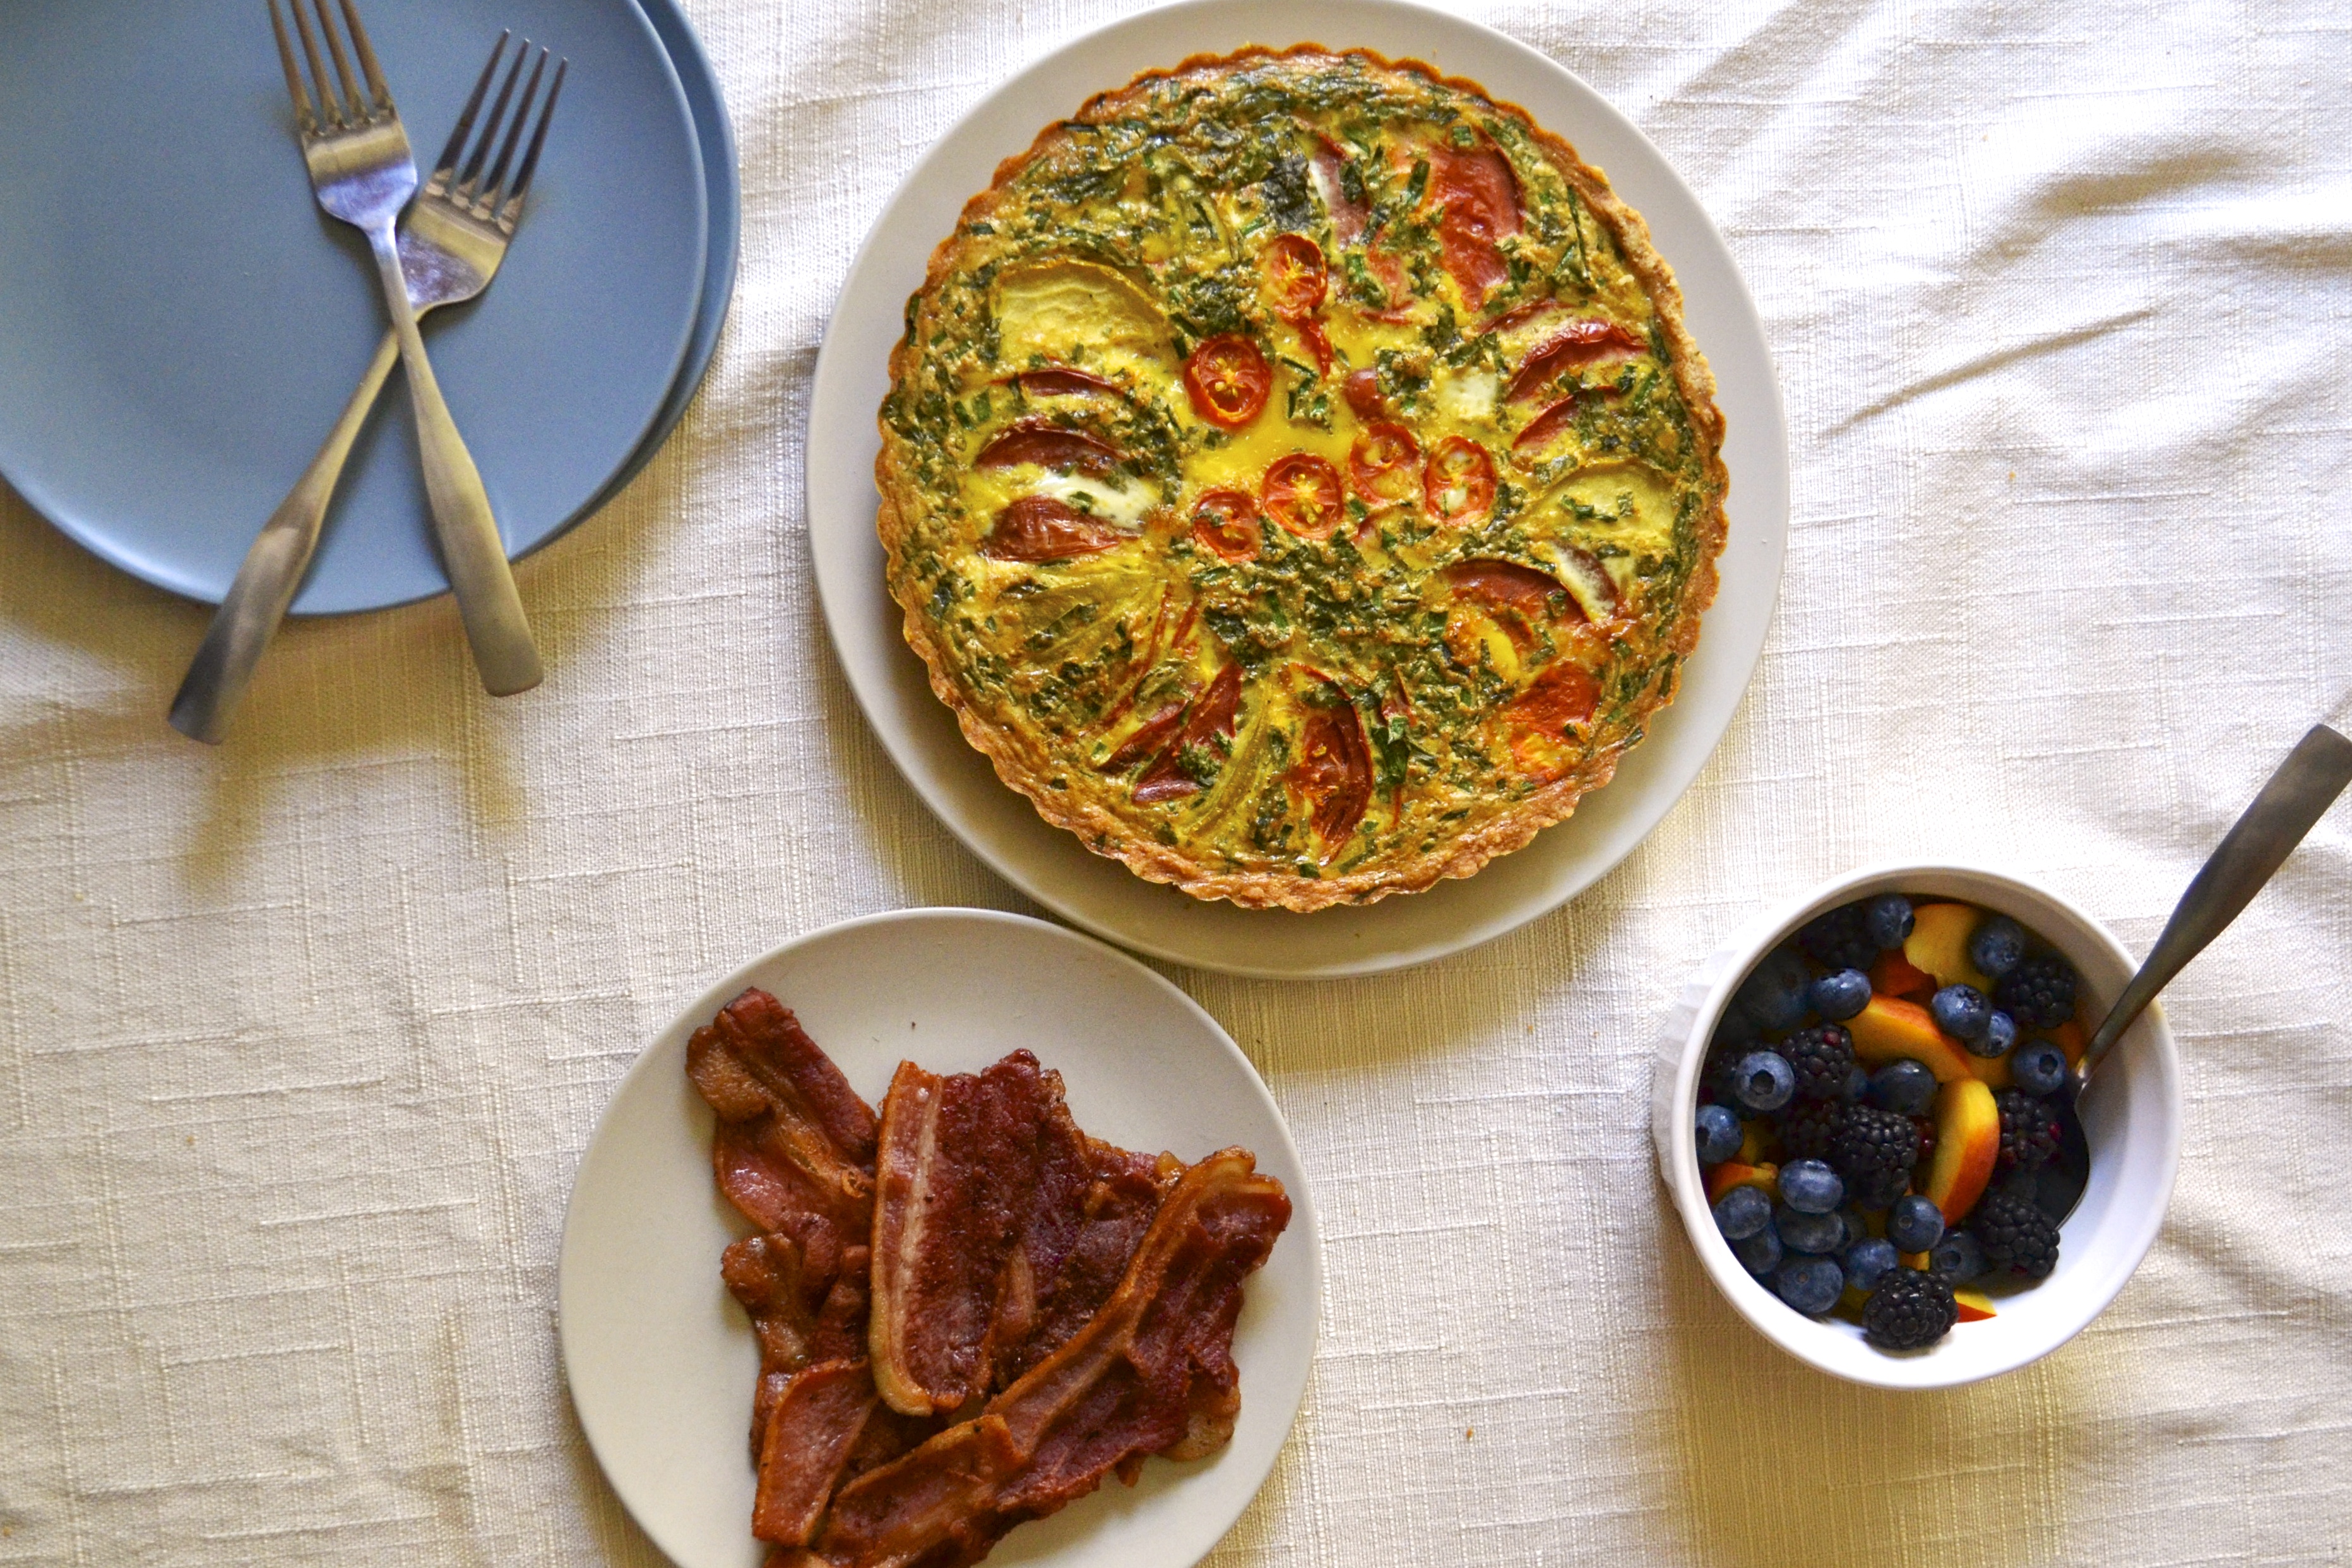
Ok, so, since Mira still hasn’t come, let’s talk about this heirloom tomato Quiche. I used my basic almond flour tart crust and filled it with a thinly sliced Cherokee purple tomato, fresh herbs, and fresh farm eggs. I have made this for the past several weekends. The rosemary crust and fresh heirloom tomatoes are splendid together. This is definitely a winning brunch recipe that is perfect whip up when you have company. And don’t think quiche is just for breakfast, I ate this puppy for lunch and dinner!

*checks phone*

DSC_0213

Heirloom Tomato Quiche with Rosemary Almond Flour Crust (Grain Free, Gluten Free, Dairy Free, Paleo Friendly)

Serves 6

Ingredients

  • 1 9-inch savory rosemary almond flour tart shell
  • 1 large heirloom tomato (I used cherokee purple)
  • 1/4 cup fresh herbs (such as basil, chives, parsley), chopped
  • 6 eggs
  • 1/2 teaspoon salt
  • 1/4 teaspoon dijon mustard
  • 1/8 teaspoon cracked pepper

Instructions

  1. Preheat oven to 350 F. Prebake rosemary almond flour tart shell (or crust of your choice) for 10-15 minutes. Remove from oven and allow the tart crust to cool on a wire rack while you prepare the filling.
  2. Slice one large heirloom tomato in half. Then slice in very thin slices, perpendicular to the first cut so that you have thin half moons (as shown in the pictures above). Place a few layers of paper towels onto a large plate. Lay out the tomato slices in a single layer on top of the paper towels to drain some of the extra juice. Sprinkle lightly with salt. Allow to sit for about 5 minutes.
  3. In a medium bowl, combine the eggs, herbs, salt, dijon mustard, and pepper.
  4. Place the tart crust on a rimmed baking sheet (to catch any flow over of the quiche filling). In the slightly cooled tart crust, place the tomatoes in a single layer in a circular fan patter on the bottom of the tart crust. Pour the egg mixture evenly over the tomatoes. Using the rimmed baking sheet with the filled quiche into the preheated oven. Bake for 45-55 minutes, keeping an eye on it. It will be done with the center of the quiche is set. Transfer to a wire rack and cool for 10 to 20 minutes. Serve warm.

Rosemary Almond Flour Tart Crust

I’m on a mission to take life slower. Sometimes things move so quickly that I get caught up in trying to get everything done perfectly and on time and I miss the important things that are going on around me. I forget to breathe. I forget the basics. I focus on the wrong things.

This weekend I decided to slow down, to be present, to breathe.

DSC_0219

DSC_0221

Hang my clothes out on the line.

Read a book.

Spend meaningful time with dear friends.

Eat butter pecan ice cream and remember my father.

Remember the basics.

Hold my husband’s hand.

Eat simply. And simply eat.

DSC_0222

DSC_0226

Bake something wholesome…. like a savory tart, which is where this basic tart crust came into my life this weekend. Everyone should have a basic pie crust and tart crust recipe up their sleeves. And bonus for the gluten and grain free gang, almond flour makes a wonderful flaky and light crust.

DSC_0205

This basic tart crust is based on a fabulous recipe from the Gluten-Free Almond Flour Cookbook by Elana Amsterdam. (Which is a great book for those who are breaking into the world of almond flour baking.) This basic tart crust recipes is easily adaptable to go to the savory side or the sweet side. Currently my fave way to serve this tart crust is by adding fresh herbs from the garden and filling it with eggs and heirloom tomatoes. Simple. Done. And leftovers will be breakfast for the upcoming week! Man, I’m liking this simple life.

For other savory fillings, you could use this crust for a quiche crust or as an open pot pie crust! However, if going sweet, eliminate the black pepper and rosemary and add a tablespoon of honey. This would be simply great filled with lemon curd. Mmmm.

DSC_0232

Rosemary Almond Flour Tart Crust (Adapted from Gluten-Free Almond Flour Cookbook)

Makes 1 9-inch tart crust

Ingredients

  • 1 1/2 cups almond flour (I use Honeyville)
  • 1/4 teaspoon salt
  • 2 teaspoons fresh chopped rosemary
  • 1/8 teaspoon ground black pepper (optional)
  • 1/3 cup coconut oil (or butter), softened
  • 1 to 2 Tablespoons cold water

Instructions

  1. Preheat oven to 350 F. Lightly butter or oil a 9-inch tart pan and set aside.
  2. Place the dry ingredients into a medium bowl and combine with a wire whisk.   Add softened coconut oil and mix with a spoon until combined. Add in the ice water, starting with just 1 tablespoon. Combine with your hands until the mixture begins to hold together. If the dough is not holding together, add a second tablespoon of cold water. Press into a ball. If making ahead, you can cover the ball of dough in plastic wrap at this stage and place in the fridge for a few hours until you are ready to bake it.
  3. Place the dough ball into the prepared tart pan. Starting from the center of the dough, press into the tart pan evenly working your way out to the sides. Press the dough up the sides evenly. Pierce the bottom of the crust with a fork a few times.
  4. If making a tart crust that will be cooked after it is filled, then you will want to partially bake the crust. However, if you are filling the tart with something that will not bake after it is filled, then you will need to fully bake this crust.  Place the tart crust in a preheated 350 F oven and either partially bake for 15 minutes or fully bake for 30 minutes or until the tart is lightly golden brown.
  5. Remove from oven and allow to cool on a wire rack for 5 to 10 minutes before filling.

Paleo Zucchini Brownies

I like surprises. Do you like surprises? Good. I have one for you.  Be ready to have your mind space blown.

Zucchini brownies.

DSC_0235

We are gettin’ craaaaazy today. Adding veggies to brownies. Ya, you heard me. I know stuffing a brownie with healthy zucchini might not be your idea of a great surprise, but I promise this brownie won’t disappoint you.

These are cakey-style brownies. So for you fudgey-style brownie lovers (like me) these are not those, buuuuut they are incredibly delicious. Plus, they are stuffed with wholesome nutritious zucchini, almond butter, maple syrup, and raw cacao powder! Ya, these are likely the healthiest brownies out there. They are really close to zucchini bread but with a double chocolate edge that comes from the cacao powder and diced dark chocolate bites. Mmmmmm. Can I get an AMEN?!?

DSC_0226

DSC_0239

If you don’t have almond butter, any nut butter would work. For the nonPaleo peeps and those not allergic to peanuts, these would be delish with peanut butter swapped in for the almond butter. But if your nut butter is not all natural (or has salt and added sweetener), be sure to eliminate the salt and reduce the sweetener in the below recipe to account for it.

Don’t worry. I won’t tell anyone that you ate these for breakfast.

DSC_0238

Paleo Zucchini Brownies (adapted from Fast Paleo)

Ingredients

  • 1 cup creamy unsalted and unsweetened almond butter (or any nut butter)
  • 1 egg
  • 1/3 cup honey or maple syrup
  • 1 teaspoon vanilla
  • 1 teaspoon baking soda
  • 1/8 teaspoon kosher salt
  • 2 Tablespoons cacao or cocoa powder
  • 1 1/2 cups shredded zucchini
  • 1/4 cup chopped dark chocolate or chocolate chips

Instructions

  1. Preheat oven to 350 F. Grease an 8 X 8 baking dish and set aside.
  2. Shred 1 to 2 zucchini with either a grater or a shredder attachment on a food processor. Set aside.
  3. In a medium bowl, combine almond butter, egg, maple syrup, and vanilla. Mix well. Stir in baking soda, salt, and cacao powder. After well mixed, stir in shredded zucchini and chopped dark chocolate.
  4. Pour into prepared 8X8 baking dish. Bake for 20 to 25 minutes in preheated 350 F oven. The brownies are done with the center is set. Remove from oven and allow to cool for 5 to 10 minutes.

Almond Flour Blueberry Peach Muffins

DSC_0223

I don’t know what evokes more tasty, comforting memories: peach cobbler or blueberry muffins.  Both make me giddy. Both make me drool. Both make me scramble to the kitchen and wait impatiently for them to get out of the oven and promptly take too quick of a bite which then results in me burning the crap out of my mouth.

Every. Dang. Time.

And do I learn, people?

No.

DSC_0202

DSC_0191

A friend of mine went blueberry picking and graciously parted with a few of her fresh, sweet, awesome blueberries.  I also had some fresh Missouri peaches at the house. Oh YaH!

Are you guys thinking what I’m thinking? YAH! Let’s burn the crap out of our mouths with hot sexy blueberry peach muffins!!!!! YAH.  Wait….that’s not what you were thinking? Seriously? Well it should be. Cuz that’s what we are going to DO! Tell your mouth to get ready.

DSC_0205

DSC_0219

What do we want? BLUEBERRY PEACH MUFFINS. When do we want them? NOW!

Fresh blueberries + fresh peach + lemon zest = dreamy

DSC_0194

While these muffins were cooking, I sat and waited and watched through the oven door as they rose. I smelled the ridiculous spell-binding, blueberry-peach aroma as  it wafted through my house. My stomach growled. I couldn’t take it! I nearly pulled them out of the oven too early because I WANTED THEM NOW! I was drooling.

But once they were finished, I pulled them out…I let them cool (for 2 seconds) and then I took a bite and felt those bursts of blueberries, the zip of lemon zest, the fresh juicy peaches…. And then it hit me.  OOOOOOW…crap…burnt again…but…Mmmmmmm. The burned roof of my mouth and seared finger tips forget the pain easily when tempted and provided with such awesomeness.

DSC_0213

Almond Flour Blueberry Peach Muffins (Grain Free, Gluten Free, Paleo-Friendly, Dairy Free)

Ingredients

  • 2 1/2 C almond flour (I use Honeyville blanched almond flour)
  • 3/4 teaspoon baking soda
  • 1/4 teaspoon kosher salt
  • zest of 1 lemon (organic preferably)
  • 3 eggs
  • 1/4 C maple syrup or honey
  • 2 Tablespoons grass-fed butter or coconut oil (melted)
  • 1/2 C unsweetened applesauce
  • 1 ripe peach, diced (ok to leave skin on)
  • 1/2 to 1 C blueberries (fresh or frozen)

Instruction

  1. Preheat oven to 350 F. Place 12 muffin liners in a 12 regular-sized muffin tin. Set aside. (I ran out of muffin liners half way through so I just sprayed coconut oil inside the muffin cups that were not lined.)
  2. In a medium bowl, combine almond flour, baking soda, salt, and zest. In a separate bowl, combine together wet ingredients, which include eggs (slightly beaten), maple syrup or honey, melted butter or coconut oil (allow to slightly cool before adding to eggs or you will scramble those suckers), and applesauce. Add dry to wet and stir until combined. Stir in peaches and blueberries carefully!
  3. Spoon about 1/4 cup of batter into each lined muffin tin. Bake for 15 to 20 minutes at 350F. Muffins will be set in the center and lightly browned on edges. Remove from oven and allow to cool in muffin tin for 5 minutes. Then move to cooling rack (if you can stand it) and allow to cool the rest of they way…about 30 minutes…or if you are me, 30 seconds.

Notes:

* The base recipe for these delicious muffins is adapted from an awesome blog called Power Hungry.

Paleo Banana Ice Cream Cake

It’s already the middle of July and this weekend was the first time that I put a bathing suit on.  Honestly, between you and me…this doesn’t have to happen again.

DSC_0242

Why do bathing suits have to be so UNFLATTERING! Ugh.

I should just wear a T-shirt or a trash bag.

But Oh well….I guess I didn’t get too upset, because after swimming all day, all I wanted was ICE CREAM.  So I promptly made this amazing dairy free and grain free banana ice cream cake to go along with ribs that we smoked.  Maybe this is why my bathing suit is unflattering?  Ice cream cake + ribs?

Naaaaah.

DSC_0252

DSC_0219

DSC_0222

This cake is amazing. Creamy. Dreamy. Guiltless. It is made with cashews, bananas, dates, hemp seeds, raw cacao powder! Ya…shhhh….it’s good for you.

So I will just serve myself up another slice of cake…banana ice cream cake, that is. And I will eat it in my ugly, weird fitting, old bathing suit. And be happy.

Very happy.

DSC_0255

Paleo Banana Ice Cream Cake (adapted from This Rawsome Vegan Life)

Crust Ingredients

  • 1/2 C raw pecans
  • 1/4 C hemp seeds
  • 2 Tbsp cacao powder
  • 1/4 tsp salt
  • 1 C pitted dates

Caramel Ingredients

  • 1 C pitted dates, soaked in hot water for 10 minutes
  • 1/4 C water
  • 1/8 tsp salt

Chocolate Ingredients

  • 1/4 C cacao powder
  • 1/4 C water
  • 2 Tbsp coconut oil
  • 2 Tbsp honey or maple syrup or agave nectar

Filling Ingredients

  • 2 C frozen bananas (3 to 4)
  • 2 C raw cashews, soaked for 3 to 4 hours (or overnight)
  • 1/2 C water or nondairy milk
  • 1/3 C maple syrup or honey
  • 1/3 C coconut oil
  • 1/8 tsp salt
  • 1 tsp vanilla

Instructions

  1. Crust – In a food processor, place nuts, hemp seeds, raw cacao powder (or cocoa powder), and salt.  Pulse until the ingredients combine to make a flour like consistency. Add dates and process for a few minutes until it forms into a paste.  The mixture should hold together when you pinch a small amount between your fingers.  In a springform pan, place wax paper or syran wrap on the bottom. Press crust evenly into the bottom of the springform pan only slightly coming up the sides. Set in the freezer while preparing the filling.
  2. Caramel Sauce – Clean out food processor. Place soaked dates and 1/4 cup of water in the bowl of the food processor. Process for several minutes until a caramel-like substance is formed.  Add additional liquid as necessary. Add salt. Spoon into a separate bowl. Clean food processor bowl for next step.
  3. Banana Ice Cream Filling – Microwave the coconut oil in a small Pyrex dish for 30 seconds until mostly melted. Place all of the filling ingredients (except the caramel sauce) into the bowl of the food processor and blend on high-speed for several minutes until very smooth.
  4. Chocolate Sauce – In a separate bowl, combine cacao powder and 1 tablespoon of warm water. Stir carefully until a fudgey mixture is formed. Add warm water 1 tablespoon at a time until a drizzleable (is this a word???) fudge sauce is formed.  Stir in melted coconut oil at a tablespoon at a time. Keep mixture warm or it will harden. Pop in microwave if necessary.
  5. Assembly – Remove the crust from the freezer. Pour about two-thirds of the cashew mixture onto the crust and smooth evenly with a rubber spatula. Swirl in half of caramel mixture and alternate with 1/3 of chocolate mixture using a butter knife. Top with remaining filling. And swirl in remaining caramel sauce and another 1/3 of chocolate sauce. Drizzle any remaining chocolate sauce on top. Place in freezer for about 2 hours or until solid.
  6. Serving – To serve, remove from freezer about 30 minutes before serving.  Heat a smooth and sharp knife under hot water and cut the pie into 8 slices. Serve with any additional chocolate sauce. Store any remaining pie in the freezer.

Steak with Grilled Zucchini and Herb Salad

So I am incredibly proud right now. I have to admit something to you.  I painted my kitchen!

Wait wait wait…Before I gloat, it should be known that I am the worlds worst at picking out paint colors. I have a near panic attack in the paint aisle with ALL OF THOSE STUPID COLORS. Names like “pony tail”, “mushroom mist”, “crisp dawn”, “twilight foxtail”….what?  Who comes up with these names for Pete’s sake!

DSC_0173

I swear I am partially color blind (is that a thing?). Or maybe I’m just terrible with colors. My wardrobe proves it. And I can’t decide on things. I have had paint swatches on a wall for months and months before. I have left painter’s tape in the hallway for nearly a year because I couldn’t pick a stupid paint color! Ugh. And when I do pick one, finally, I hate it. It either resembles a cardboard box, or a hospital, or baby blue boys room, or a 1980s doctor’s office. Seriously…I suck at this.  Well until yesterday!

I stand before you…well, I type before you today as a new woman! A woman who PICKED THE PERFECT GRAY PAINT! ya…GRAY. That is a bitch of a color, can I say. It’s either a purple gray, or a blue-gray, or a brown gray….blah! I just want gray.  And I did it…first try. Well…ok, with the help of my hubby. But honestly, we went in the paint store in the morning and looked at the colors.  We pointed at a color. Paint dude mixed it up. We went home and we completely repainted the kitchen cabinets in a day! A day! I have a new kitchen now…white walls instead of blue. Gray lower cabinets and the cutest farm hutch that I repainted in a bright turquoise. Totally urban farmhouse. I just have to redo the floors. Once it is all put back together I will post picks! High five to me and my man.

DSC_0178

But in the mean time, here is a simple farm salad that is easy peasy to throw together (even when your kitchen is in shambles from remod stuff). Fresh greens from the garden mixed with those fresh herbs that are so bountiful right now.  Top it with grilled steak and a fresh vinaigrette. Dinner in under 20 minutes. That includes the time to go pick your fresh veggies, if you are so lucky to have a garden. And even if you don’t have a back yard, you can easily grow these herbs and a salad mix in containers.  Try it!

DSC_0188

Steak with Grilled Zucchini and Herb Salad  (adapted from Bon Appetit)

Ingredients

  • 1/4 cup white wine vinegar
  • 1/3 cup olive oil plus 1 tablespoon
  • 1 teaspoon dijon mustard
  • salt and pepper
  • 1 medium zucchini, cut into 1/4-inch rounds
  • 1 lb hanger or skirt steak
  • 4 cups of arugula or fresh salad mix
  • 2 cups (packed) assorted fresh herb leaves (such as basil, mint, chives, parsley, cilantro)
  • salt, pepper, and smoked paprika or Piment D’Espelette to taste

Instructions

  1. Combine white wine vinegar and dijon mustard in a small bowl. Whisk in 1/3 cup olive oil until well combined. Season vinaigrette with salt and pepper. Set aside.
  2. Prepare grill for medium-high heat. Brush zucchini with remaining 1 tablespoon of olive oil. Season with salt and pepper. Grill, turning often, until tender and charred in spots, 5 minutes on each side (watch carefully to not burn). Set aside and allow to cool.
  3. Next season steak with salt and fresh cracked pepper on both sides. Grill 5–7 minutes per side for hanger steak (medium-rare) or, for skirt steak (which is thinner), about only 2 minutes per side. Let rest for about 5 minutes.  Then thinly slice against the grain.
  4. Toss arugula (or fresh salad mix), herbs, grilled zucchini, steak, and reserved vinaigrette in a medium bowl. Season with smoked paprika (or if you are lucky enough to have piment d’espelette), salt and fresh cracked pepper.

Jalapeño Bacon Jam

Heaven in a jar. Spicy + Smokey + Sweet + Salty.

I am going to give you a huge warning. Once you begin making this, your house will turn into a drool zone. People will come from all over. If you make it, they will come. Headlights will line up your street. People will pay admission to just be near you. It is the Field of Dreams of Jams. True story.

DSC_0015

DSC_0001

After researching and researching different versions of this amazing jam, there are several ways to make it. I really think you could stir nearly anything into it and get something magical. No matter what, it will be hard for you to not devour in one sitting or even while you are cooking it. Seriously.

Typically this jam consists of:

  • bacon (duh),
  • onions (I used red but yellow would work too),
  • vinegar (many recipes used cider vinegar but I opted for balsamic),
  • sugar (I used maple syrup + 1 tablespoon of molasses…several recipes use a combo of brown sugar + maple, you could definitely play around with the ratios here)
  • liquid (I used water, but Martha used strong brewed coffee)
  • Optional spices (I added a jalapeño, but I also think some chipotle powder or other spicy add-ins would be redonculous like this recipe)

So without further ado…I present to you, the heavenly and amazing Jalapeño Bacon Jam!  *Jazz Hands*

We had several people over and slathered it on burgers…erhmehgeeerd. SO GOOD. Somehow there was magically one tablespoon left. So I squirreled it away for my lunch the next day and topped a baked sweet potato with it. *swoooon*

DSC_0022

Notes on storage – This should keep in a jar with a tight fitting lid in the refrigerator for 3 weeks or the freezer for up to 6 months. But if this stuff is around longer than two days, I will be AMAZED at your self control. And don’t be surprised if it gets stolen…don’t look at me???

Jalapeño Bacon Jam (adapted from Martha Stewart and Homesick Texan)

Ingredients

  • 1 lb bacon (nitrate free if possible), cut into 1/2-inch pieces
  • 1 tablespoon reserved bacon grease
  • 2 red onions (about 2 1/2 cups), diced
  • 3 cloves garlic, minced
  • 2 jalapeños, deseeded and diced (about 1/4 cup)
  • 1 cup of water
  • 1/3 cup balsamic vinegar
  • 1/4 cup real maple syrup
  • 1 tablespoon unsulphured molasses
  • salt and cracked pepper

Instructions

  1. Cut the bacon slices into 1-inch strips. Over medium-high heat, cook the bacon in a dutch oven stirring frequently until the bacon is browned but not crispy. Use a slotted spoon to transfer the bacon to a paper-towel lined plate. Drain the bacon grease but reserve about 1 tablespoon.
  2. Add onions, jalapeño, and garlic to the dutch oven and cook over medium heat until the onions become translucent. This should take about 5 minutes.  Add bacon and remaining ingredients. Simmer on low for 1 to 2 hours, stirring occasionally. If jam gets too dry, add additional water 1/4 cup at a time. After it is good and thick, remove it from heat and allow to cool.
  3. If you want the jam to be a finer consistency, add it to a food processor and pulse a few times (not too much).  I personally liked mine a bit chunky. Transfer to a jar with a tight-fitting lid. Store in refrigerator for 3 weeks or in the freezer for 6 months. But if this stuff lasts longer than one or two days in your house, bravo to your self control!

Sweet Potato and Kale Stuffed Poblanos

My garden has a bumper crop of amazing lettuce, spinach, kale, and chard! It’s beautiful. But I am having a hard time trying to eat it all. Plus, we are leaving for PARIS in less than 24 hours and I need to figure out ways to harvest it before the summer heat and lack of watering kills it all.

I have made a few things recently that are perfect for freezing for quick weekday lunches.  Hope you enjoy! These were a big hit.

DSC_0018

DSC_0031

These Sweet Potato and Kale Stuffed Poblanos are spicy and very flavorful. Poblanos are easy to grow but also can be found in your local market. They are great for stuffing, given their large open cavity. I roast mine over an open flame on the oven before stuffing and baking them.  It’s quick and easy and gives a great smoky flavor.

DSC_0027

DSC_0028

Sweet Potato and Kale Stuffed Poblanos

Ingredients

  • 1 tablespoon olive oil
  • 1/2 medium onion
  • 2 to 3 medium garlic cloves
  • 1/2 jalapeño, deseeded and minced
  • 1 medium sweet potato, 1/2-inch cubes
  • 1/2 teaspoon smoked paprika
  • 1/2 teaspoon ground cumin
  • 1 bunch of kale (about 4 cups chopped), or spinach
  • salt and pepper
  • 4 poblano peppers
  • Toppings: cheese, cilantro, and salsa

Instructions

  1. Preheat oven to 350 F. Prepare a 9X13 glass pyrex with oil or nonstick spray. Set aside.
  2. To make the filling, heat olive oil in heavy skillet over medium heat. Sauté onion until translucent (about 5 to 7 minutes).
  3. Add garlic, jalapeño, sweet potato, paprika, and cumin. Cook, stirring frequently, until sweet potatoes begin to soften (about 10 minutes).
  4. Clean kale and remove stems. Don’t dry off. Chop into 1-inch pieces. Add to sweet potato mixture. Cook until kale is wilted (about 3 to 5 minutes). Remove from heat and set aside.
  5. Cut poblanos in half right through the stem. Remove seeds and rinse and dry thoroughly. To broil poblano peppers in an oven, place the halves cut side down on a roasting pan. Place on the highest rack in the oven and broil on high for a few minutes until the skins are blistered.  You can also do this using gas burners on your stove. Place the poblanos skin side down onto the gas flame using tongs to turn. Remove when skin is well blistered, about 1 or 2 minutes per side.
  6. Place poblanos skin side down into the prepared pyrex dish.  Spoon about 1/4 cup of the sweet potato-kale mixture into each poblano half.
  7. Bake for 30 minutes at 350F. Remove from oven. Serve with cheese (optional), avocados, cilantro, and salsa.

Almond Butter Banana Muffins

I am a bit of a hoarder.  I’m definitely a food hoarder, but also a hoarder of things. My husband thinks it is junk.  Which it isn’t! But seriously, I keep things in boxes that I have never looked at for the past four years that we have lived here.  I find myself holding on to things because… “don’t you dare get rid of it because I am saving that chair just in case some day I want to paint it red and have a tea party”. Yes…that really came out of my mouth.

DSC_0001

He recently decided to have a garage sale…or an “Alissa’s Things Sale” as I refer to it. He doesn’t hold on to anything. When we got married, he moved into my house with a single box. I had a U-Haul trailer that could have fit a plane. So needless to say, purging is a hard thing for me. I remember every gift someone gave to me. I can’t seem to part with it even if that person totally does not remember giving it to me. They probably just picked it up randomly and thought “crap, it’s her birthday…uhm…ya, here’s a chicken tea pot…she eats chicken…she drinks tea…CHICKEN TEA POT!”.  And here I am 15 years later with the ugliest tea pot and refusing to get rid of it. Until one day I wake up and the love of my life is selling all of my precious belongings (crap) and other people are walking away with my chicken tea pot!  *sob*

DSC_0003

DSC_0015

It was a similar feeling for me when I made the switch a year ago to give up gluten. Making the switch to being gluten free can be tough sometimes. It’s hard to not feel like an outsider when everyone is laughing and enjoying cake and big plates of lasagna. Family gatherings and cookouts and office parties offer a plethora of pasta salads and cupcakes and brownies and bread and crackers.  I would end up being the person in the corner snacking on carrots and a bag of nuts that I had stashed away in my purse like a squirrel.  BECAUSE I AM A HOARDER.

One day I decided to PURGE! I threw away everything that contained wheat or even traces of wheat.  It felt awesome.  I began researching and arming myself with easy recipes to bring to gatherings. So now I always offer to bring something that I know that I can eat and that will blow the socks off of others that have no idea how great gluten free food can be.

DSC_0010

This recipe uses nut butter in place of flour! No flour, no oil, no butter.  Basically it is just almond butter and bananas and honey and eggs. Those purged cabinets probably have these simple ingredients in them.  These muffins are rediculously good and rediculously easy!  I have made them with almond butter and also with peanut butter. Both are fabulous.  You can also add cocoa powder to the batter for chocolate cupcakes!

Almond Butter Banana Muffins

Ingredients

  • 1 cup almond butter* (see note below)
  • 2 ripe bananas, mashed (about 1 cup)
  • 2 eggs, lightly beaten
  • 1 teaspoon baking soda
  • 1 teaspoon vanilla
  • 1/2 teaspoon sea salt
  • 1/4 cup honey
  • 1/2 teaspoon cinnamon (optional)
  • 2 tablespoons cocoa powder (optional)

Instructions

  1. Preheat oven to 350 F. Prepare a 12 cup muffin tin with muffin liners. Set aside.
  2. In a medium bowl, combine the banana, eggs, and almond butter until well mixed. Add the remaining ingredients except the cocoa powder. With half of the batter, fill 6 muffin liners 3/4 full. I use a 1/4 cup to measure for each. With the remaining muffin batter, add the cocoa powder. Fill the remaining 6 muffin cups to 3/4 full with the chocolate batter.
  3. Bake for 15 minutes at 350F. Muffins will be firm a slightly golden, but fluffy. Allow to cool for 10 minutes then remove from the muffin pan to a wire rack.

*Notes

  1. I have also made these with peanut butter and they were great. I assume other nut butters would work too. If you have a nut allergy, sunbutter (sunflower seed butter) would be a good substitute.
  2. I recommend all natural and unsweetened nut butters. However, if you aren’t using all natural nut butters (that is, if they have added sweeteners) then lower the overall amount of added honey in the recipe.
  3. These are also delicious as cupcakes!

Blackberry Cashew Cheesecake (Vegan, Dairy Free, Gluten Free, Paleo)

DSC_0041

I like surprises.  Well…good surprises. This week has been full of some unpleasant surprises but it has also been filled with amazing surprises like…friends dropping by to say hey for no reason but just to visit, a letter from an amazing friend telling me how they cherished our friendship, random hugs, dinner ready when I get home from work, coffee ready when I get up (what a blessing), random dance parties downtown…

DSC_0001

DSC_0015

I also like having intimate gatherings at our place and surprising people with a healthy dessert.  When it comes to a dessert that surprises most folks because it is both gluten-free and dairy free, this cashew cheesecake takes the “cake”. I have made multiple versions including strawberry-vanilla, chocolate-banana, and now blackberry.

This blackberry cashew cheesecake was the BEST so far.  I made the cashew cheesecake filling using my high-powered Cuisinart Pro Plus food processor.  If you have a Vitamix or Blendtec, use it. I’m jealous. But seriously, a great food processor will do the trick but it just may take a bit more time.

DSC_0008

DSC_0017

Instead of mixing whole blackberries into the filling, I made a blackberry sauce and strained out those pesky seeds that looooove to stick around in your teeth while you are trying to be sexy and suave but no one tells you that you have a massive black seed the size of a minivan lodged in your front teeth.  So, I just amped up your sex appeal and created a seedless sauce to mix into the blackberry cheesecake layer. You are welcome!

DSC_0021

The blackberry sauce is easy and takes only an extra 10 minutes. I used 2 cups of blackberries that I froze last summer.  You could also use a bag of frozen blackberries (completely thawed and use organic if possible) or fresh blackberries when they are in season. Boil the blackberries and juices in a saucepan until it begins to thicken (about 5 minutes).  Add a tablespoon of arrowroot powder mixed with water to make a slurry. Arrowroot powder is a grain-free starch alternative to cornstarch. If you aren’t worried about grains, then you could swap cornstarch for the arrowroot powder. Adding the starch will make the sauce even thicker.  Strain the cooked blackberries through a strainer and reserve about 1/3 to 1/2 cup of the sauce. This sauce is amazing in yogurt, on pancakes, waffles, my face.

DSC_0027

DSC_0037

So go surprise your face and someone you love or maybe even just tolerate and make this cheesecake. I promise you won’t be disappointed. Plus, it is gorgeous!

Blackberry Cashew Cheesecake (Paleo, Gluten Free, Grain Free, Dairy Free)  (adapted from My New Roots, serves 8)

Note – You will need a very powerful food processor or blender (such as a Vitamix). I have a Cuisinart Pro Plus food processor that works like a champ and a half. 

Crust Ingredients

  • 1/2 cup raw pecans
  • 1/2 cup pitted dates
  • 1/4 teaspoon sea salt

Filling Ingredients

  • 1 1/2 cups raw cashews (soaked at least 4 hours)
  • 1/3 cup coconut oil (melted)
  • 1/3 cup maple syrup (or honey for non vegan)
  • juice of 2 lemons (about 1/4 cup)
  • 1 teaspoon vanilla extract
  • 1 to 2 cups fresh or frozen blackberries (thawed if frozen and retain the juices)
  • 1 tablespoon arrowroot powder + 2 tablespoons of water

Instructions

  1. Crust – In a food processor, place nuts, salt, and pitted dates and pulse until the ingredients combine into a paste.  The mixture should hold together when you pinch a small amount between your fingers.  Place Saran wrap in a 7″ pie pan (spring form pans work best but aren’t necessary) or 8×8″ square baking dish. Spoon crust mixture into pan and press evenly and firmly, making sure that the edges are well packed. Wash and rinse the food processor.
  2. Blackberry Sauce – Place the blackberries and thawed blackberry juices in a heavy saucepan and heat over medium heat. Stir frequently, and bring to a low boil.  In a small bowl, mix the arrowroot powder with 2 tablespoons of cold water until it forms a slurry. Slowly stir the arrowroot slurry into the blackberries. Simmer for about 5 to 10 minutes until the homemade blackberry sauce thickens to coat the back of a metal spoon. Remove from heat. To get separate the seeds from the blackberries, set a strainer over a heat-proof bowl. Pour the blackberry sauce into the strainer and mash with the back of a spoon to get all of the juices from the blackberries. You should get about 1/2 cup of sauce. Reserve the sauce for later use in the filling. You can keep the blackberry mash for either a topping or another use (stirred into oatmeal? in yogurt?).
  3. Cashew Cheesecake Filling – Microwave the coconut oil in a small Pyrex dish for 30 seconds until mostly melted. Whisk in maple syrup to combine. Place all of the filling ingredients (except the blackberries) into the bowl of the processor and blend on high-speed for several minutes until very smooth.
  4. Assembly – remove the crust from the freezer. Pour about two-thirds of the cashew mixture onto the crust and smooth evenly with a rubber spatula. To the remaining third of the cashew filling mixture, add the blackberry sauce (about 1/3 cup). Blend on high until smooth. Pour this mixture onto the first layer of filling. I drizzled an additional 1/4 cup of sauce on the top of the blackberry layer and made a swirl pattern with a butter knife. Place in freezer for about 2 hours or until solid.
  5. Serving – To serve, remove from freezer about 30 minutes before serving.  Heat a smooth and sharp knife under hot water and cut the pie into 8 slices. Serve with any additional blackberry sauce. Store any remaining pie in the freezer.