Thai Green Curry Burger Wraps with Spicy Peanut Sauce

DSC_0251

Are you sitting down? Because when you taste this burger, I swear you will fall over. It is a religious experience and will fill you with joy. And best of all…this burg is a tastebud-party that you can hold in your HAND! YOUR HAND! This will revolutionize your tailgating burger experience. For those of us that don’t get to partake in burger buns, here is your chance at handheld goodness.

Portable spicy burger snacks are the best….especially when they are topped with peanut sauce. Mmmmm.

DSC_0274

DSC_0247

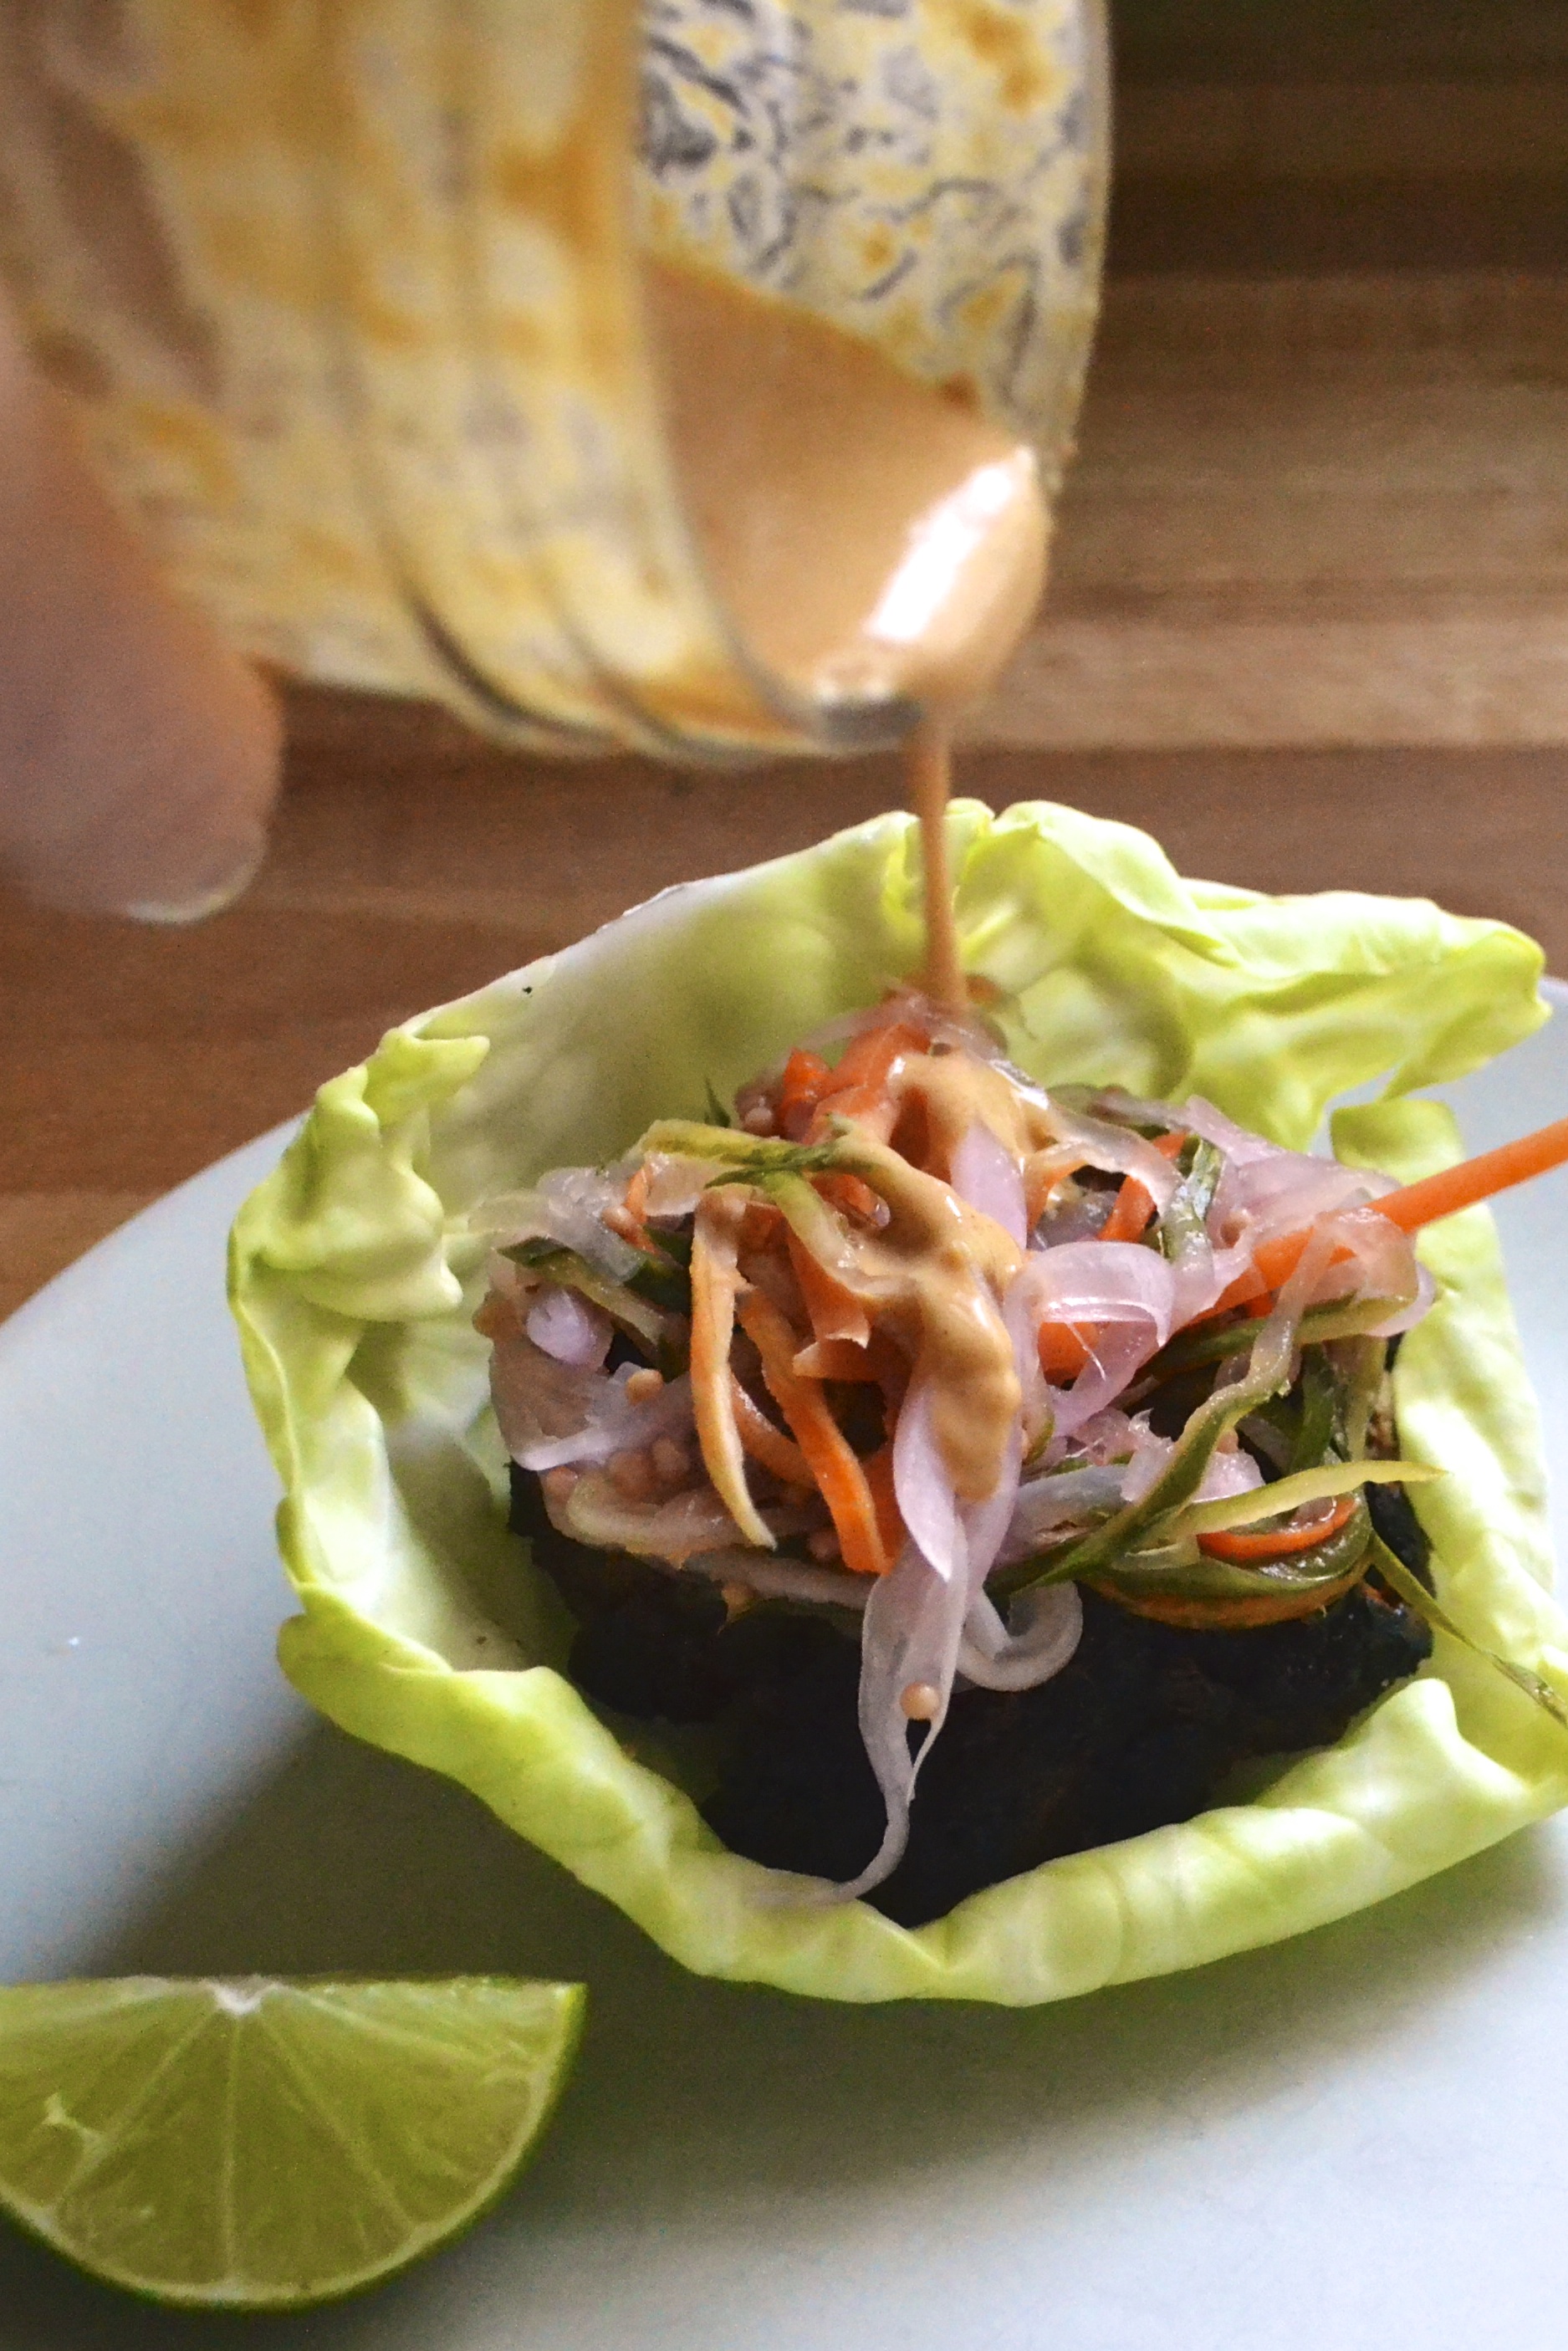
This burger comes at you with green curry, spicy siracha sauce, tangy pickled slaw, herby freshness, and then the holy moly frijole PEANUT SAUCE. Seriously, this peanut sauce will change your life. Stick this recipe in your back pocket and USE IT. I am now an amazing fan of peanut butter on burgers. For a paleo friendly sauce, just replace the peanut butter with almond butter or sunbutter.

Really. Just try it. Trust me. You won’t look back.

Your life will consist of BPS and APS…life Before Peanut Sauce (BPS) on burgs and life After Peanut Sauce (APS) on burgs.

DSC_0220

DSC_0260

Now the ingredient list below is a bit lengthy. But don’t let that scare you. These burgs come together pretty quickly once you get everything prepped. I promise it is worth it and it will blow the mind of anyone that you serve it to. These also are great sliders to prepare for a crowd for football watch parties. But if you make them, just invite me. Because I can’t get enough of them.

DSC_0264

Thai Burger Wraps with Spicy Peanut Dressing

Green Curry Burger Ingredients

  • 1 lb ground beef
  • 1/2 Tablespoon fish sauce
  • 1/2 Tablespoon soy sauce
  • 1 Tablespoon green curry paste
  • 1/4 cup green onions, diced
  • 1/4 cup cilantro, chopped
  • 1/2 Tablespoon siracha
  • 1/4 teaspoon sea salt

Burger Fixins’

  • Asian pickled slaw
  • ¼ Cup fresh cilantro leaves, chopped
  • ¼ Cup fresh basil leaves, chopped
  • ¼ Cup fresh mint leaves, chopped
  • 4 leaves of green cabbage
  • Siracha
  • 1 lime, sliced into 4 slices

Thai Spicy Peanut Sauce

  • 1 Tablespoon fresh ginger, peeled and grated
  • 1 clove garlic, minced
  • 1/3 cup unsalted creamy peanut butter (or almond butter or sunbutter)
  • 1 Tablespoon soy sauce
  • 1 Tablespoon rice wine vinegar
  • 1 Tablespoon lime juice
  • 1 Tablespoon honey
  • 1 teaspoon Siracha
  • ¼ Cup water

Instructions

  1. Making Patties: Combine all of the ingredients in a large bowl and mix with hands until ingredients are distributed throughout meat. Try to handle as lightly and as little as possible  so that the meat does not become compact and tough when cooking. Marinate meat for 15 minutes before making patties. After 15 minutes, lightly form the meat into 4 equal-portioned patties, about ¾-inch thick. Make a dimple in the middle of the patty, pressing down with thumb or fingers. This will keep the burger from bulging and maintains juiciness.
  2. Peanut Sauce: Combine all ingredients in a food processor or blender. Blend until smooth. Set aside.
  3. Cooking Patties: Heat a gas grill to medium-high. When the grill is ready, brush the grill rack with the vegetable oil. Place the patties on the rack, cover, and cook, turning once, until done to preference, 3 to 5 minutes on each side.
  4. Wrap Fixins and Toppings: Mix herbs in a bowl and set aside. Wash cabbage leaves and allow to dry.
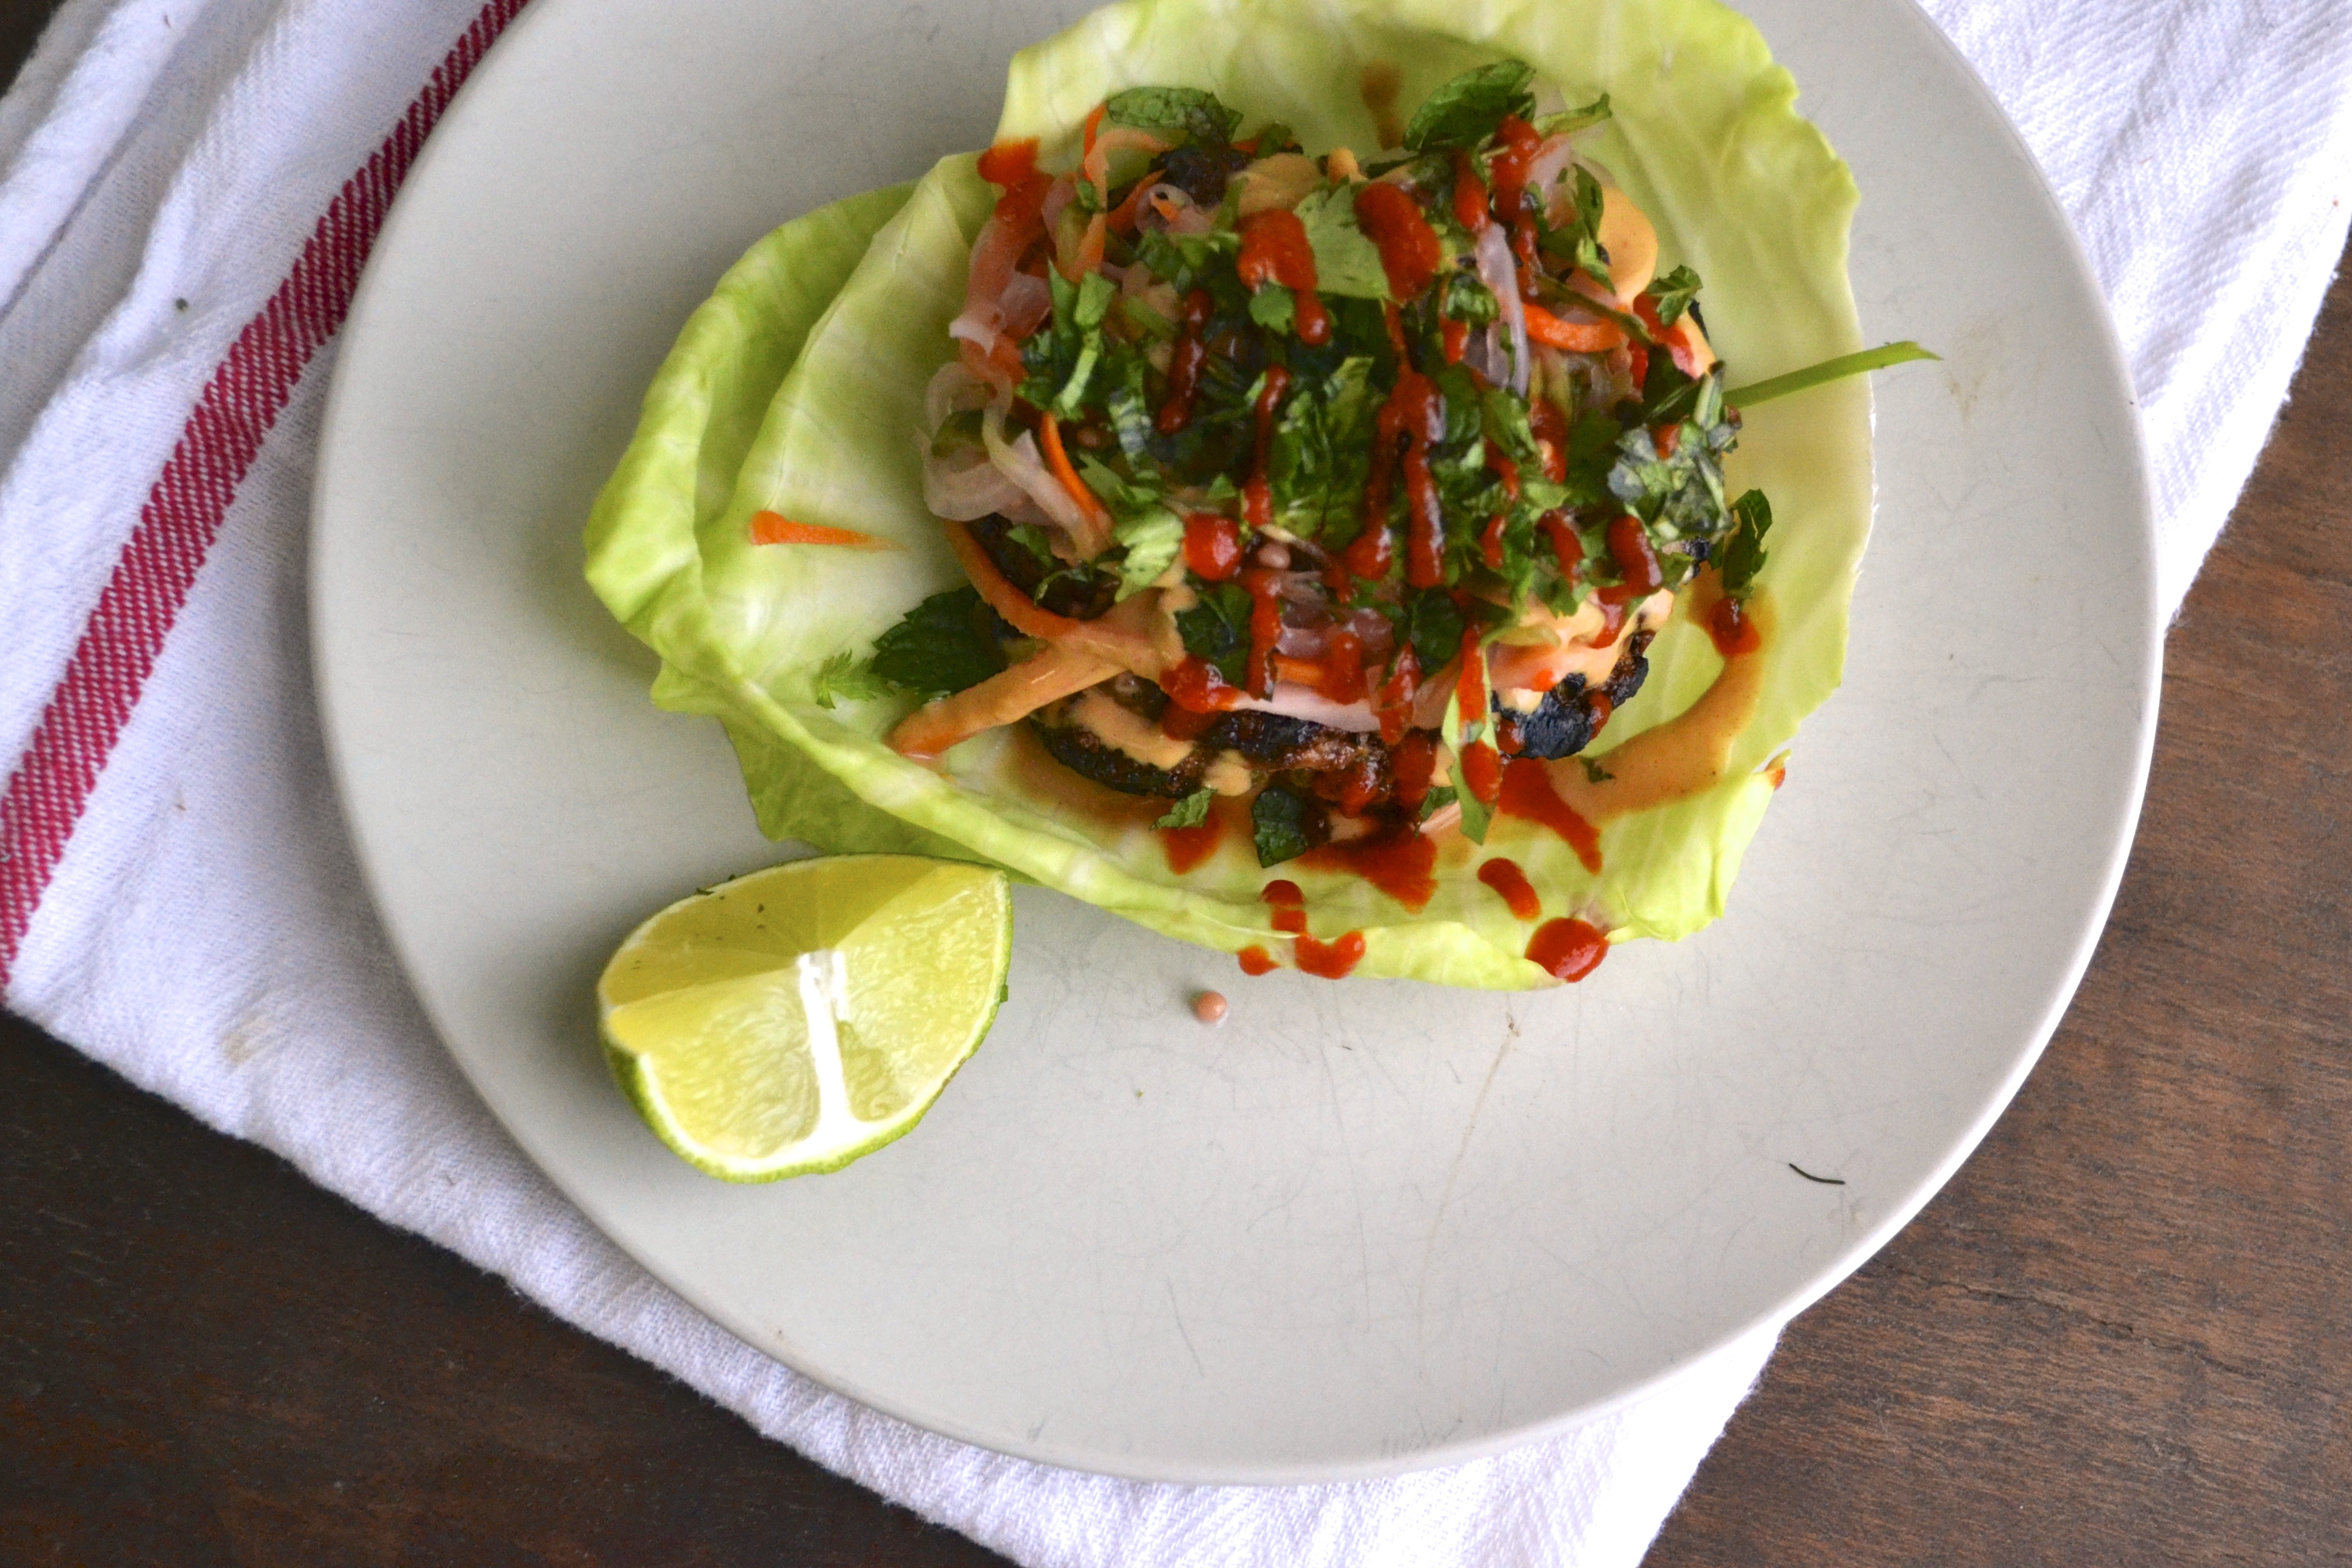
  5. Assembling Burger Wraps: Lay out washed and dried cabbage leaves. Spread 1 teaspoon of siracha in the bottom of each cabbage leaf. Then on top of the cabbage leaf, place one grilled patty, then one heaping tablespoon of peanut sauce, then add 1/3 C of pickled slaw, and then top with one heaping tablespoon of herb mixture. Spread additional siracha and fresh lime juice on top of your burger wrap.

Paleo Roasted Banana Creamsicles

DSC_0213

In April, winter would not let go. We had two massive snow storms that dumped over 15 inches of snow each.  And now, it is nearing mid September and summer is being just as pesky and stubborn as winter. We have had the hottest days ALL summer this week with temps breaking triple digits. Really? Why can’t spring or fall be stubborn? Get feisty, fall! Take over…strong arm summer! Who’s the Boss? Not Tony Danza…It’s you, fall. Come ON!

*Stomp* *Stomp* I want to wear sweaters, eat chili, watch football!

DSC_0224

But alas…the heat persists. No rain. Just muggy and sweaty and sticky and mosquito heaven. Fine. SO instead of chili, I will settle for POPSICLES! And I suggest you do the same. Popsicles are really the best sweet treat there is because they are cheap, portable, kid-friendly, and healthy. The other thing I dig about popsicles is that they have built-in portion control.

DSC_0200 DSC_0205

These popsicles are really swoon-worthy. I highly recommend roasting your bananas. It offers a whole new level and depth of bananananana-ness. Roasting bananas also is a great way to get under ripe bananas über sweet. They can either be roasted in an oven for 15 minutes or can be placed directly over an open gas flame (as shown above). There is no added sweetener in the popsicles because the roasted bananas take on a luscious caramelized flavor.  If you want much sweeter popsicles, you can add 1 tablespoon of honey. For the “cream” part of the creamsicles, I used light coconut milk to make it dairy free. You could also sub any dairy or nondairy milk instead.

DSC_0227

So cheers to the (hopefully) last days of summer. Tip your cups and popsicles and remember this sweaty weather when winter hits in a few months.

Note – I purchased my popsicle molds from World Market, but there are several BPA-free brands offered on amazon as well. Here is a great article on the Kitchn about top popsicle molds. If you do not have molds, have no fear. You can easily make popsicles with plastic cups and wooden popsicle sticks, as shown here

Paleo Roasted Banana Creamsicles

Ingredients

  • 3 bananas
  • 1 cup coconut milk
  • 1 teaspoon vanilla
  • pinch of salt

Instructions

  1. There are a few ways to roast bananas. (1) Place whole and unpeeled bananas on a foil lined roasting pan. Roast in a 350 F oven for 10 to 15 minutes. Remove and allow to cool. OR (2) Place whole and unpeeled banana directly on a gas flame of your oven. Use tongs to turn and blacken the banana evenly. This will take about 5 minutes per banana.
  2. Peel bananas and place them in a medium bowl. Mash bananas thoroughly with a potato masher or place in a blender and puree. Stir in coconut milk, salt, and vanilla.
  3. Pour banana mixture into popsicle molds leaving 1/4-inch before the top to leave room for expansion.  For popsicle molds that contain bases with sticks or hold wooden sticks in place, snap on popsicle base and freeze until solid, about 4 to 5 hours. If you do not have popsicle mods, glasses or open paper cups can be used. For these types, pour popsicle mixture into the glasses or open cups and freeze until the popsicle is beginning to set (about 1 1/2 to 2 hours). Then insert wooden sticks and freeze until fully solid (another 3 to 4 hours).

Lemony Apricot and Cherry Clafoutis (Grain Free, Gluten Free, Dairy Free, Paleo)

DSC_0271

I’m jumping straight into this dessert.

Number one: it’s pronounced cla-foooooo-teeeee.

Number two: it’s good.

Number three: it’s easy.

Number four: We jumped straight into this dessert before I could properly photograph it. Doh!

This french-based dessert is a mix between custard, flan, heaven. Traditionally, clafoutis contain a little bit of all purpose flour, whole milk, eggs, sugar, and whole cherries that have not been pitted. The pits give off an amazing almondy flavor. But who wants to be enjoying a creamy amazing dessert and then break a tooth when you bite into a surprise pit. And then have to spit. Mmmm. Fancy.

DSC_0249

DSC_0263

So when coming up with a grain free clafoutis recipe, using almond flour seemed like it would work wonderfully and provide that almond flavor naturally. I scoured through several different recipes and finally landed on this one from Gourmande in the Kitchen. I slightly adapted it, by adding the zest and juice of one lemon, a tablespoon of coconut flour to thicken the mixture (making it more sturdy and creamy), and honey instead of sugar.

DSC_0265

A friend brought me some fresh Michigan sweet cherries and apricots that she brought back from her vacation.  We ate most of the cherries, but I managed to squirrel away a batch for this clafoutis.  Halve and pit the cherries and apricots and then place them into the bottom of a cast iron skillet. You could also use a 9-inch pie pan, cake pan, or a shallow tart dish. Simply place all of the remaining ingredients into a blender or food processor and whirl together for one minute. Then bam! Pour the custard filling on top of the prepared fruit. Then pop this baby into the oven and 45 minutes later, you have a light, creamy, and amazing dessert. The best thing about this dessert is that you can prepare a stunning dessert for company without having to worry about it. You can focus on the main course, or a side dish…or your drink and company!

If you don’t have cherries, no worries, I also have prepared this clafoutis with blueberries. It would be awesome with any fruit that is in season…pears, apples, peaches, raspberries, blackberries…plums!

DSC_0274

Lemony Apricot and Cherry Clafoutis (adapted from Gourmande in the Kitchen)

Serves 6 to 8

Ingredients

  • butter or coconut oil for baking dish
  • 1/2 cup pitted cherries
  • 4 apricots, pitted and sliced in half
  • 1 cup coconut milk
  • 3 eggs
  • 1/2 cup almond flour
  • 1 tablespoon coconut flour
  • 1 teaspoon vanilla extract
  • 1/3 cup honey
  • juice and zest of 1/2 large organic lemon
  • 1/4 teaspoon sea salt

Instructions

  1. Preheat oven to 375 F. Butter or grease a 10-inch cast iron skillet or 8X8 inch pyrex dish or even a 9-inch round pie pan or cake pan will work.
  2. Place prepared and pitted cherries and apricots in the bottom of the prepared baking dish. Arrange in a single layer and evenly disperse the fruit.
  3. Meanwhile, place all of the remaining ingredients (coconut milk through salt) into either a blender, food processor, or bowl of a mixer. Blend or mix on high for 1 minute. Gently pour the mixture into the prepared baking dish on top of the fruit, being careful to not disturb or dislodge the fruit.
  4. Place into the preheated oven and bake for 35 to 40 minutes, or until set. Remove from oven and allow to cool for 10 minutes. Serve warm or at room temperature.

Strawberry and Cucumber Ribbon Salad

DSC_0243

My husband pulled the trigger this week. Four years of waffling on my end.  But he just woke up one morning this week and decided it was time. He jumped in and started pulling up the 85 layers of laminate and tile and fiber board that covered our kitchen floors. Good thing he stopped just before hitting the asbestos tile. What a man!

He sent me pictures of the destruction while I was at work. Needless to say I was shocked. And then kind of excited. But then it hit me…

“Wait… You JUST did this???? Are you kidding??? No stove? No fridge? No floor?  Is that asbestos? Are you dying? Is that a respirator? Are you drinking water???? Don’t eat the floor! Don’t die on me.”

DSC_0240

I guess this means I’m GETTING A FLOOR!

What do you eat when you don’t have a kitchen and your garden is going gangbusters with cucumbers? Cucumber salad!

Let’s get fancy….cucumber ribbon salad! Oooooh gurrrrl!  Ya, I did it. I used a vegetable peeler for something besides collecting dust in my kitchen utensil crap drawer. Boom!

DSC_0249

DSC_0252

I also threw some fresh strawberries, basil, mint, and feta into the mix. Personally, I think the fresh herbs and feta really bring this dish together. I also drizzled a little bit of good balsamic vinegar on top. This has been my go to lunch of choice this week. Summer in a bowl!

DSC_0250

This also is a perfect picnic salad! Because I’m basically picnicking every meal until our kitchen floor installation is complete.

DSC_0260

Strawberry and Cucumber Ribbon Salad

Makes 4 side salads or 2 large salads

Ingredients

  • 2 medium cucumbers
  • 1/2 cup sliced strawberries
  • 2 to 3 Tablespoons crumbled feta
  • 2 to 3 Tablespoons fresh mint and/or basil, slivered
  • 1 to 2 Tablespoons balsamic vinegar

Instructions

  1. Using a vegetable peeler or or mandolin slicer, cut the cucumber lengthwise into long thin ribbons. Stop before you get to the seeds.
  2. Place cucumber ribbons in a bowl with sliced strawberries, crumbled feta, basil, and mint. Drizzle with good balsamic vinegar when ready to serve.

Almond Flour Blueberry Peach Muffins

DSC_0223

I don’t know what evokes more tasty, comforting memories: peach cobbler or blueberry muffins.  Both make me giddy. Both make me drool. Both make me scramble to the kitchen and wait impatiently for them to get out of the oven and promptly take too quick of a bite which then results in me burning the crap out of my mouth.

Every. Dang. Time.

And do I learn, people?

No.

DSC_0202

DSC_0191

A friend of mine went blueberry picking and graciously parted with a few of her fresh, sweet, awesome blueberries.  I also had some fresh Missouri peaches at the house. Oh YaH!

Are you guys thinking what I’m thinking? YAH! Let’s burn the crap out of our mouths with hot sexy blueberry peach muffins!!!!! YAH.  Wait….that’s not what you were thinking? Seriously? Well it should be. Cuz that’s what we are going to DO! Tell your mouth to get ready.

DSC_0205

DSC_0219

What do we want? BLUEBERRY PEACH MUFFINS. When do we want them? NOW!

Fresh blueberries + fresh peach + lemon zest = dreamy

DSC_0194

While these muffins were cooking, I sat and waited and watched through the oven door as they rose. I smelled the ridiculous spell-binding, blueberry-peach aroma as  it wafted through my house. My stomach growled. I couldn’t take it! I nearly pulled them out of the oven too early because I WANTED THEM NOW! I was drooling.

But once they were finished, I pulled them out…I let them cool (for 2 seconds) and then I took a bite and felt those bursts of blueberries, the zip of lemon zest, the fresh juicy peaches…. And then it hit me.  OOOOOOW…crap…burnt again…but…Mmmmmmm. The burned roof of my mouth and seared finger tips forget the pain easily when tempted and provided with such awesomeness.

DSC_0213

Almond Flour Blueberry Peach Muffins (Grain Free, Gluten Free, Paleo-Friendly, Dairy Free)

Ingredients

  • 2 1/2 C almond flour (I use Honeyville blanched almond flour)
  • 3/4 teaspoon baking soda
  • 1/4 teaspoon kosher salt
  • zest of 1 lemon (organic preferably)
  • 3 eggs
  • 1/4 C maple syrup or honey
  • 2 Tablespoons grass-fed butter or coconut oil (melted)
  • 1/2 C unsweetened applesauce
  • 1 ripe peach, diced (ok to leave skin on)
  • 1/2 to 1 C blueberries (fresh or frozen)

Instruction

  1. Preheat oven to 350 F. Place 12 muffin liners in a 12 regular-sized muffin tin. Set aside. (I ran out of muffin liners half way through so I just sprayed coconut oil inside the muffin cups that were not lined.)
  2. In a medium bowl, combine almond flour, baking soda, salt, and zest. In a separate bowl, combine together wet ingredients, which include eggs (slightly beaten), maple syrup or honey, melted butter or coconut oil (allow to slightly cool before adding to eggs or you will scramble those suckers), and applesauce. Add dry to wet and stir until combined. Stir in peaches and blueberries carefully!
  3. Spoon about 1/4 cup of batter into each lined muffin tin. Bake for 15 to 20 minutes at 350F. Muffins will be set in the center and lightly browned on edges. Remove from oven and allow to cool in muffin tin for 5 minutes. Then move to cooling rack (if you can stand it) and allow to cool the rest of they way…about 30 minutes…or if you are me, 30 seconds.

Notes:

* The base recipe for these delicious muffins is adapted from an awesome blog called Power Hungry.

Paleo Banana Ice Cream Cake

It’s already the middle of July and this weekend was the first time that I put a bathing suit on.  Honestly, between you and me…this doesn’t have to happen again.

DSC_0242

Why do bathing suits have to be so UNFLATTERING! Ugh.

I should just wear a T-shirt or a trash bag.

But Oh well….I guess I didn’t get too upset, because after swimming all day, all I wanted was ICE CREAM.  So I promptly made this amazing dairy free and grain free banana ice cream cake to go along with ribs that we smoked.  Maybe this is why my bathing suit is unflattering?  Ice cream cake + ribs?

Naaaaah.

DSC_0252

DSC_0219

DSC_0222

This cake is amazing. Creamy. Dreamy. Guiltless. It is made with cashews, bananas, dates, hemp seeds, raw cacao powder! Ya…shhhh….it’s good for you.

So I will just serve myself up another slice of cake…banana ice cream cake, that is. And I will eat it in my ugly, weird fitting, old bathing suit. And be happy.

Very happy.

DSC_0255

Paleo Banana Ice Cream Cake (adapted from This Rawsome Vegan Life)

Crust Ingredients

  • 1/2 C raw pecans
  • 1/4 C hemp seeds
  • 2 Tbsp cacao powder
  • 1/4 tsp salt
  • 1 C pitted dates

Caramel Ingredients

  • 1 C pitted dates, soaked in hot water for 10 minutes
  • 1/4 C water
  • 1/8 tsp salt

Chocolate Ingredients

  • 1/4 C cacao powder
  • 1/4 C water
  • 2 Tbsp coconut oil
  • 2 Tbsp honey or maple syrup or agave nectar

Filling Ingredients

  • 2 C frozen bananas (3 to 4)
  • 2 C raw cashews, soaked for 3 to 4 hours (or overnight)
  • 1/2 C water or nondairy milk
  • 1/3 C maple syrup or honey
  • 1/3 C coconut oil
  • 1/8 tsp salt
  • 1 tsp vanilla

Instructions

  1. Crust – In a food processor, place nuts, hemp seeds, raw cacao powder (or cocoa powder), and salt.  Pulse until the ingredients combine to make a flour like consistency. Add dates and process for a few minutes until it forms into a paste.  The mixture should hold together when you pinch a small amount between your fingers.  In a springform pan, place wax paper or syran wrap on the bottom. Press crust evenly into the bottom of the springform pan only slightly coming up the sides. Set in the freezer while preparing the filling.
  2. Caramel Sauce – Clean out food processor. Place soaked dates and 1/4 cup of water in the bowl of the food processor. Process for several minutes until a caramel-like substance is formed.  Add additional liquid as necessary. Add salt. Spoon into a separate bowl. Clean food processor bowl for next step.
  3. Banana Ice Cream Filling – Microwave the coconut oil in a small Pyrex dish for 30 seconds until mostly melted. Place all of the filling ingredients (except the caramel sauce) into the bowl of the food processor and blend on high-speed for several minutes until very smooth.
  4. Chocolate Sauce – In a separate bowl, combine cacao powder and 1 tablespoon of warm water. Stir carefully until a fudgey mixture is formed. Add warm water 1 tablespoon at a time until a drizzleable (is this a word???) fudge sauce is formed.  Stir in melted coconut oil at a tablespoon at a time. Keep mixture warm or it will harden. Pop in microwave if necessary.
  5. Assembly – Remove the crust from the freezer. Pour about two-thirds of the cashew mixture onto the crust and smooth evenly with a rubber spatula. Swirl in half of caramel mixture and alternate with 1/3 of chocolate mixture using a butter knife. Top with remaining filling. And swirl in remaining caramel sauce and another 1/3 of chocolate sauce. Drizzle any remaining chocolate sauce on top. Place in freezer for about 2 hours or until solid.
  6. Serving – To serve, remove from freezer about 30 minutes before serving.  Heat a smooth and sharp knife under hot water and cut the pie into 8 slices. Serve with any additional chocolate sauce. Store any remaining pie in the freezer.

Jalapeño Bacon Jam

Heaven in a jar. Spicy + Smokey + Sweet + Salty.

I am going to give you a huge warning. Once you begin making this, your house will turn into a drool zone. People will come from all over. If you make it, they will come. Headlights will line up your street. People will pay admission to just be near you. It is the Field of Dreams of Jams. True story.

DSC_0015

DSC_0001

After researching and researching different versions of this amazing jam, there are several ways to make it. I really think you could stir nearly anything into it and get something magical. No matter what, it will be hard for you to not devour in one sitting or even while you are cooking it. Seriously.

Typically this jam consists of:

  • bacon (duh),
  • onions (I used red but yellow would work too),
  • vinegar (many recipes used cider vinegar but I opted for balsamic),
  • sugar (I used maple syrup + 1 tablespoon of molasses…several recipes use a combo of brown sugar + maple, you could definitely play around with the ratios here)
  • liquid (I used water, but Martha used strong brewed coffee)
  • Optional spices (I added a jalapeño, but I also think some chipotle powder or other spicy add-ins would be redonculous like this recipe)

So without further ado…I present to you, the heavenly and amazing Jalapeño Bacon Jam!  *Jazz Hands*

We had several people over and slathered it on burgers…erhmehgeeerd. SO GOOD. Somehow there was magically one tablespoon left. So I squirreled it away for my lunch the next day and topped a baked sweet potato with it. *swoooon*

DSC_0022

Notes on storage – This should keep in a jar with a tight fitting lid in the refrigerator for 3 weeks or the freezer for up to 6 months. But if this stuff is around longer than two days, I will be AMAZED at your self control. And don’t be surprised if it gets stolen…don’t look at me???

Jalapeño Bacon Jam (adapted from Martha Stewart and Homesick Texan)

Ingredients

  • 1 lb bacon (nitrate free if possible), cut into 1/2-inch pieces
  • 1 tablespoon reserved bacon grease
  • 2 red onions (about 2 1/2 cups), diced
  • 3 cloves garlic, minced
  • 2 jalapeños, deseeded and diced (about 1/4 cup)
  • 1 cup of water
  • 1/3 cup balsamic vinegar
  • 1/4 cup real maple syrup
  • 1 tablespoon unsulphured molasses
  • salt and cracked pepper

Instructions

  1. Cut the bacon slices into 1-inch strips. Over medium-high heat, cook the bacon in a dutch oven stirring frequently until the bacon is browned but not crispy. Use a slotted spoon to transfer the bacon to a paper-towel lined plate. Drain the bacon grease but reserve about 1 tablespoon.
  2. Add onions, jalapeño, and garlic to the dutch oven and cook over medium heat until the onions become translucent. This should take about 5 minutes.  Add bacon and remaining ingredients. Simmer on low for 1 to 2 hours, stirring occasionally. If jam gets too dry, add additional water 1/4 cup at a time. After it is good and thick, remove it from heat and allow to cool.
  3. If you want the jam to be a finer consistency, add it to a food processor and pulse a few times (not too much).  I personally liked mine a bit chunky. Transfer to a jar with a tight-fitting lid. Store in refrigerator for 3 weeks or in the freezer for 6 months. But if this stuff lasts longer than one or two days in your house, bravo to your self control!

Almond Butter Banana Muffins

I am a bit of a hoarder.  I’m definitely a food hoarder, but also a hoarder of things. My husband thinks it is junk.  Which it isn’t! But seriously, I keep things in boxes that I have never looked at for the past four years that we have lived here.  I find myself holding on to things because… “don’t you dare get rid of it because I am saving that chair just in case some day I want to paint it red and have a tea party”. Yes…that really came out of my mouth.

DSC_0001

He recently decided to have a garage sale…or an “Alissa’s Things Sale” as I refer to it. He doesn’t hold on to anything. When we got married, he moved into my house with a single box. I had a U-Haul trailer that could have fit a plane. So needless to say, purging is a hard thing for me. I remember every gift someone gave to me. I can’t seem to part with it even if that person totally does not remember giving it to me. They probably just picked it up randomly and thought “crap, it’s her birthday…uhm…ya, here’s a chicken tea pot…she eats chicken…she drinks tea…CHICKEN TEA POT!”.  And here I am 15 years later with the ugliest tea pot and refusing to get rid of it. Until one day I wake up and the love of my life is selling all of my precious belongings (crap) and other people are walking away with my chicken tea pot!  *sob*

DSC_0003

DSC_0015

It was a similar feeling for me when I made the switch a year ago to give up gluten. Making the switch to being gluten free can be tough sometimes. It’s hard to not feel like an outsider when everyone is laughing and enjoying cake and big plates of lasagna. Family gatherings and cookouts and office parties offer a plethora of pasta salads and cupcakes and brownies and bread and crackers.  I would end up being the person in the corner snacking on carrots and a bag of nuts that I had stashed away in my purse like a squirrel.  BECAUSE I AM A HOARDER.

One day I decided to PURGE! I threw away everything that contained wheat or even traces of wheat.  It felt awesome.  I began researching and arming myself with easy recipes to bring to gatherings. So now I always offer to bring something that I know that I can eat and that will blow the socks off of others that have no idea how great gluten free food can be.

DSC_0010

This recipe uses nut butter in place of flour! No flour, no oil, no butter.  Basically it is just almond butter and bananas and honey and eggs. Those purged cabinets probably have these simple ingredients in them.  These muffins are rediculously good and rediculously easy!  I have made them with almond butter and also with peanut butter. Both are fabulous.  You can also add cocoa powder to the batter for chocolate cupcakes!

Almond Butter Banana Muffins

Ingredients

  • 1 cup almond butter* (see note below)
  • 2 ripe bananas, mashed (about 1 cup)
  • 2 eggs, lightly beaten
  • 1 teaspoon baking soda
  • 1 teaspoon vanilla
  • 1/2 teaspoon sea salt
  • 1/4 cup honey
  • 1/2 teaspoon cinnamon (optional)
  • 2 tablespoons cocoa powder (optional)

Instructions

  1. Preheat oven to 350 F. Prepare a 12 cup muffin tin with muffin liners. Set aside.
  2. In a medium bowl, combine the banana, eggs, and almond butter until well mixed. Add the remaining ingredients except the cocoa powder. With half of the batter, fill 6 muffin liners 3/4 full. I use a 1/4 cup to measure for each. With the remaining muffin batter, add the cocoa powder. Fill the remaining 6 muffin cups to 3/4 full with the chocolate batter.
  3. Bake for 15 minutes at 350F. Muffins will be firm a slightly golden, but fluffy. Allow to cool for 10 minutes then remove from the muffin pan to a wire rack.

*Notes

  1. I have also made these with peanut butter and they were great. I assume other nut butters would work too. If you have a nut allergy, sunbutter (sunflower seed butter) would be a good substitute.
  2. I recommend all natural and unsweetened nut butters. However, if you aren’t using all natural nut butters (that is, if they have added sweeteners) then lower the overall amount of added honey in the recipe.
  3. These are also delicious as cupcakes!

Blackberry Cashew Cheesecake (Vegan, Dairy Free, Gluten Free, Paleo)

DSC_0041

I like surprises.  Well…good surprises. This week has been full of some unpleasant surprises but it has also been filled with amazing surprises like…friends dropping by to say hey for no reason but just to visit, a letter from an amazing friend telling me how they cherished our friendship, random hugs, dinner ready when I get home from work, coffee ready when I get up (what a blessing), random dance parties downtown…

DSC_0001

DSC_0015

I also like having intimate gatherings at our place and surprising people with a healthy dessert.  When it comes to a dessert that surprises most folks because it is both gluten-free and dairy free, this cashew cheesecake takes the “cake”. I have made multiple versions including strawberry-vanilla, chocolate-banana, and now blackberry.

This blackberry cashew cheesecake was the BEST so far.  I made the cashew cheesecake filling using my high-powered Cuisinart Pro Plus food processor.  If you have a Vitamix or Blendtec, use it. I’m jealous. But seriously, a great food processor will do the trick but it just may take a bit more time.

DSC_0008

DSC_0017

Instead of mixing whole blackberries into the filling, I made a blackberry sauce and strained out those pesky seeds that looooove to stick around in your teeth while you are trying to be sexy and suave but no one tells you that you have a massive black seed the size of a minivan lodged in your front teeth.  So, I just amped up your sex appeal and created a seedless sauce to mix into the blackberry cheesecake layer. You are welcome!

DSC_0021

The blackberry sauce is easy and takes only an extra 10 minutes. I used 2 cups of blackberries that I froze last summer.  You could also use a bag of frozen blackberries (completely thawed and use organic if possible) or fresh blackberries when they are in season. Boil the blackberries and juices in a saucepan until it begins to thicken (about 5 minutes).  Add a tablespoon of arrowroot powder mixed with water to make a slurry. Arrowroot powder is a grain-free starch alternative to cornstarch. If you aren’t worried about grains, then you could swap cornstarch for the arrowroot powder. Adding the starch will make the sauce even thicker.  Strain the cooked blackberries through a strainer and reserve about 1/3 to 1/2 cup of the sauce. This sauce is amazing in yogurt, on pancakes, waffles, my face.

DSC_0027

DSC_0037

So go surprise your face and someone you love or maybe even just tolerate and make this cheesecake. I promise you won’t be disappointed. Plus, it is gorgeous!

Blackberry Cashew Cheesecake (Paleo, Gluten Free, Grain Free, Dairy Free)  (adapted from My New Roots, serves 8)

Note – You will need a very powerful food processor or blender (such as a Vitamix). I have a Cuisinart Pro Plus food processor that works like a champ and a half. 

Crust Ingredients

  • 1/2 cup raw pecans
  • 1/2 cup pitted dates
  • 1/4 teaspoon sea salt

Filling Ingredients

  • 1 1/2 cups raw cashews (soaked at least 4 hours)
  • 1/3 cup coconut oil (melted)
  • 1/3 cup maple syrup (or honey for non vegan)
  • juice of 2 lemons (about 1/4 cup)
  • 1 teaspoon vanilla extract
  • 1 to 2 cups fresh or frozen blackberries (thawed if frozen and retain the juices)
  • 1 tablespoon arrowroot powder + 2 tablespoons of water

Instructions

  1. Crust – In a food processor, place nuts, salt, and pitted dates and pulse until the ingredients combine into a paste.  The mixture should hold together when you pinch a small amount between your fingers.  Place Saran wrap in a 7″ pie pan (spring form pans work best but aren’t necessary) or 8×8″ square baking dish. Spoon crust mixture into pan and press evenly and firmly, making sure that the edges are well packed. Wash and rinse the food processor.
  2. Blackberry Sauce – Place the blackberries and thawed blackberry juices in a heavy saucepan and heat over medium heat. Stir frequently, and bring to a low boil.  In a small bowl, mix the arrowroot powder with 2 tablespoons of cold water until it forms a slurry. Slowly stir the arrowroot slurry into the blackberries. Simmer for about 5 to 10 minutes until the homemade blackberry sauce thickens to coat the back of a metal spoon. Remove from heat. To get separate the seeds from the blackberries, set a strainer over a heat-proof bowl. Pour the blackberry sauce into the strainer and mash with the back of a spoon to get all of the juices from the blackberries. You should get about 1/2 cup of sauce. Reserve the sauce for later use in the filling. You can keep the blackberry mash for either a topping or another use (stirred into oatmeal? in yogurt?).
  3. Cashew Cheesecake Filling – Microwave the coconut oil in a small Pyrex dish for 30 seconds until mostly melted. Whisk in maple syrup to combine. Place all of the filling ingredients (except the blackberries) into the bowl of the processor and blend on high-speed for several minutes until very smooth.
  4. Assembly – remove the crust from the freezer. Pour about two-thirds of the cashew mixture onto the crust and smooth evenly with a rubber spatula. To the remaining third of the cashew filling mixture, add the blackberry sauce (about 1/3 cup). Blend on high until smooth. Pour this mixture onto the first layer of filling. I drizzled an additional 1/4 cup of sauce on the top of the blackberry layer and made a swirl pattern with a butter knife. Place in freezer for about 2 hours or until solid.
  5. Serving – To serve, remove from freezer about 30 minutes before serving.  Heat a smooth and sharp knife under hot water and cut the pie into 8 slices. Serve with any additional blackberry sauce. Store any remaining pie in the freezer.

Roasted Strawberry Ice Cream

Weeks like these deserve stress relieving treats. They deserve a treat that evokes memories of great times, great summers, great friends, and great loves.  A treat worth sharing! Cherish and celebrate those that are with us now.  Treat the ones you love. Treat yourself with….

Homemade ice cream.  Ding Ding Ding!!!!

DSC_0026

I am typically pretty boring when it comes to ice cream flavors. A good homestyle vanilla is always my choice over a triple chocolate chunk or candy bar crammed scoop. I love the simplicity of a deeply intense vanilla ice cream. But step out of my way if fresh strawberry ice cream is available. I will knock down an old woman for it…just kidding…well, unless she had the last scoop. Am I right?

DSC_0022

DSC_0028

My favorite strawberry ice cream recipe is from the queen of simplicity, Alice Waters.  Her recipe calls for both heavy cream AAAAND half and half. Double yum. However, this time I used 2% milk instead of the half and half, and felt it was sufficiently creamy. If you can get your hands on a pint of fresh picked strawberries, this ice cream will scream SUMMER with no apologies. And you will be dancing like Beyonce with every bite that enters your mouth. Oh oh Oh oh Oh oh!

But don’t fret…I have a fix for those of us that either don’t have access to fresh strawberries or just can’t wait and gotta have it NOW.

*whisper* Use frozen strawberries.

Shhhhh. I’m serious.

DSC_0003

DSC_0014

Thaw out a package of unsweetened frozen strawberries (organic if possible) in the microwave or in the fridge. Throw them on a rimmed baking sheet. Roast at 400 F for about 20 minutes and voila…jammy strawberries that pack a super duper punch of strawberry love. Scoop the strawberries and jammy juice into a bowl and add a tablespoon of maple syrup or honey. Mash up the whole jammy strawberry goodness and allow it to cool in the fridge for a few hours or overnight.

After it has cooled, it can be added to the base recipe for vanilla ice cream provided below. Process according to the directions of your ice cream maker.

Although this recipe does take some planning, it is well worth it. So kick your heels up this weekend, make a fresh batch of ice cream, share it, and then take a nap in the hammock.  We all deserve it.

P.S. – Use these steps to make ice cream without a machine.

P.P.S. – For a dairy free version of this recipe, check out Sprouted Kitchen’s coconut milk version.

DSC_0018

Roasted Strawberry Ice Cream (adapted from The Art of Simple Food by Alice Waters)

Ingredients

  • 1 lb of fresh or frozen strawberries
  • 1 tablespoon maple syrup
  • 3 egg yolks
  • 3/4 cup milk (I used 2%)
  • 1/3 cup coconut palm sugar (or maple syrup, or honey)
  • 3/4 cup heavy cream
  • 1/4 teaspoon vanilla extract
  • pinch of sea salt

Instructions

  1. Preheat oven to 400 F. If using frozen strawberries, defrost in microwave. If using fresh, quarter the strawberries. Place strawberries in a single layer on a rimmed baking sheet. Roast for 15 to 20 minutes. Place roasted strawberries and juice into a bowl and mash with the back of a fork. Allow to cool completely. This can be done in a day in advance.
  2. To make the vanilla custard ice cream base recipe, place egg yolks in a heat-proof bowl and lightly beat, just breaking the yolks. In a heavy saucepan over medium heat, heat the milk and sugar to a light simmer. Add a few tablespoons of the hot sugar-milk mixture at time to the eggs to temper them until they are warmed.  Once the egg mixture is warmed, slowly add back into sugar-milk mixture. Cook the egg-milk-sugar mixture over a medium heat, stirring constantly until it is thickened and coats the back of a wooden spoon. Remove from heat and add cream, vanilla, and salt. Cool and then chill for several hours (or overnight) until cold. This is the vanilla ice cream base recipe.  You can proceed from here for just vanilla ice cream OR you can mix in fresh or roasted strawberries or whatever your sweet ice cream-loving heart desires.
  3. Place a large bowl in the freezer and have it ready for the ice cream. For strawberry ice cream, mix the mashed strawberry mixture with the vanilla ice cream base mixture.  Add this mixture to the bowl of the ice cream machine and follow the directions of your ice cream maker. My ice cream maker takes about 20 to 30 minutes.
  4. Immediately transfer the strawberry ice cream to the bowl that was placed in the freezer. Freeze for an hour or two to harden. Pull the ice cream out of the freezer and allow to sit for 5 minutes before serving.