Cauliflower Pizza Crust (Grain Free, Gluten Free, Paleo)

Pizza, beer, and a movie is my idea of a perfect date night.  I’ve been hunting around for a good grain free pizza crust recipe.  Who knew cauliflower would come to the rescue!

DSC_0317

Cauliflower is like the working mother of five or even fifteen.  It can transform into so many different things…mash it, roast it, puree it, rice it, grill it. And now I’m adding one more thing to the list…crust it…that is, pizza crust, my friends. I was really amazed at how much this tasted like pizza.

DSC_0294DSC_0300DSC_0309

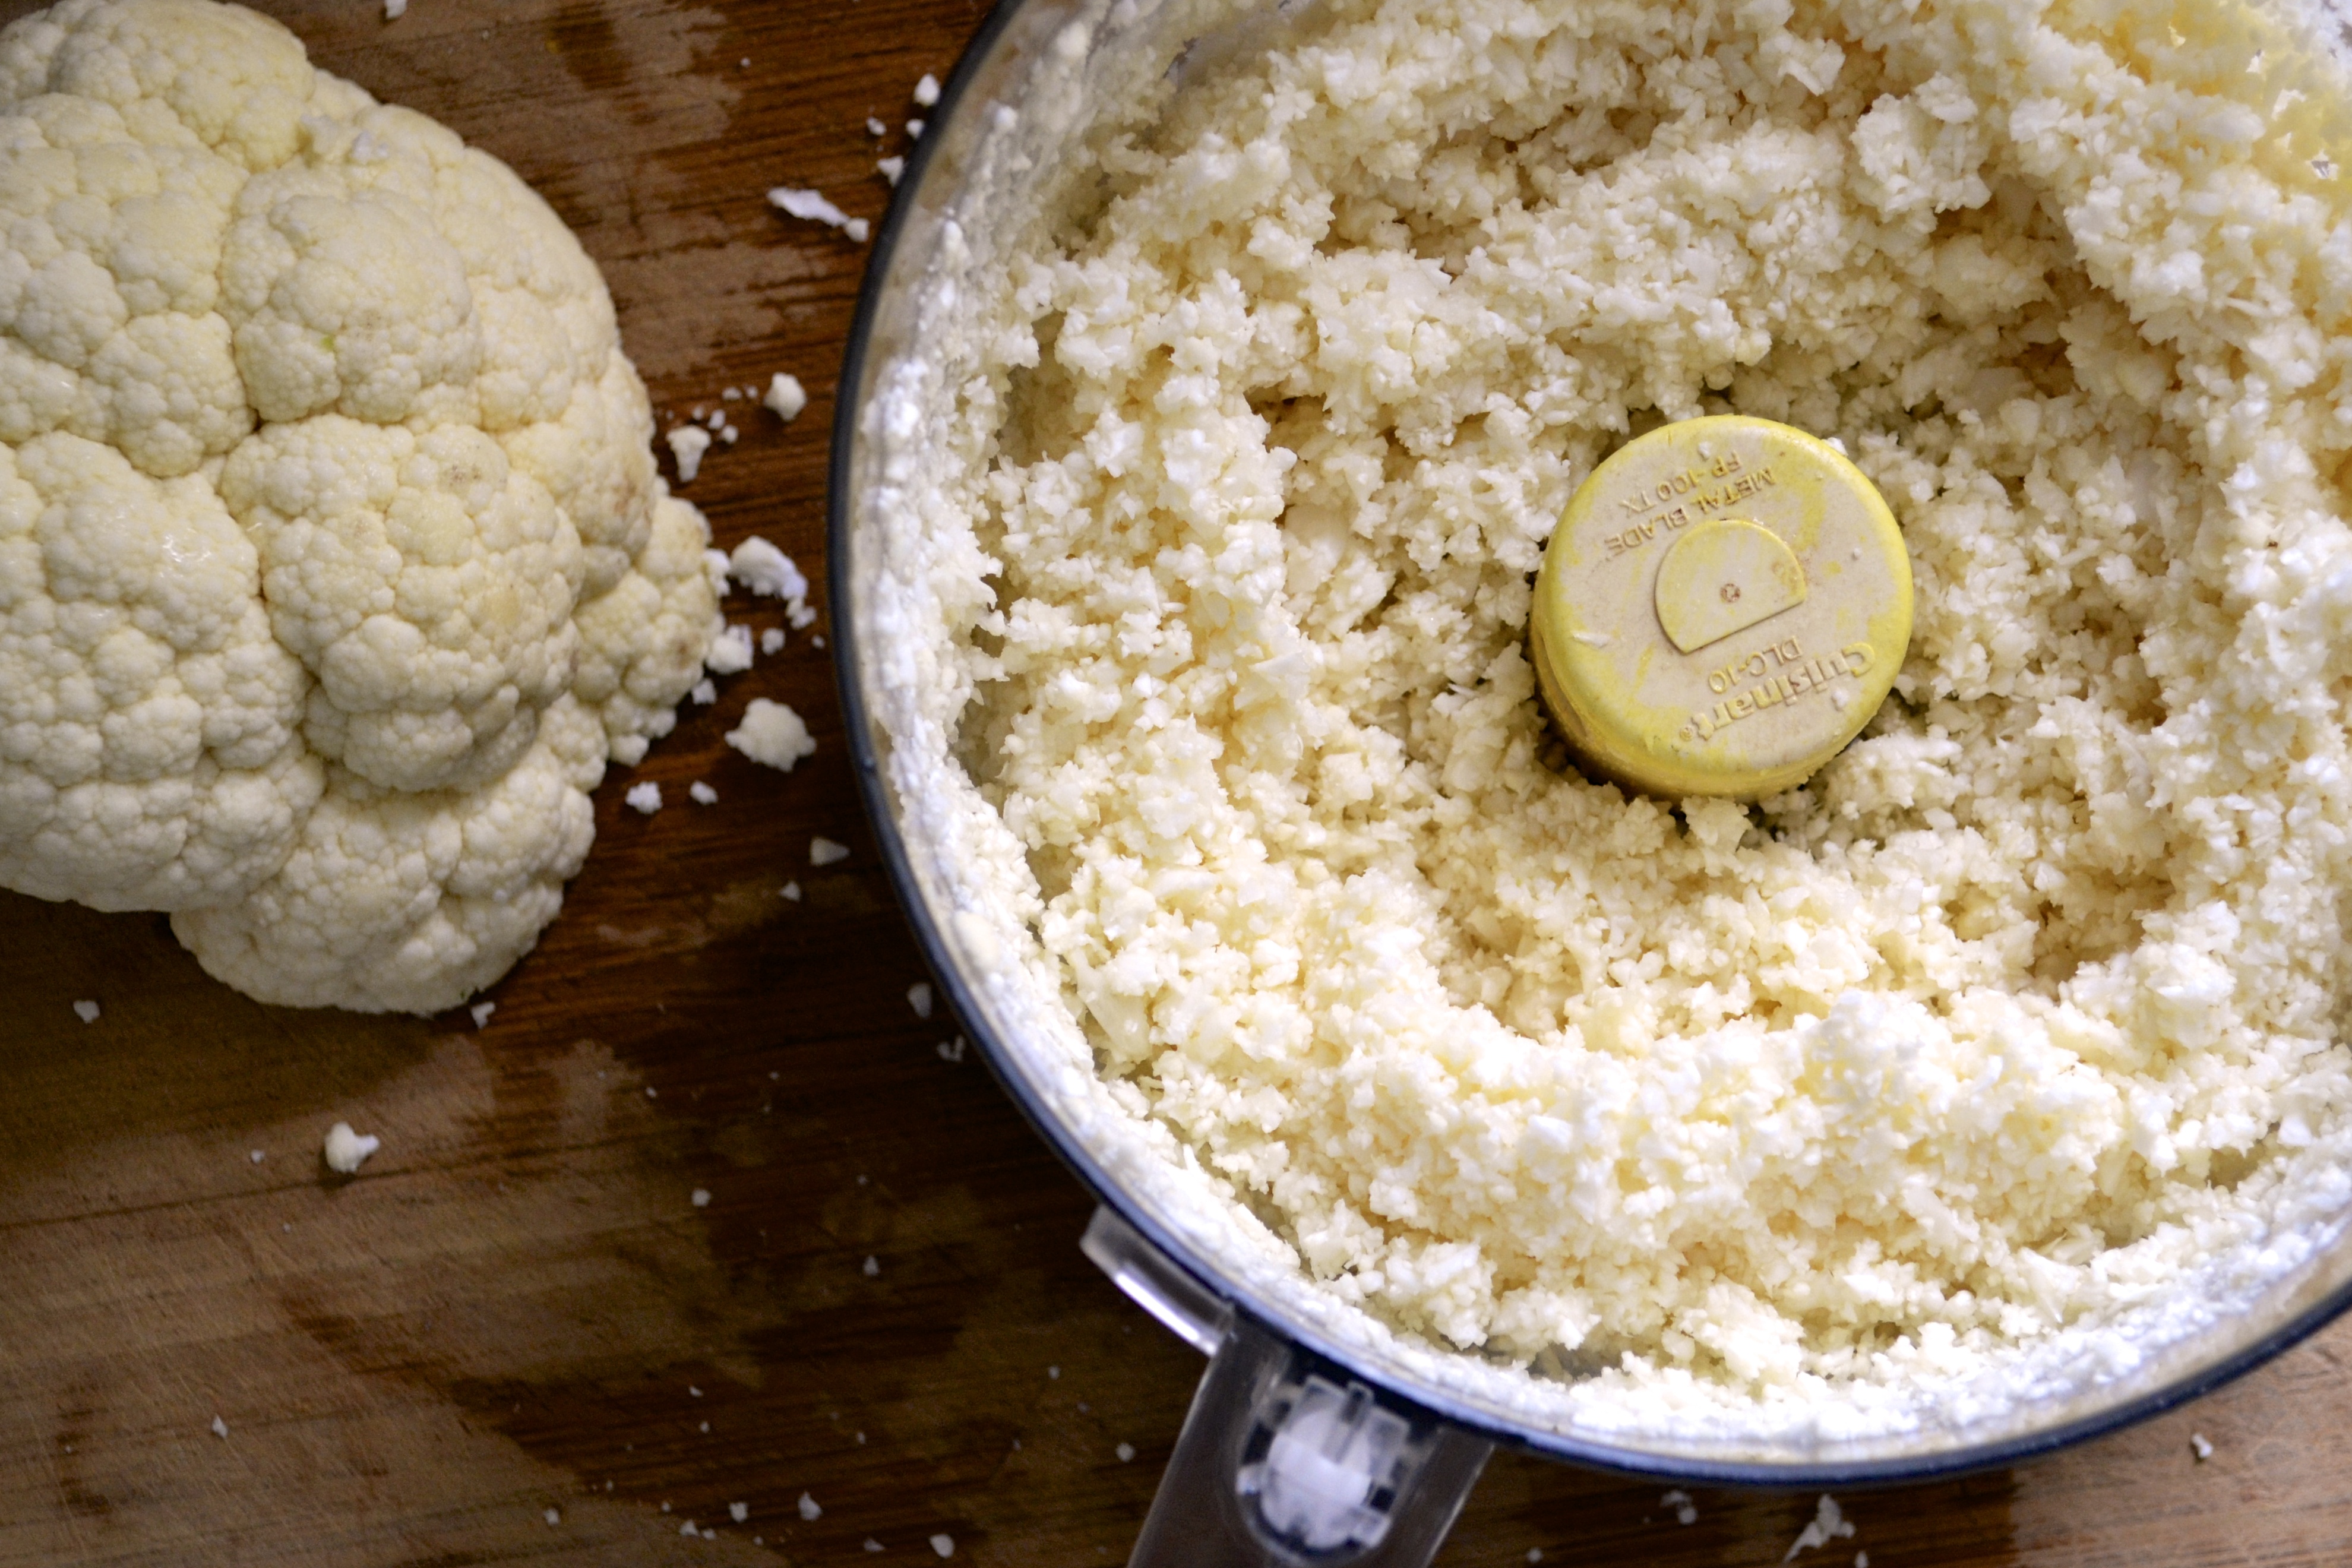
Get out your handy dandy food processor and rice that cauliflower. Combine the riced cauliflower with eggs, seasonings, and some almond flour.  Preheating a pizza stone and applying the cauliflower pizza “dough” onto the preheated stone helps produce a crisper crust. Prebake to get a golden crust. Then top with whatever toppings you choose.  I have included my easy homemade pizza sauce recipe as well.  Friday pizza night is back on!

DSC_0315

Cauliflower Pizza Crust (slightly adapted from Love and Lemons)

  • 1 cauliflower, diced in 1/2-inch pieces
  • 2 eggs
  • 1/2 teaspoon each of garlic powder, onion powder, salt
  • 1 teaspoon each of oregano and parsley
  • 3/4 cup almond flour

Homemade Pizza Sauce

  • 1 6 oz can of organic tomato paste
  • 1 cup of water
  • 1 tablespoon each of oregano, basil, and parsley
  • 1 teaspoon each of garlic powder and onion powder
  • 1/4 teaspoon ground black pepper
  • salt to taste

Instructions

  1. 1. Preheat oven to 450 degrees. Place a pizza stone in the oven and allow to preheat.
  2. Chop cauliflower into 1/2-inch pieces. Place cauliflower flourettes into the food processor and pulse for a “riced” consistency. Don’t go too far or you will puree it. Remove from food processor and place the riced cauliflower into a microwave save bowl. Microwave for 3 minutes.
  3. Add remaining ingredients and mix  to form into a wet ball. If it is too sticky to handle, add more almond flour. Gently knead it a few times to help it come together. Remember…this is cauliflower, NOT all purpose flour so it will not resemble typical pizza dough.
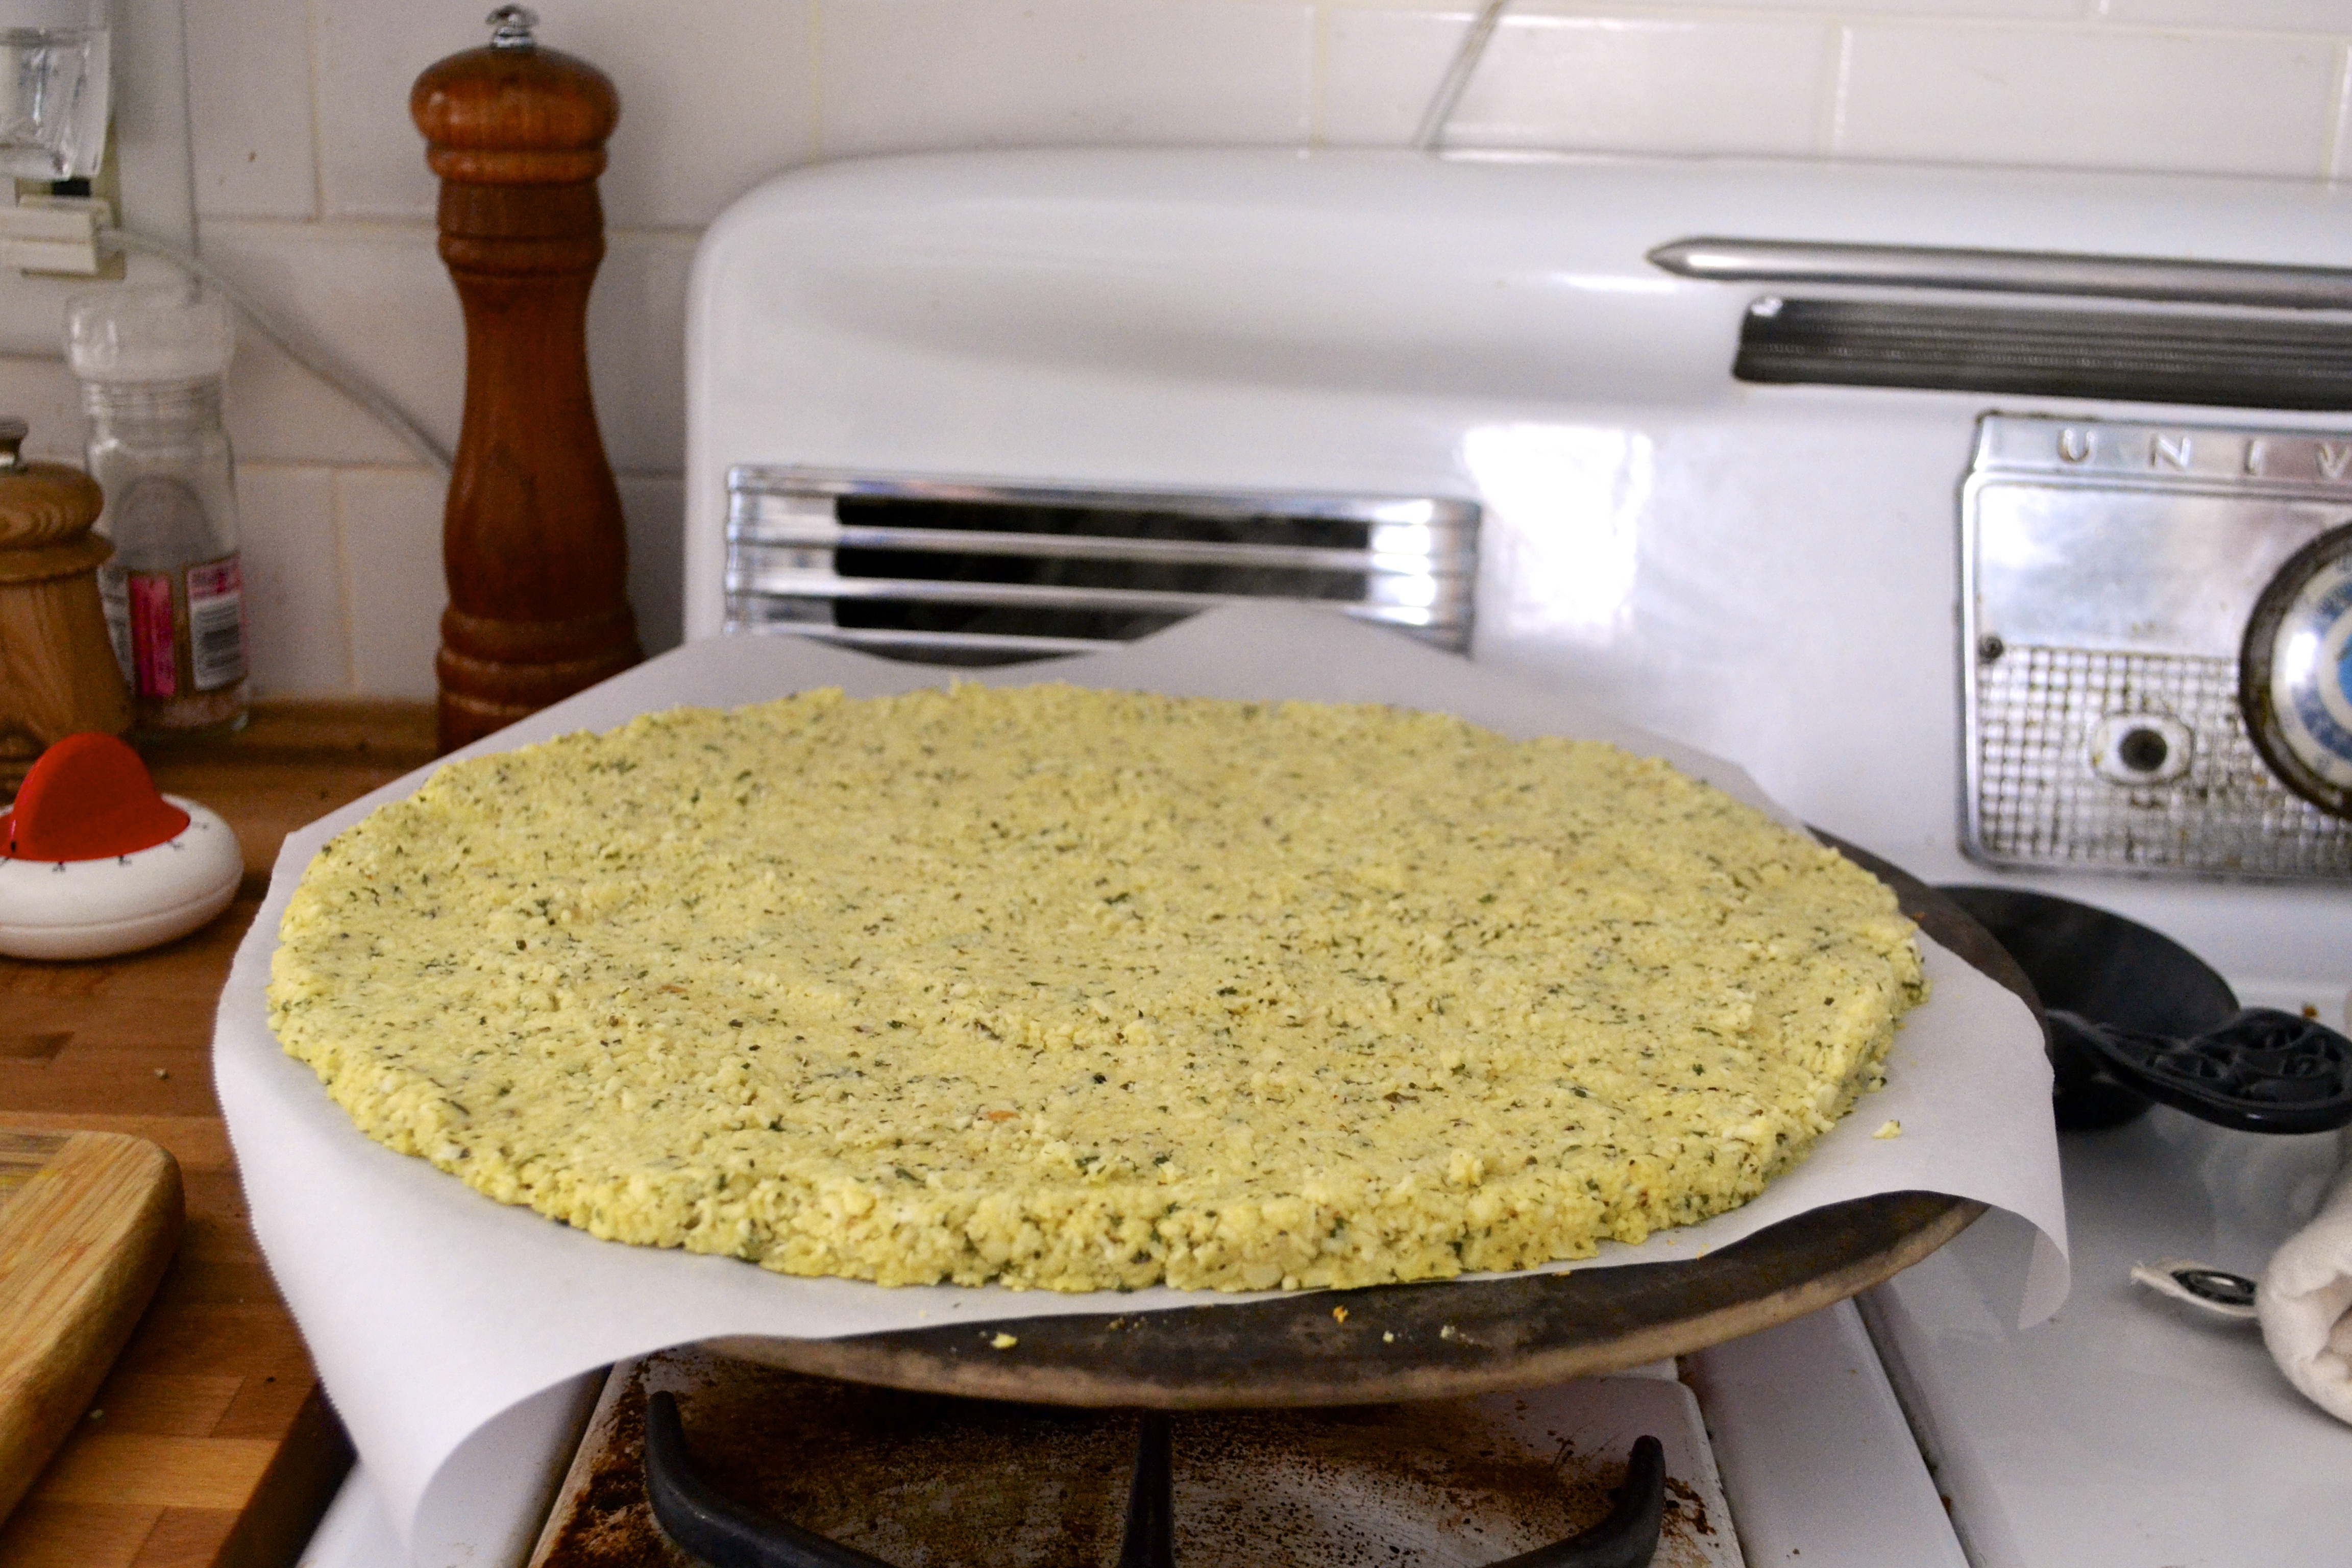
  4. Remove the preheated pizza stone from the oven or use a baking sheet. Place parchment paper on top of the stone or baking sheet. Press the cauliflower “dough” ball onto the pizza stone or baking sheet lined with parchment paper. Gently mold it into a 1/4-inch thick circle.
  5. Bake at 450 F for 20 to 25 minutes until golden brown.
  6. For the pizza sauce, combine all ingredients into a medium bowl. Top the baked pizza crust with the homemade pizza sauce.Then top with your favorite ingredients. We topped ours with cheese (not paleo, but I really wanted some melty cheese), pepperoni, jalapeño, and mushrooms.
  7. Bake for about 10 minutes.

DSC_0305

Almond Flour Biscuits (Grain Free, Gluten Free, Paleo)

In most diners in small Oklahoma towns, B&G…that is biscuits and gravy…is a standard side that comes with your breakfast. You typically can get two eggs, bacon, toast, pancakes aaaaand B&G for under $7. Oh I forgot hash browns…you always get hash browns.  Oh and you will get a stretcher to roll yourself onto and go into a food coma.

But ooooh that B&G. I dream about it. Even though it is presented as a mere “garnish” to that HUUUGE breakfast, it so amazing. The gravy is so thick. The biscuits are so light, so fluffy, so buttery.   Sure it packs a huuuge caloric and carbalicious load on the badunkadunk. But let’s not ruin my B&G dreams.

DSC_0197

After realizing that I had a gluten intolerance, I thought I would never have a soft, flaky, buttery, amazing, warm biscuit again. I have tried making grain free biscuits using coconut flour, but I was less than impressed. Tropical flavored biscuits are a far cry from flaky biscuit heaven.

But I couldn’t give up. I found this basic almond flour biscuit recipe on Elana’s Pantry.  Victory!!!! These almond flour biscuits are much closer to my beloved southern biscuits…flaky and buttery.   I made the basic biscuit recipe and also adapted a batch by adding cinnamon and raisins. Mmmmmm.

DSC_0179

DSC_0206

Don’t expect these to taste like real buttermilk biscuits, people…once you give up gluten…those suckers are gone. But these grain free biscuits are the closest I have tasted.  I just have to remember that by giving up gluten, I have gained so much in the way of health, tummy comfort, and hormone balance! So with that in mind, these come in really close to the read deal in taste. Plus they stand head and shoulders over the “real deal” when it comes to health, protein power, and the fact that they don’t pack on the poundage on the budunkadunk.

Now I just need to tackle a gluten-free gravy….I’m not so sure that is going to be possible. But challenge accepted!

DSC_0188

Almond Flour Biscuits (adapted from Elana’s Pantry)

Makes 8

Basic Ingredients

  • 2 1/2 cups almond flour (I use Honeyville)
  • 1/2 teaspoon sea salt
  • 1/2 teaspoon baking soda
  • 1/4 cup butter or ghee (or coconut oil)
  • 2 Tablespoons honey
  • 2 eggs (at room temperature)

Cinnamon-Raisin Biscuits Add-ins:

  • 1 teaspoon ground cinnamon
  • 1/2 cup raisins

Instructions

  1. Preheat oven to 350 degrees F. Place parchment paper (or silpat mat) on a baking sheet and set aside.
  2. Combine all the dry ingredients (almond flour, baking soda, salt, and optional cinnamon) and blend well with a fork. In a separate bowl, whisk together all the wet ingredients (honey, butter, eggs) and combine with the dry ingredients. Mix until a dough forms. (If making cinnamon raisin biscuits, stir in raisins now).
  3. For easier handling, roll the dough into a ball and place it in the freezer for about 10 minutes.
  4. Take the dough out and form biscuits with your hands using a 1/4-cup scoop, rolling into a ball and flattening to about 1 inch thickness. Or place the dough between two pieces of parchment paper and roll it to a thickness of about 1 inch and cut the biscuits with a cookie cutter.
  5. Place the biscuits on the prepared parchment paper on the baking sheet.  Bake at 350 F for about 12-15 minutes, or until they’re browned on the outside and a toothpick stuck into the center of the biscuit comes out clean.

Dijon Ham Steaks with Apples

Snow snow snow snow!!!! Winter is not giving up in Kansas City with predictions of 10 to 15 inches of snow and zero visibility. Plus, we are not just getting metric boat loads of snow, but….(cue deep booming echoing voice) THUNDER SNOW.  It sounds more like an X Men character or superhero name or maybe they should add this as the next movie in the Mad Max movie serious….Return of Thunder Snow….anyone? come on!

Ham steak

DSC_0176

It’s really strange to see the light snow falling and hear booming thunder outside.  They have canceled and closed everything around here including schools, work, gyms, ceremonies. The grocery stores have been like war zones the last few days with people stocking up for Snowmeggedon.  So now there is nothing left to do but hunker down, cook up a hearty breakfast, put a fire in the fireplace, add a roast in the oven to cook low and slow, and cuddle with my favorite boys…Guinness and Kiley.

DSC_0183

Even if you aren’t getting (booming voice) THUNDER SNOOOOOW…. you can still make a heart-warming breakfast that deserves being stranded in a snowy mountain cabin with a warm fire in the fireplace.  My local Community Supported Agriculture (CSA) meat supplier provides us with 12 to 16 oz bone-in ham steaks.  We like to brown these in a cast iron skillet for breakfast.  In the summer, I like to cook these steaks on the grill.  When cooking indoors in a skillet, I cut the ham steak into four equal portions to cook evenly and quicker.  A simple Dijon sauce and butter-sauted apples pair well with the ham. This is even good as a quick dinner.

DSC_0184

Dijon Ham Steaks with Apples (Adapted from Gourmet, 1999)

Serves 4

Ingredients

  • 12 to 16 oz uncooked ham steak (1/4-inch thick), trimmed of fat and cut into 4 portions
  • 1 Tablespoon whole grain mustard
  • 1 Tablespoon Dijon mustard
  • 2 Tablespoons butter
  • 2 small apples (or 1 large), cored and sliced in 1/4-inch slices

Instructions

  1. Preheat oven to 250°F.
  2. In a small bowl, mix whole grain mustard and Dijon mustard. Spread mustard mixture on top of ham steak.
  3. Heat 1 tablespoon butter in a skillet over moderately high heat. Add ham steaks to skillet and sauté until browned (about 5 to 6 minutes). If your ham steak is thicker than 1/4-inch, cook a little longer. Transfer browned ham to a heat-proof dish, loosely covered with foil, and place in preheated oven to keep warm while apples cook.
  4. Add remaining tablespoon butter to skillet and sauté apple slices, turning once, until golden and tender, about 4 minutes total. Remove ham from oven. Top each piece of ham with apple slices. Serve with fried eggs for a fabulous fancy country breakfast.

Blood Orange and Avocado Salad

I like simple things….

t-shirt and jeans…

a warm day in the middle of a cold spell…

a hug after a long day…

and winter citrus! 

Winter citrus is an anomaly to me: bright and flavorful fruits that are at their peak when everything else is dormant.  I can’t seem to get enough grapefruit, Meyer lemons, clementines, oranges, and especially blood oranges!  Have you had a blood orange? Eating them is like a secret escape to my own tropical island. Where’s my mai tai? Where’s my pool?  Where’s my hammock????

DSC_0186

The salad I made is adapted from Alice Water’s amazing avocado and grapefruit salad from her-must have cookbook The Art of Simple Food.  A girlfriend of mine had this cookbook and I poured over it every time I was at her house. And then I received a copy for my birthday!!!  The recipes are so simple and so flavorful.

DSC_0197

I swapped blood oranges in for the grapefruit and served it over a bed of mixed greens. Using blood oranges makes me feel like I just bedazzled my salad.  I whipped this up for a quick lunch and took it to work, eating with some leftover salmon. It totally made feel like I was on vacation in the tropics and not sitting inside an office cage in the middle of winter peering out a tiny jail-sized window. Womp womp.

Hrmmm….note to self…get a hammock for my office….and more winter citrus!

Blood Orange and Avocado Salad (adapted from The Art of Simple Food by Alice Waters)

Serves 4 as a side

Ingredients

  • 4 to 6 cups of mixed salad greens, washed and dried
  • 2 Blood oranges
  • 1 Avocado
  • 1/4 cup white wine vinegar
  • 1/4 cup extra-virgin olive oil
  • salt and pepper

Instructions

  1. Divide the salad greens evenly among four plates.
  2. With a sharp knife, peel the rind from the blood oranges down to the flesh. Slice in thin rounds. Divide the orange slices evenly among four plates.
  3. Cut the avocados in half and remove the pits. Sprinkle the inside lightly with salt. Inside the skin, slice the avocados in 1/4-inch slices. Carefully scoop from skin and divide the avocado slices evenly among the four plates.
  4. In a small lidded jar, add vinegar and olive oil with a pinch of salt and pepper. Shake well. Drizzle the vinaigrette lightly over each salad. Store leftover vinaigrette in the refrigerator for up to 3 days.

Mushroom, Spinach, and Sausage Crustless Quiche (Gluten Free and Dairy Free)

Want to have brunch with me this morning?

Please? I’ve made a delicious Quiche.  It’s crustless, but I promise you won’t miss the crust.

Go on…pull up a chair…keep your pjs on…I made an extra pot of coffee.  I even have a fire in the fireplace. It’s cozy. No need to put pants on. You are my guest!

DSC_0261

DSC_0267

It’s biting cold outside, but in the kitchen it smells of coffee, bacon, and love. Quiche love.  Warm and creamy and hearty and filling Quiche that is baking just for you.  No no no…it was no trouble at all. Whipped it up quick and threw it in the oven. Here…need more coffee? Let’s talk.

DSC_0258

I’m sorry that things have been so tough lately.  Life is crazy and terrible sometimes. But just for this morning, let’s not think of those things. Let’s dream. Let’s remember the great times and the blessings that we have. Let’s remember our small victories.

Need some more coffee? Cream? Sugar?

I missed you.  I’m so glad that you came over.

Need another slice of bacon? Seriously…I made extra. Next time I’ll make us a mimosa.

We should do this more often.

DSC_0263

Mushroom, Spinach, and Sausage Crustless Quiche (Gluten Free and Dairy Free)

Serves 4 to 6

Ingredients

  • 1/2 teaspoon salt
  • 1/4 teaspoon fresh black pepper
  • 8 eggs
  • 1/3 cup coconut milk (low fat or full fat)
  • 2 Tablespoon butter, bacon grease, or olive oil
  • 10 oz baby bella mushrooms, sliced
  • 1/2 teaspoon dried thyme
  • 1 spicy italian chicken sausage, diced
  • 1 package of fresh spinach (or kale) (3 to 4 cups)

Instructions

  1. Preheat oven to 375 F. Butter a 9-inch pie pan or cake pan and set aside.
  2. In a medium bowl, whisk eggs, salt, pepper, and coconut milk. Set aside.
  3. In a heavy skillet, heat butter over medium heat. Add mushrooms and thyme in a single layer and sauté until browned. Don’t crowd them. Toss in sausage and brown (about 2 minutes) stirring often. Add spinach on top of cooked mushrooms and sausage. Stir and cook until spinach is slightly wilted, about 1 to 2 minutes. Remove skillet from heat. Add a pinch of salt and pepper to taste.
  4. Spoon and spread the mushroom, sausage, and spinach evenly into the prepared pie pan. Top this with the egg mixture.
  5. Bake for 35 to 40 minutes, or until slightly golden brown on edges, puffed, and set in the middle. Serve warm or at room temperature.  Leftovers are great reheated for breakfast or lunch.

Paleo Cranberry and Apple Cobbler

My heart is heavy on this last day of December and this last day of 2012. I’m staying in my pajamas and watching the snow fall. The snow falls so peaceful outside my window, yet I know that sometimes there is no peace and life is just not fair.  

DSC_0234

My thoughts go out to everyone who has lost someone this year. My thoughts go out to those that are lost. My thoughts go out to those that are enduring hardships that are unfathomable. 

There are so many cruel and unfair things that occur and I always ask “why?”…but sometimes there is no reason. It’s just the way it is.  I only hope that there is something better that hopefully will come out of tragedy.

DSC_0239

DSC_0253

So I make this cobbler for my friends that are struggling right now, my friends that are enduring an unfathomable loss, my friends that are lost in life.  I make this cobbler to hopefully bring comfort into their hearts and to warm their souls.

Paleo Cranberry and Apple Cobbler (Grain Free, Gluten Free, and Diary Free) (adapted from Beeckman 1802 Heirloom Cookbook)

Filling:

  • 12 oz bag of fresh cranberries
  • 3 medium apples, cored and diced
  • 1/4 cup crystallized ginger, diced
  • 1 cup water
  • 1/3 cup honey
  • 2 tablespoons arrowroot powder

Topping:

  • 1 cup almond flour
  • 1/4 cup chopped walnuts
  • 1 teaspoon ground cinnamon
  • 1/8 teaspoon sea salt
  • 1/4 cup coconut oil, melted

Instructions:

  1. Preheat oven to 350F.  Grease a 9X9-inch baking dish with butter, coconut oil or nonstick spray.  Set aside.
  2. In a medium saucepan, combine cranberries, apples, crystallized ginger, water, and honey. Heat over medium heat until the mixture begins to boil and the cranberries pop. Cook for 5 to 10 minutes.  Remove from heat and stir in arrowroot powder. Pour the hot cranberry mixture into the baking dish and set aside.
  3. In a separate medium bowl, combine all of the topping ingredients. Mix well.  Spoon the topping mixture evenly over the filling.
  4. Bake at 350F for 30 to 40 minutes. The cobbler will begin to bubble and the topping should lightly brown.  Remove from oven and allow to cool for a few minutes.  Best when served with vanilla coconut ice cream!

Grain-Free Chewy Ginger Chocolate Chip Cookies

I’m so excited. Christmas is getting closer. We went and picked out our tree a week ago. Even though it feels like Christmas in California (temps are in the 70s!!!), we still decorated the tree, drank bourbon-spiked egg nog, and watched Home Alone.

We pulled out all of our old and favorite childhood ornaments, placing them strategically on each limb.   We have many ornaments that have special meaning, but some are just funny.

Grain Free Ginger Chocolate Chip_04

For instance, we have a ceramic ornament that came from some craft show ages ago that has Santa’s face painted on what appears to be tree bark but instead looks like Santa is floating on poop. We lovingly refer to this ornament as “Terd Santa”. Terd Santa has a high priority placement on the tree. He is usually placed near the 1980 Avon classic Bear Bell (a mama bear whose legs are the swinging bell) and the Headless Paper-mache Angel.

Now that it looks like Christmas has vomited throughout my house, leaving poinsettia and pine cones everywhere….it was time to make it SMELL like it too! I cooked up a batch of ginger chocolate chip cookies to make the house smell of gingerbread and spice.  These are inspired by this amazing cookie that I made last year, which unfortunately contains gluten from the wheat flour. In order to make those cookies grain free, I used almond flour as the base.  If you don’t have almond flour on hand, I have also made these cookies using almond butter, making them slightly more dense and chewy but still scrumptious.

Ginger Chocolate Chip

Even if you are not gluten-free, I seriously recommend this grain free cookies for the following reasons:

(1) The nuts give them protein…GOOD.

(2) They ooze of chocolate…DOUBLE GOOD.

(3) The ginger gives a nice spicy kick in your mouth….YES.

(4) And they are a COOKIE! Hellooooo. Nuff said, peeps.

I made these cookies bite-sized and rolled each one in turbinado sugar. The crunch of the sugar in contrast to the gooey, chewy, chocolatey cookie is divine.  WARNING – these suckers are so easy to pop in your mouth like popcorn. They can be quite addictive.

SO HIDE THEM IF YOU WANT TO EAT ANY!!!!  Because as soon as you tell anyone else that you made them, they will disappear and you may not get any…booooh. At least that is what happens in my house!!!

Ginger Chocolate Chip

Grain-Free Chewy Ginger Chocolate Chip Cookies (Gluten Free, Vegan, Paleo Friendly)

Makes 2 dozen tiny, bite-sized cookies

Ingredients

  • 1½ cups almond flour*
  • 2 Tablespoons coconut oil, softened
  • 4 Tablespoons maple syrup or honey
  • 2 Tablespoons unsulphured blackstrap molasses
  • 3 teaspoons ground ginger
  • 1/8 teaspoon fine sea salt
  • 1/4 teaspoon baking soda
  • 1/4 cup dark chocolate chips or bar, chopped into tiny pieces
  • 1/3 cup turbinado sugar or coconut palm sugar (optional)

Instructions

  1. Preheat oven to 350F. Line a baking sheet with unbleached parchment paper or a Silpat mat. Place the large-grain turbinado sugar or coconut palm sugar in a small bowl and set aside.
  2. In a medium bowl, combine almond flour, coconut oil, maple syrup, ginger, salt, and baking soda. Mix until a thick batter is formed. Chill the batter in the refrigerator for at least 30 minutes which will make it easier to scoop and form cookies.
  3. I like these cookies tiny and barely bite-sized.  Scoop out the dough in exact, level tablespoons. Then tear those pieces of dough in two before rolling each 1/2 tablespoon of dough into a ball shape. From there, grab a small handful of the large-grained sugar that was set aside earlier and roll each ball between your palms to coat the outside of each dough ball.  Place dough a few inches apart on prepared baking sheets.  Use a wet fork to flatten each dough ball into your desired cookie thickness. 
  4. Bake for 7 to 10 minutes or until firm around the edges, but still soft in the center. Allow to cool on the pan for 5 to 10 minutes before transferring to a wire rack to cool completely before serving.
  5. Hide a few for your secret stash!

*NOTE – I use Honeyville almond flour. I have also made these cookies using 1 cup of almond butter instead of the 1.5 cups of almond flour. The cookies tasted great but were a little more dense.  I personally liked them both! So feel free to sub out for almond butter if you do not have access to almond flour.

Roasted Pumpkin Seeds (Pepitas)

Tis’ the season of roasting pumpkins, butternut squash, acorn squash, delicata squash…. We all know what to do with the roasted flesh. Hello pumpkin pie and pumpkin bread.

But, don’t stop there! Roast those seeds. They are delicious as a snack, on a salad, or topping a delicious pumpkin or butternut squash soup!

These were a great addition on our holiday table this year. I used the seeds from the pie pumpkin that was the centerpiece for our Friendsgiving!

Toasted pumpkin seeds are a healthy snack too.  The flavors options are endless: Cajun, BBQ, cinnamon-spice, curry, or simply salt and pepper.

When you scoop out the seeds from the pumpkin or winter squash, wash off the pumpkin goop. Discard stringy fiber from seeds along with any seeds that are split or cracked then transfer to a strainer and rinse well. Drizzle with olive oil, seasoning, and salt. Roast in an oven until golden and BAM. Tasty tasty tasty.

I hope that everyone has a wonderful Thanksgiving.  We are lucky to have amazing friends and family to celebrate and eat delicious food with.  Please be safe this week in your travels! Merry Thanksgiving from Kansas City!

Roasted Pumpkin Seeds

Ingredients

  • Seeds from one medium-sized pumpkin or winter squash (Acorn, Butternut, Hubbard, Delicata) – about 1 cup
  • 2 tsp olive oil
  • 1/2 tsp sea salt
  • 1 to 2 tsp seasoning of choice (Cajun, BBQ, curry, cinnamon n sugar) (optional)

Instructions

  1. Preheat oven to 375. Spray a rimmed baking sheet with nonstick spray.
  2. In a medium-sized bowl, drizzle the olive oil over the pumpkin seeds. Add the seasoning of choice and salt. Toss well. Place seeds in a single layer across a baking sheet.
  3. Bake for 15 to 20 minutes or until seeds are golden. Sprinkle with a bit more seasoning when the seeds come out of the oven. Taste and season with more salt if needed. Makes about 1 cup.

Kale Salad with Cranberries, Pecans, and Roasted Apples

I’m drowning. Drowning in recipes and ideas and drooling over too many food photos. I can’t decide what to make for Thanksgiving. I want to make tooooo much.

How about sweet potatoes…..or sweet potato casserole, or sweet potato and chard gratin, or sweet potatoes with bourbon glaze. No…I’ll make a gluten free apple pie, or an apple crisp….or baked apples….or Ack…wait… look at these chocolate-caramel tartlettes.

OK…something green….. like green beans, green beans with miso and almonds, or roasted brussel sprouts, or….. *SNAP* And then my brain just…shuts….down. Stops.

And then I end up thinking…well, hell…I guess I’ll just make a salad.

But this just isn’t any salad, people. It’s a celebration. A Kale Party!  Ya…I know no one thinks of a party when you say “YAY KALE”. Except me. And well, maybe my friend Kathryn.

This kale party in a bowl salad is adapted from The Smitten Kitchen Cookbook. Another winning recipe from this amazing compilation from Deb.  She uses cherries where I used cranberries that I had on hand. I also added roasted apples and toasted pecans for autumnal festiveness. Dig in….

Kale Salad with Cranberries, Pecans, and Roasted Apples

Serves 6 to 8

Kale Salad Ingredients

  • 1 bunch of kale, washed and dried, stalks removed and leaves torn into bite-sized pieces
  • 1/4 cup dried cranberries (or cherries)
  • 1/4 cup raw pecans, chopped
  • 1 medium apple, cored and sliced thin

Honey Dijon Dressing Ingredients

  • 3 tablespoons olive oil
  • 1 1/2 tablespoons apple cider vinegar
  • 1 tablespoon smooth Dijon mustard
  • 1 1/2 teaspoons honey
  • salt and pepper to taste

Instructions

  1. Preheat oven to 350F.  Place apple slices on half of a roasting pan. On the other side of the pan, place the chopped pecans. Roast for 5 minutes. Remove from oven, and stir. Place back in oven for an additional 5 minutes, keeping an eye on the pecans to make sure that they don’t burn. Remove from oven and allow to cool to room temperature.
  2. Meanwhile, place torn kale leaves in a medium to large serving bowl. Sprinkle with a dash of salt and gently massage the kale until it begins to break down a bit.  Add the dried cranberries, toasted pecans, and roasted apples. Sprinkle with salt and pepper.
  3. For the honey dijon dressing,  add the olive oil, vinegar, mustard, and honey to a small mason jar with a lid. Shake the jar vigorously.  Drizzle the dressing evenly over the salad.  Toss everything together to coat everything in dressing.  Although you can eat the salad immediately, I let mine rest for at least 20 minutes, allowing the leaves to become even more tender.  This salad is great for make ahead events!

Roasted Beets with Apples and Greens

I have a confession.

I have a Friday ritual.

I cry.

I cry every damn Friday morning…not because I want to cry. No, I cry because Story Corps comes on NPR’s Morning Edition every Friday morning while I am on my way to work. And I’m not a cryer, folks,…I’m tough…I’m strong…I do what I want….Rargh!!!!

But on Fridays, there I am….crying at the stop sign or crying by a playground or crying in the parking lot of my office.  I have mascara smeared across my face because this little old man is being interviewed by his granddaughters and he is talking about his wife of 70+ years that just passed away and he remembers dancing with her the first day that they met and how beautiful she was and how she sparkled and now life just doesn’t have that sparkle anymore because she was his sparkle and….damnit…here those stupid tears come again.

This morning those tears streamed down again as I heard an amazing story of a young woman that was homeless in highschool. She shared a room in a Chicago shelter with 6 other family members. She rode the bus 1.5 hrs one way every day to school. She currently is in college, working hard and continuing to take care of her family.  And here those tears come again…it kills me knowing how common this story is. So many Americans are well below the poverty line. So many children are homeless. They have so much to overcome and many are able to but many do not have the chance.

So here is where I give an interweb high five *BAM* to all you educators (my husband included) for fighting for these kids and working long hours and believing and loving and opening your homes and hearts. Keep trucking, because what you do matters.

Doh! There I go again. Telling ya’ll a story and forgetting to go into much detail on the featured recipe.  So lets talk beets and fall apples!  A dear friend of mine from grad school sent me a recipe for an apple and kale saute.  I drooled and immediately made it the next night but added two roasted beets that I had bought at the market. Winner!

Roasting beets is super duper easy. It is way better than boiling…ew!  Read below for a short tutorial on roasting and removing the outer skin of the beet. I always run my roasted beets under running water and the skins rub off easily. Oh and USE THOSE GREENS!!!!  I added the beet greens with the kale. The tart apples and earthy roasted beets are a perfect pair. A dijon vinegerette drizzled on top really seals the deal!  Serve as a side with grilled salmon, pork chops, or chicken. Or for a vegetarian or vegan dish, serve over quinoa and maybe add some toasted walnuts. Mmmmm fall.

Roasted Beets with Apples and Greens (adapted from Whole Foods Market)

Serves 4 as a side

Ingredients

  • 1 bunch of beets with beet greens (about 1 lb)
  • 2 small apples
  • 1/4 medium red onion, thinly sliced
  • 1 bunch of kale, stems removed
  • 1 Tablespoon olive oil, divided
  • 1 Tablespoon apple cider vinegar, divided
  • 1 teaspoon stone ground mustard or dijon mustard
  • salt and pepper to taste

Instructions

  1. Preheat oven to 400 F. Let’s roast some beets! Remove greens from beets. Set beet greens aside to use later. Scrub beets well and do not dry off. Wrap beets loosely in aluminum foil. If beets are similar size, then they can all be wrapped together. If the beets are very large, then wrap them separately. Transfer the wrapped beets to a baking sheet and roast for 1 hour for large beets and 45 minutes for smaller beets. Beets are done when a fork slides easily to the middle of the beet. Allow the beets to cool for 5 minutes, or cool enough to handle. Hold the beets under running water and rub the outer skin away easily. Note – if the skin doesn’t come off easily then it is likely that the beets need to cook a little longer.  Peel and slice all the beets. Set aside.
  2. While the beets are roasting in the oven and they have about 20 minutes until they are done, start cooking the rest of your ingredients. Wash and remove the stems from the beet greens and kale.
  3. Heat 1/2 Tablespoon of olive oil in a skillet. Saute red onion for 5 minutes or until translucent and browned. Add thinly sliced apples and cook for 5 minutes, stirring frequently. Add 1/2 tablespoon of apple cider, kale, and beet greens. Place lid on top of skillet and allow to steam for about 5 minutes, stirring frequently. Remove from heat when greens are wilted.
  4. In a small bowl, mix remaining 1/2 tablespoon olive oil, 1/2 tablespoon apple cider vinegar, and mustard. Set aside.
  5. Divide the kale and apple mixture among 4 plates. Place sliced beats on top of kale and apples. Season with salt and pepper. Drizzle with vinaigrette. Serve warm or at room temperature. Note – If you don’t use all of the roasted beets, they can be stored whole or sliced for up to a week in the refrigerator.